The electrical equipment of any car is not complete without fuses (fuse links) and the VAZ 2107 is no exception. Thanks to these elements, electrical wiring is protected from damage in the event of improper operation or failure of a particular consumer.
- Fuse box VAZ 2107 injector and carburetor
Where is it located?Old version of the block
- Table: which fuse is responsible for what
- New sample block
- Video: how to remove the fuse box on a VAZ 2107
- Repairing a broken track
- How to remove the power supply
Purpose of VAZ 2107 fuses
The essence of the operation of fuses is that when the current passing through them exceeds, the insert located inside burns out, thereby preventing heating, melting and fire of the wiring. If an element has become unusable, it must be found and replaced with a new one. How to do this and in what sequence you need to understand in more detail.
The nuances of manipulating the power unit
To correctly replace an element in a LADA Granta, you should use specific rules and know where the so-called fuse box is located. If a burnout occurs, do not rush and replace the failed part with an analogue one. It is recommended to check the serviceability of the current collectors protected by this fuse.
We replace the element that contains the fuse box in strict accordance with the requirements of the circuit. There is no need to resort to installing fuses designed for a higher current limit, as this can cause a fire. It is also necessary to disconnect the negative voltage from the battery.
Fuse box VAZ 2107 injector and carburetor
When operating a VAZ Seven, owners sometimes encounter a situation where one or another fuse blows. In this case, every car enthusiast should know and navigate where the fuse block (FB) is installed and which electrical circuit this or that element protects.
Where is it located?
The fuse box on the VAZ 2107, regardless of the engine power system, is located under the hood on the right side opposite the passenger seat. The unit has two versions - old and new, so in order to clarify the situation, it is worthwhile to dwell on each of them in more detail.
The choice of power supply sample does not depend on the vehicle's power system.
Old version of the block
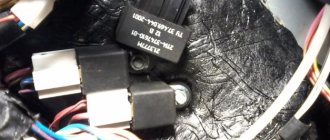
The old mounting block consists of 17 protective elements and 6 electromagnetic type relays. The number of switching elements may vary depending on the vehicle configuration. Fuse links are arranged in one row, made in the shape of a cylinder, and are held using spring-loaded contacts. With this connection method, the reliability of the contacts is quite low, since at the moment large currents pass through the protective element, not only does it heat up, but also the spring contacts themselves. The latter become deformed over time, which leads to the need to remove fuses and clean oxidized contacts.
The mounting block is made in the form of two printed circuit boards, which are installed one above the other and connected via jumpers. The design is far from perfect, since its repair is quite difficult. This is due to the fact that not everyone can disconnect the boards, and this may be necessary in case of burnout of the tracks. As a rule, a track on the board burns out due to installing a fuse of a larger value than necessary.
The fuse box is connected to the vehicle's electrical network through connectors. To prevent errors when connecting, the pads are made in different colors.
The rear of the mounting block protrudes into the glove compartment where the rear wiring harness and instrument panel connector fit. The bottom of the power supply is located under the hood and also has connectors of different colors. The block body is made of plastic. The unit cover is transparent with markings of the locations of switching devices and fuse links.
Removal and replacement instructions
All car mechanics, without exception, recommend disconnecting the “-” terminal of the battery when working with the vehicle’s electrical equipment.
Preparation
Work on replacing electrical fuses or relays can be carried out anywhere. The main thing is that the place should be well lit. Before starting work, be sure to turn off the car.
Video about replacing the fuel pump fuse on a Lada Granta - to help you.
The work of replacing fuses in the cabin and engine compartment is almost identical. With minor differences.
Cover removal diagram
- Let's start with the first one. To gain access to the fuses and relays located to the left of the driver's feet, you need to remove the cover.
- This must be done according to a certain scheme. First you need to pull the cover by the lower left corner, it is designated as number 1 in the diagram. Next, release the left locking point. Then the middle one at number 2. Next are points 3 and 6. Now all that remains is to free the top points 4 and 5. The entire cover has been removed.
- Visually inspect the block. There should be no burning or melting in it. There should also be no burning smell.
- In the decoding we find the consumer we need and according to the diagram we find its location.
- Using tweezers located in the block, remove the problematic element. We inspect it visually or check it using a device.
- If it is burnt out, then we put a new one in its place.
- The cover of the interior unit is installed in the following order: first of all, you need to snap the right part, then the bottom, and finally the top. It is necessary to ensure that the fastening parts of the cover and the latches match exactly.
The request returned an empty result.
- If the element we need is located in the engine compartment, then we proceed somewhat differently, namely, we open the hood itself.
- Find where the block is located.
- Slide the cover up and remove. We determine the burnt out element, just like in the cabin unit.
- We put the cover in place.
- Connect the “-” terminal of the battery.
- Turn the ignition key.
- If the consumer earns money, then everything is in order.
The request returned an empty result.
If the fuse blows again, the problem may be more serious and you will need to call a professional to help.
Why are fuses needed?
Fuse links are required in the on-board network as a protective element. Each line provides a small safety margin, but in case of a short circuit this is not enough. In the event of a critical power surge, the wires or powered part may melt or ignite, which leads to serious consequences for the car.
Fuse links are calibrated by the factory to a certain threshold. When the mark is exceeded, the thin element is destroyed and the circuit opens, which “saves” the entire machine from fire.
Afterword
Car owners whose cars keep melting fuses should be sure to check all installed wiring at the first opportunity.
Very often this problem is evidence of serious damage in one or more circuits. To do this you will need detailed:
- electrical circuit;
- pinout;
- tester.
If you lack the necessary knowledge, it is better not to undertake repairs yourself, but to entrust this task to professionals. The fee for their services, of course, can be quite high, but eliminating the consequences of unqualified intervention will cost much more.
Where is the main and interior fuse box of the VAZ 2114 located?
The car is equipped with two main mounting panels. The first part is installed inside the engine compartment. You can find the module on the left side in the direction of travel of the car. It is distinguished by a black or orange plastic cover. You can get to the fuse links and relays by opening the protective cover. This is done by pressing two latches.
The second part is mounted inside the cabin under the dashboard. To access the panel, you will need to open the service hatch in the front passenger's feet on the left side of the heater casing. Unscrewing 4 screws opens the panel itself. Here are relays and fusible links that control the operation of the main components of the machine.
Location of VAZ 2114 fuses in the main block
On the fourteenth Lada model, in 90% of cases two types of mounting blocks are used. The location of the internal parts and the pinout of the fuses of the VAZ 2114 are not significant, but they are different. Therefore, it is most convenient to consider both options separately.
Note!
Some modifications of the vehicle may be equipped with other module designs. You can find out the name of the variety on the inside of the lid.
Fuses for VAZ 2114 injector (block 3722010-60)
The module contains fuse links and automatic circuit breakers. All elements are marked in order.
Main unit relay
- 1 – Head optics wiper switch;
- 2 – Contact insert breaker of the turn signal and hazard warning signal mechanism;
- 3 – Responsible for the proper operation of the windshield wipers;
- 4 – Fuse for monitoring stop lines and vehicle lighting;
- 5 – Power supply to electrical accessories (window regulators);
- 6 – Horn control, main circuit;
- 7 – Power line for heating the aft glazing;
- 8-9 – respectively, control of high and low beam head optics.
Decoding the fuse diagram of the VAZ 2114 head unit
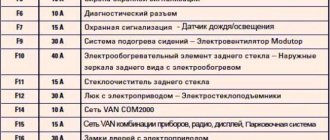
- F 1 – fog lights at the rear of the car;
- F 2 – control circuit for turn signals and hazard warning switch;
- F 3 – power supply to the interior and luggage compartment lamps, also ignition indication, ECM;
- F 4 – fuse for the aft wind window heating relay circuit; the portable lamp contact is also energized here;
- F 5 – fuse for the signal of the VAZ 2114 and the head fan of the cooling system;
- F 6 – is fully responsible for the electrical package circuit;
- F 7 – standard fuse for the VAZ 2114 heater, also responsible for electric drives for the windshield washer, glove compartment lighting and headlight wipers;
- F 8/9 – fusible links responsible for the front fog lights;
- F 10/11 – backlight for the left and right sides, respectively, also responsible for illuminating license plates, cigarette lighter, instrument panel;
- F 12/13 – light fuse for VAZ 2114 for low-range mode on the right and left sides, respectively;
- F 14/15 – similarly for the long-range lighting mode on both sides of the car separately;
- F 16 – VAZ 2114 instrument panel fuses are responsible for indicating sensors and device status.
Main relays and fuses for VAZ 2114 in block type 3722010-18
A more modern modification, installed on cars since 2010. Here the arrangement of elements and fusible links is more thought out. Thanks to a more logical layout, individual elements are easier to access.
At the same time, not only the location of the fuses is different, their functionality and area of responsibility are also changed.
Head relays
- 1 – optical wipers;
- 2 – is responsible for the switch for turn signals and emergency lights;
- 3 – cleaners for the front part of the car glass;
- 4 – module for serviceability of lighting elements and backlight;
- 5 – control of the electrical package circuit;
- 6 – horn power supply;
- 7 – power conductors for heating the rear window;
- 8-9 – circuit breakers for high and low beam head optics, respectively.
Deciphering the VAZ 2114 fuse box diagram
- F 1 – headlight cleaner contact connectors, also refers to the sprinkler tank motor activation valve;
- F 2 – turns and opens the alarm when activated;
- F 3 – interior lighting, power supply circuit for side lights at the rear of the vehicle;
- F 4 – cigarette lighter fuse for VAZ 2114, overload protection for the heating element of the rear window, this also includes a portable lamp;
- F 5 – VAZ 2114 fan fuse, which is responsible for cooling the antifreeze, is also responsible for the horn;
- F 6 – power supply for windows and electrical accessories;
- F 7 – control lines for the front and rear sets of headlight and windshield washers – a complete circuit of equipment, this also includes the glove compartment lighting;
- F 8/9 – front fog lights for the right and left sides, respectively;
- F 10 – fuse for the lighting of the VAZ 2114, the cigarette lighter, the instrument panel indication, the engine compartment lighting, also the left side of the side light;
- F 11 – separately for the right side of the side lights;
- F 12-15 – power supply for head optics, complete lighting set;
- F 16 – fuse for VAZ 2114 instruments, also coolant temperature indicators, voltmeter.
Step-by-step replacement instructions
Russian car enthusiasts driving Zhiguli “classics” ask the question of how to connect or replace the light relay on a VAZ 2106 so that it functions without problems in the future. Similar work is carried out when replacing the “six” light relay.
Replacing the VAZ 2106 light relay is carried out in the following sequence:
- Disconnect the wire from the negative terminal of the battery
- Using a Phillips screwdriver, unscrew the two screws and remove the relay.
- Installation of all removed parts is carried out in reverse order. We secure the side panel upholstery with new holders.
The “six” light acquires special importance when a motorist has to drive in conditions of poor visibility, in difficult weather conditions and at night. However, any driver must remember that defects in the vehicle’s electrical equipment system, one way or another, affect the functionality of the power plant. And this is despite the fact that the main electrical circuits are protected by relay elements, just as the lighting of the “six” is protected, the safety devices of which are routed to the vehicle’s fuse box.
On the VAZ 2106, the headlight relays, along with other main electrical equipment of this vehicle with high current consumption and high voltage, are connected via relay elements. The main purpose of the VAZ 2106 light relays, whose price is low, is to protect the switch contacts from energy overload.
Car enthusiasts often ask where the high and low beam relays are located on the “six” and what they look like. Let us explain that almost all relay devices, as well as the relay - voltage regulator, are located in the power plant compartment. The exception is the turn signal and hazard warning relays, which are located under the instrument cluster in the car interior, covered by a front panel. Both relays are identical in appearance (they can be easily found on the mudguard on the right as the car moves) and are located next to the battery charging indicator relay.
The electrical diagram of the light relay is located below:
On the general diagram of the electrical equipment of the “six” you can see at number 5 the VAZ 2106 low beam relay, and at number 6 the VAZ 2106 high beam relay, which are interchangeable elements. Also here you can see the integration of the main electronic devices of the vehicle into the general electrical supply circuit of the vehicle of this modification.
Cabin fuses for VAZ 2114 - decoding of circuits and areas of responsibility
A separate fuse panel for the cabin unit is designed to control secondary circuits of electrical equipment. The main task of the module is to relieve the engine compartment and minimize the likelihood of breakdowns due to board overload.
In 90% of cases, the mounting block is equipped with a small set of inserts. This is due to the intended purpose of the device. In fact, such modules are installed here.
In the mounting panel, the control relays are arranged in sequence from left to right:
- Control of the fuel pump power cores. From here voltage is supplied to the main line.
- Main engine relay. Responsible for powering the ECU and parallel circuits of the primary control system of the vehicle.
- Breaker element for the power cores of the main fan of the engine cooling system.
There is also a similar number of fuse links. Each element works in tandem with a relay and is responsible for protecting the system from overload:
- F 1 – VAZ 2114 fuel pump fuse, is responsible for monitoring the correct supply of voltage to the line;
- F 2 – fuse VAZ 2114 injector 8 valves, responsible for controlling the voltage of the car’s main circuit;
- F 3 – fuse link going to the electronic control unit.
Recommendations for use
Good and failed fuse
In order to determine whether a fuse is good or not, drivers usually practice two methods.
- The simplest one is to remove the problematic element and see if its conductive part is intact.
- The second method is a little more complicated, but is more accurate than determining by eye. To do this, you need to turn on a non-working consumer, for example, a cigarette lighter. Without removing the element itself, we check the voltage at one end and at the other. If there is voltage only at one end, then the conclusion here is clear - the fuse is blown and needs to be replaced.
If you find that your VAZ 2115 protective elements often burn out, then it is quite possible that your wiring is not in order. In such a situation, it is better to contact a service station.
- When operating a vehicle, never install so-called “bugs” or jumpers instead of electrical fuses. If the voltage in the circuit increases, the consumer may simply fail completely.
- Replace the burnt out one with a whole one of similar value.
- It would be wise to always keep in stock a set of electrical fuses of different amperages. They won’t take up much space, but in certain situations they can help out.
Set of electrical fuses
Sorry, there are no surveys available at this time.
Removing the head unit
In some situations, it may be necessary to remove the mounting block. This is usually caused by voltage surges or part of the circuit burning out. Also, if fuses burn out on a VAZ 2114, the reason may be hidden in oxidized or melted tracks or connecting terminals.
When asked how to remove the fuse box on a VAZ 2114, you must follow the simple dismantling instructions:
- open the negative terminal on the battery;
- from the inside of the cabin, you will need to disconnect the five main connectors of the wiring harnesses;
- dismantle the cover of the mounting block by clamping two terminals;
- the sixth pin connector is disconnected on the top side of the module;
- using a key No. 10 with an adapter, you need to unscrew the fastening of the main module;
- lift the mounting diagram with a screwdriver;
- remove the last terminal blocks from the bottom side;
- remove the mounting device.
Reinstallation is performed in the opposite order. The simplicity of the procedure is due to the fact that all terminals are different from each other and it is impossible to confuse their location.
Replacing fuses on Lada Granta
- Flat head screwdriver;
- A set of new modules;
- A driver with a "10" head.
Sequence of actions when replacing the mounting block:
- We place the car on a flat, spacious area, turn off the engine, open the hood, remove the terminals from the battery;
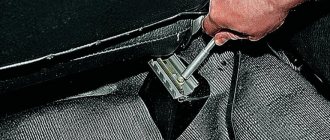
- The power supply unit is located to the left of the steering column, unclip the cover and lower it down;
- We unscrew the bolts, unclip the connectors with the wires, and remove the board;
- We carry out troubleshooting, check the integrity of each of the modules: visually, and also using a multimeter. Violation of the integrity of the melting plate is the first sign of a malfunction.
After we have found and replaced the modules, we assemble the structure in the reverse order.
It’s easy to find a damaged fuse with a multimeter; you need to connect the terminals to the contacts and look at the arrow indicators. If the latter tends to “zero”, replace it with a new one.
When purchasing, check the catalog article numbers and consult with service station specialists regarding the compatibility of components.
VAZ 2114 fuse blown, what to do
Periodically, voltage surges or other failures occur in the vehicle's electrical circuit. This leads to an overload in the circuits and the fuse link is destroyed.
If the breakdown is caused by a momentary failure, it is enough to replace the damaged element and everything will be fine. In the case of a larger defect, the new element will burn out as soon as the car starts. To fully diagnose the system and troubleshoot the problem, you will need to look at the entire line from the fuse to the consumer.
Important!
It is recommended to remove the fuses of the VAZ 2114 injector 8 valves only with special pliers or tweezers. From swinging to the sides, the thin legs of the part may break off.
Knowing the source of the problem will help make the search easier. Failure of the fuse element only occurs when there is a serious increase in voltage within the network, which is caused by a short circuit or system failure of the ECU.
The sequence of actions looks like this:
- remove the damaged element from the socket;
- find the corresponding wire on the back of the diagram;
- move along the highway to the consumer;
- detected damage must be eliminated; if the powered unit itself is damaged, replacement is carried out with a known good one.
Replacing the "six" light relay
Russian car enthusiasts driving Zhiguli “classics” ask the question of how to connect a light relay to a VAZ 2106 so that it can function without problems in the future. Similar work is carried out when replacing the “six” light relay.
The work is carried out in the following sequence:
- We unscrew the fasteners and dismantle the headlight relay for subsequent replacement;
- We remember the frequency of connecting electrical wiring or mark them with a marker. Remove the wiring from the device connectors;
- We install the updated device in the reverse order.
Useful post?
Yes
No
VAZ 2114 fuses burn out - how to prevent
The easiest way to eliminate a breakdown is to take proactive action. High-quality and timely diagnostics help prevent breakdowns and sudden circuit failures.
The manufacturer recommends performing basic procedures in a timely manner.
- Treatment of contact groups with special oils. The products isolate metals from exposure to oxygen and water.
- Periodic control of the seating density of elements. Over time, mounting connections can become loose, leading to loss of contact and the potential for arcing, which can burn out metal parts.
- Strength of fastening of consumers in sockets. The size fuse of the VAZ 2114 may blow out if the light bulb dangles in the lampshade or water gets inside when it rains.
- Serviceability of blocks and main mechanisms. It is necessary to carry out diagnostics of vehicle devices in a timely manner. The VAZ 2114 starter fuse often fails when there is damage to the electric motor or the retractor element touching the body.
The power supply system of a domestic car has its own disadvantages and design features. To prevent unexpected breakdowns, it is recommended to carry out diagnostics of the machine in a timely manner. The VAZ 2114 fuse panel will help troubleshoot the problem.
labavto.com
If you are the owner of a Lada Granta car and you have problems with electrical equipment, then first of all you will need to check the fuses. In most cases, replacing one of the elements is enough.
If the fuse is intact, then it is likely that you will need to contact the services of a service station. Or, in order to save money and time, troubleshoot the problem yourself. Remember - the main thing in such situations is to slowly figure out what the problem is.
An electrical fuse or relay is a small device that is designed to protect the specific electrical circuit in which it is installed. In fact, all consumers of the Lada Grant are protected by fuses, not counting the battery charging circuit, generator and starter.
Car Lada Granta
Any Lada Granta circuit that is protected by a fuse is designed for the maximum current flowing through it. Taking this indicator into account, a safety element is installed. If a situation arises when one of the elements of the circuit fails and the current exceeds the design norm for this circuit, the conductive part in the fuse will burn out and the system will be de-energized. This is what guarantees the safety of the car's electrical wiring and prevents fire.
Where is it located and how can you remove the fuse box in the VAZ-2115
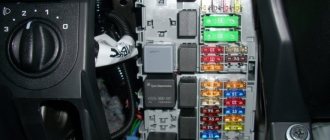
Of course, in order to look for a problem in a particular component of the car, you need to know its location. In the VAZ-2115, the designers decided to move the fuse box to the engine compartment - in the first generation Samara it was located in the cabin. Finding the block will not be difficult - it is located in a black box, near the left glass. Let's look at the decoding of the fuses located there. In particular:
- K1 – is responsible for the headlight cleaning system relay;
- K2 – alarm and relay for the turn signal switching system;
- K3 – windshield cleaning system;
- K4 – control of lamp performance;
- K5 – electric windows;
- K6 – sound signals;
- K7 – heated rear window;
- K8 – high beam;
- K9 – low beam.
In addition, the block also contains special fuses, marked with the letter F with numbers from 1 to 20.
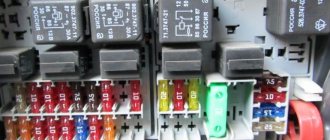
It is worth drawing your attention to one more point. There is also a fuse box in the cabin of the “tag”. It should also be described in more detail. Here, in particular, there are 3 relays and fuses, as well as an electronic control unit. If we look at this block from top to bottom, we will see the following picture. The fuses will be distributed in the following order:
- 15-amp, responsible for the operation of the fuel pump;
- 7.5-amp - it is equipped with speed, crankshaft and mass air flow sensors, a valve located on the adsorber purge, and an electric fan relay;
- 7.5-amp - the electronic control unit is powered through it.
What to do if charging is lost?
If the vehicle is equipped with a G-222 generator device and the generator has lost charging, it is necessary to diagnose the connections in the fuse box. The test is performed using a tester. Below is a list of connections that are subject to diagnostics:
- Sh4-1 - Sh11-4;
- Ш1-6 - safety device number 9 - Ш11-3, most often the reason lies in the rupture of this connection;
- Ш1-4 - Ш10-1;
- Sh5-3 - Sh10-7;
- Ш1-6 - safety element number 10 - Ш4-1.
If the machine is equipped with a 37.3701 generator device, then only the last three circuits are diagnosed:
- Ш1 — brown connector, located on the power supply unit on the interior side;
- Ш4 - blue connector, also located in the cabin;
- Ш5 — yellow connector, in the passenger compartment;
- Ш10 — brown connector, located in the engine compartment;
- Ш11 - yellow connector in the engine compartment.
Location and electrical diagram
If this occurs, remove any traces of corrosion using a wire brush or sandpaper, then spray the fuse terminals with electrical contact cleaner.
Fuses, their numbers and assignments located in the passenger compartment Most fuses are installed in the mounting fuse block in the passenger compartment, the block cover in the instrument panel is removed, located at the left end of the instrument panel under the plastic cover.
The circuits protected by fuses are shown in the photo and are shown in the table Table: The second unit is installed by the manufacturer in the engine compartment, in the area of the battery.
PSU in the cabin First, let's look at the diagram and assignment of fuses in the cabin. As mentioned above, this block is located on the left side of the dashboard, in the area of the hood opening lever.
To get to it, you will need to remove the plastic decorative trim - under it are all the elements of the device. Diagram of the device that is located inside the car Depending on the configuration, not all parts of the device may be installed on your car. However, we will consider the purpose of each of the elements. Table of the purpose of the parts of the power supply located in the passenger compartment of the Renault Logan vehicle. Here we should also tell you about the cigarette lighter fuse.
How to remove the relay and fuse box
The current consumer can be not only the cigarette lighter itself, but also any other device connected directly to it: If you notice problems with operation, then first of all you should check the cigarette lighter fuse. It is marked in red and has a number. Remember that the device directly responsible for the cigarette lighter is not in the car, since it consumes voltage from the media system or radio, depending on what is installed in the car.
Therefore, when checking a part for operability, you need to check the functioning of the number. As practice shows, the most common cause of combustion of fusible parts is the connection to the network of devices that consume a lot of voltage. Poll Can you replace the fuse box yourself?
Why might the wipers not work?
The most basic reasons why wipers on a Lada Granta may not work.
- The steering column switch for the wiper operation mode is faulty.
- The contact relay is faulty.
- The fuse is faulty.
- The wiper mechanism (motor, ramp) is faulty.
- Circuit break.
Let's consider each of these reasons separately.
Fuse blown
The most common situation is a blown fuse. Diagnostics should begin with it; to do this, replace the fuse with another one from the mounting block. The number of the windshield wiper fuse in the mounting block is F4. Detailed diagram of the mounting block is here.
The windshield wiper fuse is indicated by an arrow.
The wiper relay has “decided to live for a long time”
If, after replacing the fuse with a known good one, the wipers still do not work, then check the contact relay. The check is the same, it is replaced with a known good one.
The windshield wiper relay is indicated by an arrow.
Incorrect operation of the steering column switch
The car's wipers only work when the ignition is on. Therefore, if you try to turn on the windshield wiper with the ignition off and nothing happens, then this is not a breakdown!
Steering column switch for car wiper operation modes
If any of the modes does not work, then most likely the steering column switch has failed.
We remove the wiper mode switch for visual diagnostics
If there is voltage at the fuse connector, then the steering column switch is working.
Damage to the wiper mechanism
Often the nut 13 is unscrewed
The inspection begins with a visual inspection of the mechanism and checking the tightness of the threaded connections. It is not a rare situation when the nut on the output shaft of the wiper mechanism gearbox, which holds the trapezoid drive crank, is not tightened. Next, they try to apply voltage to the motor directly from the battery, this will help to find out whether the wiper motor is working properly.
No voltage on the motor
If after checking the relay, fuses and switch the wipers still do not work, then check the voltage at the motor terminals. If it is missing, then there is a break in the circuit somewhere.
The standard windshield wiper relay (526.3747-03) for Lada Granta, Kalina or Priora cars provides for 4 sweeps of the wipers after washing the windshield. For high-quality cleaning, two strokes are enough, and the next two strokes pass through dry glass with a squeak. The problem can be solved by modifying the wiper relay, which will reduce the number of strokes of the windshield wiper blades.