Repair / From Ekaterina Larina
- Performance diagnostics
- Fuel pump repair
The fuel pump does not pump
- Replacing the rod
- Cleaning the fuel pump
- Using the repair kit
- Video: repairing a VAZ 2106/07 fuel pump
- Dismantling the pump
In the ranking of the most capricious components of a car, the fuel pump occupies one of the first places. Therefore, any car enthusiast needs to know the basics of diagnosing the performance of the pump and the procedure for repairing and replacing it.
Fuel pump repair - is it advisable to carry out?
Many motorists are trying to save on repairs; to do this, they buy a kit for restoring the VAZ-2106 fuel pump. Its price is 3-4 times lower than that of an assembled pump. But is the game worth the candle? According to reviews from the same motorists, the service life of elements from such kits is several weeks. After this, the unit ceases to perform its main function - pumping fuel.
The cost of a new pump assembly is 450-800 rubles. It is preferable to use Pekar, but its price is very high. But the service life and quality of the elements are excellent. As practice shows, repairing a fuel pump by replacing its components gives a positive effect for a short time. You can try to repair only if only the spring or diaphragm is faulty. There is no need to change valves. Therefore, it is better to purchase a new assembly and install it on the car.
What fuel pumps were installed on VAZ 2108/2109 cars
Most VAZ 2108/2109 cars were equipped with gasoline engines with carburetor injection of a combustible mixture into the combustion chambers. Only their latest modifications were equipped with fuel injection systems.
Table: serial engines of VAZ 2108/2109 cars
| Engine modification | Volume, cm3 | Number of valves, pcs | Injection type | Years of manufacture |
| VAZ 2108 | ||||
| 2108 | 1289 | 8 | Carburetor | 1984–1997 |
| 21083 | 1499 | 8 | 1986–2005 | |
| 21081 | 1099 | 8 | 1987–1997 | |
| 2111–80 | 1499 | 8 | Injection | 1994–2005 |
| VAZ 2109 | ||||
| 2108 | 1289 | 8 | Carburetor | 1987–1997 |
| 21081 | 1099 | 8 | 1988–1997 | |
| 21083 | 1499 | 8 | 1988–2004 | |
| 2111–80 | 1499 | 8 | Injection | 1994–2004 |
| 11183–20 | 1596 | 8 | 1994–2004 |
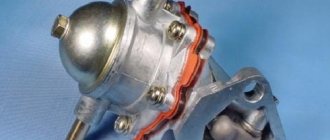
Absolutely all carburetor “eights” and “nines” were equipped with DAAZ mechanical fuel pumps produced by the Dimitrovgrad Automotive Accessory Plant. They were and are now produced under catalog number 2108–1106010.
Mechanical fuel pump DAAZ 2108–1106010
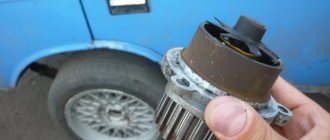
VAZ 2108/2109 injection engines were equipped with electric submersible gasoline pumps produced by Russian enterprises Pekar, Utes, SAAZ, as well as pumps of joint and foreign production. Fuel pumps were installed on the latest modifications. The catalog number of the submersible electric fuel pump VAZ 2108/2109 is 2112–1139009.
Electric pump "Bosch" 2112–1139009
How to remove the fuel pump?
To replace the VAZ-2106 fuel pump rod and the entire mechanism, you must completely remove the assembly. To do this, just carry out a few manipulations:
- Disconnect the hoses from the pump by loosening the clamps.
- Using a “13” key, unscrew the two nuts securing the fuel pump housing.
- Carefully remove the assembly, being careful not to damage the gaskets located underneath it.
There is nothing complicated about this. The new pump is mounted in the reverse order, just try not to overtighten the nuts. Otherwise, you will destroy the threads and you will have to install new studs.
Cleaning the mesh in the non-collapsible fuel pump of the Skoda Octavia A5
My car is a late 12-year model and most of these Skodas have a dismountable fuel pump. The Czechs were helpful to me - I do NOT have a collapsible one. Well, okay. Doesn't really float. I did everything according to the reports from the drive. There is nothing particularly complicated.
In the article I will write what is needed to clean the mesh, steps with nuances and the photo report itself with explanations. Cat. I will post the numbers of the mesh for the collapsible pump in a separate article.
So, to work you need:
- hammer, - screwdriver, - plastic cup 2-3 pcs. - rags, - carburetor cleaner, - a toothbrush for cleaning, - a vacuum cleaner, - well, and cardboard where to put the fuel pump
STEPS:
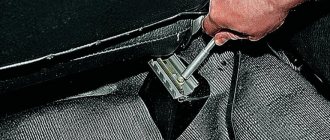
1. I pulled back the sofa, see photo on how to do it correctly. We lift the sofa up and pull it towards the chair. We lift the carpet and see a round plug.
2. The plug contains a rubber plug with wires, which can be easily removed. Let's take it off. We put our finger in there and take out the completely round plug, we are not afraid of anything, nothing will break, it comes out easily.
3. Cover with rags around the gas pump so that gasoline does not accidentally get on the carpet, and so that it does not stink later.
4. Next, disconnect the plug with the wires. It was difficult for me to remove it. There is a little red thing, like a latch, lift it up and pull the plug up. I didn’t want to act, but then I did. Then I took the compartment back and took it off again and broke the little thing, now the plug can be removed without problems and is not fixed. Here, the main thing is to remove it carefully.
5. Next. Let's go get behind the wheel. We start the car and remove the pressure in the system, run the engine for 20-30 seconds and stall on its own, start it again and it stalls immediately.
6. Now let's go remove the blue hose first. How can I remove it without breaking anything? The blue and black hoses have chips that hold the hose. In the chip itself there is a button, like a stopper, small buttons, difficult to see but possible. We press the button and pull the piece with the hose up. That's it, she's in her hands.
7
Black hose, ATTENTION! We remove it in the same way and substitute a plastic cup, because gasoline will flow out of it under pressure. No gasoline flows from the blue hose
8. Place the glass under the gasoline and drain. It drains a little, 150 grams.
8.a. We make a mark where the arrow is.
9. Then take a hammer and screwdriver, and tapping counterclockwise, unscrew the ring. Don’t forget, there is an arrow where the pump was originally located, let’s mark it so that we can put everything in the same place later. Marked with a screwdriver, see photo.
10. The ring was removed. The pump slowly rises up, about 2-3 cm. There’s nothing wrong with that. Yes, I almost forgot. When we hit the ring with a hammer to unscrew it, dirt and dust still fly from the sides onto the pump itself. There is nothing terrible, you can immediately wipe it after removing the ring so that nothing gets inside the tank.
11. Remove the ring, carefully remove the pump, lift it up
It is important that the gas tank is almost at minimum, it’s easier this way
12. Raise the fuel pump carefully. Do not touch the fuel level float; it is located in the direction of the passenger seat behind the driver.
13. As soon as the float rests against the upper wall of the tank, bend the pump in the opposite direction and remove the pump without touching the float. Along the way, anyone with straight arms, without rushing, will understand the meaning of the matter.
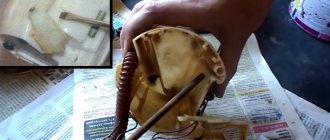
14. I removed the pump, poured gasoline into the machine from the glass of the pump itself. We look inside the glass, everything is clean, except for a light coating on the walls of the glass, like pollen sediment. The filter itself is dark in color. No clogging or soot was found during disassembly. Cleaned the fuel pump with carburetor cleaner. Under pressure, I cleaned the mesh inside with a cleaner - the walls, all the mechanisms, wiped it with a rag where I could reach. The filter itself became visually cleaner, it drained all the dirty slurry into a glass, see photo. Then I put everything back in its place, in reverse order. The condition of the fuel pump mesh is good. Although I found threads where people generally tore off these nets and don’t worry, they drive without nets at all.
Actually, that’s all - use it for your health).
Collections on the topic:
Skoda 1.6 bse stalls while driving and does not start immediately - treatment The steering wheel icon on the Skoda panel is constantly on - what is it and how to fix it
The Skoda started to warm up - what could happen?
Lost idle speed - reasons and how to restore it yourself (from the manual)
Fuel pump malfunction on Skoda or another global scam!
It blows cold from the air duct - Skoda Octavia 2011, 1.6 MPI
Speed jumps on Skoda
The central locking button is faulty
Why does the pump stop pumping?
A node can fail for various reasons. But most often this happens due to:
- Resource development.
- Destruction of elements due to incorrect assembly during repairs.
- Destruction of elements due to manufacturing defects.
Be sure to make sure that there is gasoline in the tank, that the filter and the tubes going to it are not dirty. After this, you can only look for the cause of the breakdown of the VAZ-2106 fuel pump. They can be caused by:
Repair of fuel pump rod VAZ 2107
The fuel pump rod was
on
a VAZ
2107.
the rod
was ground off by 4-5 mm, so the gas pump did not work...
How to adjust the fuel pump VAZ 2106
Replace
The fuel pump is very simple, you just need to disconnect the fuel hoses, unscrew two nuts...
- Strong production of rubbing components.
- Destruction of the diaphragm.
- Loss of elasticity of the spring or its destruction.
- Accumulation of dirt inside the valves.
Sometimes the car starts to behave strangely - at low speeds the engine runs stably, but at high speeds it starts to stall. In this case, you need to check the pressure generated by the fuel pump. There are two reasons for this behavior - insufficient fuel level in the float chamber and excessive wear of the VAZ-2106 fuel pump rod.
Performance diagnostics
The main reasons for checking the performance of the pump are as follows:
- significant reduction in fuel supply to the carburetor;
- reduction in engine performance;
- car jerking while driving.
Before diagnosing pump malfunctions, you need to make sure that other elements of the fuel system are working - carburetor, fuel hoses, filters, etc.
For diagnostic work you will need:
- open-end wrench 10;
- flat screwdriver.
The work is performed in the following sequence.
- On a car with a cold engine, the hood opens.
- Use a screwdriver to loosen the clamp securing the pump inlet pipe.
Use a screwdriver to loosen the clamp securing the inlet pipe. - The pipe is removed and a plug (bolt of a suitable size) is installed in its hole to prevent fuel leakage.
- The fuel supply hose is disconnected from the carburetor fitting and lowered, and a plug is placed in the hole.
- By pressing the manual pump lever, the resistance of the diaphragm spring is checked - the pump should make retracting sounds. If there is no resistance and no characteristic sounds, then the pump is faulty.
Disassembling the pump housing
To carry out all the work on disassembling the mechanism, you will need a pair of screwdrivers, a small hammer, a needle file, and a scraper. The disassembly looks like this:
- Unscrew all the bolts that secure the housing halves.
- Remove the diaphragms by pressing them and turning them 90 degrees.
- Carefully remove the diaphragms and remove the spring.
If you want to experiment, try removing two valves and installing new ones in their place, which are included in the repair kit. Please note that if there is even minor damage or cracks on the housing, the entire assembly must be replaced. Don't even try to restore it. Repairing the fuel pump in this case is not cost-effective.
The most common failure of this type of pump is destruction of valves or diaphragms. In any store you can purchase these parts, which are installed on fuel pumps without the slightest modification. But the kit does not include plastic spacers. Therefore, you will have to use this element from an old fuel pump.
Cleaning method
The procedure is carried out in several stages. First, the rear seat cushion is removed and half of the sofa is reclined. Then remove the plastic cover of the fuel pump. Then you need to relieve pressure in the fuel system.
Now you can remove the negative terminal from the battery. It is necessary to disconnect the tubes from the pump (gasoline may spill). A special clamping ring-cover is unscrewed. The remaining gasoline should be drained from the fuel pump housing and the sealing ring should be removed. The pump can now be removed.
You will need to disassemble the pump to clean it. First, the lower part is removed, and only then the mesh. To dismantle the latter, you need to pick up the filter with a screwdriver at the place where the pump is attached to the housing. Usually the mesh is very dirty.
You can replace the part with a new one, but you can also clean it. As for cleaning the fuel pump mesh, it is better to choose one designed for cleaning the carburetor. If there is a need for mechanical action, it is better to clean the part with a soft brush. Then the mesh is dried and blown. At the end of the process, it is recommended to wash the mesh itself and the bottom of the fuel pump housing with gasoline. All that remains is to put everything back together.
Replacing diaphragms and valves
To replace these elements, you need to perform a few simple manipulations:
- Hold the diaphragm rod by the shank.
- Unscrew the nut.
- Remove all components of the diaphragm assembly. Be sure to remember how they are located.
- Reassemble in reverse order. The holes for the bolts must match. The tongues should be directed in one direction.
- Next you will need to remove the valves from the seats. First you need to open them with a needle file.
- Be sure to cap it after installing a new valve.
If the valves are not secured, they may fall out during operation and, at best, cause a failure of the fuel supply system. During assembly, make sure that the hole in the spacer is opposite the pump lever. In this case, it will be possible to detect a leak much faster.
Steering
- Replace steering rack bushing on Chevrolet TrailBlazer
- How to change the power steering of a Chevrolet TrailBlazer with your own hands
- How to Change Power Steering Fluid on a Chevrolet TrailBlazer
- Change the power steering fluid on a Chevrolet TrailBlazer
- Replacing the steering shaft driveshaft of a Chevrolet TrailBlazer with your own hands
- How to change the steering shaft spider on a Chevrolet TrailBlazer
- How to change the oil in the power steering of a Chevrolet TrailBlazer
- Change the tie rod end of a Chevrolet TrailBlazer with your own hands
- Installing the Steering Shaft Bearing on a Chevrolet TrailBlazer
- Installing the Chevrolet TrailBlazer steering rack boot
- Change the steering rack of a Chevrolet TrailBlazer with your own hands
- Do-it-yourself Chevrolet TrailBlazer steering linkage installation
- Change the steering ends of a Chevrolet TrailBlazer yourself
- Remove the Chevrolet TrailBlazer steering wheel yourself
- Do-it-yourself repair of Chevrolet TrailBlazer front suspension arms
- Change the rack seal on a Chevrolet TrailBlazer with your own hands
- Replacing a Chevrolet TrailBlazer kingpin with your own hands
Signs of breakdown
Among the obvious breakdowns, the presence of which may require replacing the VAZ-2106 fuel pump, one can highlight one - a leak. If the housing is constantly wet, covered with gasoline that drips onto the engine block, it is necessary to carefully inspect the unit and make repairs. It is quite possible that the seal was lost due to loose tightening of the fastening screws. In this case, you don’t even have to disassemble the entire assembly, but wipe it dry and tighten the bolts with a screwdriver. If desired, you can change the engraving washers. If a leak appears from cracks in the housing, then it is better to completely replace the VAZ-2106 fuel pump. The price of a new one is not very high, but the resource is quite decent.
The next two malfunctions, typical of mechanical pumps, are diaphragm rupture and valve failure. If the membrane is torn, gasoline will begin to flow into the lower chamber of the fuel pump. And the unit will stop creating pressure in the system. There are two valves in the top cover - inlet and outlet. If one of them stops working normally, the necessary pressure will also not be created in the system. Very often the valves stick when exposed to high heat. In this case, you can moisten a rag with water and place it on the pump body - this is the only effective way out of this situation.
Post Views: 2,157
Diesel engine power supply system
High pressure fuel line between pump and rail
Removal and installation
1. Stop the engine and wait at least 30 seconds. During this time, the fuel pressure in the power system should decrease.
2. Remove the decorative engine cover.
3. Remove the air conditioning compressor.
4. Unscrew the fastening bolt (1) of the high pressure fuel line bracket.
Note
: Tightening torque: 10 N∙m.
5. Unscrew the union nut (2) securing the high-pressure fuel line to the fuel rail.
Note
: Tightening torque: 24 N∙m.
6. Unscrew the union nut (3) securing the high-pressure fuel line to the high-pressure fuel pump.
Note
: Tightening torque: 28 N∙m.
7. Remove the high pressure fuel line (4) and close all open holes (to prevent contamination of the fuel system) using a set of suitable plugs.
8. Installation is carried out in the reverse order of removal.
9. After completion of the repair:
- Perform the fuel system priming procedure.
- With the engine running, check the fuel system for leaks.
Reason #3 – Lack of spark
To start the engine, two conditions must be met:
- Setting something on fire is fuel, we’ve already dealt with that;
- To set fire to something means the presence of a spark. Let's talk about this.
It is necessary to check sparking at the spark plug electrodes.
To do this, unscrew the spark plug and put an armor wire or ignition coil on it. We place the threaded part of the spark plug on the engine body and “twist” the starter.
If there is a spark, then everything is in order, if not, then there may be several reasons:
- The spark plug has failed.
If there was only one, the engine would fail, but since it won’t start, we check all the others. Carbon deposits, oily deposits, damaged or melted electrodes may be the cause. - Armored wires.
Due to old age, their insulation may become damaged, part of the current will go to the “side”, and there will be no spark. - Ignition coil or individual ignition coils.
In the first case, it may be a real problem starting the engine. In the second, all the coils must be “covered with a copper basin” at the same time, which is unlikely. So let's move on. - Ignition module.
If there is no spark on all the candles, it means that the “end” has come for him.
Check the removed fuel pump
A malfunction in the pump does not always mean that the device itself is broken. The reason may be in any part or unit. For example, a common problem is a blown fuse. Each brand has its own location, which is described in the instructions. Often, you need to look for the fuse box on the left side of the steering wheel or under the hood.
To check the condition of the pump, diagnostics are needed. After assessing the condition of the fuse, the voltage on the device is checked. It is necessary to exclude damage related to the battery. Using a tester (multimeter), the voltage at the terminal is measured. No results? So you need to check the contacts. They must be in place and connected to ground. Oxidation or breakage of one contact can cause failure of the entire fuel module system. If a break is excluded, but the voltage reading drops by more than 1 volt, then the contact is oxidized or there is a problem in the wiring. If everything is fine with the contacts, then the problem is in the BN.
The operation of the pump will be checked according to the following scheme:
- Fuse. If the pump does not buzz when you turn the ignition, you need to check the plate on the BN fuse; it should be solid;
- Relay. If you don’t hear clicks from it, you need to check the relay coil for breaks by connecting a 12 V lamp to the contacts;
- Nutrition. To check the supply to the pump, it is necessary to connect a voltmeter to the connector; the operating voltage should be from 12 to 12.5 V. The resistance of the stator winding is measured at the moment the power is supplied;
- You can check the BN for functionality if you directly supply power from the battery. This test method will show the performance of the pump. Also at this stage it is recommended to check the level of contamination of the coarse filter;
- Pressure testing can be carried out in several modes: static and dynamic. Measuring the pressure in these conditions will show the performance of the injectors and check valve. The optimal pressure level is from 3 to 3.7 atm (depending on the brand of car). After the car is started, the pressure in the ramp should not drop sharply.
You can check the pump by removing it from the car and connecting it to 12 V.
Welcome to VAZ.EE+ Extended Edition
Since May 2013, our portal has expanded the thematic sections of the forum for the exchange of experience: subforums Americans, Koreans, Germans, French, Japanese have been added, due to the increase in the fleets of our visitors.
In addition to changing the style, our Chat, Mail, Entertainment and photo/video sections, Literature have become built-in and do not require separate registration. In addition, there are other useful and pleasant innovations that you can all familiarize yourself with when visiting the portal.
You can contact the administration with questions and suggestions in a special section of the forum or through the feedback form.
- literature Articles
- Library
- Jokes
- Cars
- Gallery
- Automobile
- Help
- Search
- Users
- Reputation
- Forum home
- Experience exchange
- Engine and transmission
- print version
- Download/Print theme
- Display Modes
- Switch to: Tree-like
- Standard
- Switch to: Linear
What to do if the car does not start after replacement
Sometimes the car doesn't start right away because the fuel pump needs to restore pressure. You should wait - turn on the ignition for 5-10 seconds. The instrument panel should light up. Next you need to crank the engine with the starter. The first attempt may not be successful - you should wait a minute and try again.
If the method does not give positive results, then the reason lies in other factors. It is possible that an error was made during the assembly or connection of the pump. Or there is a malfunction in the new fuel module. It is possible that the problem is in the car's security system or in the lock.
Article: 21010-1106166-00more, additional articles: 21010110616600, 2101-1106166hide
Order code: 003329
In stock Available for order – >10 pcs. Data updated: 05/27/2021 at 19:30
Order code
003329 Articles 21010-1106166-00, 21010110616600, 2101-1106166 Manufacturer LADA Catalog group: .. Engine power Width, m: 0.005 Height, m: 0.005 Length, m: 0.08 Weight, kg: 0. 012
Product reviews
Where is it used?
Certificates
Reviews
There are no reviews for this product yet.
Write a review
Articles about the product
- “Crystal” vases: “Classic”. Do you remember how it all began? April 16, 2013 Today, the next article in the series “Crystal VAZs or typical breakdowns of domestic cars” is dedicated to the “classics”: VAZ-2101, 2103, 2104, 2104, 2105, 2106 and 2107. These cars have been driving along our roads for decades and, despite all the shortcomings that we will talk about, their popularity is still high.
- “Crystal” VAZs: “Eight”, Kalina, Priora
March 26, 2013 A series of articles ““Crystal” VAZs, or typical breakdowns of domestic cars” talks about typical problems and malfunctions of cars produced by the Volzhsky Automobile Plant. Today we will talk about the front-wheel drive Samara family, as well as its modern analogues. - “Crystal” VAZs or typical breakdowns of domestic cars
March 9, 2013 In the series of articles “Crystal” VAZs or typical breakdowns of domestic cars” we will tell you about the typical problems that occur when operating cars of the Volzhsky Automobile Plant. In this article we will talk about the VAZ-1111 (“Oka”) car.
- Fuel pump pusher VAZ-2101-2108 AvtoVAZ Article number: 21010-1106166-00, 21010110616600, 2101-1106166 Order code: 003329 75 ₽ or place an order by calling 8 800 6006 966
Availability of goods in warehouses and stores, as well as the price of the goods is indicated on
27.05.2021 19:30
.
Prices and availability of goods in all stores and warehouses are updated once an hour.
If there is a sufficient quantity of goods in the store you need, you can buy it without pre-ordering. Internet price
– valid when ordering on the website or through a call center operator by phone
8-800-600-69-66
. Subject to sufficient quantity of goods at the time of order.
Price in stores
– retail price of goods in store sales areas without pre-order.
The period for moving goods from a remote warehouse to the warehouse of an online store.
The parts data presented on this page is for informational purposes only.
e47c4aca63414f58603952b95ff4db69
Add to cart
Available to order:
Order quantity:
Product successfully added to cart
!
- Like
- I do not like
Chepa Jul 21, 2010