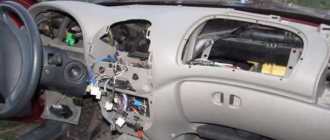
Replacing a grenade on a VAZ 2110 is required quite often. This is caused by the appearance of characteristic knocking sounds when the wheel begins to turn. The grenade contains:
- frame;
- separator;
- balloons;
- inner race;
- drive shaft;
- anther;
- retaining ring.
You can replace the grenade yourself. It is not necessary to do such repairs at a service station. Moreover, the price of such service is quite high. To make sure that the grenade has actually failed, you first need to check whether there is any play in the drive axis. To do this, you need to lightly shake the drive shaft with your hands.
The check can be carried out in another way. It is enough to turn the wheel towards the grenade and look under the car. If the boot has ruptures, cracks are clearly visible, therefore, it is necessary to change the grenade cover. But usually in this condition it is necessary to completely replace the grenade.
Work when replacing a grenade
Before you start changing the VAZ 2110 grenade, the car is set to the handbrake. For greater stability, wheel chocks are placed under the wheels. Sequencing.
- The protective cap is removed.
- The hub nut is unscrewed. Since a lot of force is required, it is necessary to use a wrench extension. Usually, for this purpose, a pipe is taken, which is put on the key. The large lever will help you quickly unscrew the nut.
- The wheel bolts are unscrewed.
- The car is raised on a jack. A wheel is hung from the side of which the grenade will be changed.
- The thrust washer is removed.
- The ball joint is released.
- The steering wheel is turned all the way in the opposite direction.
- The steering knuckle is pulled back together with the strut.
- The splined end is removed from the hub of the outer grenade.
- To reach the inner end of the grenade, you need to slightly pry it with a pry bar.
- The drive axis is clamped in a vice.
- All clamps are removed.
- The anthers are cut off with a knife.
After replacing all failed parts, the VAZ 2110 grenade is assembled. During assembly, you need to install a new hub nut. After tightening it, so that it does not unwind, the nut must be locked.
When installing the drive into the box, it is necessary that it connects with the side gear until it is completely locked. This can be done with light blows from a wooden backed hammer. The blows are applied evenly along the axis of the shaft.
Correct replacement of anthers
Very often, when inspecting a car, cracks in the boot of the outer grenade are discovered. Typically, such gusts cause dirt to get inside the housing. All this ultimately leads to the need to change the entire grenade. But this is very expensive and unprofitable. In order not to lead the situation to such repairs, you just need to replace the boot on time. For this purpose you must have:
- set of wrenches;
- wheel wrench;
- mount.
- The wheel bolts are unscrewed.
- The car is jacked up.
- Additional support is provided.
- The wheel is removed.
- Use a screwdriver to remove the protective cap.
- The mudguard covering the engine is unscrewed.
- The oil is drained from the gearbox.
- The bolts holding the ball joint are unscrewed. If they have turned sour, they need to be sprayed with a special liquid.
- The assistant must apply the brake and hold it. This way, it will be possible to unscrew the nut that holds the drive shaft and wheel hub.
- The thrust washer is removed.
- The wheels need to be turned towards the wheel where the axle is removed.
- The outer grenade is pulled out. To prevent the shaft from falling, it is tied to a suspension. A thorough inspection of the boot is carried out.
- The inner grenade of the VAZ 2110 is pressed out using a pry bar.
You need to remove all the drive shafts before pressing out the second shaft. Insert the old housing from the internal grenade into the gearbox. This must be done, as the installation of the semi-axial gears will be disrupted. As a result, it will become almost impossible to reinstall the drive shafts.
Replacing CV joints on VAZ cars.
Initial stage of work.
Before replacing the CV joint with your own hands, you need to secure the car with a parking brake, and put bars under its rear wheels for better fixation. Then you should loosen the hub nut, first removing the protective cap using a regular screwdriver. Only a strong tool that will go in conjunction with the pipe will help you do this. Although for these purposes you can also build (or borrow) a homemade key designed to unscrew the drive, which is deservedly considered the most reliable and trouble-free tool. It consists, by the way, of a chisel with a welded screwdriver for 30 and a one and a half meter metal pipe.
Replacing the corner joint boot
To carry out the replacement, you need:
The drive axle is secured in a vice. This must be done carefully so as not to damage the part. Using a screwdriver, loosen the clamps that secure the anthers sitting on the bodies of both grenades. After removing the clamps, the anthers can be cut off. They won't be needed anymore. Using a hammer with a wooden head, both grenades are removed from the drive axle.
The hinges are washed with gasoline. A thorough inspection of the technical condition of the hinge parts is carried out. When there is no need to replace other parts, new boots are installed on the shaft. A special lubricant is packed into the body of the external grenade. Then the part is pressed onto the drive axis with a hammer. Lubricant is applied before the retaining ring is put on.
The clamp securing the boot is clamped with a special tool on the drive axis. After putting the boot on the grenade body, lift it slightly with a screwdriver. This is done in order to allow the accumulated air to escape.
The installation of the internal grenade boot is also done. There is one small difference. A plastic plug must be attached to the end of the internal hinge axis. After this, the clamps securing the boot are tightened. The replacement has been completed, all that remains is to install the drive shaft.
The work of replacing VAZ 2110 anthers is available to almost every car enthusiast. It doesn't pose much of a challenge. You just need to follow the sequence of operations exactly and be careful.
Front-wheel drive and CV joint
What is a CV joint? This is a kind of hinge, which is responsible for equal angular velocities. The VAZ CV joint, or as this part of the grenade is called, serves to transmit torque directly to the wheels of the car. The design of this part, although responsible for important running parameters, is a fairly simple design. Thus, a car grenade consists only of a ball-type bearing, rotating not along its axis, as is customary, but across it.
Note. In other words, a hinge or grenade connects axle shafts that are at an angle to each other. At the same time, we should not forget that this angle is constantly changing, and the grenade or CV joint is the part that normalizes all this.
Pricing factors
Today, most car owners are trying to make financially profitable purchases. But a cheap part does not always turn out to be of high quality. This must be remembered when choosing a CV joint for a VAZ 2112.
To make the purchase profitable, you need to visit different places where this part is sold and compare the performance parameters and cost. The price at different sales points will vary greatly. It is important to understand that the cost is influenced by the following factors:
- Quality.
- State.
- View.
- Originality.
- Company manufacturer.
- Place of purchase.
- The need for product delivery.
- Seller popularity.
Determination of CV joint failure and causes of failure
Faulty grenade VAZ 2110
Before starting the process of replacing a grenade, it is recommended to determine which grenade needs replacement. Simply feeling the shaft play on the overpass is an accessible method for determining the malfunction of a particular grenade. As a rule, a working grenade should not create any play at all.
Note. It is worth noting that a faulty grenade does not necessarily occur on older cars. This situation is often observed when the CV joint fails on a car that has recently left the assembly line.
What are the main reasons why a grenade fails? Here they are, listed below:
- the quality of the grenade, which can be low or high (often a fake is sold instead of the original part or a defect is established);
- lubricant that is either completely absent or available in insufficient quantities;
- failure of the boot (see How to replace the boot on a vase), which leads to damage to the grenade (the boot is protection and if it is missing, various abrasive debris and water get into the grenade mechanism);
- incorrect driving style (aggressive driving style);
- poor condition of roads (especially important here in Russia).
So, you can determine the malfunction of the CV joint yourself, as mentioned above, by detecting play in the shaft. In addition, the malfunction of a grenade, like any other part or mechanism of a car, is caused by a change in properties, dimensions, formation of a hole, etc. As mentioned above, the grenade is a hinge, the structure of which contains elements that rub and are under constant load. If the CV joint is a kind of bearing, then its races must have transverse grooves. This is what allows you to change the angle between the drive and driven axle shafts. Since the grenade, forcing the car to move, transfers significant force to the wheels, over time it loses its performance and wear is formed on the part. It also increases the gap. And where there is no close contact between mechanisms and parts, knocking, noise, etc. occur.
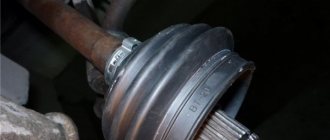
Torn boot on a VAZ 2110 grenade
The appearance of a characteristic crunch when turning the wheels is the main sign of failure of the grenade, which most experienced drivers know about. Such a sound can only be produced by metal balls rolling along the gutters.
Note. Such a crunch can appear at any time, but, as a rule, when turning the wheels or sharply accelerating from a standstill. In addition, a characteristic sound may appear when overcoming obstacles.
Slight jerks when the car starts moving will also help to identify signs of a CV joint malfunction. Also, experts recommend changing driving dynamics to quickly identify faulty grenades. As was said, there are two types of grenade: external and internal. How to determine the malfunction of an external grenade, or as it is also called an external grenade, was indicated above.
Note. The external CV joint differs from the internal one, first of all, in that it is smaller in size and fails much more often than the internal CV joint.
- To determine the malfunction of the external grenade in another way, you need to turn the steering wheel and move away. If the grenade is faulty, it will begin to “crunch”.
- To determine the malfunction of the internal grenade, you will need to drive not in a curved manner, as when checking the outer CV joint, but in a straight line. The internal grenade will especially clearly signal with a sound signal that it is time to replace it when overcoming holes, snowdrifts or shallow ditches.
- You can finally check the malfunction of the grenade on the lift. The front wheels will be suspended and if the CV joint is faulty, a characteristic crunch will appear.
Replacing a grenade
Before you begin the process of replacing a grenade, you need to arm yourself with the following tools:
- lift;
- a sledgehammer or large hammer;
- an ordinary hammer;
- heads for 17 and 30;
- balloon type wrench;
- a chisel, not necessarily sharp;
- a flat screwdriver, preferably a slotted one;
- wrenches 13 and 17;
- crowbar or pry bar;
- pipe;
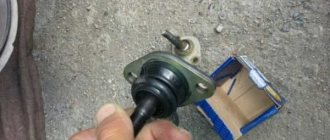
- a special puller designed to replace CV joints;
Special puller for CV joints
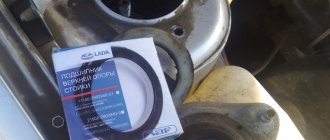
And, of course, you should purchase a new CV joint kit.
New CV joint kit
Dismantling an old grenade
Let's start the replacement process:
- first you will need to unscrew the nut that sits on the shaft using a 30mm socket, a wrench and a pipe;
Nissan X-Trail › Logbook › Inner left front grenade - damn it)))
I don’t even know where to start)) How much time I wasted: - searching for useful information on the Internet; — visited all the investigations in the city; — called investigations in cities that are closer; — how many people have I troubled with my problem))). etc. Finally I made up my mind and ordered a low-quality substitute for Febest (0211-T30LH). By the way, it’s cheaper at www.repart.ru/.
Internal CV joint, gearbox side (0211-T30LH)
When purchasing the car, I immediately noticed the torn boot of the inner left grenade. Well, okay, I thought))).Then I’ll put on the dust cover and that’s it)))…that’s not the case. I called some stores in the city (I was looking for a boot), everywhere from 1500 rubles. and higher. I decided to wait and order through existential for 750 rubles. Febest (0215-071T)
Internal CV joint boot (0215-071T)
While I was waiting for the boot, I wrapped a bag))) with lubricant)). I noticed a slight vibration especially during acceleration. Well, it’s a small thing)))… I waited for the boot. I changed it, it took about 2 hours to replace it… Then I went for a ride)) only then I read on the Internet about the vibration during acceleration. Everyone who wrote about vibration mentioned the torn left boot! In existential terms, the cheap Febest substitute at that time cost 4,700 rubles, a couple of months later it began to cost 3,200 rubles.)) Having already driven 6-7t.km. The vibration has increased and it’s not bad))) (by the way, the boot is still intact) I was thinking about a used drive unit, but if X-trails have this problem, then it makes sense to take a used one. I read on the Internet that the left front drive fits from Nissan Cefiro (A33), from Nissan Primera (P12) and, with minor modifications. I was more inclined towards the drive from the Nissan Cefiro (A33), because... The internal grenade will be stronger)).
But nowhere in Kurgan was there a used drive (((in other cities a used one from 5-7 t.r. immediately disappears. To order through the website www.japancar.ru/ it also costs about 5 t.r. and so on will come...unknown((In the end, I made up my mind and ordered Febest (0211-T30LH) 2860 rubles, I couldn’t continue to worry myself and those around me)) Only reviews about those who installed Febest were not found as a substitute((about the fact that Febest is complete shit..., this okay)) let’s see how long it lasts and if the vibration goes away))
As soon as it arrives, I’ll change it right away))
Diagnose part problems
The grenades are protected by a rubber boot. It is mounted on an external and internal hinge. The boot prevents dirt from getting into the CV joint. Another of its functions is to retain lubricant; without it, the hinge will not work.
If the boot wears out over time or is torn, sand, small stones and dirt will begin to get into the joint. After some time, the CV joint will become unusable and the grenade will have to be replaced. Such repairs will cost much more
Therefore, it is important to monitor the integrity of the anther. If a defect is detected, replace the CV joint boot
You can visually check the condition of the anthers yourself, without resorting to the services of service station workers. It is best to drive your car into the inspection hole
First of all, you should pay attention to the boot of the outer CV joint. VAZ 2110 has two boots on each outer side of the wheels
These anthers most often fail. The inner boot needs to be replaced much less frequently than the outer boot.
You can check the integrity of the outer CV joint boot without a hole. We stop the VAZ 2110 on the road, preferably in a place where the car will not interfere with the movement of either cars or pedestrians. We turn the steering wheel to the right to the extreme position, this will be enough to diagnose the outer boot on the left side.
We similarly inspect the boot from the opposite side. If traces of grease are visible on the boot or there are cracks and cuts, then the boot should be replaced. The design of the VAZ 2110 allows you to cope with the replacement yourself.
Following the recommendations of experienced craftsmen, you should replace the boots of both the outer and inner CV joints at the same time. Even if the inner CV boot still looks intact and without cracks.
Purpose and device
The CV joint performs an important function in a car; it consists of seven parts:
The VAZ 2110 drive unit is responsible for transmitting torque to the wheel from the gearbox. The CV joint allows the front wheel pair to make turns by normalizing the changing angle between the axle shafts. The machine has two grenades: the external one transmits rotation to the hub, and the internal one is needed to transmit rotation from the gearbox to the shaft.
A sharp start from a standstill with the steering wheel turned to one side leads to premature wear of the “ten” joint. The service life of a factory part is about 100 thousand kilometers.
Signs of CV joint failure
Wear of the grenade due to defects or the end of its service life and contamination of parts are the most common failures of the angular velocity joint. A faulty CV joint will itself “inform” the driver that it is time to replace the outer joint and boot. While driving, a crunching sound appears, crackling sounds are especially noticeable when turning, and vibrations appear in the body of the VAZ 2110. If measures are taken in time, then you will not have to replace the internal and external hinge; it will be enough to install a new boot. To find out the extent of the damage, you will need to conduct an analysis.
You can identify the breakdown and confirm your guesses in the following ways:
- Turn the steering wheel all the way to the right, and then to the left. During this process, the condition of the anther should be assessed. If there are breaks in it, then the element needs to be changed.
- Take the drive shaft and rock it from side to side. If play appears, then replacement of the inner and outer CV joints is required.
Anthers protect the grenade from dirt, which destroys the part. They wear out faster than other components of the assembly, so the covers should be inspected regularly. If you ignore the malfunctions and continue to use the car, the CV joint on the VAZ 2110 may break in half. These are not only costs, but also the danger of getting into an accident, because a breakdown can happen on the road.
Functionality check
The condition of the inner and outer CV joints should be examined separately, since the procedures and symptoms are somewhat different.
External grenade
The most obvious and main sign of wear of this element is the appearance of a sound similar to a crunch. It appears because the grooves have worn out and the balls do not move along them as well as before. The crunching becomes noticeable when entering turns, sharply pressing the gas pedal or passing difficult road sections.
Grenade
If you want to verify that the outer CV joint is faulty, do the following:
- When starting from a standstill, deliberately create jerks, but not strong ones;
- Try to accelerate sharply and slow down;
- Move the shaft transversely between the CV joints. If you feel any play, then the grenade is definitely worn out.
Internal grenade
It is noteworthy that the internal hinge is more durable and less subject to wear. Most often, the inner CV joint declares its malfunction when simply driving in a straight line or when passing through difficult sections. A check for play, similar to an external grenade, will allow you to verify problems.
But to understand whether an element really needs to be replaced, do this:
- Raise the drive wheels, which will allow you to bring the inner CV joint to its maximum angle;
- Start the engine;
- Turn on first speed;
- If the hinge is at the limit of wear, you will hear a characteristic crunch. This is a signal that you need to change the grenade.
Replacement
Necessary tools and preparation for work
- Standard screwdriver set.
- Extension.
- Mounting and breakdown.
- Set of socket wrenches.
- Hammer.
- Jack.
To make repairs convenient, the “ten” should be driven onto an overpass or into a pit, do not forget to put the car on the handbrake. You need to put clamps under the rear wheels, and then engage the gear. Both CV joints are installed on the shaft drive, replacement takes place according to the same scheme.
Step-by-step instruction
- We unscrew the nuts on the crankcase protection, there are two nuts on each side, 19 at the back, 17 at the front.
- Drain some of the oil from the gearbox (less than 50%). We remove the bolts using a spray can from the side of the faulty grenade. Armed with a 30mm socket, unscrew the outer CV joint nut.
- We jack up the car and remove the required wheel. On the hub you will see two bolts that hold the grenade. We unscrew it with the 13th key and move on.
After the work is completed, you can hit the road to test the new grenade. If you still have questions, you can watch the video instructions below.
approximate cost
In Russia, you can buy a new grenade at a price from 700 to 1300 rubles .
Approximate prices depending on the type of CV joint:
- Outdoor – from 700 rubles .
- Domestic - about 1200 rubles .
Approximate prices depending on the manufacturer:
- AvtoVAZ - about 1100 rubles .
- PRAMO - from 700 rubles .
- LGR – from 980 rubles .
- Lucas - about 1300 rubles .
- Hofer - about 1200 rubles .
- Pilenga – from 850 rubles .
An old spare part in Russia is sold for about 400-500 rubles .