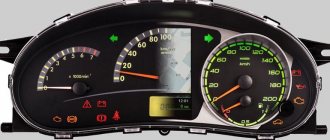
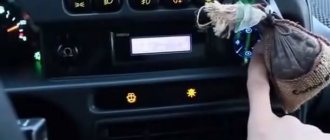
How to calibrate the arrows, otherwise I overexposed the instrument and put them back, now they show incorrectly?
all the arrows? Which devices are not showing correctly?
all the arrows? Which devices are not showing correctly?
I assume he changed the LEDs/light bulbs on the dash.
What's the problem? As I understand it, if they show it incorrectly, then they are lying by the amount by which you mistakenly shifted them. I don’t know exactly how to do it correctly, but I assume it’s by selection using the device’s self-diagnosis mode.
When the ignition is turned off they should always be at zero, did you somehow set them incorrectly or something? What exactly do the arrows show? Post a photo or describe the situation in detail.
There is some kind of system there to calibrate them to the factory position, but everything is different from the factory, not everything is absolutely at zero
I did this at 10 when the ignition was turned off. You put the arrow on the axle a little bit and lower it down to the cutoff, then you press the arrows harder and put it on all the way. I think it's clear...
Pinout of the Priora instrument panel connector | Tricks of Life
For greater driver comfort, the booster provides several economical and sport modes. Those who have tested this device in practice claim that it has a positive effect on the car’s reaction speed. And the reasonable price of 4,300 rubles speaks in favor of booster tuning.
Expert opinion
It-Technology, Electrical power and electronics specialist
Ask questions to the “Specialist for modernization of energy generation systems”
How to set the arrows - Official Lada Priora Club You can also verify the serviceability of the installed LEDs using a multimeter in tester mode, bringing the probes to the LED according to the polarity of the red probe plus. Ask, I'm in touch!
How to set arrows on the Priora dashboard?
Compared to other VAZ cars, the Lada Priora has a more modern design and fairly high-quality materials. The panel is made of Soft Look plastic and has a convenient instrument cluster. However, there are also disadvantages, for example, the backlight could be more effective. Therefore, many drivers decide to tune the Priora instrument panel.
Analysis of the Priora shield
The panel can be attached in two ways. These can be latches that you just need to press and the panel will simply come out. Or there may be bolts that need to be unscrewed with a screwdriver. However, in general the panels all come out the same way without any effort.
We continue disassembling for subsequent tuning of the Priora instrument panel.
Once you have removed the panel, you need to remove the glass from the front and unscrew the back cover. It is held on by several bolts. Under it you will see a green microcircuit and other internals of the devices.
Visor
After the back cover, you need to remove the visor. It is held on by two latches. The arrows should be positioned at zero. In general, when disassembling the panels, it is better to take a photo of where the arrows point, so as not to get confused later and to align them correctly.
Arrows
You must try not to touch the coating with your nails, otherwise marks and scratches may remain on the panel. They will be highlighted and spoil the whole picture.
Overlay and light guides
Priora usually has three separate light guides. They are attached with latches and can be removed very easily. Sometimes the light guide may be damaged during removal. There is nothing wrong with this and you can continue to use it.
Removing the screen
To continue disassembling the instrument panel in the Priora for tuning with your own hands, remove the screen. It rests on rubber conductors, so it is also easy to remove. Turn the panel over and unscrew the remaining bolts. We also take out light bulbs that are no longer needed.
Using pliers, release the clamps and take out the screen. Under the screen there is another light guide - a bright light green color; it must be removed.
The panel is almost disassembled, all that remains is to separate the main white part from the green microcircuit. Thus, we have disassembled the entire dashboard and can continue tuning the Priora instrument panel.
Glass tinting
Glass tinting is an elementary type of tuning the panel of a Lada Priora. The film is attached to the outside of the glass. You can use film No. 15 or any other depending on the driver’s preference. The main thing is to choose the right shade to make the glass look good. American film, which often has a reddish tint, is not suitable for every interior.
The film is applied as usual - we degrease the glass using any dishwashing detergent, Fairy and others will do. We apply the film and cut it, paying special attention to the edges. It is better to cut off the edges so that the film does not start to bubble after installing the glass in place.
What kind of lighting do you prefer?
Built-in Chandelier
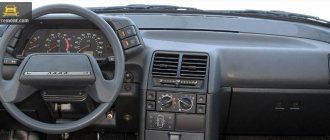
The dashboard contains the following elements:
- Unit for controlling instrument lighting and external lighting.
- Horn switch.
- Switch for turn signals and headlights.
- Instrument cluster for Lada Priora.
- Lever for glass washer and wiper.
There is also an ignition switch on the instrument panel, which is combined with an anti-theft device. On the Lada Priora it has three positions. In addition, the instrument panel contains buttons and mechanisms such as a heated switch on the rear window, a clock, an alarm switch, a glove box lid, a tape recorder socket, an ashtray, a fan control unit, etc.
Expert opinion
It-Technology, Electrical power and electronics specialist
Ask questions to the “Specialist for modernization of energy generation systems”
Overexposure (backlight tuning) of the instrument panel Lada Granta, Kalina 2 "n Here we connect 1 Speed control, connect the white wire to the gray 28 contact of the dashboard connector 2 Ignition connect the yellow wire to orange 21 contact of the dashboard connector 3 Dimensions connect the blue wire to the yellow 7 dashboard contact block. Ask, I'm in touch!
What lamps are installed and how many of them?
VAZ car lamp installed in a socket and without it
Usually lamps are bought with a small margin (2-3 more), but I would recommend changing everything at once if they are incandescent, since it is unknown how long the old ones will last - they can burn out tomorrow and the day after tomorrow. And again disassemble your VAZ because of one light bulb?
If desired, instead of incandescent lamps, you can install LED ones in the VAZ instrument panel - they are produced for the same voltage with the same standard size and can be either with or without a socket. By the way, in the latest modifications of dozens of VAZs, LED light sources have already been installed.
What kind of lighting do you prefer?
Built-in Chandelier
LED bulbs without socket and with socket for VAZ 2110
Why are LEDs better?
First of all, they have a longer service life (up to 20-30,000 hours instead of 1,000 for incandescent lamps). They are not afraid of vibrations and are 8 times more economical. But you have to pay for all this in the literal sense of the word: LED light bulbs are many times more expensive than their conventional incandescent counterparts. If you consider that there are 20 of them in the VAZ panel, the amount will be considerable.
Be careful with the generator warning lamp; based on feedback from our readers, it is better to replace it only with the same one.
Do-it-yourself tuning and dismantling of the center console
The situation is much worse if the instrument panel in the Priora is faulty and requires repair. In this case, pinout is needed, i.e., matching the contacts and wires to a particular device. The description of the combinations for the shield states that contacts 2,3,5,6,8,9,16, 17,22, 28-30 are reserve,
- while contact No. 1 goes to the power steering, No. 4 goes to the parking brake switch (both negative),
- No. 7 - to the lighting module (plus),
- No. 8 - on CAN_H,
- No. 9 - on CAN_L,
- No. 12-13 - immobilizer antenna inputs (a and b),
- No. 14 - to the “Reset” switch,
- No. 15 - to the brake fluid level sensor (minus),
- No. 18 - to the backlight adjustment module,
- No. 20 - to the terminal on the battery “30” (plus),
- No. 21 - to the ignition terminal “15” (plus),
- No. 23 - to the “menu down” key on the steering column switch, No. 24 - to the “up right” key on the steering column switch (both negative),
- No. 25-26 - to external temperature sensors (minus and plus, respectively),
- No. 27 - to the fuel level sensor,
- No. 31 - to the diagnosis of the instrument cluster.
Advantages of spacers under the hood of Priora Prosport
Existing instrument clusters for Lada Priora
Installation of additional Priora door seals
How to increase ground clearance (clearance) for a Lada Priora car?
Malfunctions and repairs
Inaccurate installation leads to failure of elements. On the instrument panel board, the parts are attached using simple rivets, hence the negative result. The body is constantly subject to vibrations, so the installation simply “falls apart” and breaks appear in the circuit. Repair in this case involves soldering the rivets and thoroughly cleaning the contacts.
- It is necessary to remove the plug; the board does not need to be disconnected from the case.
- The next step is to apply flux to the places on the board with arrows (photo below). Both pads also need to be removed and thoroughly lubricated.
After soldering is completed, the instrument panel can be returned to its place. If you have free time, you can go through the contacts using sandpaper. On older cars they usually oxidize, which can prevent the devices from functioning properly.
You can see how to remove the dashboard in the video below.
How to change the color of the instrument cluster illumination
1. Use SMD of the desired color. For example, use white LEDs to illuminate one part of the panel, and blue LEDs for the other.
2. Use a light filter (electrical tape or film of different colors) together with white LEDs. We stick it on the desired area, as a result of which we get the illumination of the desired color. To change the color, you do not need to use a soldering iron, just disassemble the instrument panel and stick a film of a different color.
It is worth noting that the hands have an orange coating. To change the illumination of the hands, wipe off the varnish with nail polish remover and, if necessary, apply a new varnish of a suitable color. Another option is to use LEDs for the arrows of the desired color.
You can change the backlight of the screen (display) not only by replacing its LEDs, but also by turning the film over. First, we tear off the film from the display, clean the remaining adhesive with a solvent and glue the film on the back side. This results in an inversion of the panel display:
3. Use RGB-SMD LEDs. If you want to change the backlight color at once. In this case, you will have to additionally output switching control.
Expert opinion
It-Technology, Electrical power and electronics specialist
Ask questions to the “Specialist for modernization of energy generation systems”
2. Controls and monitoring devices | Lada Priora operation and repair Lights up when the ignition is turned on, if the driver's seat belt is not fastened, accompanied by an intermittent buzzer signal for 90 seconds. Ask, I'm in touch!
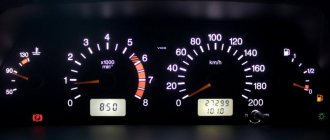
Overexposure of the instrument panel VAZ 2109
Not long ago, one good man
, part-time - my
friend
tema4970, it was his birthday... and I decided
to give him a gift
for his 2109 “My Cherry Nine”... give him
an overexposure of his tidy.
After all, since childhood I have heard - “The best gift is a gift made with your own hands!”
))
What came out of this is for you to judge
!)
Once upon a time, as soon as I started to overexpose the devices, this same friend gave me the old unit from his 2109. So I decided to overexpose it:
Disassembled. There’s nothing complicated here, just like everywhere else. Then I immediately started drawing the backlight circuit boards
in “sprint”:
Along the way I try on the layout, check it and eliminate inaccuracies using paper
:
The result is finished boards
:
I post the boards
in the dashboard box.
I connect them
with wires, attach them, and solder the contacts.
I also glue mini-scarves of arrow backlights
.
After that, I move on to the scale, the MOST difficult part.
I’m going to the copy center and scanning the stock scale...
Because Methods for printing scales are not available to me
, I still use the same “old-fashioned” method -
plotter cutting.
This is the scale we got after 3 days of torment: drawing the layout
,
adjusting sizes
and
cutting on a plotter
in an advertising agency,
transferring film to plastic
,
sticking color filters
.
Next is the second most difficult part.
) This is the plastic backing of the scale.
Of course, it was possible to remove it, but I didn’t, with it the height and alignment of the height are optimal
.
It needs to be improved
- cut out everything in it that interferes with the light, get onto the scale and shine through it!
To make it look like this:
Next, I wanted to make the CORRECT BSC BADGES!
So that the pictrogram icons themselves glow
, and not the dot-square-LED next to them... because now it’s just a pictogram drawing -
it won’t be visible!
To do this, BSK replaced and resoldered the stock diodes with SMD c-diodes 3528 of the corresponding colors!
And so that the c-diodes, when illuminated, do not illuminate neighboring icons
, it was necessary to make
a separating glass - a delimiter
for pictograms...
And thanks to 3D printing
, such a
“glass-svtovod” was born)
Now each symbol
, will glow
only from its c-diode
!
I'm moving on to the final stage
—
illumination of the hands and the hands themselves.
I place a small “light guide glass”
from heat shrink of the required diameter so that the red light
does not fall on the scale
when the arrow lights up
(two-channel smooth ignition... more on that below)
Well, the arrows
— from the same
Volga-3110)
I adjust the pointer bushings to the axles
: I file
their length
and drill out
the seats.
Oh yes! I almost forgot! Be sure to remove the tachometer board and move it outside the device... because... it interferes with the lighting!
Well, where would we be without smooth , 2-channel ignition with adjustable backlight brightness and “Night” mode?
?))
Of course - nowhere!)
Installing the
SCOOTER-VETERAN module (v.5.0)
The moment of truth has come...
You can hear the second hand ticking on your wristwatch...
We supply power to the ignition...
Improving the aesthetics of the Lada Granta interior
Driving an original and bright car with an updated interior is doubly pleasant, and words of admiration addressed to your vehicle will also be like a balm for the soul.
Decorating the interior elements of the cabin
If you have a Lada Granta at your disposal, it is best to start tuning the interior by changing some of the internal devices of the car. In particular, you can change the main element with which the vehicle is controlled.
Some owners decide to install a sports steering wheel, accompanied by a smaller diameter. However, such actions are not welcomed by all car owners; sometimes it is simply difficult to control a small steering wheel, so we recommend that you use an alternative method of decorating the steering wheel.
The steering wheel can be covered in leather to enhance its appeal. However, it is important to understand that the process of covering with leather is not entirely easy. This definitely requires certain practical skills.
You can find a wide variety of armrests in car markets. At first glance, it may seem to you that there will be no problems with their selection and subsequent installation. Unfortunately, this is not the case, the market is replete with various offers, but mostly these are all Chinese products, which not only over time, but almost instantly can provoke your dissatisfaction.
Lada Priora Hatchback › Logbook › Correct connection of the tidy backlight
After connecting the original dashboard, I encountered one slightly unpleasant situation. During the daytime, when the headlights are off and the DRLs are on, the instrument lighting does not light up.
Of course, the manufacturer took into account that the white scale on a gray background should already be clearly visible. But after so many years of driving foreign cars, this clearly did not suit me.
Two schemes very similar to each other are very common on the Internet. 1. cut the white wire, connect the end coming from the dash to the orange wire, and insulate the other end. 2. connect the white and yellow wires to each other, but to eliminate reverse current, install diodes.
In the first case, we lose the opportunity to turn on the instrument lighting when the ignition is off. And in both cases, we are deprived of the ability to adjust the brightness. At night. Especially on a dark road. Especially if the windshield is tinted.
After thinking a little (about 40 seconds), a third scheme came to mind, which I had not seen anywhere or on anyone. Since I am a kind person and not greedy, I am sharing this scheme with you. The scheme is actually simple.
It is enough to use a regular five-pin relay.
We break the white wire, and connect the end coming from the tidy to pin 30. At pin 87 we connect the second end of the white wire (the wire comes from the adjustment)
At 87a (or 88 on some relays) contact we connect the orange wire (power when the ignition is turned on). To switch the relay, you need to connect the yellow (dimensions) and brown (ground) wires to contacts 85 and 86.
Naturally, it is better to solder all connections, and it is also necessary to insulate them.
Now during the day the backlight lights up at full brightness, and in the evening (with the headlights or low beams on) it lights up dimmer, depending on the adjustment.
After assembly, I made a short video showing how it works.
Now all that remains is to change the color of the scale. I will be glad if my scheme is useful to someone.
Expert opinion
It-Technology, Electrical power and electronics specialist
Ask questions to the “Specialist for modernization of energy generation systems”
Which LEDs to choose for backlighting the instrument panel Having realized that it was losing its tuning skills, AvtoVAZ decided to start producing a new proprietary system, which will be equipped with a neutralizer from the well-known company Eberspaecher. Ask, I'm in touch!
Instructions for replacing the tidy yourself
The procedure for removing, disassembling and replacing the control panel can be carried out on your own; there is nothing complicated about it.
- First of all, turn off the ignition, and then disconnect the battery from the power supply.
- For greater convenience, you should remove the steering column cover, and also dismantle the steering wheel itself.
- After this, using a screwdriver, you need to unscrew the two screws that secure the upper part of the tidy.
- Next, two more screws are unscrewed, only now from the bottom.
- There are two more screws on the sides of the control panel; they also need to be unscrewed.
- After this, you can pull the tidy towards you, but do not remove it completely. Since wires are connected to the device, you need to disconnect the connectors on the back side, and then release the latch.
- The PP is removed and replaced with a new one. Assembly steps are carried out in reverse order.
The learning key (with red insert) allows you to unlock the anti-theft system and encode a spare working key. The training key should be stored in a place that prevents access to it by unauthorized persons. To ensure stable reading of the ignition key code when starting the engine, it is not recommended to mount two or more ignition keys on one ring.
The working key handle has a built-in remote control for the central locking and the vehicle's standard security system.
If the operation of the remote control malfunctions, it is necessary to check the serviceability and, if necessary, replace its battery.
The car is equipped with an electronic anti-theft system with an immobilizer. The immobilizer sensor is installed in the ignition switch. The immobilizer warning lamp is installed in the instrument panel, and the control unit has a built-in buzzer for sound signals. The ignition keys have built-in chips from which the immobilizer sensor reads codes that remove the ban on starting the engine.
The manufacturer supplies vehicles with a non-activated anti-theft system. When not activated, the immobilizer allows you to start the engine without reading the code from the ignition key. In this case, after turning on the ignition, the control indicator will light up for 15 seconds.
immobilizer lamp. In the activated state, starting the engine is possible only after the immobilizer sensor reads the “correct” code from the ignition key.
The immobilizer must be activated when the car is sold at pre-sale preparation points in the presence of the owner. After activating the system, the training key becomes “its own” for the immobilizer and performing other procedures (training or retraining a spare key, etc.) is possible only with this key.
After replacing the engine control computer and the bodywork control unit, the system must be reactivated.
Expert opinion
It-Technology, Electrical power and electronics specialist
Ask questions to the “Specialist for modernization of energy generation systems”
Purpose It all started with the fact that I began to be wildly irritated by the breakdowns of the two-piece, it seemed like nothing serious was broken, but damn it, there were so many little things that really started to irritate me. Ask, I'm in touch!
Do-it-yourself dashboard tuning on Priora
Hello everyone, I filmed a vlog for you while I’m waiting for a parcel with goodies. In this video: overexposure of the dashboard, light.
#Independent overexposure of the panel #LED backlighting #How to overexpose the panel yourself #Optitron on a Priora.
WE are located in the gingerbread city of TULA Led Scale - manufacturing LED boards for self-installation in .
ATTENTION! Credit card for everyone with 5% cashback for purchases on aliexpress goo.gl/rx1feg ✓Buy on aliexpress.
Welcome to the Stories from the Garage channel! I am very pleased that you have already liked and subscribed to the channel! In that .
So the instrument panel of a VAZ 2170 or there is a Kalina Priora panel with a tinted scale, that is, look at everything, then nothing.
. Priors, overexposure of the VAZ 2170 dashboard, white illumination of Priora instruments, overexposure of the Priora dashboard.
Expert opinion
It-Technology, Electrical power and electronics specialist
Ask questions to the “Specialist for modernization of energy generation systems”
Instructions for replacing the device with your own hands The ignition switch has a lock that does not allow you to re-turn the key to position II without first turning off the ignition, that is, to restart the engine after an unsuccessful attempt, the key in the switch must first be turned to position 0, and then try again. Ask, I'm in touch!
Removal and disassembly
Do-it-yourself removal of the instrument board is carried out according to the following algorithm:
- First of all, remove the casing;
- Use a Phillips screwdriver to unscrew the fastening bolts;
- We find and unlatch the latches. It is better to snap off the ones at the bottom first, and then push up. This way it can be easily removed;
- Before tuning, you need to remove the arrows. At first, just pull them lightly. If they don’t give in, start turning them from right to left, while slightly tightening them – they will definitely come off.
An article on dismantling a torpedo can be found here:
How to Remove the Speedometer Arrow on a VAZ 2107
It should be noted that the shape of the LED lens should be funnel-shaped. This lens helps diffuse the light coming from the LED. Blue provides a slight zoom and arrow effect. Although white diodes cannot give such an impression.
Now you need to decide how many LEDs you need.
For small devices, use one diode and a VAZ 2107 . You will need a large tachometer, one diode lamp and 4 LEDs for each device, which are inserted instead of standard lamps.
Setting the VAZ 2107 speedometer: how it works.
How to remove the tachometer and speedometer needle of a VAZ 06-04. How to remove the tachometer needle
tachometer or speedometer
with dashboard, car.
the arrows from VAZ instruments take off as
2106 My group and sale of scales. vk.com/shkalyvaz Repair and review.
The devices were removed and disassembled. To do this, you need to go around the perimeter of the chrome ring and take off . Try to do this carefully to minimize damage to the ring. The glass has been removed from the device. The screws and nuts are unscrewed from the back of the device, and the device is removed.
Expert opinion
It-Technology, Electrical power and electronics specialist
Ask questions to the “Specialist for modernization of energy generation systems”
What kind of speedometers are there? Afterwards, you should carefully lift the scale sticker from the side of the stud and tighten the latch, using tweezers, or, if you don’t have one, thin scissors. Ask, I'm in touch!