Internal combustion engines are far from perfect, so most of the energy consumed during the operation of such units is released in the form of heat. In the winter season, this “by-product” can be successfully used to maintain optimal air temperature in the cabin, but in the summer this is not necessary, so antifreeze can boil even after a short period of operation of the internal combustion engine. When the coolant heats up to a certain value, the fan automatically turns on and the coolant temperature returns to normal. The VAZ 2110 fan switch-on sensor, with the help of which the forced cooling of the internal combustion engine is timely activated, will be discussed in this article.
Design and principle of operation
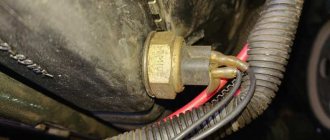
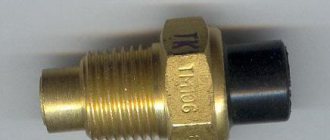
The VAZ 2110 fan sensor, both 8 and 16 valves, consists of a sealed housing, inside of which there is a bimetallic plate and electrical contacts. A feature of the working element is the possibility of significant physical expansion when heated. When the temperature changes significantly upward, the plate expands and the thermal relay contacts close.
On the outside of the housing, a thread is cut, which is necessary for reliable fixation of the sensor in the cooling system of the internal combustion engine. On the opposite side of the sensor, terminals are installed that are necessary for connecting the contact wires.
Symptoms of a problem
If the engine boils, and the characteristic hum of the cooling system fan is not heard, then with a high degree of probability one can suspect the presence of a malfunction of the internal combustion engine. The opposite situation, when forced cooling operates as long as the ignition is on, will also indicate a problem with the automation. On a VAZ 2110 injector, a constantly switched on fan sensor may indicate problems with the controller. The control unit could “remember” an error that appeared earlier and, as a result, the electric motor is activated every time it is started.
Periodic turning on and off of the fan when the engine is not yet warmed up is also a sure sign of an imminent failure of the combustion engine.
Description of the fan switch sensor
Where is the injector or carburetor in the VAZ 2107, what is its purpose? To begin with, we recommend that you familiarize yourself with the purpose and possible malfunctions.
Location and purpose
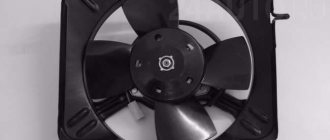
This controller is an integral element of the cooling system of the power unit and actually performs a function similar to a thermostat. When the engine temperature increases to a certain value, the controller activates the ventilation device, which helps cool the engine radiator. A ventilation device is used to remove heat from the radiator by forcing an air flow onto it. The main purpose of the fan sensor is to prevent overheating of the power unit.
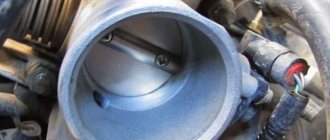
As for the installation location, you should look for this device in the engine compartment of the VAZ 2107. Opening the hood, you can immediately see the radiator assembly, where the sensor is installed. Depending on the shape of the radiator device, the controller can be located at the bottom left or right.
Operating principle
The operating principle is as follows:
- On the bottom of the controller there is a special plate that changes, that is, bends if the temperature of the power unit increases.
- During bending, the plate exerts a certain pressure on the piston. The latter begins to move forward, while moving it closes the contacts on the device. We are talking about both moving and fixed contacts.
- If the coolant remains cold and does not heat up, the plate, accordingly, will not bend.
Forced fan activation
In accordance with the technical characteristics of the Semerka cooling system, the fan should not run constantly. But in some cases, the principle of its forced inclusion is still implemented. This occurs as a result of a controller failure - the temperature sensor located in the engine compartment has displayed data on the instrument panel about an overheated power unit, but the fan does not turn on. This may indicate a breakdown of the fan sensor or poor contact with the vehicle's on-board network.
Where is
Drivers who have never encountered a malfunction in forced engine cooling before may not know where the internal combustion engine is located. On a carburetor VAZ 2110, this element of the cooling system is located on the radiator. If the driver finds this part, then he can easily find the fan switch sensor, which is located on the side. A characteristic feature of the product is the electrical wires connected to it. On the injection VAZ 2110, this part can be found on the cylinder block.
The sensor located in this way allows you to respond promptly to changes in coolant temperature. In addition, access to this part is not difficult and you can immediately begin repair or diagnostic measures if there are doubts about its performance.
Modernization
If you want to improve the operation of your radiator fan on the VAZ 2109, we offer the appropriate instructions.
To upgrade, you will need to install a second sensor and modify the system somewhat.
- The standard power sensor will be responsible for the operation of the fan at maximum speed.
- An additional sensor will include a reduced speed. It is installed at the top of the cooling system.
Now let’s talk more specifically about how to organize all this.
- Take a temperature sensor whose response temperature is similar to the standard regulator.
- Install it in the upper pipe fitting to the radiator.
- To mount the element, you will need a pair of washers and a nut. Be sure to lubricate the washer with sealant to prevent leakage from the installation hole.
- Buy a resistor to install on the stove fan. It has several outputs, so if desired, you can make several operating speeds.
- It is necessary to make an additional control circuit. Through it, less voltage will be supplied to the motor winding.
- The temperature sensor located in the upper part of the cooling system is responsible for turning it on.
- It is better to do control not by plus, but by weight.
- The system will work through a button in the cabin. To the left of the dashboard there is a grille with two plugs. Cut out one of them and set it to turn off on two modes. You can take the heater switch from a VAZ 2107.
- In the first position the low frequency will be switched on, and in the second – the maximum speed.
- One common wire is fed to the minus.
Such modernization is not provided for by the design of the VAZ 2109. These are modifications made by car enthusiasts. Therefore, installing a second sensor is entirely your personal responsibility.
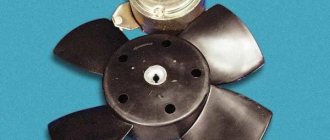
The fan is an important component of the cooling system of VAZ 2109 injection and carburetor engines. If you wish and have time, you can easily replace or repair it yourself.
How to replace
The fastest and easiest way to find out the reason for the fan not turning on or running continuously is to replace the DVV with a known good product. To avoid further confusion, it is not recommended to use used products, as well as sensors purchased from unverified retail outlets.
To carry out work on replacing the internal combustion engine, it is necessary to prepare a new part, a set of wrenches, rags and a container for collecting coolant. The process of removing the old part and installing a new sensor is as follows:
- Place the car on a level surface.
- Disconnect the negative terminal of the battery.
- Unscrew the cap of the expansion tank.
- Disconnect the wires from the DVV.
- Place a wide container under the engine to collect coolant.
- Using a 30mm wrench, unscrew the faulty part.
- Install a new DVV.
- Connect wires to the sensor.
- Pour coolant into the expansion tank.
- Close the lid.
- Connect the battery.
After starting the engine, it must be allowed to run for 15–20 minutes. During this time, the coolant temperature will reach a level at which the thermal relay contacts close and the fan will begin to rotate.
Safety valve
Knowing physics, you will agree that at normal atmospheric pressure, the water that is part of antifreeze boils at a temperature of 100 degrees Celsius.
To fix this problem, replace the expansion tank cap. The new element must maintain the pressure inside the system above atmospheric pressure, which will allow the laws of physics to work, the boiling temperature to rise to 105 degrees Celsius and thereby turn on the blades of the unit.
Diagnostics of VDV
If, as a result of replacing the sensor, the functionality of the cooling system is not restored, then the new part may be defective.
To make sure that the DVV is working, you need to perform the following simple steps:
- Remove the sensor from the car.
- Place it in a metal container with water.
- Place the tank on the gas stove.
- Boil.
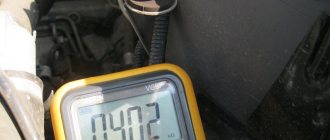
- Remove the DVV from the container and measure the resistance between the contacts.
You can use an inexpensive multimeter or tester to perform the diagnostic operation. If, as a result of measurements, the presence of insignificant electrical resistance is established, then the sensor is in working order and can be used for its intended purpose. How to check this part is now clear, so if you don’t find an inexpensive used part, you can also install it after a diagnostic operation.
Checking the functionality of the sensor
Checking the functionality of the device should begin with monitoring the response temperature. To do this you will need a thermometer and a multimeter. All actions can be performed independently, without resorting to a visit to the service center. If the multimeter is equipped with a thermocouple, then there is no need for a thermometer. To check the sensor, follow the instructions below:
If there is a critical deviation of the response limit, the sensor must be replaced. After purchasing a new device, you must check its suitability. Defective products are very common on sale, so checking whether the sensor turns on correctly is the responsibility of every car owner.
Tips and tricks
During the diagnostic operations and replacement procedure, some difficulties may arise that you should be aware of in advance, for example:
- The sensor may be fully operational and the wiring intact, but the fuse installed in this electrical circuit may fail. It is also recommended to replace this part with a new one in order to exclude it from the list of possible “culprits” for the fact that the VAZ 2110 fan does not turn on.
- You can diagnose the fan switch sensor without a multimeter or tester. It is enough to assemble an elementary circuit with a current source, a light bulb and a series-connected DVR, which will serve as a thermal switch.
The process of replacing the DVV VAZ 2110 is simple, so even if you have no experience in performing such work, you can perfectly perform this operation the first time without outside help.
Method two - electric
If you have a new car, an injector and an electric fan are installed, is it worth spoiling it with a forced impeller? It would be somewhat more reasonable to leave the electric fan, but make a backup way to turn it on using a button. Purchase several items and materials from the store:
- New sensor (if the old one has become unusable).
- Electromagnetic relay with normally open contacts.
- Red wire with a cross section of 0.75 square meters. mm.
- A button for installation in the dashboard of a VAZ 2107 (preferably backlit).
- Heat shrink insulation.
- Female connectors and relay socket.
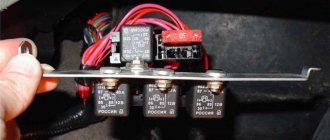
The connection diagram is shown in the photo. First of all, turn off the fan and change the sensor for turning it on. Then you assemble the circuit.
Please note that newer vehicles use sensors that can handle very high currents. But despite this, they still burn out. Sudden loads still quickly damage it. What to do? There is only one way out - to reduce the current at the sensor terminals. To do this, introduce an electromagnetic relay into the circuit. Now the chance of sensor failure is reduced. But the chance of relay failure becomes higher. True, it will be easier to change it.
Install a button to force the fan on in the dashboard and stretch two wires from it - one can be connected directly to ground, and the second to the sensor output. It turns out that your button and sensor contacts are connected in parallel. Therefore, if the sensor fails, you can turn on the electromagnetic relay with a button.