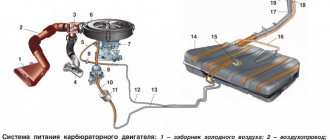
Wiring diagram for VAZ 2110 carburetor
In the instrument panel wiring harness, the second ends of the wires of white, black, orange, white with a red stripe and yellow with a blue stripe are connected to each other at the same points. The bends of the wires at the points of entry into the harness indicate the direction of their laying in the bundle.
See the complete diagram in one file below (click to enlarge):
1 – headlight 37 – instrument cluster 2 – front brake pad wear sensor 38 – rear fog light switch 3 – fan motor switch 39 – fog light indicator lamp 4 – engine cooling system fan electric motor 40 – rear window heating indicator lamp 5 – sound signal 41 – clock 6 – generator 42 – rear window heating switch 7 – oil level sensor 43 – steering column switch 8 – carburetor solenoid valve control unit 44 – block for switching wires when installing headlights of another type 9 – heater controller 45 – switch instrument lighting 10 – recirculation valve switch 46 – ignition switch 11 – illumination lamp for heater control levers 47 – connectors for connecting the headlight cleaner wiring harness 12 – switch 48 – socket for a portable lamp 13 – carburetor limit switch 49 – directional light 14 – control sensor oil pressure lamps 50 – brake light switch 15 – spark plugs 51 – interior lamp 16 – carburetor solenoid valve 52 – on-board control system unit 17 – coolant temperature indicator sensor 53 – fuel level indicator sensor 18 – ignition distributor 54 – hazard warning switch 19 – ignition coil 55 – driver’s seat belt sensor 20 – starter 56 – cigarette lighter 21 – heater fan motor 57 – ashtray backlight lamp 22 – additional resistor for heater motor 58 – glove compartment light switch 23 – speed sensor 59 – connector for on-board computer 24 – reverse light switch 60 – glove box lighting lamp 25 – micromotor gearbox for heater flap drive 61 – side turn signal 26 – recirculation valve 62 – switch in the front door pillar 27 – brake fluid level sensor 63 – switch in the rear door pillar 28 – pads for connecting the rear window washer motor 64 – parking brake warning lamp switch 29 – battery 65 – trunk light 30 – windshield washer motor 66 – interior air temperature sensor 31 – washer fluid level sensor 67 – external rear light 32 – level sensor coolant 68 – internal rear light 33 – windshield wiper motor 69 – license plate light 34 – mounting block 70 – block for connecting the rear window heating element 35 – blocks for connecting the warning light harness 71 – block for connecting an additional brake signal 36 – outdoor light switch
Lada 2110 OneTen › Logbook › Block for connecting the trip computer (BC).
Block for connecting the trip computer (BC, in my case the device is Multitronics SE-50).
VAZ cars of the tenth family have a standard connector for connecting the on-board computer to the car. That is, to install the BC, everything is already provided by the factory, this is the first thing that is needed. The second is connecting the control line from the electronic control unit to the trip computer. Connection is carried out according to the following instructions:
Connecting the K-line and assigning contacts to the BC block
Types of diagnostic pads
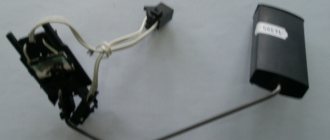
Some of the wires of the trip computer connector had to be restored because they were torn out; it was not originally installed in the car.
Ready connector BC
The automatic switching on of the interior lights was implemented through the on-board display unit, but it is now missing. Therefore, to preserve this function, it is necessary to connect the following contacts according to the diagram:
Why the scanner does not connect to the VAZ 2110 ECU and how to fix it
Often, car owners are faced with the problem of the inability to connect a device with a control module, why does this happen:
- You purchased a low-quality adapter. In this case, we are not talking about the firmware, but rather about the inoperability of the hardware, which is typical for defective devices. If the board fails or is initially inoperative, then it will be impossible to check the operation of the motor. Accordingly, how to connect to the control unit.
- Damaged or defective cable that prevents device communication. It is necessary to diagnose the wire to identify damage.
- Another reason why there may be no connection is due to bad firmware. If the software version is too old, it will be impossible to synchronize the device with the car.
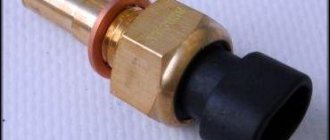
How to reflash the on-board computer?
- A flashing program (for example, BootLoader.exe) is installed on the PC or laptop.
- Next, you should connect the bookmaker to your personal computer.
- The next step is to connect the power.
- In the flashing utility, you need to set the value of the port to which the COM1 data cable is connected.
- If the previous step is completed correctly, the “upload file” button will appear, and after its activation, a window will open in which you need to select a firmware file in the “hex” format.
- Next, all that remains is to press the “Start ISP” button, and use the on/off key to restart the on-board computer. A loading indicator will be available on the PC display.
- After the download of the updated software is completed, the message “download complete” will be displayed on the screen, and the system will also prompt you to start the controller. After confirming the operation, it is necessary to check the functioning of the new BC firmware.
Diagram and pinout of the on-board control system BSK VAZ-2110, 2111 and 2112
Pinout of on-board control system VAZ 2110, 2111, 2112
1 — the indicator of insufficient oil level in the engine crankcase lights up in orange when the oil level in the engine crankcase drops below the “MIN” mark of the indicator. 2 - the left front door ajar indicator lights up red when the left front door is not closed. 3 — the right front door ajar indicator lights up red when the right front door is not closed. 4 - the brake light and side light bulb malfunction indicator lights up orange if one of the brake light bulbs or side lights is faulty. 5 — the front brake pad wear indicator lights up orange if the thickness of the linings has decreased to 1.5 mm. 6 - the seat belt warning light lights up red when the driver is not fastening the seat belts. 7 — the right rear door ajar indicator lights up red when the right rear door is not closed. 8 - the left rear door ajar indicator lights up red when the left rear door is not closed. 9 - the indicator of insufficient coolant level in the expansion tank lights up orange when the coolant level in the expansion tank on a cold engine drops below the permissible limit. 10 - the indicator of insufficient washer fluid level in the tank lights up in orange if there is less than 1 liter left in the tank. washer fluid.
Date added: 07/14/2014
Nuances of setting up a bookmaker
After connecting the bookmaker, it needs to be configured. To set up a bookmaker, you need to perform the following series of actions:
- Turn on the vehicle ignition and start the engine.
- Activate settings mode.
- Select the type of electronic unit.
- Select fuel consumption mode.
- Select the indicators that will be displayed on the device screen and adjust the backlight brightness.
- The final, important stage of setup will be determining the conditions for turning on the fan to cool the motor. To set the condition for turning on the “cooler”, you need to specify the engine temperature at which the motor requires cooling.
How does an electronic sensor work?
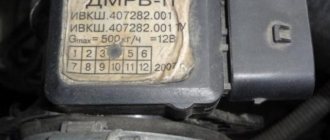
Until 2006, cars were equipped with a speed sensor that worked in conjunction with the drive. The drive gear was rotated by the drive gear of the main pair. Therefore, such a sensor could be installed on cars with a mechanical speedometer; this required installing a new speed indicator, which worked not from a rotating cable, but from sensor impulses. The operation of the sensor is based on the Hall effect - the electromotive force (EMF) in the inductor changes when metal passes through it. Since 2006, they began to install a new model of sensor, which did not require a drive, because it works with a reference point (metal pin) installed on the drive gear of the gearbox.
Error Diagnosis Methods
In 2022, errors on the VAZ 2110 on-board computer can be identified in two ways.
- Self-diagnosis. The method is feasible thanks to a special option in the on-board computer. The principle is that the system shows faults in the main circuits and mechanisms. The advantage is that there is no need for additional equipment or special programs - everything that is needed is already “hardwired” into the on-board computer. The disadvantages include the low accuracy of the readings.
- With the help of auxiliary equipment. This type of procedure is characterized by high accuracy of the read data. Thanks to a third-party analyzer, you can find out exactly where the breakdown occurred, which simplifies the repair process. An obvious disadvantage is the need to connect a computer with a special program. Such equipment is present only in specialized service stations.
Self-diagnosis VAZ 2110: error codes
To enable self-diagnosis mode, the driver or technician will need to perform a certain sequence of actions.
- Turn off the engine ignition.
- Press the daily mileage reset button and, without releasing it, turn on the ignition. In this case, all digital cells should light up on the display.
- Click on any module control button twice.
- The device will display the error number.
If everything is done correctly, one of the following symbols will light up on the device:
- 2 – critical excess of the rated voltage of the on-board network, a short circuit of the main line or loaded components is possible;
- 3 – a similar error on the instrument panel of the VAZ 2110 indicates that the gasoline level sensor is damaged or there are problems in the sensor’s power supply; to check, you can replace the part with a new one and ring the circuit;
- 4 - error 4 VAZ 2110 indicates that the antifreeze temperature sensor is broken or its wiring is broken, the problem is resolved in the same way;
- 5 – the thermometer designed to measure the temperature outside is faulty;
- 6 – the engine is very overheated, you need to stop and wait for it to cool down, and there should be a sound signal (add antifreeze/water into the radiator);
- 7 – the lubricant pressure in the crankcase compartment of the engine is below the established norm, the losses must be urgently replenished;
- 8 – error 8 VAZ 2110, interpretation shows that the brake system is damaged, possibly a drop in the fluid level in the expansion tank or severe wear of the pads;
- 9 – the battery is completely discharged, the element needs to be charged or replaced with a new module;
- E – software failure of the on-board computer firmware; complete diagnostics with a scanner and qualified repairs in a workshop will help here.
Also, error 14 VAZ 2110 or another two-digit number will indicate the presence of two problems. Usually, with such a picture, the ciphers are summed up. For example, error 10 VAZ 2110 may indicate problems in circuits No. 4 and 6.
How to reset errors on a VAZ 2110
Typically, the procedure is carried out after repairing the unit for which the fault code is responsible. In this case, the symbol does not disappear - it must be forcibly reset. This is done quite simply. The user is required to enter the service mode (hold down the daily mileage button), then double-click on any control. After completing the manipulations, a code will appear on the display. To eliminate this, the daily mileage button is pressed for 3-4 seconds and the system is reset. The machine exits the dialog box automatically after 30 seconds of inactivity.
Characteristics
Important! Depending on the type of on-board computer, certain characteristics of the device play an important role. For example, screen resolution and diagonal are important for multimedia files, or for viewing maps when planning a route. Well, the presence of a huge number of options for controlling the car’s electronic systems is suitable for narrowly targeted on-board computers.
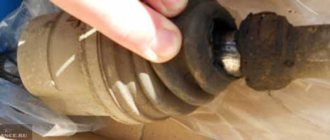
Soulemil › Blog › Crankshaft position sensor VAZ 2110 - how to find a fault and replace it?
A modern car consists of many parts, each of which performs its own important function. Information about the condition of the engine and other components is transmitted by various sensors, but the VAZ 2110 crankshaft sensor performs work that is unusual for these devices. Purpose of the VAZ 2110 crankshaft position sensor Crankshaft position sensor
If the engine of a 9th or 10th series car refuses to start, any driver immediately begins to check the power and ignition system, and when it comes to contacting a car service center, they say that the DPKV has failed (this is what the abbreviation for the full name of the sensor looks like ). The bewilderment of car owners is dispelled when they find out that this is the only sensor without which the engine will not work.
The crankshaft sensor of the VAZ 2110, as well as on many other cars, does not perform a monitoring function, but synchronizes the phases of fuel injection and supplying an impulse to ignite the combustible mixture in the combustion chamber
Obviously, removing such an important attribute from the design makes it impossible for all systems to work harmoniously
In its operation, the sensor uses the principle of electromagnetic induction, and reads the necessary “information” from the generator drive toothed pulley, in the immediate vicinity of which it is installed. Disconnect the sensor Unscrew the mount Remove the sensor VAZ 2110 crankshaft sensor - faults and their diagnosis Crankshaft position sensor bracket
Considering that the role of the DPKV in the operation of the engine is very significant, in the event of its malfunction, a variety of “surprises” can be expected. A completely failed sensor will definitely prevent the engine from starting. Other manifestations of sensor problems include:
unstable operation of the engine at idle; decrease in power; increase and decrease in the number of crankshaft revolutions (spontaneously); detonation when the load increases; intermittent starting.
For a device such as the VAZ 2110 crankshaft sensor, faults come down to two types:
damage to the windings and parts of the sensor itself; violation of the integrity of the wire and the quality of connections in the circuit.
The PCV sensor itself is very simple in design and rarely fails. A crankshaft position sensor error or breakdown can be caused by reasons such as: manufacturing defects, mechanical damage, significant contamination. The first two reasons do not depend on the driver, and the car owner can monitor the cleanliness under the hood.
In addition to the fact that the engine compartment is always under the influence of many destructive factors, such as temperature changes, small stones and dust flying from the roadway, significantly adding to the problems of oil leakage. If it is discovered that there is a leak of engine oil in any place, especially in the area where the sensor is installed - on the oil pump body, it must be repaired immediately. The contacts of the sensor wire connections must always be clean and protected. The wire insulation should not be damaged or have exposed wires. How to check if the VAZ 2110 crankshaft sensor is working?
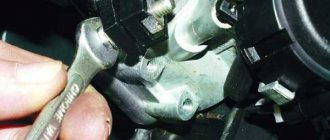
Considering that a crankshaft position sensor error or complete failure has very similar symptoms to many other breakdowns, you should understand how to check its condition. You can only verify that the DPKV is working if you remove it. This is not at all difficult to do, you just need to follow these steps:
turn off the ignition; remove the terminal connector with the wire from the sensor; unscrew the only screw holding the sensor to the oil pump cover; remove the sensor.
To check, you need to have an ohmmeter and check the resistance of the windings. If the instrument readings differ from the required 550-570 Ohms, it means the crankshaft sensor is faulty. You should not try to repair it, as this device cannot be repaired. The only way out of the situation is to replace the crankshaft sensor of the VAZ 2110. The cost of the DPKV is low, installation does not require much time and skills, especially since the car without it still remains motionless. If the device shows that the resistance of the sensor windings is normal, then the breakdown should be looked for elsewhere. How to replace the crankshaft sensor?
Installation, as well as removal of the PCV sensor, is done quickly and without difficulty. Before proceeding with installation, the installation site should be cleared of dust and dirt. Next, simple steps are performed: the new sensor is inserted into its regular place; the fastening screw is tightened; The connector with the wire is put on. At this point, the replacement of the VAZ 2110 crankshaft sensor is completed and you can start starting the engine.
Self-installation of BC
After purchasing a suitable device, you need to connect the purchased equipment. For the bookmaker to function, you will need:
- DC voltage source +12V (usually a car battery performs this function).
- The power supply supplied to the BC at the moment the key is turned in the ignition switch. Thanks to this, the BC will turn on simultaneously with the start of the vehicle engine.
- Voltage when the side lights are turned on. Thanks to it, the BC will automatically adjust the screen brightness and reduce it when the dimensions are turned on. This will also reduce battery consumption.
- Weight.
- Signal from the fuel level sensor. Many modern bookmakers cannot do without it. This is due to the fact that the computer needs sensor data to automatically calculate the level of fuel consumption.
- Diagnostic lines (K-line). The channel is responsible for providing information about all car systems.
On some older models, a diagnostic block with signals is not installed. In order to obtain a voltage of +12 Volts, you will need to supply power to the BC from the ignition switch, and connect the side lights to the cigarette lighter. The mass can be taken from the body or from the cigarette lighter.
IMPORTANT! Before carrying out work on connecting the battery, you need to turn off the power to the battery.
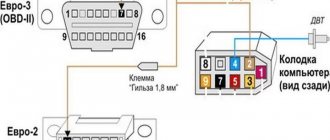
To connect the BC to the fuel sensor, you need to carefully study the electrical circuit of the vehicle. Thanks to this, you can find the right cable to connect. Afterwards, all that remains is to decide on the connection location and connect the wire from the BC there. K-line is usually located on the diagnostic block. “Euro 2” connectors are equipped with them in socket “M”, and in “Euro 3”, in socket “7”.
As a rule, a temperature sensor is included in the standard configuration of the BC. It must be installed outside the vehicle. The most common location for attaching the device is the left side of the bumper. This way, the device will not be exposed to any unnecessary heat. Well, the wire from the sensor is routed into the holes between the engine compartment of the vehicle and the passenger compartment.
As for the installation time of an on-board computer on a car, it takes no more than 1–2 hours, but at the same time, it allows you to significantly save money (for example, the average cost of installing an on-board computer is 50 US dollars).
Instrument needles are jumping
It often happens that they simply start jumping on a scale from minimum to maximum. Typically, the cause of such a malfunction is a poor connection between the contact and ground. Its wire coming from the shield is fixed on the partition separating the engine compartment from the passenger compartment.
You can find it by removing the radio from its socket. But if an alarm was installed on your car, most likely, the fastening of this wire was moved to a more convenient place for greater convenience. Usually, experts move it behind the interior trim, not far from the driver’s left foot.
Car owners can expect the same thing after installing a radio. At the moment of fixing its negative cable, perhaps the ground wire of the shield was poorly wrapped. As a result of this oversight, under the influence of vibrations transmitted to the car body, the cable could become loose.
This happens very often, and for a long time car owners cannot understand why the dashboard on the VAZ-2010 does not work. It is worth saying that even specialists often wrap the mass wire poorly due to the fact that doing so is not entirely convenient.
If the fastening of this cable turns out to be of good quality, it is worth checking the shield itself. To do this, it must be removed from the place of fixation so that you do not have to disconnect the wires going to the pads.
You need to check the mass cable on the white block X1, going to the first contact. In addition, it is worth checking the voltage on pins 9, 6 and 10 - it should be at least 12 volts
In addition, be sure to pay attention to the condition of the tracks at the back of the panel, along which impulses are transmitted to consumers
Selection of diagnostic equipment
Demand creates supply. Online stores are full of advertisements for diagnostic devices that check all kinds of car brands of different years of production. Adapters that satisfy a wide range of untrained users are considered. The buyer makes the choice. Some car enthusiasts want to perform periodic monitoring, maintain the operating condition of the vehicle, and use a laptop or tablet. Others like to be an airline pilot, constantly monitoring changes in dozens of parameters on a smartphone by connecting a test device permanently. The diagnostic devices produced will satisfy various wishes.
VAZ car owners should pay attention to devices designed to test VAG Group vehicles (48 automobile manufacturing enterprises producing branded cars in 21 countries around the world). In an effort to enter the world market, VAZ developers focused on electronic units with the logic for constructing tires from the VAG concern. The scanner must support the required protocol. Vehicles manufactured before 2007 are checked using the K-Line bus. New cars operate via a CAN bus; the K-Line bus is not provided on the connector.
Other diagnostic methods
If you don’t have a scanner or laptop at hand, you can conduct a mini-diagnosis. To do this, you need to hold down the odometer button (located on the dashboard). At the same time, the ignition is turned on. After which the button is released. At the same time, the instrument needles begin to jump. Next, press the odometer once. The display will show the firmware number. You should press and release the button again.
This way you can see the two-digit error code. However, it should be noted that not all faults can be diagnosed in this way. Therefore, this does not replace a full diagnosis.
Conclusion
. Engine management problems are not uncommon. Therefore, the skill of independently diagnosing problems will not be superfluous. To do this, you need to know the error codes for VAZ 2114 and 2115. You will also need a scanner or laptop with the program installed. There are usually no difficulties with using this equipment.
The topic of this article will be diagnostics of the tidy on the VAZ 2110, 2111, 2112.
In order to start the self-diagnosis mode of instrument clusters, you must turn on the ignition while holding down the button that resets the daily mileage.
How to understand that the mode has started? Everything is very simple, the oil pressure lights, the battery icon, the fuel warning light and the Chek light will start to light up. In this case, all arrows begin to move from the initial position to the maximum, and this process is repeated. This way you can check the operation of all light bulbs, instruments, and arrows.
When we press the button to reset the daily mileage, an error code will appear.
To reset this error, you need to press and hold the button that resets the daily mileage. Until the error resets to 0.
To check that the errors have been reset, we repeat the procedure: enter the mode - diagnostics of the VAZ 2110 device (while turning on the ignition, press and hold the button that resets the mileage); Press the mileage reset button three times and look at the on-board screen. It should show 0.
We decided on this. But now we need to find out what kind of error we identified during the self-diagnosis of the instrument clusters. A table is presented to you for this purpose.
If the number is different, for example, like ours, this means that there are several errors and the computer shows their sum: 6 (2+4), 10 (2+8), 12 (4+8), 14 (2+4+ 8).
You can watch the whole process in the video below:
We sorted out the errors during self-diagnosis of the instrument clusters of the VAZ 2110, but here you can see (when the engine light comes on) for yourself.
The desire to improve the cars they produce led the engineers and developers of the Auto VAZ concern to the idea of the need to introduce such an innovation as an on-board computer. Its purpose is to identify vehicle malfunctions and report them in coded form.
But in order for the car owner to independently figure out what the problem is, he will need to know how the codes are deciphered. It makes sense to consider the issue in more detail, using one of the VAZ models.
on-board computer VAZ 2115 with your own hands (step by step)
To detect the reasons why the on-board computer issues error codes, diagnostics will be required.
This can be done in different ways:
- contact the specialists of a specialized service station
- try to diagnose it yourself
If it is necessary to independently carry out diagnostics, owners of VAZ2115 cars will be able to follow the recommendations containing a list and procedure for all actions:
- find the odometer button on the instrument panel and hold it down, then you will need to turn the ignition key to position “1”
- The odometer button can now be released
- this action will cause the arrows on the dashboard to move after pressing the odometer button again, a code will appear on the speedometer, which indicates the version of the standard firmware of the on-board computer
- By pressing the odometer button a third time and returning it to its original position, we get a fault code.
What do error codes look like when diagnosing yourself?
This will be a two-digit combination of numbers; when performing diagnostics using professional equipment that service stations are equipped with, the combination will consist of four numbers.
Features of the models
As mentioned earlier, on-board computer models vary depending on their application. So, narrowly focused ones are divided into:
- Trip computers
On-board computers of this type allow you to plot the route of the vehicle. Features of the device include the ability to automatically determine coordinates and full navigator functionality. Additional indicators include information about travel speed, fuel consumption and weather “overboard”.
- Control computers
Designed to control electronic systems. They allow you to manually regulate the operation, starting from the fuel dampers of the power unit and ending with the climate control system.
- Diagnostic computers
The device is also called a service computer. It is intended for troubleshooting the vehicle. It is important to note that an on-board diagnostic computer is quite rare. The functions of this device can be equipped with universal on-board computers. As for the functions of the service BC, these include: Monitoring the status of the vehicle's electrical supply devices. Allows you to identify problems such as short circuits, overvoltage, malfunction of car sensors and lighting devices, and electrical leaks. Monitoring wear of brake pads and discs. Oil and coolant level monitoring. Diagnostics of the performance of all vehicle systems. The ability to save received data has been implemented.
Important! In addition to the above, the device is capable of storing information about the occurrence of certain problems. Afterwards, based on the information, a special report is generated, which provides information about the performance of the vehicle systems, and the report also provides recommendations on systems that require repair.
Diagnostics of DS on VAZ 2110
Location of the regulator in the engine compartment
How to check the speed sensor on a VAZ 2110 on your own? First of all, for this you need to know where the DS should be located, after which its drive is diagnosed. In accordance with the connection diagram, on the tenth VAZ models the regulator is located in the engine compartment, not far from the exhaust manifold. As practice shows, connection wires can rub against a heated collector, causing them to melt.
As a result, a short circuit occurs. As a rule, this problem can be solved by insulating the wires and fixing them so that they do not come into contact with the collector. Another diagnostic option would be to check for a broken cable. This reason is one of the most likely. If the cable is in order and no damage was detected during the process, then the problem lies in the controller itself or its drive.
On-board computers are divided into two types
1. Universal - they are suitable for any model. They are most often installed on the roof next to the rearview mirror or on the windshield.
2. Made specifically for certain car models.
In truth, a BC cannot be called an essential item - many owners get by just fine without it.
On the other hand, just imagine what opportunities it gives you.
For example, you need parking sensors, you want to install a DVD, a navigator or something else. For all this you need a separate place. And all of this needs to be managed separately.
If you have an on-board computer on a VAZ 2112, then you will control all devices through it, and they will be connected to it. That is, you save your time and space in the car. Then you may have a question...
Main types of computer diagnostics
The adapter, which is connected to the on-board computer system and your laptop (or tablet), allows you to carry out the following types of diagnostic work:
- assessment of the technical condition of the engine. It will allow you to find out why the power unit suddenly loses its original power, and will also help you understand why fuel consumption increases and problems arise with starting the engine;
- suspension diagnostics, which is simply necessary if problems arise with the maneuverability of the car, tires wear unevenly, or extraneous sounds appear while driving;
- checking the condition of the automatic transmission. You will not need this function, since the VAZ-2110 is equipped with “mechanics”. However, it is of great importance for diagnosing other machines.
Troubleshooting BC
Malfunctions occur with BCs of various modifications. It would be useful for the owner to know what to do in such cases. Many failures occur when the on-board computer was not installed properly. First, you need to check the reliability of the connections. Secondly, there is a high probability of accidental damage or pinching of the K-line. Multitronics itself will report this, displaying obviously incorrect data.
It is inexpensive, and the entire replacement procedure will take no more than 60 minutes. More time will be required if the problems of the on-board computer 2110 are caused by broken contacts. It is necessary to disconnect the device after performing a visual inspection. If bent plugs are still present, you should select new ones from the store and resolder them.
Using the BC on a VAZ passenger car allows the owner to always be aware of the technical condition of the car. The device is selected based on needs. Its effectiveness depends on correct installation.
Many owners of domestically produced cars, including the VAZ-2110, are trying in every possible way to improve their cars. And if cutting off an extra coil from the rear springs or screwing a “bench” onto the trunk lid is nothing more than “collective farm tuning,” then installing an on-board computer is a completely justified step. An on-board computer is a useful tool with which you can track engine operating parameters, current and average fuel consumption, speed and other equally important information.
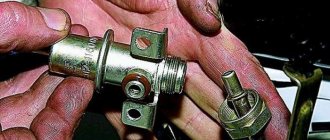
Checking the DPKV for serviceability
Also, the motorist should not forget to measure the clearance between the synchro disk and the sensor before dismantling, which cannot go beyond the size of 0.6-1.5 mm. If there are no mechanical damage such as scratches, dents, or damage to the material structure, the sensor is checked using other measuring instruments:
checking with an ohmmeter. In this case, it is necessary to measure the resistance of the sensor winding
Since the standard value of this indicator, set by the manufacturer, ranges from 550 to 750 Ohms, going beyond the specified limits indicates the malfunction of this device, which is important for the correct operation of the car - which means it is faulty. It is worth noting here that the manufacturer still allows a slight discrepancy in resistance with the nameplate values, but in any case they must correspond to the data specified in the machine’s operating instructions; checking with a voltmeter, inductance meter and transformer
This method is more complicated, but more effective - the resistance is measured with the same ohmmeter, after which the inductance is checked (should be from 200 to 4000 millihenry), with a sensor winding voltage of 500 Volts. Next, you need to measure the resistance with a megger and make sure that it does not exceed 20 MOhm.
If the sensor still does not pass these tests, it must be replaced. During this procedure, it is necessary not to forget about the distance between it and the synchronization disk regulated by the manufacturer, as well as alignment with the marks on the crankcase that were made on the previous device. Before installing a new sensor, be sure to check it, since even if all installation procedures are followed correctly, it may not work properly.
A new DPKV is checked according to the same procedure as a supposedly faulty one, and based on the test results, the device can be installed instead of the previous one or rejected. When installing, the bolts are tightened with a torque of 8 to 12 Nm. However, in any case, before carrying out all the actions to replace a rather expensive and hard-to-reach component, you should definitely make sure that it is the one that has failed, because cars produced by our automotive industry can often bring unpleasant surprises.
First way to check
In this case, you will need an ohmmeter with which you will replace the resistance on the winding. According to the manufacturer's standards, the indicator ranges from 550 to 750 Ohms.
It's okay if your numbers are slightly different from the norm. If the deviations are serious, you will definitely have to replace the sensor.
It should be noted in fairness that the crankshaft position sensor on VAZ 2110 models rarely breaks down. Among the main reasons for its failure to function normally is the accumulation of dirt, mechanical damage, as well as banal factory defects.
Features of testing on other cars
As for other cars, for example, VAZ-2109 with an injection engine, VAZ-2112 and VAZ-2114, their check is carried out identically to the VAZ-2110 car.
It is noteworthy that for VAZs, when checking the resistance of the crankshaft sensor coil, an additional check can be carried out.
But to do this, the multimeter must be switched to voltmeter mode with a measurement limit of 200 mV.
Then connect the probes to the DPKV terminals and pass them with any metal object, for example, a screwdriver, at a short distance from the core.
If the sensor is working properly, it will react to metal, the multimeter will show voltage surges on the display. The absence of these bursts will indicate a faulty element.
As for a car like the Reno Logan, the difference from the VAZ in this car comes down to slightly different readings of the resistance of the sensor coil when measured with an ohmmeter.
A working Logan DPKV has a normal resistance of 200-270 Ohms.
For Daewoo Lanos, the coil resistance should be in the range of 500-600 Ohms.
But on the ZMZ-406 engine, installed on Volga and Gazelle cars, the normal coil resistance is in the range of 850-900 Ohms.
Second method
Here you will need a voltmeter, a transformer and an inductance meter. It is advisable to measure resistance under compact temperature conditions.
Once the ohmmeter readings are obtained, arm yourself with an inductance measuring device. Normally, the device should show from 200 to 4000 units (millihenry).
A megger measures the resistance when the crankshaft position sensor winding is powered at 500 volts. Under normal conditions, the readings will be no more than 20 MΩ.
Types, prices
On-board devices can be divided into two large groups:
- Universal. These models can be installed on any car model. Most often they are mounted as an alternative to an interior mirror. Sometimes universal type BCs are mounted on the windshield;
- Individual. Such on-board computers are focused either on one car model or on a group of similar ones. For example, VAZ 2108, 2109, 2110 - the group is determined by the old instrument panel. These are more functional and efficient devices that use an electronic control unit and are mounted in the dashboard.
You can also distinguish injection and carburetor types. The first option has gained great popularity among motorists, so there are significantly more models on the market. As for the VAZ 2110, this car requires computers for the old type of torpedo. The most popular device manufacturers are State and Gamma. Depending on the price, the State offers a different set of features. There is even a color version of BC State. Gamma devices have a higher price, but they have less choice, since the model range is limited to functional modern devices.
Their prices are as follows:
- The cheapest State computer will cost the owner of a VAZ 2110 1200-1300 rubles; for 2500 rubles you can already purchase a more serious version with a color display and a large set of functions. The latest model of the universal device, State, costs about 5 thousand rubles.
- As for Gamma, the cheapest on-board computer here costs 3,200 rubles. The most expensive is 7,000 thousand.
In addition to these companies, there are Prestige, Orion, Multitronics and others on the market. It’s hard to say who is better and who is worse, since the functions are almost the same everywhere.
When is diagnosis necessary?
Computer diagnostics involves reading error codes, erasing them and correcting them. For this, various diagnostic adapters and systems are used. These include multifunctional stands, OBD connectors, portable readers and other devices. Thanks to diagnostic equipment and software, the slightest malfunctions in the vehicle’s control system and its main components are detected.
Using diagnostic systems, you can change parameters to increase the power characteristics of the machine. If a new car model comes out, you can reprogram the functions for the new equipment.
Computer diagnostics are usually carried out in the following cases:
- indicators on the dashboard light up, signaling any malfunctions;
- the driver has suspicions of a malfunction of any components or systems;
- check the condition of a used car before purchasing;
- Experts recommend diagnostics at least once a year.
Diagnostic adapter k line
This device serves as a link between the on-board computer software and personal electronic devices (laptop, PC, tablet), on the monitor of which information from the computer is displayed. Its use reduces the likelihood of serious breakdowns and failures, thanks to timely diagnosis of just emerging disorders.
Some craftsmen make their own K-line adapters. They use diagrams from the Internet and an unnecessary telephone cord as the necessary connector.
Using the k line adapter, you can monitor important parameters while driving. Such as mileage, travel time, status of various sensors, speed, amount of fuel consumed, etc.
- Registering a driver on a PC. After purchasing the adapter, you need to install its driver on your computer. It is downloaded to the disk that comes with the adapter. It can be found on the internet. Before installing the driver, do not connect the adapter to the computer. Place the disc in the drive and its contents will appear on the screen. Go to the driver folder and run “Setup”. By clicking the “Next” button, go through all the steps of the installer, simultaneously agreeing to his requests and accepting his suggestions. Wait for the message about the end of the process, click the “Finish” button.
- How does k-line work ? In electronic terms, the operation of the k-line can be characterized as the transmission of pulse packets generated in electronic units. By closing the network to ground, the initial voltage value (12V) changes, the pulse of which is supplied to the k line. When the engine is turned off and the ignition is turned off, there is no voltage on the line (=0).
When a connected scanner sends pulses to the k line, where a specific recipient is encrypted, closing the circuit (changing the voltage), the k-line sends a message to all blocks. Everyone receives, but only the addressee responds, generating and sending voltage pulses to the k-line. From there, the scanner reads these signals, which contain encrypted information in the form of codes.
- When there is no response to the adapter request. If there is no response from the unit to the adapter request, first of all you need to check the presence of current in the ECU connector where the k-line adapter is connected.
The standard OBD2 connector has 16 pins, each of them is responsible for one or another connection. K-line provided with contact No. 7. The onboard voltage, the source of the channel's power, enters there. The lack of voltage at the contacts can be explained by several reasons:
— wire k line is shorted to ground
- k-line freezes due to the actions of some block
Finding the cause and the faulty unit is a troublesome task. You need to disconnect the blocks from the k line one by one, testing the wire until you come across a faulty block. In order not to delay diagnostics when the above malfunction is detected, there are ways to connect to the ECU directly. All other links in the chain are not tested.
- K-line adapter functionality . Of course, depending on the software, the functions of the adapter for different car models vary greatly. Yes, and they depend, in many respects, on the software of the car's ECU. However, all testers at this level have a basic package of functions. These include:
How to independently diagnose a VAZ-2110
The last question that remains to be addressed in our article is the sequence of diagnostics of the VAZ-2110. It looks like this:
- connect the adapter to the ODB diagnostic connector, which is located under the steering column;
- turn on the tablet or laptop, on the screen of which the diagnostic results will be displayed;
- turn on the car ignition. To check the engine and suspension, as well as to display the necessary information on the display, a mandatory power supply to the on-board network of the machine is required;
- launch the software and get the results of diagnostic procedures;
- We decipher error codes and determine malfunctions of certain components and mechanisms of the car.
As you can see, there is nothing complicated in self-diagnosis of the VAZ-2110. You can easily navigate all its intricacies without having the appropriate knowledge and skills, you will be able to identify existing problems without contacting car services, and you will be able to significantly reduce the financial costs of servicing your car.
Installing a new adapter
Modern adapters elm 327 with the OBD-II program (puncture) are suitable for the VAZ 2110 . You can also install them yourself. First you need to purchase an elm 327 and a cable for it. You already know the location of the diagnostic connector. Be sure to study the instructions, which indicate the pinout of the block and the location of each connector.
Connection diagram for ELM327 to 12 PIN diagnostic block
The pad can be removed quite easily. Insert your own cable into each connector of the block, making sure that the pinout of the elm 327 complies with the manufacturer’s instructions. Check that each connector is connected correctly and each cable is in the correct place. After this, the block is installed in its place.
Connecting the diagnostic connector to the block
Fault detection programs for elm 327 can be downloaded on the Internet, many of them in a free version. Now your VAZ is ready to detect errors in various car systems, and you can always download error codes from us.
Connecting the diagnostic connector to the block
Connecting the diagnostic connector to the block
Step-by-step instructions for diagnosing a VAZ-2110 with your own hands
To carry out computer diagnostics of a VAZ-2110 car, it is recommended to contact specialized car services that have all the necessary equipment at their disposal. However, this approach has several significant drawbacks. Firstly, the procedure for identifying faults in a service station can be quite expensive. Secondly, unscrupulous technicians have a bad habit of embellishing the results obtained and claiming faults that actually do not exist.
That is why in this article we will look at how to do computer diagnostics of a VAZ-2110 with your own hands, provide detailed step-by-step instructions and help you minimize costs.
Checking the VAZ 2110 generator with a multimeter
It is impossible to imagine a VAZ 2110 car without electrical appliances. Lighting, battery charging, on-board controllers, and electric motors consume electricity generated by the generator. Monitoring the condition of electrical equipment increases the service life of devices and wiring. The article contains practical advice on various ways to check a VAZ 2110 generator with a multimeter. VAZ cars are equipped with three-phase synchronous alternating current generator devices equipped with a diode rectifier and an electronic voltage relay regulator. Wedge...
What is an OBD connector and pinout of the OBD 2 diagnostic connector
The concept of OBD connector or OBD-2 connector refers to the use of technology that allows you to control various vehicle systems using an on-board computer (vehicle self-diagnosis).
In turn, the VAZ OBD connector makes it possible to connect diagnostic devices that, by monitoring the functioning of the vehicle system, determine the quality of the mixture based on the chemical composition of the exhaust (environmental exhaust gas standard according to the Euro 2.3 system, etc.) and other parameters.
Currently, VAZ 2110 cars use a 16-pin system (OBD 2 standard). The pinout of obd 2, equipped with 16 contacts, implies the combination of the vehicle’s on-board systems with the diagnostic block.
If we consider the 16-pin obd2 connector, the pinout and assignment of pins (1st to 8th and 9th to 16th) are as follows:
- 1st, 3rd, 8th, 9th, 11th, 12th and 13th are set by the manufacturer;
- 2nd - J1850 bus;
- 4th - vehicle weight;
- 5th - signal ground;
- 6th and 7th - high-level CAN bus, and, accordingly, the K-Line bus;
- 10th - J1850 bus;
- 14th and 15th CAN J2284 bus, and, accordingly, L-Line bus;
- 16th - plus with battery.
Reading system parameters is possible thanks to obd2 protocols. The number of parameters for different car brands is also different (about 20 parameters).