Carrying out computer diagnostics of car faults has long been available not only for foreign cars, but also for many domestic VAZ cars with an injector.
This opportunity appeared thanks to the equipping of VAZ cars with electronic control units (ECU). Equipping a car with various electronic sensors makes it possible to diagnose a breakdown using computer programs, by connecting through a special OBD VAZ connector (OBD VAZ).
Next, we will look at what an OBD connector is, where the specified diagnostic connector is located, and also what the pinout of the diagnostic connector is, using the example of a VAZ 2110.
Location of the diagnostic connector on the VAZ-2110 and features of its use
Computer diagnostics of a VAZ-2110 car can be performed independently, without contacting a specialized car service center and large financial costs. But for this you will need to have at least minimal knowledge and skills, as well as appropriate equipment. After all, without a simple understanding of where the diagnostic connector of a VAZ-2110 car is located, you will not even be able to connect the adapter to the electronic control unit.
In this article we will talk in detail about how to read and decipher error codes, and also answer the most common questions related to the ODB connector. All you have to do is follow our recommendations.
OBD Review
As a rule, the equipment of modern cars includes an electronic control unit (ECU). This device is designed to collect and analyze data about the functioning of some of its systems. To prevent unauthorized connection to the ECU, you can choose one of three methods:
install an additional immobilizer with a data bus break;
install any additional connectors into the data bus gap;
blocking the OBD data bus by installing additional channels (must occur in the security mode of the alarm installed on your car).
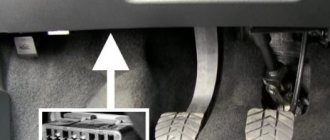
Finding the diagnostic connector on a VAZ-2110 car
Regardless of the modification of the “ten”, the diagnostic connector will be located on the right side of the driver’s seat at the bottom of the steering column. That is, right under the steering wheel. This location can be called quite convenient, since when using a laptop computer (both a laptop and any modern tablet can be equally successfully used), all necessary operations are performed directly in the driver’s seat, without the need to dismantle any components and mechanisms.
For comparison, in older UAZ cars the connector is located under the hood, which somewhat complicates diagnostic work.
In the new version of the UAZ Patriot, the manufacturer has eliminated this drawback. Now the block is installed under the steering column, as in the VAZ-2110.
Practical recommendations regarding choosing an on-board computer
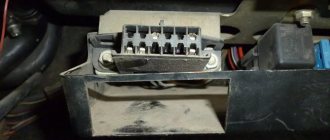
VAZ 2110 on-board computer block
Objectively, it is necessary to understand that the quality and efficiency of a car’s on-board computer directly depends on its market value. From a practical point of view, the best way to choose an on-board computer is the advice of friends of motorists who have previously purchased one.
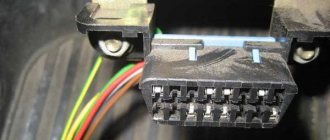
ODB connector pinout: convenient pin layout
In order to personally diagnose a VAZ-2110 car through the connector located under the steering column, you need to know where to connect this or that equipment. This task is greatly facilitated by pinout, which is a diagram of the placement of contacts. It identifies the following main outputs:
- A – ground from the car battery is connected to this output;
- B – output is intended for connecting L-Line type equipment. It is not used on all modifications of the VAZ-2110, so be sure to pay attention to this when choosing a computer scanner or adapter;
- M – K-Line type devices are connected to this output. They are rightfully considered the optimal choice for self-diagnosis of the VAZ-2110, as they provide excellent interaction with any computer equipment;
- H – output to which power is supplied during diagnostic operations;
- G is a very important pinout element, since it is it that ensures safety control of all procedures performed and eliminates any short circuits or other emergency situations.
This designation of contacts will allow you to avoid mistakes when connecting diagnostic equipment, as well as perform all the necessary work efficiently. Now that you know the location of the ODB connector, as well as its main components, you can begin to assess the technical condition of the car.
K Line connection problems
K-Line adapter (VAG COM) does not connect
When making a K-Line adapter yourself or purchasing it in a store, users in some cases encounter problems connecting the adapter.
This problem has two subtypes:
— Problem when connecting the adapter to a PC (with our K-Line 409 adapter, the kit includes a video instruction on how to use the device, we recommend that you read it if you have any questions)
— Problem connecting the K Line 409 (VAG COM) adapter to the car
To solve the first problem, you need to install the driver for the device located on the disk, then go to the device manager and see if your adapter is displayed correctly. If in the device manager you see your adapter in the COM ports and LPT section without any question marks, etc. then you can rest assured that the drivers are installed correctly. To be more confident, you can double-click on it to find an inscription stating that the device is working normally.
If your adapter is indicated with a question mark or is located in the other devices section, apparently you have not installed the driver and you need to reinstall it.
We select our device, select, update the driver and specify the folder with the drivers, then click next and see the installation process, otherwise select another folder and repeat the operation until we achieve success.
If you installed the driver correctly, but when connecting to the car the connection does not occur, first check the cable for functionality, to do this, install the Vasyadiagnostic program, then in the settings section select the port number on which your adapter is located and click the test button ( The car engine must be running or the ignition is on).
Computer diagnostics of cars: basic steps
To perform diagnostics, first start your tablet or laptop, and then connect the adapter or extended cable connecting the tester to the connector. It is necessary if the operation is carried out using a desktop computer to the appropriate output. After this, you just need to take a few simple steps:
- turn the key in the ignition to turn on the power. This is necessary, since otherwise the software will not be able to receive a signal from the controller and display error codes on the computer display;
- we launch the software on a tablet or laptop. If you made no mistakes when connecting and use only working equipment, a diagram of the entire electronic part of the car will appear on the display;
- We select the type of diagnostics we need from the menu (checking the engine, suspension, electrical equipment, gearbox, etc.) and start the process.
During diagnostics, the software will display only error codes detected by the on-board computer. To identify certain faults, you will need to decipher them. It’s not difficult to do, since you can easily find the meaning of all codes on any specialized website.
How to choose the right type of diagnostic work? We suggest focusing on the symptoms of a car malfunction. For example, if fuel consumption suddenly increases, you should check the engine, and if extraneous noise appears while driving, evaluate the serviceability of the vehicle’s chassis.
What set of equipment will be required for troubleshooting and configuration.
In order to configure the systems and identify vehicle malfunctions, you will need:
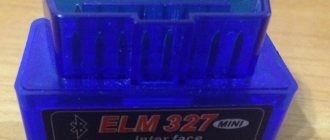
1. ELM327 adapter;
2. Computer, laptop, or PDA, smartphone;
3. Software.
Adapters model ELM327 are one of the best developments for working according to the OBD standard. The device ensures coordination of the vehicle diagnostic system and the computer, ensuring full data exchange between the computer and the vehicle system is necessary. It supports most OBD standard protocols and interacts well with free and paid diagnostic software.
The software required to work with the ELM327 is mostly free, but certain software with advanced capabilities will need to be purchased.
Key features of the ELM327 scanner
• Reading system operation error codes;
• Displaying fault codes and decoding them;
• Printing data;
• Removing fault codes (errors);
• Display of readings in one of two measurement systems – metric and US;
• Saving parameters and received data;
• There is an integrated acceleration time counter to a speed of 100 km/h.
Diagnostics and monitoring of systems using this scanner can be performed on the go.
The adapter comes with a software disc. You don't have to purchase it separately. If for some reason the program from the set does not suit you, you can always find an alternative on the Internet.
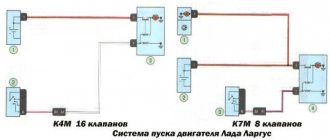
Diagnostic connector VAZ 2110: modification with your own
Modern VAZ 2110 cars have a fault diagnostic system, which can tell a lot not only to a service station specialist, but also to an ordinary driver, if he knows how to correctly read and decipher error codes.
In order to read codes, or in case of replacing diagnostic equipment, you need to know that the diagnostic connector on the VAZ 2110 is located under the dashboard console on the left, and here is the pinout for each cable.
Diagnostic connector VAZ 2110
OBD2 unification
The second important difference of the obd2 standard is unification. A standard diagnostic connector, unified exchange protocols, and a unified system for designating fault codes gives manufacturers of diagnostic equipment the opportunity to create inexpensive universal devices, and specialists to significantly reduce the cost of purchasing expensive diagnostic equipment and standardize the process, reducing the time for diagnostics.
One of the most important achievements of the obd2 diagnostic standard is the development of operational diagnostics and the significant simplification of this procedure. The control unit is assigned a huge number of functions that provide continuous monitoring of all vehicle systems. Thanks to the development and improvement of car manufacturers' model ranges, the number of control unit control functions is growing dramatically with each generation.
Let's look at how you can use obd2 diagnostic capabilities in your daily work.
This is reflected in document J1979, which defines the diagnostic modes that must be supported by both the engine control unit/automatic transmission and the diagnostic equipment.
Below is a list of these modes: - Real-time parameters
- Saved parameter frame
- Monitoring for inconsistently tested systems
- Monitoring results for constantly tested systems
- Executive components management
- Vehicle identification parameters
- Reading fault codes
- Erasing fault codes, resetting monitor status
- Oxygen sensor monitoring
How can you tell if your car is faulty?
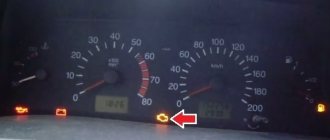
There is a special lamp on the instrument panel with the inscription CHECK ENGINE. When you turn on the ignition, it lights up, and until you start the engine, a special program reads data from all systems and components of the car, thus transmitting data to the on-board computer to identify faults.
After you start the engine, the lamp should go out, but if it stays on for another 10 seconds, it means that some problems have been identified and error codes have been entered into the on-board computer programs.
Communication with the controller is carried out using the diagnostic block.
CHECK ENGINE control signal on the instrument panel of a VAZ 2110
Useful videos on the topic
The owner of every modern car knows what computer diagnostics are and what goals they serve. Thanks to this type of checking of all systems and components, the motorist has the opportunity to learn about malfunctions of certain mechanisms in a timely manner. However, as practice shows, not all owners of the “ten” know where the diagnostic connector is located on a VAZ 2110 car and what it is needed for. Read more about this below.
Calculation of codes
Most often, diagnostic program codes are “deciphered” using a special device. However, on VAZs it is not so difficult to do it yourself.
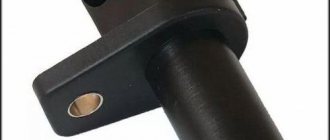
ECU January 4 for VAZ 2110
The diagnosis itself goes like this:
- Connect contact “B”, which has the diagnostic block and “ground”;
- Turn the ignition key to the third position, do not start the car;
- First, the aforementioned “CHECK ENGINE” lamp flashes code 12 three times in a row. It, in fact, does not signal any malfunction, but simply shows that the diagnostic programs are working. On the VAZ 2110 this happens in this order: the lamp blinks briefly once (which should be considered the designation of number 1). After a pause of at least two seconds, it flashes twice in a row (two). So we got the number two. And this is repeated three times so that the driver can understand these signs;
- Now you need to be careful not to miss any faults. After the diagnostic program has declared its serviceability, it will begin to display error codes, if any. In the same way - flashes and pauses.
Installing a new adapter
Modern adapters elm 327 with the OBD-II program (puncture) are suitable for the VAZ 2110 . You can also install them yourself. First you need to purchase an elm 327 and a cable for it. You already know the location of the diagnostic connector. Be sure to study the instructions, which indicate the pinout of the block and the location of each connector.
Connection diagram for ELM327 to 12 PIN diagnostic block
The pad can be removed quite easily. Insert your own cable into each connector of the block, making sure that the pinout of the elm 327 complies with the manufacturer’s instructions. Check that each connector is connected correctly and each cable is in the correct place. After this, the block is installed in its place.
Connecting the diagnostic connector to the block
Fault detection programs for elm 327 can be downloaded on the Internet, many of them in a free version. Now your VAZ is ready to detect errors in various car systems, and you can always download error codes from us.
Connecting the diagnostic connector to the block
Connecting the diagnostic connector to the block
Materials for download:
- Pinout for some cars
- OBD 2 error codes
- VAZ error codes
- Error codes for Mikas 10.3/11 controllers
Let's sum it up
With the advent of computer diagnostics, car owners and repair specialists immediately appreciated the main advantages in the form of time savings, as well as the absence of the need to dismantle and test important components and parts of the car.
As a summary, we note that an adapter connected to the OBD-2 diagnostic connector of the VAZ 2110 and connected to the computer via a cable or wireless connection makes it possible to comprehensively test the car. If a particular malfunction is detected using the software, you can read the corresponding error codes to accurately decipher them.
Sources
- https://ladafakt.ru/gde-nahoditsya-razem-dlya-diagnostiki-vaz-2110.html
- https://remontvazov.com/samostoyatelnaya-diagnostika-vaz-2110
- https://vaz-2110.ru/elektrika-i-provodka/gde-nahoditsya-diagnosticheskij-razem-na-vaz-2110-raspinovka-soft-kak-ispolzovat.html
- https://vazweb.ru/desyatka/elektrooborudovanie/diagnosticheskij-razjom.html
- https://elm327.club/diagnostika-avto/raspinovka-razioma-dlea-diagnostiki.html
- https://cashbuzz.ru/hi-tech/1707-raspinovka-diagnosticheskogo-razema-vaz-2110-starogo-obrazca.html
- https://ladafakt.ru/raspinovka-diagnosticheskogo-razema-vaz-2110.html
- https://elm327-obd2.ru/diagnosticheskiy-razem/vaz-2114.html
- https://ladafakt.ru/raspinovka-diagnosticheskogo-razema-vaz-2114.html
- https://provaz07.ru/elektrooborudovanie/diagnosticheskij-razem-vaz-2107.html
- https://auto-self.ru/opredelenie-neispravnostey-vaz-2110-cherez-diagnostiku/
- https://avto-idea.ru/diagnostika/diagnostika-vaz-2110-svoimi-rukami-chto-dlya-eto-nuzhno/
- https://ladaautos.ru/vaz-2110/poshagovaya-instrukciya-po-provedeniyu-diagnostiki-vaz-2110-svoimi-rukami.html
- https://luxvaz.ru/vaz-2110/261-diagnostika.html
- https://KrutiMotor.ru/diagnosticheskij-razem-vaz-2110/
- https://elm327.club/diagnostika-avto/diagnosticheskij-razem-obd2.html
Self-diagnosis of VAZ 2110: pinout, connector location, features
Inside every modern car there is a lot of electronic stuffing.
This also applies to the new generation of VAZ, which includes the Lada 2110. If there is electronics, then it can be tested. Today, this task is performed by computer diagnostics, which quickly and effectively finds all problems with the car. Testing can be done by yourself, but this requires an adapter. Diagnosis requires experience in working with computers.
Computer diagnostics are divided into 2 types:
- Suspension testing. Performed when knocking or uneven tire wear is detected. Testing is also carried out if drift of the front or rear axle occurs during sharp turns.
- Diagnostics of the power plant. Performed when problems are detected in the engine: increased fuel consumption, the engine is difficult to start, low or high idle speed, the presence of black or white smoke, etc.
There is also a computer check of the automatic transmission, but this does not apply to the VAZ 2110. Now we know why diagnostics are required. It is performed using a special scanner, which is connected to the car via a diagnostic connector.
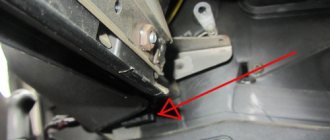
Connector location
So, we plan to check our car and we even have the necessary equipment. Now you need to find the connector - it is located at the bottom of the steering column, to the right of the driver. This connector is also called OBD. Knowing this name, it will be easier to find a suitable adapter.
If you believe the reviews, the most successful adapter for VAZ cars is considered to be a device for connecting K-Line. It has a lot of free space, so you can connect almost any testing equipment to it.
As for the main diagnostic device, it will be a computer. Of course, it is easiest to work with a laptop, since the process can be performed right behind the wheel of a car. But if there is only a stationary option, then you should take care of a long cord connecting the computer to the adapter.
Why does the OBD2 GM12 pin adapter for VAZ, Daewoo not work?
Having ordered an OBD2 - GM 12pin diagnostic cable and connecting it to a VAZ family car, many are faced with various troubles.
The best, so to speak, of which is simply the impossibility of diagnosing the car, but there are also cases where the fuel pump turns on or there is a short circuit in the electrical wiring, and if you’re lucky, the matter will be dealt with by simply replacing the fuses.
After such experiments, the average person takes the cable in his hands and, waving it, scolds the seller and the manufacturer.
The above troubles are usually a consequence of incorrect cable pinout, that is, power is supplied to the device along the wire through which information is to be read, or power is supplied to the fuel pump along the wire through which power is supplied. And what do you tell the latter to do? Right! Turn on and work.
But no matter how strange and incomprehensible everything now turns out to be, and it may sound absurd, the cable actually turns out to be serviceable and working. Yes, yes, workers, and even the pinout is correct. Correct, but not suitable for our car brand.
How so? You ask? And the answer here is simple. The cord is only intended for a different brand of car, and this brand is called nothing less than DAEWOO.
That's basically it. Having the same connectors for diagnostics on VAZ and DAEWOO cars
We have different pinouts, which means that just because the cord fits into the socket, this does not mean that by connecting it it will work and will not cause detrimental consequences to the electronics of your car.
And so, let's figure out what cable is needed and what pinout it should have to diagnose a VAZ car.
To diagnose AvtoVAZ before 2005, you need to connect three wires to the diagnostic block:
VAZ OBD2 and GM 12pin Correct pinout
Performing diagnostics yourself
Many motorists believe that having a computer and an adapter is enough to perform a quality check of their VAZ 2110. But the main “component” for a successful and extensive test is the presence of a competent specialist. Of course, you can complete the task yourself, but to do this you need to install special software, which is publicly available on the Internet. A good option is Motor-Scan.
Also, the presence of the Internet is necessary in order to decipher the received error codes and abbreviations. The work is performed in the following sequence:
- The adapter is inserted into the OBD connector (located where the steering block is), and the computer must be turned on.
- When the block has received the adapter, the ignition is turned on, since without power the program will not be able to read anything.
- Now the testing program starts on the laptop.
- If the block and other elements are in working order, then the electronics of the VAZ 2110 will be displayed on the monitor. Now you can start checking.
ELM327
Separately, we will introduce you to the ELM327 adapter, with the help of which many VAZ 2110 owners perform full diagnostics on their own.
ELM327 is one of the latest OBD developments. This scanner is used to check cars using a computer. The key advantage is that the device supports all known OBD protocols and interacts with many diagnostic programs. A USB cable is used to connect the device to a computer.
ELM327
The software for the ELM327 is mostly free, although some software is available only for a fee.
The adapter can work on computers with different OS. Namely:
The full capabilities of the scanner can only be fully realized through properly selected software. For self-diagnosis, software for scanning the transmission and engine is available free of charge. Commercial versions of the programs allow you to additionally check other components of the car.
Key Features
Let's take a look at the capabilities that the ELM327 chip provides:
- Reads error codes and vehicle malfunctions;
- Displays codes and their descriptions;
- Exports data for printing, if necessary;
- Removes error codes;
- Displays data in metric and US measurement systems;
- Records, saves data, builds graphs;
- It has an acceleration counter from 0 to 100 km/h, which allows diagnostics on the go.
Many vehicle operating parameters must be checked while driving. Not all adapters are suitable for this, so it is important to choose equipment that suits your requirements.