Many inexperienced drivers begin to panic and talk about a breakdown of the gearbox, although in fact the culprit of the problem is the rocker.
Practice shows that replacement and repair are rare and not very common measures. Much more often, the current situation forces you to simply adjust the scenes.
But today we will talk not only about adjustment, but also talk about the features of modification, repair and replacement of this element.
Element location
Signs of breakdown
In fact, it is not difficult to determine that the backstage is the culprit of all the troubles. After all, there are a number of characteristic signs that indicate this.
You can prepare to work on adjusting or replacing the rocker if:
- The first gear does not want to stubbornly engage or disengage, or move to another position;
- When you engage first gear, initially the gearshift knob behaves normally, but then the box spontaneously jumps into reverse gear;
- You cannot engage first and/or fifth gear, while changing to other speeds is no problem.
At the first sign of a problem, you should go to a service station or your own garage to have the problem repaired.
Sign of breakdown
Explanation
There is play on the gear lever
Most likely the linkage is worn out. In this situation, the problem can only be solved by replacing the worn element
It occurs most often when there are problems with the gearbox on a VAZ 2110. The ringing can be caused by defects in factory production, or by poor-quality repairs
It’s hard to engage the gearbox, it gets knocked out
In such a situation, you can try two methods - adjustment and replacement. If the adjustment does not help, change the element
Instead of first gear, reverse gear is engaged
Everything is fine with the lever, but the rocker let you down. Make a replacement. Although repairs using a repair kit can also help
Lever vibrates excessively
Check the condition of your transmission handle joints. Most likely, there was a serious backlash in them
The gearshift lever of the VAZ 2110 dangles and plays - we eliminate the reasons
Even ardent supporters of the Russian automobile industry cannot help but be annoyed when the gearshift lever on a VAZ 2110 dangles; moreover, it also produces the most unpleasant rattling sound. Those with stronger nerves put up with it as an inevitable “side effect”; some even got used to constantly holding the gear shift knob with their own hand.
However, this cannot continue forever, especially if the vibration gets to the point that the lever begins to miss when shifting gears, confusing second with fourth and third with fifth. But in order not to take the situation to an extreme, let's talk about what to do to avoid rattling the gearbox handle.
Adjustment
Now let's talk about how you can adjust the link if it shows primary signs of malfunction.
- First of all, try by hook or by crook to engage first gear.
- Place the car on an overpass, turn on the handbrake, place additional supports under the wheels to avoid the car moving.
- Do not turn off first gear on the transmission.
- At the bottom, find the clamp that holds the rocker and secures it. To do this you will have to crawl under the hood. You shouldn't have any problems finding the gearbox. The clamp needs to be loosened.
- Now return to the salon. Your task is to move the box lever as far as possible to the left. If you start to pull the handle forward or backward, the drawstring will most likely come off. You don't need it.
- Get back under the car and tighten the clamp back.
- In many cases, simply shifting the rocker relative to the cardan shaft by literally a few millimeters is enough.
When adjusting, pay attention to the condition of the cardan shaft. It may require replacement if worn.
Work is in full swing
Finalization
Now many owners of the VAZ 2110 are discussing the possibility of refining and improving the gearbox by replacing the rocker from a standard one to a short-throw one.
The short walk is the result of independent tuning. Decide for yourself whether to carry out such work or not. But from the point of view of the efficiency of the gearbox, installing a short-throw rocker is only beneficial, since gears begin to shift more clearly.
Short walker
To install a short walker for yourself, it is not necessary to completely dismantle the standard version.
To do this you need to perform several operations:
- You just need to disassemble the ball joint from the outside;
- Next, the metal ring of the support is opened and the legs made of plastic are spread apart;
- This is how the ball will come out;
- Now the rod is disconnected from the support, and a small piece of pipe and a piece of sheet metal of good strength are welded to the rod;
- Be sure to lift up the hinge with the hook, otherwise erroneous switching of speeds will not be avoided.
Installing a short drive will entail the need to apply more force when engaging a particular gear. But on the other hand, switching becomes clear and smooth. Therefore, decide for yourself which option would be better for you - standard or short-stroke.
How to replace the universal joint on a VAZ 2110-VAZ 2112?
Note! It is possible to remove this hinge only on an overpass, inspection hole, or if you raise the car, because this hinge is located under the bottom and you will need to crawl under it to unscrew both bolts that secure it!
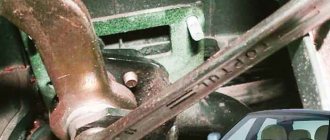
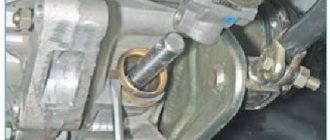
Removal: 1) At the beginning, as you already understood, you will need to crawl under the car, after that, look for the boot (Indicated by the arrow) and the hinge itself, which is located under this boot, so after that, take two keys in your hands and hold the bolt with one to prevent it from turning , loosen the nut of this bolt a little as shown in the figure, and after the clamp nut is loosened, grab the rod with your hand and remove it from the hinge as shown in the small figure.
Note! Before you start unscrewing the nut of the tie rod bolt, drag the boot towards the box so that it does not interfere, and after you disconnect the link, drag the boot towards it and thereby completely remove it from the car!
2) Now you will need to unscrew another bolt that secures the hinge in the front part to the gear selector rod, so after this bolt is unscrewed, you can pull the hinge and calmly remove it from the place where it is installed.
Note! When you install the new joint, you will need to get these bolts into the hole in the gear selector rod, so remember approximately where this bolt is located after installing the new joint in the same place and screw it in so that it fits into the hole in the gear selector rod!
Installation: Installation of a new hinge is carried out in the reverse order of removal, but only when you install the hinge, the link will definitely need to be adjusted, otherwise the gears will not engage clearly and instead of, for example, first gear as mentioned earlier, the reverse gear may easily engage. (For information on how to adjust the rocker, see the article entitled: “Replacing the rocker on a VAZ”)
Additional video: If you want to learn in more detail how the hinge is removed and installed, then watch the video below that clearly shows everything:
Repair
Regardless of what exactly you do with the rocker - repair, adjust or change, you will still need to disassemble this unit.
Disassembly is performed as follows.
- Remove the cover from your gear shift knob.
- Place the car on a pit, or raise the front end with a jack.
- Remove the front console. It is held in place by mounting bolts.
- Now remove the curtain itself. To fix it, AvtoVAZ used 6 bolts in the case of the VAZ 2110 model.
- When carrying out dismantling work, be sure to examine the condition of all elements.
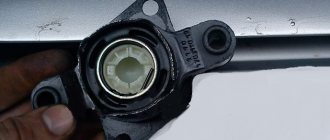
- By bending the boot, you will gain access to the support, oil seal and cardan shaft.
Changing the boot
Now regarding the repairs. There may be several recommendations in this regard, depending on the current state of the node and its components.
- At best, repairs will require the use of a repair kit for the backstage. It doesn't cost much.
- If the bushing is deformed, it will need to be replaced with a new one.
- Check the lever shaft bore for wear.
- Make sure there is no play in the driveshaft. Otherwise, a regular repair kit will no longer be enough, that is, a complete replacement of the entire backstage will be required.
- Often the culprit of extraneous noise and rattling when shifting gears in gearboxes is the rocker pad. Changing it is quite simple, and even a beginner can perform the operation.
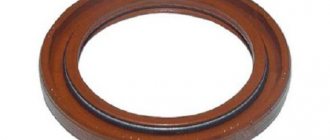
Replacing the oil seal
Quite often, VAZ 2110 owners are faced with a situation where, after parking under the car, they find traces of oil. There are two options here - the oil filter has worn out or there are problems with the oil seal.
As you replace the oil seal, you will be able to simultaneously inspect and change such elements as the cushion, cardan shaft, and boot.
Dismantling works
But let's talk about everything in order. First of all, check whether it is really an oil seal and not a filter. If everything is fine with the filter, then we drive the car into a pit or find another way to end up under the bottom of your VAZ 2110. Beforehand, it would be a good idea to watch video materials regarding your current situation.
- Carefully inspect the boot. If oil leaks from the gearbox through the oil seal on your car, traces of it will definitely remain on the boot.
- Bend back the boot. This way you can get to the cardan, disconnect it and gain access to the cuff.
- You first need to dismantle the cardan from the lever, and only then from the rocker itself. Not the other way around.
- The cardan has been removed, so we move to the oil seal.
- The cuff is removed from the gearbox using a hook and an awl. Therefore, make sure you have these tools at hand in advance.
- Now a new one is installed in place of the old oil seal. Craftsmen have adapted to using ordinary plastic bottle caps. If you get used to it, it turns out to be very easy to change the oil seal.
- After replacing the element, return all dismantled components to their places. If some of them need replacing or signs of wear are already visible, it is better to replace them immediately. It is unlikely that you will want to repeat the same operation in a couple of weeks and lie under your own car.
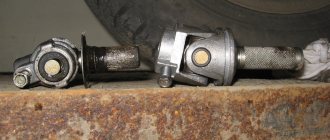
Differences between a short-stroke link
The main differences can be seen even in photographs. We see that the short-stroke rocker has smaller dimensions, namely length. To reduce the stroke length at startup, the length of the transmission under the hinge should be increased. Due to this, we can not only get shorter gears, but also maintain the traction axis in its original position.
It is worth understanding that after such tuning, you will need to put more effort when changing speeds. After upgrading, switching will resemble joystick control, which is undoubtedly a plus. In addition to the rocker, you can install a backlash-free cardan, which will also have a positive effect on the smooth operation of the gearbox.
What is a rocker and why is it in a checkpoint?
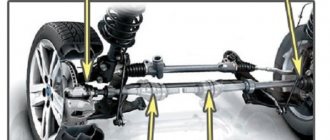
The rocker is a special lever, thanks to which the force of the person changing the gear comes from the lever to the driveshaft. It is an integral part of both manual and automatic transmissions. The standard rocker, which is installed at the factory, is quite long, so a large amplitude is required to change gears. For many drivers, this turns out to be not very convenient, especially for those who prefer a sporty type of driving and cars with high power.
The short-throw rocker has long been used on sports cars, and has now lost its prerogative to be used only in sports cars - an increasing number of car owners are trying to install it on their cars. It has completely different bending angles, which allows you to reduce the lever stroke and speed up the engagement of the desired gear. In addition to speed, car owners who replaced the standard version with a short-throw version also note an increased clarity in engaging the desired gear.
If you don’t take into account expensive foreign cars, the products of the domestic automobile industry have recently significantly improved in quality. But despite the fact that the latest VAZ models are distinguished by good characteristics of the suspension and the engine itself, when operating on broken road surfaces, the gearbox is the first to be affected. This is due to the fact that it is an extremely loaded and involved dynamic complex of the car. Therefore, after a relatively short period of time, the gear change lever in the cabin begins to vibrate very strongly.
Making a short-stroke slide with your own hands
So, let's begin the modernization process:
- We raise the place of attachment of the piece of iron that goes from the gearbox to the lever inside the VAZ 2110 interior.
- You can do without dismantling the rocker, the main thing is to disassemble the ball joint.
- Now we need to ensure that the plastic paws release the ball. To do this, you need to unclench the metal ring. We disconnect the rod and carefully drag it inside through the cover, which is responsible for protecting it from dirt. It will be much more convenient to work if the clamp near the gearbox is loosened.
Replacement is carried out according to the same scheme. Only instead of welding, a freelance short-stroke rocker from another car is installed. Replacement is a more expensive solution, so doing it yourself is problematic. If you have experience working with gearboxes, then replacing and purchasing a new part will cost about 1,000 rubles.
Installing a short-stroke cardan
The first step is to purchase the cardan itself. The best choice would be a part from Priora or Kalina. Usually it is included in the repair kit with a boot, so the standard boot from a VAZ 2110 will not fit here.
Work is performed only if there is an overpass, inspection hole or lift. It is also recommended to call an assistant for help, since at the end of the process it will be problematic to independently adjust the position of the gearshift lever.
The work proceeds according to the following scheme:
- Armed with two 13 keys, we need to loosen the clamp on the drive rod and then pull it off the rod.
- The next step is to dismantle the boot. Next, use the 10th key to unscrew the bolt, which is a lock on the standard cardan. Now you can remove the cardan with gentle blows of a hammer.
Important: it is necessary to check the condition of the oil seal. If this is the first intervention in the gearbox, then it is most likely in a worn condition, so it is recommended to change the boot.
- We install the driveshaft from the Priora in the reverse order: put on the boot and install the new driveshaft, securely tighten the fixing bolt, and then tighten the boot. All that remains is to put the drive rod on the cardan rod, but the clamp should not be tightened.
- Now the assistant gets behind the wheel and places the gearshift lever in the optimal position. At this time, the clamp is tightened. Done, the replacement is complete, all that remains is to test the switching.
Determining the cause
So, while accelerating or idling, your gear lever is shaking like crazy, making an annoying rattling noise. But no other faults related to the gearbox were found. What could be causing this?
- An engineering miscalculation by the creators of the VAZ 2110. They simply forgot to think about the fact that the metal bushing for connecting the lever to the rod “clings” to the edge of the rod while driving, which is why rattling occurs;
- You have tuned the lever using a Lada Kalina. This replacement brought you several positive aspects, and one that was not very pleasing. When the car is in motion, vibration occurs in the driveshaft from Kalina, which transmits rattling through the traction of the entire mechanism. Many who have carried out such tuning claim that even if the lever is removed altogether, it still does not eliminate rattling;
- The retaining spring could have broken, or it might not have been there at all. In this case, rattling is inevitable;
- Often the VAZ 2110 gearshift knob rattles due to wear on the engine and gearbox mounts. It is also possible that other parts responsible for eliminating chatter (damping vibrations) have worn out.
If the gearshift lever dangles, and difficulties of various kinds arise when shifting gears, then a little tuning will not help here; repair and adjustment is needed not only of the handle, but also of the gearbox itself.
Signs of breakdown
In fact, it is not difficult to determine that the backstage is the culprit of all the troubles. After all, there are a number of characteristic signs that indicate this.
You can prepare to work on adjusting or replacing the rocker if:
- The first gear does not want to stubbornly engage or disengage, or move to another position;
- When you engage first gear, initially the gearshift knob behaves normally, but then the box spontaneously jumps into reverse gear;
- You cannot engage first and/or fifth gear, while changing to other speeds is no problem.
At the first sign of a problem, you should go to a service station or your own garage to have the problem repaired.
Adjustment
Now let's talk about how you can adjust the link if it shows primary signs of malfunction.
- First of all, try by hook or by crook to engage first gear.
- Place the car on an overpass, turn on the handbrake, place additional supports under the wheels to avoid the car moving.
- Do not turn off first gear on the transmission.
- At the bottom, find the clamp that holds the rocker and secures it. To do this you will have to crawl under the hood. You shouldn't have any problems finding the gearbox. The clamp needs to be loosened.
- Now return to the salon. Your task is to move the box lever as far as possible to the left. If you start to pull the handle forward or backward, the drawstring will most likely come off. You don't need it.
- Get back under the car and tighten the clamp back.
- In many cases, simply shifting the rocker relative to the cardan shaft by literally a few millimeters is enough.
Adjusting the position of the gear shift lever
Read how to adjust the gear shift control drive on a VAZ 2110. A diagram of the device is presented.
If during operation of the car you have problems with gear shifting (there is no clear shift), then it’s time to adjust the drive that controls this mechanism. Also, this work must be carried out immediately after you have removed the gearbox, repaired it and reinstalled it, since after such actions the entire gear shift mechanism “diverges”.
We did the setup on a VAZ 2110 car.
Repair
Regardless of what exactly you do with the rocker - repair, adjust or change, you will still need to disassemble this unit.
Disassembly is performed as follows.
- Remove the cover from your gear shift knob.
- Place the car on a pit, or raise the front end with a jack.
- Remove the front console. It is held in place by mounting bolts.
- Now remove the curtain itself. To fix it, AvtoVAZ used 6 bolts in the case of the VAZ 2110 model.
- When carrying out dismantling work, be sure to examine the condition of all elements.
- By bending the boot, you will gain access to the support, oil seal and cardan shaft.
Now regarding the repairs. There may be several recommendations in this regard, depending on the current state of the node and its components.
- At best, repairs will require the use of a repair kit for the backstage. It doesn't cost much.
- If the bushing is deformed, it will need to be replaced with a new one.
- Check the lever shaft bore for wear.
- Make sure there is no play in the driveshaft. Otherwise, a regular repair kit will no longer be enough, that is, a complete replacement of the entire backstage will be required.
- Often the culprit of extraneous noise and rattling when shifting gears in gearboxes is the rocker pad. Changing it is quite simple, and even a beginner can perform the operation.
Replacing the oil seal
Quite often, VAZ 2110 owners are faced with a situation where, after parking under the car, they find traces of oil. There are two options here - the oil filter has worn out or there are problems with the oil seal.
As you replace the oil seal, you will be able to simultaneously inspect and change such elements as the cushion, cardan shaft, and boot.
But let's talk about everything in order. First of all, check whether it is really an oil seal and not a filter. If everything is fine with the filter, then we drive the car into a pit or find another way to end up under the bottom of your VAZ 2110. Beforehand, it would be a good idea to watch video materials regarding your current situation.
- Carefully inspect the boot. If oil leaks from the gearbox through the oil seal on your car, traces of it will definitely remain on the boot.
- Bend back the boot. This way you can get to the cardan, disconnect it and gain access to the cuff.
- You first need to dismantle the cardan from the lever, and only then from the rocker itself. Not the other way around.
- The cardan has been removed, so we move to the oil seal.
- The cuff is removed from the gearbox using a hook and an awl. Therefore, make sure you have these tools at hand in advance.
- Now a new one is installed in place of the old oil seal. Craftsmen have adapted to using ordinary plastic bottle caps. If you get used to it, it turns out to be very easy to change the oil seal.
- After replacing the element, return all dismantled components to their places. If some of them need replacing or signs of wear are already visible, it is better to replace them immediately. It is unlikely that you will want to repeat the same operation in a couple of weeks and lie under your own car.
Repair will not give the desired result if the adjustment was carried out with errors. To do everything carefully and competently, use the help of a partner. One will work under the car, the second will help from inside.
The gearbox is one of the most complex components of a vehicle. However, this does not mean that its repair cannot be done at home on your own. Now we will tell you what the VAZ 2110 rocker is, what may be the reasons for its malfunction and how to repair the mechanism.
Diagnosis of the problem
The gearbox linkage in a car is necessary so that the unit cannot independently change gears as a result of the simultaneous movement of the sliders. This mechanism requires careful care, as well as periodic and high-quality adjustments. If the adjustment is performed poorly or some time has passed, this may manifest itself while the car is moving and the driver will feel discomfort.
In practice, as a result of constant use of a car with a rocker drive that requires adjustment, the vehicle may be at risk of breaking the entire transmission system. Therefore, attention should be paid to the quality of the unit’s operation and problems that arise during operation should not be neglected.
To understand that in your VAZ 2110 you need to adjust the rocker shaft, you just need to pay attention to the operation of the gearbox unit. Symptoms of the malfunction will be as follows:
- There were problems with engaging first gear. In particular, it will be impossible to turn on the gearshift lever, and sometimes it will be impossible to switch from first speed to second.
- Instead of first gear, reverse gear is engaged. Imagine: you are about to start moving and engage first gear, but instead your vehicle starts moving backwards. Perhaps after switching to “neutral” the problem will disappear, but over time it may happen again. In this case, in 98% of cases the problem lies precisely in the rocker shaft, that is, this has nothing to do with the speed lever.
- There may be problems with engaging first and fifth speeds. At the same time, all transmissions will work normally.
Eliminating rattling
Some people don’t even realize that eliminating the rattling of the gearbox lever in a VAZ 2110 is a completely feasible task, and does not even require special skills. Of course, you will have to tinker a little, but then being in the car will become much more pleasant. We also remember: what helps one car may not be useful for another car. Therefore, we experiment.
This material will help you independently remove the gearbox in a VAZ 2110 car and diagnose it: https://vazweb.ru/desyatka/transmissiya/kak-snyat-korobku-peredach.html
The simplest solution is to install a spring, which is designed to hold the gearbox lever, preventing it from dangling. This type of tuning has a particularly nice feature - you don’t need to disassemble almost anything! Many people wrap the handle with a medical tourniquet before installing the spring to make the fixation tighter.
Installation of washers (plastic or rubber) on the gearbox axle. You will need a plastic lid for a regular glass jar (you can also use other elastic plastic or thick rubber). From it, after a little disassembly of the handle (produced from the salon), several washers are cut out. The first is the size of the sleeve. Here, after lubricating it with lithol, it is fixed. In addition, two more washers are inserted into the slots around the edges of the gear shift mechanism on both sides of the bushing. In this case, you may have to sharpen the bushing a little.
We purchase a repair kit for the scenes. Moreover, it is specifically for the VAZ 2110. It usually includes all those parts that most often need replacement: bushings, washers, a ball joint for the gearbox lever, a lining and a spring that holds the handle in a fixed position and does not allow it to dangle. First, you need to lift the protective and decorative cover in the cabin. After which, using a repair kit, the worn parts are replaced with new ones. However, sometimes this has only a small effect.
Many car enthusiasts confuse a faulty gearbox with a problem with the clutch. The following article will help you avoid making mistakes with diagnostics: https://vazweb.ru/desyatka/transmissiya/kulisa.html
Place the car on an overpass (pit) and unscrew the ball joint of the gearbox lever from the bottom of the car. Sometimes replacing it helps eliminate rattling. This support is included in the repair kit.
The length of the sleeve connecting the rod to the handle is adjusted. This tuning is carried out from the salon and includes the following actions:
- Raise the gearbox handle cover;
- Disconnect the lever together with the rod;
- Remove the indicated bushing;
- Remove the plastic bushings;
- Remove any remaining grease from the metal bushing;
- Measure about 2 mm from the edge on the metal sleeve and mark this place with a line;
- It will be more convenient if you wrap the sleeve with electrical tape (adhesive tape) strictly along this line;
- File off the excess with a grinder, electric sandpaper, or, if you don’t have such devices, with a strong file;
- Remove the electrical tape and put everything back together, not forgetting the lubricant.
An article devoted to the choice of clutch in a VAZ 2110 car is located here: https://vazweb.ru/desyatka/transmissiya/sceplenie.html
This tuning really helped many: the handle does not wobble, there is no metal rattling, since the bushing’s edges no longer touch the rod.
Replacement
If the steps described in the previous paragraph did not help you, then, apparently, you need to replace the element yourself.
What will you need?
In order to replace the backstage, you will need to prepare everything that may be required to complete the work:
- directly new rocker for VAZ 2110;
- screwdriver;
- side cutters;
- set of wrenches;
- ratchet;
- lubricant "Litol-24".
Step by step instructions
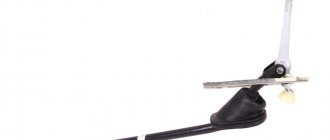
- Sit in the interior of your VAZ 2110 and use a screwdriver to dismantle the decorative cover of the gearshift lever. Pull the gear selector up and remove it along with the protective cover.
- Take a 10" wrench and unscrew the two fastening nuts one by one, as well as the bolt securing the rear gear lock bracket trim.
- Next, take a “13” wrench and unscrew the nut securing the gearbox lever axis. Then unscrew the screw securing the axle. This is where you may need a ratchet.
- Dismantle the axle. Then remove the set of bushings from the gearbox selector (so as not to lose them during the replacement process).
- After this, you need to dismantle the jet thrust from the rocker pad. To do this, take a spanner wrench with which you will hold the nut on top, and using the “13” wrench, unscrew it, as shown in the photo.
- Then you need to remove the facing part of the floor and the plastic console - otherwise it will not be possible to dismantle the backstage. To do this, unscrew all the bolts around the perimeter of the console. After removing the top of the console, do the same with the bottom. Be careful not to damage the electrical wires.
- Next, unscrew the four screws securing the gearbox selector to the car body.
- Get under the bottom of the vehicle and, using a 13mm wrench, unscrew the nuts of the rocker pad bracket, and then remove the bracket itself.
- Dismantle the rocker assembly with the gearshift lever. Carefully visually inspect all elements of the device. Perhaps only the cushion has worn out, and the drawstring itself has not yet reached the end of its service life. Then replace the pillow and install the element in place.
- If the transmission component itself has failed, that is, mechanical damage is clearly visible on it, for example, the ears have broken off, then the link should be replaced with a new one. Before doing this, lubricate all rubbing elements, including the gearbox lever, with engine oil or Litol-24 to avoid squeaks.
This completes the replacement of the VAZ 2110 backstage with your own hands. Reassemble all components in reverse order.
Replacing the gearbox ball joint race
| First, we unscrew the torque rod from the ball joint (in common parlance a butterfly), then the “butterfly” itself from the car body. The exhaust system will interfere a little. |
| Next, you will need to remove the gear knob: first the cover (by picking it up around the perimeter with a flat-head screwdriver), and then the gear knob itself (by pulling it up from the lever). Unscrew the locking bolt. |
| We unscrew the bolt connecting the rocker and the gearshift lever. Remove the bolt while holding the gearshift lever in the up-right position. |
| From the bottom of the car, remove the “butterfly” along with the gearshift lever. We release the gearshift lever by removing the retaining ring of the hinge cage. |
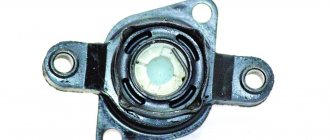
| This is what the old gearshift lever joint cage looks like: |
| Installing the gearshift lever joint cage begins with removing the retaining ring. Then we take out the plastic sleeve and lubricate it with lithol. We put it on the gearshift lever, and then insert it into the holder and the locking ring. |
| Then we install everything in the reverse order, not forgetting to put the rubber boot on the joint cage. First, we install the bolt connecting the rocker and the gearbox lever, and then we screw the “butterfly” to the bottom of the car. |
Which alarm system is better? Which alarm system to put on a car?
xn--2111-43da1a8c.xn--p1ai
Replacing a car's rocker, eliminating play
When using such a link, gear shifting occurs clearly and quickly. The process of replacing a regular link with a short-stroke one is quite simple. It is necessary to lift the fastening of the iron rod that runs from the gearbox to the shift lever in the passenger compartment. In this case, it is not necessary to remove the link; you only need to disassemble the spherical support.
A simpler option, but quite expensive, is purchasing a new rod. A short-stroke slide costs about 700 rubles.
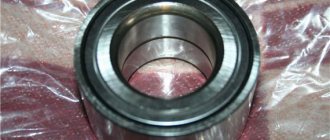
Large play on the rocker is a disease of the car model in question, the cause is the original gearbox driveshaft. To carry out repairs, you need to purchase the cardan itself. For this car, it is suitable from Kalina; it is purchased together with the boot. For the repair itself, a minimum of tools is required: keys “13” and “10”, a screwdriver and a hammer.
Unscrew the bolt and knock down the cardan with weak blows of a hammer. Installation of a new one is carried out in the reverse order, that is, first you need to put the boot on and the cardan on the shaft. After the bolt aligns exactly with the recess on the shaft, put the boot on the universal joint.
Replacing the universal joint on a VAZ 2110, VAZ 2111, VAZ 2112
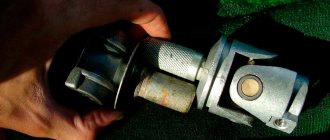
Welcome! The backstage cardan is what people usually call it, but in reality it is called the “Gearbox control drive rod joint”, something like this, thanks to it, gear shifting is carried out, or rather, not thanks to it, but thanks to your hands, that is, in that the moment when you grab the gearshift knob and shift it, by means of a rod that goes from the rocker itself to the box and the next gear is engaged, and the cardan is an intermediary in this matter and an assistant in shifting gears, if the cardan is severely deformed, then you simply cannot change gear You can, or you can shift, but with great effort, and it’s not a fact that that particular gear will turn on and not any other.
Note! In order to change this hinge (in the future it will be called that), you will need to stock up on tools, which will include: Wrenches and spanners (Whichever is more convenient for you), and you will also need a screwdriver and a rubber hammer (If you have this one, if not, then take the regular one)!
Summary:
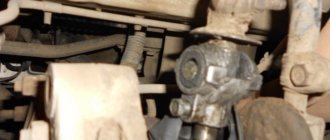
Where is the rocker shaft? You can only see it if you get under the bottom of the car and move the boot (Indicated by a red arrow) that protects it to the side; for an example, see the photo below, on which the blue arrow indicates the location of this very hinge:
When do you need to change the driveshaft? It is changed as it wears out, namely, when it wears out, the gears may not engage correctly, for example, you turn on the first gear and your reverse gear turns on instead, and also this hinge, many car owners are replaced with the same hinge, but only from the viburnum, but indeed the hinge is from Kalina does not have any play, therefore the gears are engaged clearly and the gearshift lever travel itself becomes less than if we take, for example, a standard hinge from a VAZ 2110, but there is one thing!
The whole point is that the Kalinovsky joint has no play, which means it will put more force on the gearbox, in addition, due to the fact that there is no play in the joint from the viburnum, all the vibration that comes from the box will reach the gearshift knob, unlike the original one a hinge from which much less vibration will go to the handle.
Note! Let’s say something else about the viburnum hinge, if your gearbox hasn’t been repaired for a long time and from time to time it knocks out gears when driving (Gears can knock out gears due to heavily worn gear teeth and because of worn out forks that are responsible for engaging the gear), then It is not recommended to install a Kalinovsky hinge on your car, because as mentioned earlier, it transfers more load to the box and therefore it will fail very quickly, so be careful!
Fighting the ringing
In this case, the cardan from the new model is modified to be 20 mm longer than on the ten. This sound is directly related to the part itself; the Kalina rocker has no play, and all the vibration is transmitted into the car interior, to the gear shift lever itself. The easiest way to get rid of rattling is to install a spring.
- soft plastic, you can use a regular glass jar lid;
- file;
- scissors;
- screwdriver;
- keys for “10” and “13”.
The process itself will not be easy, since the hole is very small. The washers are inserted along the left and right sides of the bushing. It will have to be sharpened; the thickness of the washer is only 1.5 mm. Place oil-resistant rubber rings onto the bushing axle on both sides. The parts need to be slightly compressed. This repair will allow you not to hear the ringing noise for a long time, and the speeds will switch much smoother.
Adjusting the gear shift control drive
2. In order to ensure free movement of the rod relative to the gear selection rod, the grooves at the end of the rod and the clamp should be widened using a screwdriver. Then place the rod in the neutral position.
3. Next, we go into the car interior and remove the gearbox cover from the handle. You can simply lower it to the very bottom, and install the lever so that its lower (non-bent) end is approximately vertical.
If you have template 67.7834.9527, then set the gear shift knob as follows: with the lever cover removed, install the template in the trim window (number 14 in the diagram above) of the reverse locking bracket.
Next, insert the stop of the axis (2) of the lever (5) into the groove of the template (13) and press it against the template in the transverse direction without causing elastic deformation of the bracket (number 1). Lock the lever (5) in this position.
4. Under the bottom of the car, you need to carefully, without sudden movements of the hand, select the axial play of the rod in the rearward direction and its angular play in the counterclockwise direction (the task is not to move the gear shift lever).