Cars with front-wheel drive have both advantages and disadvantages compared to their rear-wheel drive counterparts. Moreover, in practice, the vast majority of modern cars are often front-wheel drive, since the design of such a transmission is simpler and cheaper, a car with front-wheel drive is easier to drive, and the overall design of the transmission allows it to remain a completely reliable solution.
Many VAZ models (2108, 2110, etc.), which long ago replaced the outdated “classics,” were no exception. As practice shows, the gearbox on various front-wheel drive VAZs is quite reliable, but often the weak link is the VAZ shifter. Next, we will look at the popular VAZ 2110 model, malfunctions of the VAZ 2110 backstage, as well as how to repair and replace.
Backstage 2110: what you need to know
So, the shifter on a VAZ 2110 often makes inexperienced drivers think that the gearbox itself has failed. In fact, in the vast majority of cases, the VAZ gearbox linkage needs adjustment or repair. For this reason, it is important to know what symptoms and signs indicate a faulty yoke.
First of all, you should pay attention to the following:
- One or more gears do not engage or are difficult to engage;
- gears do not turn off after switching on or turn off with force;
- instead of engaging one gear, another is engaged (for example, instead of the first, reverse);
If such signs are noticed, it is usually not the transmission. This means that you should not rush to start diagnosing and troubleshooting the box itself. As a rule, problems can be solved by adjusting and servicing the rocker, which involves using a VAZ 2110 rocker repair kit. In extreme cases, a badly worn rocker needs to be replaced.
Let's get back to the adjustments. In fact, adjusting the VAZ 2110 rocker is not a complicated procedure, but it will require attention and patience. It happens that adjustment is required in several approaches, since it is not always possible to find a good position the first time.
To adjust the link, you will need to perform the following steps:
- First of all, the car needs to be driven onto a pit or overpass. Then you will need to put the car on the handbrake and engage first gear.
- Next, without turning off the gear, you will need to find the clamp that secures the rocker, and then loosen this clamp.
- Then, you should move the lever from the passenger compartment to the left as much as possible. In this case, you cannot move the lever both backwards and forwards. The fact is that the slide may well jump off.
- Now you need to get into the car and then tighten the clamp. In some cases, it is enough to move the rocker a few millimeters in relation to the cardan, after which the gearbox will work normally again, and gear shifts will return to normal.
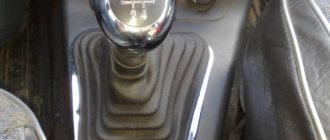
What to do if the gear shift lever is loose on the support
Most drivers use the simplest method to eliminate various sounds coming from the gear lever; to be more precise, they install a spring that eliminates vibration sounds.
But if you want to make this sound go away forever, there is an affordable and reliable option, but it takes much longer, it will require a cover made of plastic material and tools.
- You need to remove the cover from the lever.
- Unscrew the screw and nuts.
- We remove the bushing, washers and bolts, and then lubricate them with a special product.
- You need to cut a washer from the cover so that it fits into the sleeve.
- Then you need to assemble all the parts and put them in place.
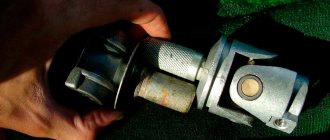
Modification and short-stroke rocker on the VAZ 2110
It should be noted that many car enthusiasts, even on the new VAZ 2110, modified the rocker for a number of reasons. On the one hand, this makes the mechanism more durable, and on the other hand, it makes gear shifting easier and simplifies operation.
You can get the desired result by trying to modify the standard backstage, but this is often difficult and not always justified. It is easier and cheaper to immediately replace the factory mechanism, while replacing the rocker is not an expensive procedure.
More precisely, we are talking about a short-stroke rocker. So, in this case, you need to approach this issue rationally. It is important to understand that a short-stroke rocker is a solution made in artisanal conditions or in mini-factories.
At the same time, its quality will not always depend on how much a backdrop of this type costs. It happens that more expensive products produced on a small but industrial scale are of worse quality than those made individually to order.
One way or another, a well-chosen and high-quality installed short-throw rocker allows you to obtain the necessary clarity when switching. This increases comfort when operating the car, and also slightly increases the service life of the gearbox, since clearer engagements mean coordinated operation of all mechanisms.
To replace the rocker, it is not necessary to remove the entire mechanism. The main task is to disassemble the ball joint from the outside (unclench the steel ring of the support, spread the plastic legs and remove the ball). Then you should disconnect the rod from the support, and then use welding to weld a piece of pipe and a piece of sheet metal to the rod.
You will also need to lift up the hinge with the hook. This will avoid failures and unclear gear shifts. If everything is done correctly, the short-throw rocker will require more effort when engaged, but the smoothness and clarity of gear engagement will be noticeably improved.
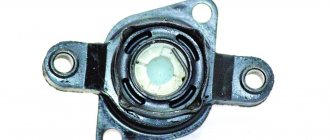
How can I restore functionality?
There are many recovery methods. A fairly popular repair method is the SJR technology, when molten polymer is pumped into the cavity between the holder and the ball.
We will consider repairs with disassembly of this unit.
To understand the mechanism of operation of the support, look at the diagram:
Often the problem occurs due to damage to the boot, and not to the metal itself
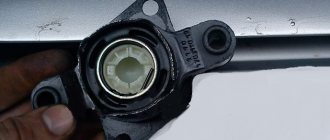
Only the polymer liner is subject to wear. It is when it is abraded that backlash appears. If you continue to drive with a loose ball joint, the top of the cylinder will also break, and then the pin may fly out of the race.
Inserts are sold in car dealerships as consumables. If your ball joint is collapsible, you can easily pull out the bottom and replace the polymer inside the product.
Consumables can be sold in a store at a more reasonable price than buying a new spare part
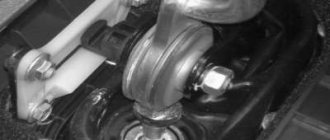
Backstage replacement and repair
Taking into account the fact that during the operation of a car, the rocker on a VAZ or on any other car experiences constant loads, the mechanism wears out, and the adjustments get lost. For this reason, it is important to understand what in a particular case would be the optimal solution: repair, adjustment or replacement of the link with a standard new one or a short-stroke one.
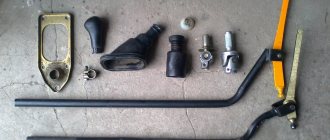
In any case, it is necessary to first disassemble the mechanism. To do this you will need:
- remove the cover on the gearshift knob;
- drive the car onto a pit or overpass/lift;
- remove the tunnel where the gearshift knob is installed by unscrewing the bolts;
- dismantle the rocker itself (on a VAZ 2110 it is secured with six bolts).
During the disassembly process, you need to carefully check the condition of each individual part, you should also bend the boot, check the condition of the support, oil seal, cardan, etc.
If, for example, the oil seal has failed, then it is enough to have a repair kit where such an oil seal is included. This kit will also come in handy if more complex repairs to the backstage are required.
If the bushing is deformed, it must be replaced. In the event that the cardan is loose, as well as in a situation where the hole in the lever axis is worn out, a complete replacement of the link will be required, that is, a repair kit will not be able to solve the problem.
We also note that a common problem that drivers note during operation is the rattling of the rocker. Typically, in this case, if there are no other complaints, the drawstring cushion is often the culprit.
At the same time, replacing the rocker cushion is not a complicated procedure, but the result is often positive and significantly increases the comfort when operating the vehicle.
- Another important procedure in the process of servicing the rocker is replacing the rocker rod oil seal. It is important to understand that the serviceability of not only the operation of the backstage, but also the gearbox directly depends on its condition.
If drops of transmission oil are visible under the car, this often indicates that the seal is leaking. As a rule, problems with the VAZ 2110 rocker seal appear in the form of a crunching noise when switching.
We also recommend reading the article on how to remove the gear shift lever. From this article you will learn about the features, subtleties and nuances that need to be taken into account when removing the gearshift lever.
As for replacing the oil seal, the car needs to be driven into a pit or raised on a lift. Next, you should inspect the rubber boot. If it is not sealed or is torn, traces of oil will be visible.
Then you should bend the boot, disconnect the cardan and thus gain access to the cuff. Now the cardan is removed from the lever, after which it is disconnected from the rocker. After removal, you can get to the oil seal and then use an awl or hook to remove the gearbox cuff.
Next, you should press in a new oil seal (in home-made conditions, installation is carried out using a stopper from a plastic bottle). If the oil seal is installed successfully, you can proceed to reassembling the entire mechanism, not forgetting to put the boot in place.
In fact, such repairs allow you to avoid oil leaks in the gearbox and improve the operation of the gear shift mechanism. Finally, we note that it is also important to carry out adjustments and settings after repairs.
The fact is that even a serviceable, but incorrectly configured rocker will not work properly. By the way, on a VAZ 2110 it’s difficult to set up the rocker yourself. To make the process easier, it is better to immediately invite an assistant.
Gearbox device
Features of gear shifting on mechanics
In general, the concept of “remaking” the box is not entirely correct, since the design of the VAZ-2105 gearbox with 4 speeds was practically no different from the same gearbox 2101. The 2105 gearbox has a three-shaft layout, with constant gear meshing and manual control. Externally, the Kopeika and Pyaterki checkpoints can be distinguished almost only by the markings on the body of the box.
The VAZ-2105 gearbox diagram with 4 stages is presented below, and structurally it does not differ from modifications 2101 and 2106:
| 1 | Bottom cover; | 40 | Needle bearing of the front end of the secondary shaft; |
| 2 | Filler and inspection plug; | 41 | Synchronizer spring thrust washer; |
| 3 | Intermediate shaft second gear gear; | 42 | Fourth gear synchronizer ring gear; |
| 4 | Intermediate shaft third gear gear; | 43 | Sliding clutch for synchronizer of third and fourth gears; |
| 5 | Intermediate shaft; | 44 | Third and fourth gear synchronizer sliding clutch hub; |
| 6 | Front intermediate shaft bearing; | 45 | Synchronizer retaining ring; |
| 7 | Clamp washer bolt; | 46 | Synchronizer locking ring; |
| 8 | Intermediate shaft front bearing clamp washer; | 47 | Synchronizer spring; |
| 9 | Intermediate shaft constant mesh gear; | 48 | Third gear synchronizer gear and ring gear; |
| 10 | Constant mesh gear of the input shaft; | 49 | Second gear synchronizer gear and ring gear; |
| 11 | Spring washer; | 50 | Secondary shaft; |
| 12 | Retaining ring; | 51 | First gear synchronizer gear and ring gear; |
| 13 | Rear input shaft bearing; | 52 | First gear gear bushing; |
| 14 | Input shaft oil seal; | 53 | Secondary shaft intermediate bearing; |
| 15 | Transmission front cover; | 54 | Intermediate bearing lock plate; |
| 16 | Bearing mounting ring; | 55 | Secondary shaft reverse gear; |
| 17 | Clutch housing; | 56 | Elastic cushion for gear shift lever damper; |
| 18 | Gearbox input shaft; | 57 | Damper rubber bushing; |
| 19 | Reversing light switch; | 58 | Damper spacer; |
| 20 | Intermediate shaft reverse gear; | 59 | Damper locking sleeve; |
| 21 | Reverse intermediate gear; | 60 | Inner gear shift lever cover; |
| 22 | Reverse fork; | 61 | Secondary shaft rear bearing oil seal; |
| 23 | Gear shift lever release spring; | 62 | Flange of the elastic coupling of the propeller shaft; |
| 24 | Tension spring bolt; | 63 | Screw; |
| 25 | Gear shift lever guide cup; | 64 | Centering ring seal; |
| 26 | Ball joint of the lever; | 65 | Centering ring retaining ring; |
| 27 | Spherical washer; | 66 | Centering ring; |
| 28 | Spring; | 67 | Rear secondary shaft bearing; |
| 29 | Gear shift lever; | 68 | Drain plug; |
| 30 | First and second gear shift fork; | 69 | Mud deflector; |
| 31 | Third and fourth gear shift fork; | 70 | Speedometer drive gear; |
| 32 | Fork rod for first and second gears; | 71 | Speedometer drive; |
| 33 | 3rd and 4th gear fork rod; | 72 | Rear gearbox cover; |
| 34 | Locking blocks; | 73 | Reverse idler gear axis; |
| 35 | Reverse fork rod; | 74 | Rear intermediate shaft bearing; |
| 36 | Rod lock ball; | 75 | Intermediate shaft first gear; |
| 37 | Retainer spring; | 76 | Gearbox housing; |
| 38 | Retainer cover; | 77 | Sliding clutch for synchronizer of first and second gears. |
| 39 | Breather; |
Since the box from the VAZ-2105 is structurally similar to the 2101, the kinematic diagram of the gearbox is the same. But the gear ratios are different; on 2105 gearboxes they are:
- 1st – 3.67;
- 2nd – 2.10;
- 3rd – 1.36;
- 4th – 1.00;
- Rear – 3.53;
As for the differences in the design between gearboxes 2105 and 2101, they mainly come down to different numbers of teeth on different gears. So, on the intermediate shaft of the gearbox, a 1st speed gear with 14 teeth is used (15 for 2101), and their inclination angle is greater. The constant mesh gear of this shaft has 28 teeth (29 for 2101). The input shaft uses an 18-tooth gear (19 for 2101). Because of these features, the shafts with gear blocks of these two gearboxes are not interchangeable if you try to install them separately. But in the case of a complex replacement - the input shaft along with the intermediate shaft and all gear blocks, then installation is quite possible. As for the secondary shaft, modification 2105 differs from shaft 2101 in the first gear gear (its teeth have a different angle, although their number is the same, and its diameter is also slightly larger).
Diagnostics
In any car, the gearbox is used to prevent the car from changing gears on its own. This part needs to be monitored and looked after; in addition, over time it becomes loose and requires adjustment. If the adjustment has not been made for a long time or it was performed poorly, then the driver will feel uncomfortable when driving the car.
It is because of this that prevention should be carried out, as well as due attention should be paid to the scenes. If the car begins to behave somehow incorrectly, then it is necessary not to delay the repair.
Gearbox slide
To understand that the rocker requires adjustment or replacement, you just need to monitor the operation of the gearbox.
As a rule, when a failure occurs, the following symptoms appear:
- Difficulty when engaging 1st gear. As a rule, it is difficult to engage the gear; the driver has to practically drive the lever in to engage 1st speed.
- Possibly difficult shifting from 1st to 2nd speed.
- Due to a loose lever, it is not 1st speed that is engaged, but reverse. This is very dangerous, especially at a traffic light, at the start. It is necessary to urgently repair the rocker, otherwise the problem will only get worse.
- Difficulty engaging 5th gear, while other speeds can be engaged smoothly.
- There is play in the shift knob. As a rule, the rocker only requires replacement and adjustment is not necessary.
- Extraneous sounds appeared coming from under the car, or rather from the gearbox. As a rule, the sound becomes ringing. This problem is a disease of the entire VAZ 2110-2112 family. As a rule, such a ringing can appear after repairing the car’s suspension.
- When driving, the speed may jump. In other words, the car, gaining acceleration, independently disables the engaged gear and switches to neutral speed. For further driving, you will need to keep the lever at the desired speed constantly so that it does not jump out.
- Strong vibration that occurs on the shift knob. This is due to the failure of the scenes. It will need to be repaired to solve the problem.
If the symptoms described above appear, then you will need to begin repair work. You should completely replace the linkage or simply adjust it and gear shifting will become comfortable again. Therefore, it should be adjusted before replacing.
Adjusting the work of the scenes
Backstage adjustment
Adjustment is made only in cases where:
- The gearbox was removed and installed back;
- Previously, repairs were carried out to replace the cardan;
- In the case when the hinges on the slide have turned.
Of course, adjustments can be made at other points as described earlier. Do not forget that even minimal gaps can disrupt the correct operation of the entire transmission.
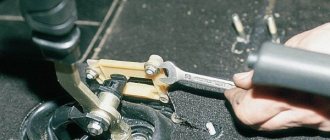
Naturally, before starting repair work and adjustments, you will need to prepare the right size wrenches. With their help, the clamps will be loosened. You should also place bricks, stones or special anti-roll devices under the wheels.
When everything is ready, you can begin the work process itself. To do this you need:
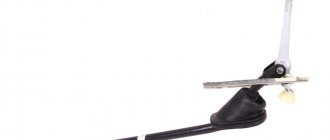
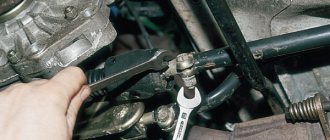
It is recommended to use an overpass or pit for repairs; if these are not available, then use reliable jacks. Next, you should go to the garage. When the car is ready for repair, it is necessary for safety to put on the handbrake and throw bricks or specialized devices under the wheels that will prevent the car from rolling away. Next, you need to crawl under the car and find a special clamp. It connects the hinge and the rocker itself. Then you will need to loosen it using a wrench. Loosen the clamp
Next you need to get out from under the car and get behind the wheel.
Now engage reverse gear, it is only important not to confuse it with 1st gear. Therefore, you should look at the position of the lever; it should be maximally in the upper left corner. It is recommended to do this procedure with someone
This person will need to hold the lever in a locked position. Next, you need to climb under the car again and tighten the clamp, applying great force.
It is recommended to do this procedure with someone. This person will need to hold the lever in a locked position. Next, you need to climb under the car again and tighten the clamp, applying great force.
That's the whole process of adjusting the scenes. Nothing complicated, the main thing is to follow safety precautions.
Stories from our readers
“Fucking basin. "
Hi all! My name is Mikhail, now I’ll tell you a story about how I managed to exchange my two-wheeler for a 2010 Camry. It all started with the fact that I began to be wildly irritated by the breakdowns of the two-wheeler, it seemed like nothing serious was broken, but damn it, there were so many little things that really started to irritate me. This is where the idea arose that it was time to change the car to a foreign car. The choice fell on the melting Camry of the tenth years.
Yes, I had matured morally, but financially I just couldn’t handle it. I’ll say right away that I am against loans and taking a car, especially not a new one, on credit is unreasonable. My salary is 24k a month, so collecting 600-700 thousand is almost impossible for me. I started looking for different ways to make money on the Internet. You can’t imagine how many scams there are, what I haven’t tried: sports betting, network marketing, and even the volcano casino, where I successfully lost about 10 thousand ((The only direction in which it seemed to me that I could make money was currency trading on the stock exchange, they call it Forex. But when I started delving into it, I realized that it was very difficult for me. I continued to dig further and came across binary options. The essence is the same as in Forex, but it’s much easier to understand. I started reading forums, studying trading strategies. I tried it on a demo account, then opened a real account. To be honest, I didn’t manage to start earning money right away, until I understood all the mechanics of options, I lost about 3,000 rubles, but as it turned out, it was a precious experience. Now I earn 5-7 thousand rubles a day. I managed to get the car buy after half a year, but in my opinion this is a good result, and it’s not about the car, my life has changed, I naturally quit my job, I have more free time for myself and my family. You’ll laugh, but I work directly on the phone)) If If you want to change your life like me, then here’s what I advise you to do right now: 1. Register on the site 2. Practice on a Demo account (it’s free). 3. As soon as you get something on the Demo account, top up your REAL ACCOUNT and go to REAL MONEY! I also advise you to download the application to your phone, it’s much more convenient to work from your phone. Download here.
In the store I ask jokingly that I need a clutch cable for a ten, which will never break! They answer me: change the car. I bought a clutch cable for a VAZ 2110 in Balakovo. Of all, he was the most expensive.
You can replace dozens of clutch cables in various ways:
- Remove the frill and the windshield wiper (to make it easier to get to the attachment of the cable end to the clutch pedal)
- Without removing the frill (method for those who are able to take the lotus position)
The standard instructions for replacing the VAZ 2110 clutch cable involve removing the frill and windshield wiper, but I decided to take the shortcut and not disassemble anything.
Also, after replacing the cable, the clutch needs to be adjusted.
Replacing the VAZ 2110 clutch cable without removing the frill
We unscrew the clutch cable fastening using a 19 key. Next, you need to remove the cable tip from the clutch release fork, but since the cable was torn, there was no need to remove anything
In fact, replacing the VAZ 2110 clutch cable with your own hands is quite simple. I did this procedure for the first time. The replacement was carried out in the winter outside in the evening with a flashlight in hand. I spent 2 hours replacing the clutch cable. I spent most of my time in the pedal area when removing and installing the cable.
Adjusting the clutch pedal VAZ 2110
The clutch pedal travel (all the way to the mat) should be 125mm (+-5mm). The maximum permissible pedal stroke is 160 mm. To adjust the clutch, you need to unscrew or tighten nut No. 2, after completing the adjustment, tighten lock nut No. 1. Tighten the rubber washer as much as possible to the fork.
You can adjust the clutch so that the pedal is lower than the brake pedal, then it will grab almost immediately after the pedal leaves the floor. If you make the clutch pedal high (higher than the brake pedal), then when you lower the clutch it will grab almost at the very end. A pedal that is too high can accelerate wear on the basket.
Replace the clutch cable on the “ten” yourself..