Many motorists face the problem of removing the radio in their car. Some people cannot remove the standard device installed at the factory, others inherited the music along with the car, and others simply lost special keys. There are also plenty of reasons for dismantling - from repairing wiring to buying a new stereo system. Hence the demand for information arose on how and with what help you can carefully remove the car radio without damaging the plastic of the front panel. And although the operation is primitively simple and can be easily performed with improvised means, there are pitfalls in it that you need to be aware of.
Types of radio mounts
To choose a method for removing a car player, you need to understand how it is fixed inside the panel. The following types of fastenings exist:
- on 2 side clamps;
- on 4 latches located on the side and top of the case;
- fastened with self-tapping screws or screws to the brackets.
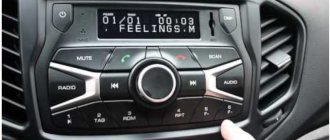
Example of mounting a standard head unit
Note. The last method of fixation is typical for standard devices that are supplied to the car by the manufacturer.
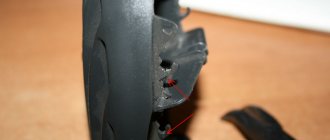
Latch on mounting frame
The principle of fastening with latches (clamps) is that the body of the radio is enclosed in a metal mounting frame, and is not directly built into the panel niche. This intermediate part, which has special petals with protrusions or grooves (depending on the brand and model of the device), is securely fixed in the niche. The player body is equipped with mating latches that engage when the player is inserted into the socket.
The counterpart of the latch on the body
To unlock the latches and remove the car radio, keys of various shapes are used, supplied by the manufacturer complete with music for the car. They are lost over the years of car operation, since they are used extremely rarely. As a rule, the key is a shaped strip of metal or a handle inserted into 2 pairs of holes located on the front panel of the device.
This is what most car radio removal keys look like
The mountings of standard radios are most often made with bolts, screwed to brackets and hidden under the front plastic panel. Here you cannot do without a minimum set of tools to dismantle this panel and unscrew the mounting screws or bolts.
Handle key for unlocking 4 latches
Reference. All of the listed intricacies with hidden latches and special keys were invented by manufacturers with one goal: to make it as difficult as possible for thieves to steal the car radio when the car is broken into.
Location of key holes
What you need to remove
To dismantle the radio, you will need the following tools:
- Keys for removing the radio. They look like a long strip with special slots. The ends have ridges that you can hold with your fingers. The tool allows you to bend and bend the clamps located on the casing. Some latches must be pressed in and held in this position until the device is removed.
- Screwdriver Set. Such tools will be required if the radio is fixed using brackets and screws. Using one screwdriver, fasteners are removed, the second is used to dismantle decorative trims, under which the bolts are hidden.
- U-shaped pullers. Such keys are used to remove car radios equipped with elastic clamps. The keys are inserted into the channels located on the front panel of the device.
- Head for unscrewing nuts. Used to remove additional stud.
- Knife, metal strip or nail file. A handy tool will be needed in case of loss of the standard keys. It is used to bend the tabs on the mounting casing. The clamps may require nails, thick wire, or cable ties to hold them in place.
Removing the device according to the instructions
The algorithm for removing the radio if you have the keys is outrageously simple. It is worth considering in order to understand how to act if they are lost. The order is as follows:
- Remove the front panel of the player and the decorative plastic frame, prying it up with a flathead screwdriver if necessary.
- Insert the first key into the gap between the housing and the mounting frame, located at the end. You should feel slight resistance as the tool bends the latch.
- Repeat the same action with the second key.
- Grasp the radio with your hands by the protruding parts on the sides of the case and carefully remove it from the niche.
To remove the radio, 2 keys are used
Advice. There is no need to apply much effort; the device should be removed quite easily. At the end, act carefully so as not to pull the wires again and break the contact.
Special keys must be inserted into the side openings
When the radio is equipped with four latches, access to them is through 2 pairs of round holes. You need to insert 2 U-shaped keys into them and pull them out by the body, as described above.
The music center can be easily removed using keys
How to remove the radio without keys?
If standard keys are lost, you need to make homemade ones, focusing on the shape of the slots. To see them, remove the device’s removable panel and plastic frame. Here is a list of available tools with the help of which owners of various cars manage to unlock the latches:
- thin steel strips 6-15 mm wide;
- stationery knives;
- plastic clamps for electrical wiring;
- nails and straight wire - for round holes;
- thin screwdrivers and other similar items that fit the shape of the cracks.
These steel strips can be used instead of keys
Reference. In many radios, the mounting slots are visible from the outside, so there is no need to remove the front panel and plastic frame.
The first step is to remove the front panel of the radio.
To remove the car radio, use the same algorithm:
- Insert first one and then a second strip of thin metal (or a utility knife, thin screwdriver) into the technological opening. Feel each latch unlock.
- If the turntable is supported by 4 clips, insert four instruments.
- Slowly remove the radio from the niche at the same time as the improvised keys.
The strips need to be inserted into the side slots
Advice. When using steel strips to open latches, be sure to wear cloth gloves to avoid cutting your hands on the sharp edges.
The music center is removed along with the strips
Important points
- When removing the device from the niche, under no circumstances should you apply great force, as you can damage the wires located behind the radio.
- If steel strips are used to remove the device, they must be used only with protective gloves, otherwise it will not be possible to avoid cuts.
- Steel strips are far from the only handy tool that can be used to remove a radio. Very often, car enthusiasts use old ATM cards or thin plastic rulers, from which “keys” are cut out using ordinary scissors. And sometimes even barbecue skewers are used to remove the radio.
So, you can remove the radio from the niche without keys. This can be done using available materials; fortunately, there is no shortage of them. If we are talking about modern radio tape recorders, then preference should be given to “keys” made of plastic, since the cases of these devices in most cases are also plastic, and metal tools can leave deep scratches on them.
The desire to dismantle the car radio may appear in different situations. For example, this is often necessary before selling a car. As always, there is no special tool or keys at hand, so further we will consider proven methods for removing an audio device.
Dismantling a standard music center
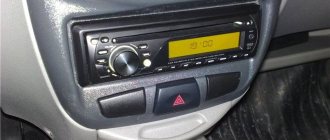
Often, standard head units (aka radios) are removed using the method described above, since they are attached to 2 or 4 clips. For example, the factory player on a Lada Priora car is held on by two latches, and to unlock them, thin steel strips must be inserted between pairs of radio channel switching buttons “2” - “3” and “5” - “6”.
Advice. Before you start disassembling the factory radio, find out about the method of its fastening, so as not to poke the pieces of hardware at random if you do not find technological openings.
In Priora, stripes must be inserted between the buttons
To remove car radios that are fastened with screws, you need to prepare a simple set of tools:
- thin flat screwdriver or knife;
- Phillips screwdriver;
- set of small sockets (from 6 to 10 mm).
With this mounting option, the factory turntable must be unscrewed using the heads
On different brands of cars, standard players can be mounted in different ways, but the principle is approximately the same: the device is screwed to brackets that are covered from the outside with a plastic lining. As an example, we propose to consider removing the radio on a Korean Hyundai Solaris car, performed in the following order:
- Use a flat-head screwdriver or knife to pry up the lower corner of the plastic decorative panel framing the stereo. Pull the edge and grab it with your hand.
- Gently pull it towards you and release the first latch, and then move around and unlock the rest.
- Holding the panel with both hands, remove it and, if necessary, disconnect the connectors located at the bottom.
- Unscrew the 4 mounting screws with a Phillips screwdriver and pull out the radio.
Decoding problems
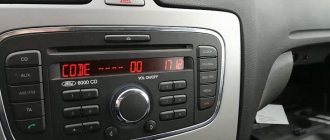
The main pitfall of the described procedure lies in the security code embedded in the memory of most radio tape recorders. The bottom line is this: disconnecting the music center from the external power supply for 10-15 minutes will lead to the fact that the next time you turn on the car radio, it will require you to enter a security code (usually a four-digit one), without which it will not function.
Advice. Removing the device to replace it with a new one is not a problem, unless you plan to use the old player on another machine. In any case, try not to disconnect the battery for a long time.
The device requests a code after connecting to the on-board network
If the card with the code is lost or missing, the issue can be resolved in several ways:
- when it comes to a standard device, for a certain fee they will help you find the code at a dealership that sells cars of your brand;
- there are companies and individual specialists dealing with these problems;
- the free way is to search for code using various programs.
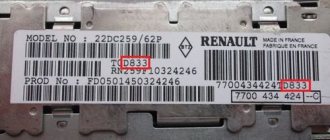
Serial number location
Regardless of the method chosen, you will have to remove the radio from the socket to find out the serial number. It is printed along with a barcode on a tag glued to the side or top of the case. After taking out the device, rewrite these numbers, and then try to calculate the PIN code using them using various online calculators on the Internet. If it was not possible to determine the required code using this method, then remove the music center and take it to specialists in this field and prepare to pay for their services.
Important point. If you do not know the PIN code of the radio, then when searching on your own, do not enter combinations of numbers more than 3 times! Otherwise, the device will be blocked, and in this state, decoding it will cost much more.
The issue of removing a car radio from its socket is not very difficult and will not require much time. But the consequences can be unexpected for an unprepared motorist. Hence the last piece of advice: find the lost pin code before turning off and removing the player in order to save your time and nerves.
Tips and tricks
Having figured out how to remove a standard radio or PG installed separately, you should also pay attention to one more nuance. Before removing the radio and turning off the power, it is recommended to remove the terminals from the battery.
So, after turning off the power, a problem may arise - the need to enter the device’s security code when connecting again. Typically, the radio PIN code must be entered if the device has been disconnected from power for 10 minutes or more. This problem affects both standard radios and some third-party head units.
If the code needs to be entered, but the owner does not know it, you should try not to turn off the power for a long time or perform the necessary manipulations without turning off the power. It is important to be extremely careful to avoid short circuits, etc.
In a situation where the radio has already been turned off and you need to enter a code, the situation is more complicated. Please note that if you do not know the PIN code of the radio, do not try to enter the password more than 2 times as part of the selection process. If there are several unsuccessful input attempts (usually 3), the radio will be completely blocked and additional decoding of the radio will be required.
So, to remove the PIN code, you can contact an official dealership that specializes in selling cars of this brand. You can also contact unofficial services, where specialists can reset all the radio settings, re-flash the device, select the radio pin, etc.
You can also try all kinds of free service programs that select the PIN code for the radio based on the serial number of the device. The specified serial number (barcode) is usually affixed to the side or top of the head unit housing. Unfortunately, if the radio is already installed, you will need to remove the device again.
Step-by-step instructions for removing the standard audio device
If you suddenly want to change your standard installed radio and install a new modern multimedia system instead, that’s great. Now all that remains is to figure out how to make the replacement without breaking anything. In the most standard cases, some tools will be needed for dismantling. These are the mounting keys that came with the radio, as well as a screwdriver. There are several methods and methods for dismantling, and before removing the radio, it is better for you to study them.
In order for the question of how to remove the standard radio to not cause difficulties during the procedure, you should carefully prepare for it at the first preparatory stage. The preparation process itself consists of first finding the necessary keys contained in a specialized kit for removing a standard audio system. In addition, you should arm yourself with an instruction manual, cotton gloves and a hair dryer.
So, the car owner has at his disposal not only a new unit for high-quality sound reproduction, but also the necessary list of auxiliary tools. Now you will need (before removing the standard radio) to remove the negative terminal from the battery. You should never neglect this condition, since the safety of the one who will change the players directly depends on it.
The car owner's further actions involve removing the cladding elements. Foreign cars are most often equipped with ordinary plastic covers, the main function of which is to disguise screw nests. The use of these minor details allows you to give the panel a presentable appearance.
The fastening of this type of cladding is small-sized pins and plastic latches. You can remove such a lining using one of the pre-prepared keys, simply by prying it off on one side, which will entail complete disconnection of the fastening element. Naturally, this procedure must be performed with extreme care so as not to inadvertently damage anything.
When removing the trim from a used car, you will most likely have to use a hair dryer. This will be needed if the former owner previously removed his audio system and “attached” the broken fasteners with glue. A well-heated lining with a hairdryer will allow the car enthusiast to easily remove the plastic.
The surface that opens before your eyes will have to be thoroughly cleaned. After the old equipment is dismantled and a new audio system is installed in its place, it will be better if the cladding is not reused, and another, more modern element is installed in its place.
At the next stage, which requires knowledge of how to remove the stock radio without unnecessary nerves and body movements, you will need some pre-prepared tools. Using a certain type of key, you can easily and quickly remove the annoying device. On sale in any auto store you can find both a universal set of tools and a narrow-profile one, selected for a specific car model.
So, first of all, you will need to unscrew all the existing screws, since they are the ones that help hold the frame in place. Next, you need to remove the screws of the adapter (we are talking about removing the 1-din audio device). The key inserted into the hole should be held as tight as possible and, applying some pressing force, try to move the standard audio device towards the output of the socket. A correctly performed procedure will be indicated by a smooth exit of the radio from its seat.
It is worth noting that the range of selected keys will allow you to get the radio from almost any vehicle, however, you should take into account an important feature of some foreign cars, in which you can only get to the sound playback device when the glove compartment is removed.
Thanks to this manipulation, the car owner will have free access to the rear cavity of the socket, through which the car radio can be pushed out without any additional effort. After removing the case, do not forget about carefully disconnecting all the wires with which the device was connected.
Features of the standard radio on the Passat B6
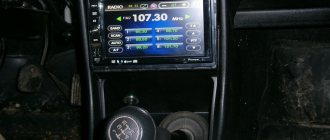
Older Passat models were equipped with standard RCD and RNS radios. Over time, they began to be supplemented with new functions. If the first devices were equipped with players RCD 310, RCD 300 with a monochrome design, then later versions began to be provided with color screens and synchronization systems with smartphones.
For example, all radio models for the 2008 Volkswagen B6 were already equipped with a more or less multifunctional multimedia center, although there were still configurations without screens at all.
Head unit for Volkswagen B6 up to 2008
Characteristics
Equipment
The car radio for Passat B6 consists of a disk drive, a USB connector, an SD card slot, a navigation multimedia center equipped with:
- USB cable for 3G/4G modem;
- GPS receiver with remote antenna;
- remote control;
- speakerphone microphone;
- RCA cable.
The standard radio of the Passat B6 supports buttons on the steering wheel and, depending on the configuration, reproduces the state of the climate, parking sensors, and on-board computer.
Other technical specifications:
- button illumination;
- rear view cameras;
- voice search;
- AUX audio and video;
- GPS + GLONASS;
- 2 USB 2.0 ports, supporting drives up to 1 TB;
- built-in Wi-Fi;
- 8 sound presets, 7-band equalizer.
Add-ons
The Passat B6 Android radio supports all modern video and audio file formats. Internet connection is optional. Additionally available:
- DVR
- TV tuner equipped with a security system that turns off the image while driving;
- parking sensors;
- Bluetooth for hands-free calling.
It is possible to include additional monitors, which is convenient for rear passengers, as well as external memory storage devices up to 1 Terabyte.
What to do?
On driving forums you can often come across a popular question: how to remove the radio without keys? Today you will learn about all the nuances and tricks that will allow you to dismantle quickly and correctly. Of course, you first need to indicate that the factory tape recorder is removed taking into account the vehicle model and its configuration, because as we know, a wrench and a set of screwdrivers are required.
Each “music box” is equipped with protective fastenings that are hidden from human eyes. Without a doubt, each manufacturer has its own developments and technologies that can affect the removal process, starting with the protective mechanism and ending with the specifics of the fasteners.
What do we need?
Before you get to work, you need to prepare well:
- Get a set of keys of different types that can be used to remove factory equipment.
- You will also need a set of screwdrivers that are equipped with tips in the shape of stars and hexagons.
- An ordinary stationery knife will also come in handy.
- You will need a flat object to remove some components. A plastic card copes with this task perfectly.
- Well, don’t forget to find tweezers that are suitable for removing cladding in some cases.
Method No. 1
So, this option involves the use of mounting keys. These tools are supplied with the vehicle. They need to be inserted into special places along the edges of the device and pressed firmly on them. If you insert the keys correctly, then they will be firmly fixed. All you have to do is pull them and the device will easily pull out.
If the car is not new, then there may not be mounting keys. And how to remove the radio in this case? Here you can dismantle it by disassembling the panel. This operation can be performed using a simple screwdriver, which everyone has in their arsenal. To disassemble the panel, simply release the special latches that hold the frame using a screwdriver.
When you succeed, you can begin to unscrew the bolts that secure the radio to the body. That's all, now the device can be easily removed. Before removing the radio frame, it is better to check everything carefully so as not to break anything. This is necessary because the panel on each car model is individual, and each of them is disassembled in its own way. That is why you need to familiarize yourself with its diagram in advance.
Let's see how to remove the radio on different brands of cars. Each model has its own removal scheme, so this will not be superfluous at all.
Required Tools
You can remove the radio using special keys for removing musical equipment, but guessing which one will fit your car model is difficult and makes no sense, since you will not remove the radio often. Therefore, you can use available tools. For dismantling you will need:
- Dismantling wedge: a small piece of iron with a smooth edge. A wide-tipped screwdriver (spatula), a small knife or a nail file may also be suitable for these purposes;
- A universal screwdriver with attachments for unscrewing hex bolts or star keys.
Progress
How to remove a radio without keys? The question is quite complicated. If you still don’t have the keys at hand, you will have to improvise and make the tool yourself:
- First you need to take care of the device's cover, which looks like a plastic front panel. Remove the component carefully so as not to damage the casing and the gadget itself.
- Now we arm ourselves with a screwdriver and unscrew the bolts that secure our device.
- In order to remove the device, you need to carefully pull the blue stoppers and press the opened petal, thereby separating the parts and pulling the connector out of the device.
- The antenna can simply be pulled out of the socket.
All steps are very simple, but do not forget to be careful when performing them. As you understand, removing factory equipment is not that difficult.
- Often the holes are protected by special screws, which can only be removed with a hex screwdriver. We simply move the freed grooves in different directions and pull the equipment towards us.
- Rectangular holes have a slightly different mechanism for dismantling. You need to insert two keys on the sides, rest them to the very end. You need to move them until they click, which will tell you that the protective mechanism has opened. After this, you can pull the device towards you.
- There are cases when a standard radio requires as many as four keys in stock, but if you show ingenuity and perseverance, you can cope with two. We simply place both instruments on one side, slightly pull out one part of the structure, then do the same on the other side and get our sound.
- Many car owners complain that there is no visual contact with the keyhole. The solution to the problem lies on the surface: just remove the volume control and you will immediately find the ill-fated hole. Next, take a six-sided screwdriver and turn it counterclockwise, thereby removing the panel. There you will easily notice two fixing screws that can be removed with the same screwdriver.
So how to remove the radio without keys? Everything is very easy and simple. Replace the keys with thin strips of steel with a width of 7 to 14 mm and do all the same steps as described above.
Before removing the standard radio in the Ford Focus 2, prepare the necessary set of tools. This is an asterisk and hex screwdriver. Different modifications are secured with different fasteners. Also pick up a plastic card and an ordinary stationery knife.
The manufacturer has released a special tool for this purpose, with the help of which this task is solved in two, maximum three minutes, but its price is about $10, which is quite a lot today. This key in appearance resembles one half of scissors with special holes. Another difficulty with this key is that it is difficult to find.
And you need not one, not two, but 4 of them. But we will try to do without it. If desired, you can disassemble two pairs of scissors. You can make your own keys. A pre-prepared card will be useful for this. Cut it into slices 2 cm wide. You need four of these records. Cut a 45 degree angle at one end of each slab. Now the tool is ready, and you have saved $40 or more.
Ford Focus - how to remove the radio?
For Ford Focus 3, the first step is to dismantle the plug. It covers the fastening elements. You need to work as carefully as possible, because you will have to attach this panel back. Then you will see two screws. Unscrew them. This will free up the frame. This frame is also secured with plastic clips. Do not pull the frame too hard, as you can remove the radio panel with almost no effort. If you pull too hard, you can break it.
The device itself is held on by two hexagon socket bolts. Unscrew them and take them out. Put such parts somewhere separately. It’s easy to lose them, and then you’ll spend a long time looking for them. Now you can disconnect the connectors at the back of the device and remove the entire device from the niche. The screen can also be removed along with the radio. It is held on by four screws.
Now let's see how things are going with Focus-2. The standard radio here is a Sony 6000 cd. It is also called “square”. It comes in three different versions. These are square, oval and restyled.
Removing the car radio using standard keys
Initially, you need to familiarize yourself with the list of required elements.
§ Standard set of keys. Their numbers vary.
How to properly remove a car radio from a niche?
· The radio panel is first dismantled. If the need arises, the decorative frame, which is located directly under the panel, is also dismantled. As a rule, the need arises when we are talking about older models.
· On the side you need to find holes directly for the keys.
· They must be placed in a special hole until there is a click. In some cases, some effort will be required.
· Once the keys have been placed, the equipment must be carefully removed.
Video about dismantling a car radio using standard keys...
Radio tape recorder "Pioneer"
This brand is well known to all music lovers. The company produces modern, practical, excellent-sounding car radios and other audio equipment. But there are different situations, and sometimes you need to remove the device, for example, when selling a car.
Many car enthusiasts on forums ask the standard question: “How to remove the Pioneer radio?” Everything is very, very simple.
Do you have the keys that came with the device? Then it's a matter of two minutes. And if not, take two knives with a thin blade. Now remove the front panel. This can be done by hand. You will see holes on the sides. This is where you need to insert keys or knives. Next you will hear a click. The radio tape recorder will slide out on guides, and you can easily get it out.
Introduction
The practical majority of modern car owners try, whenever possible, to get rid of standard factory car radios, purchasing more “sophisticated” multimedia devices to replace them. The radios that cars are equipped with at the factory are often not able to meet the needs of car enthusiasts. Not a single standard unit used for sound reproduction can surprise with high-quality sound; due to this circumstance, people head to car markets and stores in order to purchase another, more powerful radio. And when the long-awaited device is in the hands of the vehicle owner, he must first dismantle the old equipment before installing it in its proper niche. In order to correctly carry out this procedure, you need to know how to remove the radio, which will have to gather dust on the garage shelves for a long time.
"Toyota"
Let's see how to remove a Toyota radio using a Camry as an example. These cars have been produced since 1982. Production is established in five countries of the world, and the car is classified as a middle business class. Today we can see the seventh reincarnation of this model, but despite this, owners are changing radios.
Before starting dismantling work, disconnect the ground terminal from the battery. This is for your safety. Then remove the decorative washers and control selectors. The Japanese installed springs on the axes of these handles. They can be easily pressed out using a thin screwdriver. Now remove the front panel. Next to the axles you will find screws. They unscrew easily and release the staples. Then you can remove the standard radio and insert another one.
"Nissan"
As with other cars, you will need a flathead and Phillips head screwdriver for the Nissan. The multimedia system on cars from this manufacturer is fixed from the inside. The fastenings are located on the center console. It should be removed, and the console is attached using four self-tapping screws. The first two you can find under the rubber carpet. Then two more are located under the decorative plate. It can be removed using a thin screwdriver. The latches will release very easily.
Now that the screws are unscrewed, you can proceed to unsnapping the seals. Work very carefully, and you need to pull up. Don't put in any serious effort. All latches must be removed very carefully. Now it's time to disconnect the wires. Each wire has its own lock, and it is quite inconvenient to release them. That's all. Now all that remains is to unscrew the radio from the console. So you have learned how to remove the radio on a Nissan.
What is better to install in a car?
Car radios for Volkswagen Passat B6, B7 and SS are interchangeable. The standard connector for their multimedia centers is the same, which significantly expands the choice.
Instead of the standard one in the Passat B6, it is recommended to buy radios from the following manufacturers:
Cheaper options for VW Passat B6 radios can be models from:
- Sound Box;
- Incar;
- Gazer.
Using the UNIWAY radio on the Passat B6
"Chevrolet"
You will need a Phillips screwdriver and something to hook the plastic trim from the inside. Perhaps thin tweezers will work for this. Slide this hook under the trim, and after you have hooked the trim, pull it towards you. It is held on by four clamps. Using a screwdriver, unscrew the screws and pull out the device.
It may be that on some models, before removing the radio on a Chevrolet, you will need to remove the panel with deflectors. You can simply pull it towards you and it will come off. For some reason it wasn't screwed in. The cover, which is located behind the deflectors, is secured with two screws. Next, unscrew the ashtray and pull the plastic latch. You can now remove the climate control. Next, insert the new radio and reassemble everything in reverse order.
Now you can replace everything yourself, and you don’t need to spend money on a car service for this work.
Sometimes car owners are not satisfied with the standard car radio. Replacing it is not difficult at all. An article will help with this, which describes how to remove the radio correctly in order to install a new device.
Volkswagen Polo Sedan 2011, 105 l. With. - with your own hands
Cars for sale
Volkswagen Polo, 2012
Volkswagen Polo, 2012
Volkswagen Polo, 2018
Volkswagen Polo, 2020
Comments 9
What kind of equipment do you have? Or do they all have the same outputs to the radio? They fitted me with this one. stood on the trade wind. how to connect - HZ
I had the highline package. On other models I heard that the outputs may differ.
I understand that you just need to lift the frame from below and gently pull it towards you?
My friend, I learned a lot of useful things from you. I'll take care of it. Everything is very clear and simple. Thank you. Keep sharing.
I agree!))) apparently these Chinese live far from the Russian-Chinese border and still don’t know what we are capable of!)))))
and you were afraid and wanted to take it to the service center! ))) if it weren’t for the Chinese))) with their bad delivery kits))) they don’t know what kind of wires we have in the car in the Russian polo sedan))) so they send such wires according to the standard! in fact, your work should have had the following list of actions as in the photo + connect the wires from the radio to the car and everything in reverse order))) but no, you struggled with a needle and pinned everything out like me)))) a Russian person is capable of anything ! )))
Author: Valeria Filinovich 06/04/2020 Reading time: 4 minutes 6,512 views No comments yet
The Volkswagen Passat is considered a premium class car, so the radio for this model was selected for drivers with increased requirements for comfort and practicality. It is for this class of consumers that manufacturers annually release new versions of multimedia devices for cars to the market. The Volkswagen Passat B6 head unit is a whole complex of powerful modern parts and functions, harmoniously integrated into the single electronic architecture of the cabin.
Instructions for removing the device
Before replacing an installed car radio with a new one, you must first remove the old device.
Removing the device from the car
To remove it, you need to prepare a small set of tools and materials:
- a set of keys for the car radio that it comes with from the factory;
- Phillips and hex screwdrivers;
- stationery knife;
- small box;
- tweezers for removing cladding;
- insulating tape;
- pencil.
It is important to remove the device correctly so as not to disturb the wiring (the author of the video is Kirill Zbruenko).
Preparation
Before removing the radio from the car, you need to do the following preparatory work:
- Before starting work, you need to turn off the engine and de-energize the car by disconnecting the negative terminal from the battery.
- When removing the plugs from the connectors, do not pull them so as not to break them. All wires from the sockets in the rear should be disconnected as carefully as possible.
- If during dismantling there will be a lot of wires, you should prepare electrical tape and a pencil to then deal with the wiring. Wires must be insulated and labeled.
- Next, you need to prepare the keys for the radio. Each manufacturer uses hidden mounts for their devices. You should understand what fastening material is used and select the appropriate tool. Typically, keys are included with the standard car radio.
- When dismantling, it should be taken into account that some models have slides that help remove the device from its seat.
Car radios differ in design and mounting. There are usually two rectangular and four round mounts.
If there are standard keys, then dismantling should be done with their help.
Basic algorithm of actions
Removing the radio consists of the following steps:
- Before removing the car radio, it is necessary to dismantle the front panel, which protects the internal parts from mechanical damage. It must be removed carefully so as not to damage or scratch the casing.
- The next step is to unscrew the screws that secure the device to the housing. To do this, use a Phillips screwdriver. We put all the bolts and screws in a prepared box so as not to lose them.
- Now the device can be removed from the socket where it is located by pulling it towards you. On some cars, dismantling takes place without problems, but there are models on which it is difficult to remove the device.
- After removing the car radio from its seat, you need to disconnect all connectors. To do this, pull up the blue stoppers, then you need to press the released petal and you can disconnect the power connector. We simply remove the antenna from the socket.
After the device has been removed, the radio is either replaced or repaired if it does not work. If you do not know how to disassemble the device, it is better to entrust the repair to a specialist. If you are confident in your abilities, you need to disassemble the radio, fix the problem and put it back.
Installation of a new product is carried out according to the instructions that came with it. It is important to remember that if you install the radio in your car incorrectly, it will sound bad and may cause a short circuit or even a fire. Therefore, you need to connect the device only according to the instructions.
Video “Procedure for removing a car radio”
This video demonstrates how to get the radio if you don’t have the standard keys (the author of the video is Yuri Gusev).
How to properly remove a radio without special keys
Many motorists are faced with the problem of removing the radio in their car. Some people cannot remove the standard device installed at the factory, others inherited music along with their car, and others simply lost special keys. There are also plenty of reasons for dismantling - from repairing wiring to purchasing the latest stereo system. Hence the demand for information on how and with what help you can carefully remove the car radio without damaging the plastic of the front panel. And although the operation is primitively ordinary and carried out in a relaxed manner using the means at hand, there are pitfalls in it, which