Operation / From Autoclub
- Mesh outside and inside the grille - pros and cons
- How to make and install an outdoor version with your own hands?
The order of work in the photo
- Video on installing external radiator protection
- Indoor Installation Video
- How to make and paint an internal protective mesh - video
No matter how perfect the design of a modern car, a good owner will always find a lot of minor flaws in it and take care of eliminating them. One way to combine business with pleasure is to install a protective mesh in front of the radiator yourself, attaching it to the standard grille. The benefit is obvious - the new element will provide additional safety to the radiator honeycombs, and a properly color-matched mesh will give the “face” of the car a pleasant appearance.
Why put a mesh on the radiator grille?
In the vast majority of passenger cars, the radiator of the engine cooling system is installed at the front, where it is intensively blown by the oncoming air flow. But, in addition to the air stream, various foreign objects inevitably enter the heat exchanger:
- insects of various sizes;
- poplar fluff and foliage;
- road dust, fine sand and dirt;
- gravel, pebbles from under the wheels of oncoming cars.
Radiator honeycombs clogged with insects and dust
Cooling of the liquid in the radiator occurs due to its heat exchange with the air flow passing between the metal fins. When these openings become clogged with debris and insects, their flow area decreases and eventually becomes completely clogged. The intensity of heat exchange decreases, the radiator ceases to perform its function, and the engine begins to overheat.
Standard grilles installed by manufacturers protect the unit only from large stones, letting everything else through. That is why installing an additional protective mesh brings considerable benefits, increasing the service life of the radiator and the engine, which is not subject to overheating. A dirty mesh can always be cleaned and washed; this is more difficult to do with radiator honeycombs.
Car with intercooler for turbocharging
Reference. Since an increasing number of cars are equipped with air conditioning as standard, they are equipped with not one radiator, but two. The second serves as a freon cooler in the air conditioner and suffers no less from clogging with insects and dirt. In premium cars there is a third heat exchanger - an intercooler, designed to cool the air supplied to the turbine.
How important is it
In the absence of protection for the radiator, increased contamination occurs: the design of the radiator is a kind of filter for debris entering from the outside: dust, midges, gravel, sand, etc. This debris gets deep into the plates and reduces heat transfer, which means it increases the average temperature of the radiator working fluid and, accordingly, its wear.
Accidental entry of metal objects can cause circuit destruction and breakdown, which is why a radiator protection mesh is installed . Since the average speed of vehicles has increased to 110 km/h, the force of impacts from flying objects has also increased.
Mesh outside and inside the grille - pros and cons
Both methods have the right to life and are equally successfully used by car enthusiasts. But each of them has a negative and a positive side. Installing a mesh behind the radiator grille provides the following advantages:
- The mounting points are not visible from the outside, so it is easier to install protection, although you often have to dismantle the bumper;
- installation work is carried out once for the entire period of operation of the mesh material;
- you can use an inexpensive mesh and not pay much attention to the appearance, because it is difficult to see behind the standard grille;
- Implementation of this option will be cheaper.
The light mesh does not catch the eye when standing behind a dark grille.
The disadvantage of this method is the difficulty of cleaning the fine-mesh material. It’s good if in your car model the decorative grille is removed from the bumper, making it easier to access the mesh to be cleaned. Otherwise, for a major wash, the front body kit will have to be dismantled or you will have to go to a specialized car wash and pay money.
Note. When you begin internal installation, you risk encountering such difficulties as removing the front bumper. On Russian VAZs the work is done relatively simply, but with some foreign cars you need to tinker a lot.
Removing a bumper on a foreign car can be quite difficult.
The option with external installation has more advantages:
- the protective element is easy to install and remove when necessary;
- to install the net, you do not need to disassemble the car;
- washing is carried out from the outside without removing fine-mesh material;
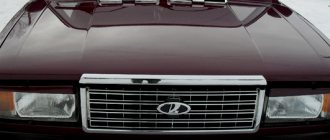
- the front part looks much nicer when the mesh is matched to the color of the car or painted.
Renault Kaptur with external mesh
There are no serious disadvantages with external installation, except that the price of finished products sold for specific car brands is “biting”. But we can overcome this drawback if you get down to business yourself and make an outer mesh with a frame with your own hands, which will be discussed later.
Factory set of nets for Renault Kaptur
MYTHS
Also, opponents may say that such grids are not only not useful, but they also contribute to overheating of the engine. Allegedly, if you take the thinnest cell, then it is:
Firstly, it will be poorly blown with air, poorly dissipating heat
Secondly, it will clog very quickly, completely clogging this mesh
Thirdly, the engine will overheat in traffic jams
But friends, this is not so, the radiator itself is made of aluminum, even without blowing it dissipates heat very well, because it is specially made ribbed (so that each rib) dissipates as much as possible.
Again, even the thinnest cell will pass the incoming air quite well (there will be an obstacle, but it is not significant). When it comes to engine overheating in traffic jams, the grille and the mesh have almost no meaning; here a large load falls on the fan, which turns on when the critical temperature is reached.
I will say even more, there are cars (standard, not tuning) whose front part was completely covered for the sake of beauty. And nothing overheating happened, just the standard fan turned on more often and cooled the car.
How to make and install an outdoor version with your own hands?
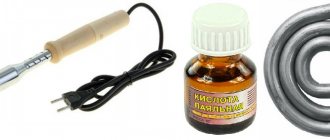
To manufacture a protective element designed for external installation, you should purchase the following materials:
- aluminum fine mesh;
- universal glue;
- a piece of thick electrical cable 2-3 m long;
- tape and clothespins;
- a sheet of cardboard (mesh packaging works well);
- plastic clamps, preferably transparent or black, to match the color of the grille.
Materials and tools for DIY
Note. The amount of aluminum mesh and cable length are determined by the dimensions of one or more grilles installed on your vehicle. The cable insulation will serve as the edging of the future protective element.
To make a mesh frame and place it on the car, prepare a set of tools:
- stationery knife;
- regular scissors and for cutting metal;
- tape measure, ruler;
- marker.
A device for safely cutting the cable is made from a knife and a strip.
Since this simple design is attached to the radiator grille from the outside with clamps, no tools are required to disassemble the bumper.
Advice. If the radiator grille on your car can be easily removed, then it is recommended to dismantle it and use it as a template, which will make the task easier for yourself.
The cable is cut lengthwise to remove the insulation.
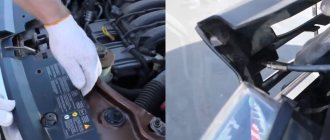
The production and installation of the outer mesh is carried out in the following sequence:
- Take a sheet of cardboard, apply it to the car grille and carefully cut out a template that exactly repeats its shape. If necessary, modify the template with scissors, achieving maximum coincidence of the contours.
- Place the template on the mesh and trace with a marker, then cut out the workpiece with metal scissors. Try it on the radiator on your car.
- Tape a utility knife to a wooden plank as shown in the photo. Using this tool, make a longitudinal cut in the cable insulation and pull out all the conductors from inside.
- Form the edging of the element by placing the cut and gutted insulation on the ends of the previously made workpiece. Fill it from the inside with glue at several points and clamp tightly with clothespins.
This is what a homemade external mesh on a car looks like.
When the glue is completely dry, the clothespins can be removed and the mesh can be installed on the car. If you did everything correctly, it will fit tightly to the grille from the outside. All that remains is to tighten and secure the resulting element with plastic clamps. After tightening, cut off their ends and turn them so that the clamp clamps are inside and do not stick out in plain sight. When you need to remove the protective element, just cut the puffs with wire cutters.
The order of work in the photo
The cardboard template must exactly follow the shape of the opening
Cutting line drawn with a marker
Bonding cable insulation edging
The mesh with frame is ready for installation on the car
Fastening the element with plastic clamps
The protective element clearly fits along the contour of the opening
Video on installing external radiator protection
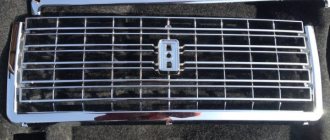
Types of radiator grilles
Grilles can be made of various materials:
- sheet metal,
- sheet aluminum,
- stainless thin steel,
- thin plastic,
- tree,
- MDF.
Metal radiator grilles
The most economical solution may be sheet metal; it can be coated with decorative coating, enamel or powder paint. This option is interesting because it has a wide selection of colors. You can also choose a different design, that is, the holes can be made in different shapes. They are easy to care for and suitable for any room.
Products made from sheet aluminum can be made in the form of polished metal, or can be painted. Stainless steel sheet grilles are not painted, so they are suitable only for certain rooms where the interior is made in a special style.
Metal is interesting because it retains heat perfectly, even if the heating radiators themselves do not work very well. It does not interfere with the transfer of warm air, heat loss will be minimal.
In addition, the metal is a completely environmentally friendly metal; it is suitable for any room. It is also possible to order any perforation pattern on such gratings; usually a standard selection of patterns is offered, but it is possible to order a special pattern on an individual basis.
Grille for floor heating radiator
Practical decorative plastic grilles
Plastic is a cheap option for decorating radiators, but it is worth remembering that plastic will inhibit the flow of warm air. Plastic tolerates the heating effect well, but heat loss will be significant.
Plastic is interesting because here you can choose any perforation options during the manufacturing process. They also attract many with their affordable price. These screen options are perfect for bathtubs, since moisture does not affect the plastic.
Plastic products do not require special painting; they are available in various colors. All you need to do is choose the right color for your space.
It is better not to use plastic fencing in residential premises and children's institutions; they are usually used in offices and restaurants. Most often, plastic products fit perfectly into office spaces, where this particular material predominates in furniture and design. These also include decorative screens.
Unique decorative wood grilles
Wooden grilles are expensive because they are made from woods such as beech and oak. Besides the fact that such grilles are quite expensive. Over time, they tend to absorb moisture and, therefore, lose their shape.
However, such options go well with an interior that has many wooden elements. For the manufacture of gratings, only high-quality wood is selected, which is subjected to special processing. All this significantly affects the cost of gratings in general.
These grilles are often handcrafted to create unique, beautiful carvings. Without such grilles it is not possible to completely recreate the country style, so such options are often chosen for country cottages.
Decorative grilles made of MDF - a replacement for natural wood
MDF material is often used as a replacement for natural wood. MDF gratings will also fit perfectly into the classic style, into the country style, while they will cost much less and will last a long time thanks to special manufacturing technology; they can withstand moisture longer.
The MDF material also allows you to choose any beautiful pattern, and it can either fit perfectly into the interior or be a good contrast.
Most often, patterns for MDF models are developed using computer programs. Therefore, it is possible to recreate any pattern, even the client’s own sketch.
Grilles installed on radiators allow you to add beauty and comfort to any interior. They also allow you to protect your children from burns and protect radiators from contamination. This makes it easier to care for the radiator; in addition, the grille can be replaced with another at any time, if the overall style of the interior changes.
About internal installation
Motorists who want to install a fine-mesh mesh directly in front of the radiator need to prepare the following tools:
- a set of keys and screwdrivers for removing the front bumper or radiator grille (if possible);
- metal scissors;
- roulette, ruler.
Most often, plastic clamps are used to fasten the mesh.
To fasten the mesh, you can use the same clamps or self-tapping screws, if the design of the body kit allows it. Instead of aluminum cellular material, it is possible to use a plastic mesh secured with a glue gun. The installation algorithm is as follows:
- Wash and dry the car. If fog lights are installed in the bumper, disconnect the negative terminal of the battery before starting work.
- Remove the front body kit by disconnecting the fog lamp connectors.
- Applying the mesh to the grille opening from the inside, cut out the blank with a margin of at least 1 cm on each side.
- Attach the workpiece to the body kit. Here you can use a combined method: first, tighten the mesh to the grille with clamps, and then screw the edges with self-tapping screws. Attach the plastic material with a glue gun at several points.
- Reinstall the front body kit, connect the headlights and battery.
Mesh attached to removed bumper
Advice. Do not screw the screws directly into the front parts of the grille, otherwise their ends will come out. For such fastening, choose jumpers and stiffeners facing inward, and screw in the screws from the side.
This is what the mesh installed inside looks like
Indoor Installation Video
What are they?
Here again there are two types:
- Which are rigidly attached to the decorative part of the car. For example, bolts or ties
- Removable , can be removed and cleaned at any time.
Personally, I am a supporter of rigidly “fixed” ones, because they do not rattle, do not come off, do not rub ANYTHING (this is very important), but will sit rigidly.
Painting the mesh
If you were unable to choose the mesh material to match the color of the car, then there are 2 options left:
- install unpainted aluminum mesh;
- take aluminum or plastic material and repaint it in the desired color.
Varnishes and paints in aerosol cans
In the first case, you will receive a minimum of worries, but over time, the aluminum will oxidize and darken, which will ruin the appearance of the car, especially when installing the grille externally. Therefore, it is better to spend 2 hours and apply paint to the element according to all the rules. To do this you will need:
- white spirit or other degreaser;
- primer for aluminum or plastic;
- paint of the desired color;
- protective varnish;
- antistatic wipes.
Note. It is assumed that you do not have a compressor and a spray gun, and primer, varnish and paint are purchased in aerosol cans.
Painting the mesh from a spray can
For ease of processing and painting, it is best to hang the mesh on a wire from the ceiling. A less aesthetic option is to place it on the floor covered with old newspapers. Then the process of applying paint will be delayed, because the element will have to be turned over. The procedure is as follows:
- Using wipes and white spirit, thoroughly degrease the mesh material.
- Shake the primer in an aerosol can and apply 2 coats with a break of 10-15 minutes. Hold the container vertically at a distance of 20-30 cm from the surface to be painted.
- Apply a base coat of paint, wait 15 minutes and repeat the operation. Make sure that there are no drips, and that each subsequent strip, when applied, half overlaps the previous one.
- After the base has dried, coat the mesh with three layers of protective varnish at intervals of 10 minutes.
Important point. Check the drying time of all coloring compositions according to the instructions on the packaging.
Installation using a glue gun
When the paintwork has completely hardened, proceed to install the mesh on the car, as described in the previous sections.
How to make and paint an internal protective mesh - video
You will have to spend from 2 to 8 hours making and installing a protective mesh with your own hands, depending on the installation method you choose and the difficulties with removing the bumper. How much money you can save depends on the make of the car and the price of the finished kit for it. Add here the cost of installing mesh elements at a service station. But, by taking on the work yourself, you can choose the appropriate material and repaint it if necessary. And the procedure is not so complicated that you need to go to a car repair shop for this service.
How to make and apply removable tinting on car windows
How to make a subwoofer for a car with your own hands
What is it made of?
Now there are two types of such grids:
- Factory - already for your car
- Homemade - made by the owners themselves
Both are often made from metal mesh (only the cell size is different), or from durable plastics that are difficult to destroy even in the cold. The most common ones are now made of aluminum; in fact, it’s very easy and quick to do it yourself, but more on that a little later.
Coloring protection.
The manufactured device is already ready for installation on the car. But for greater effectiveness, it is necessary to give the grille a colorful appearance. If you decide that the grille and frame will be painted the same color, then you can process the assembled protection. If you select separate colors for the mesh and frame, it is better to paint the element before complete assembly. The process of painting the radiator protection is completely similar to painting the metal surfaces of a car. Before applying paint, it is necessary to thoroughly clean and degrease the surface. Then, you need to apply a layer of primer and wait until it dries completely. After this, we apply paint to the surface of the element. Often, the protection frame is covered with film. Thus, you can get an interesting appearance of protection. After complete processing, we mount the part in place. Independent production and installation of an element is a fairly simple, but very effective way to modernize a car. With enough desire and enthusiasm, you will definitely achieve the desired result and make your car more attractive. Good luck!
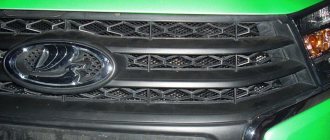
Homemade tuning grille
Some craftsmen make a tuning grille with a fine-mesh protective mesh and a factory one. Here, as an example, let’s take the domestic car VAZ-2108.
In addition to the above materials, you will also need a jigsaw, soldering iron, and sandpaper. The work to create such a lattice is carried out in the following order.
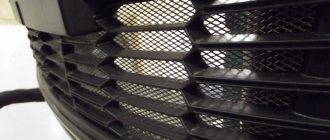
The factory grille is dismantled. Then the entire internal part is cut out with a jigsaw, leaving only the outer contour. After trimming, the surface is treated with sandpaper to remove all irregularities and burrs.
The mesh is cut so that its edges extend beyond the inner edge of the prepared contour. The mesh will be attached from the inside. For fastening, you can use self-tapping screws, as well as plastic contour, for which a soldering iron is used. The plastic heats up and the edges of the mesh are “sunk” into it.
Afterwards, the modernized grille, if necessary, is painted and installed in place.
Advantages
If you are interested in small tuning, but do not want serious innovations, just install a new grille. Your old bumper will only benefit from this.
Considering the current assortment, you can literally buy whatever you want. On Avito and other sites they sell factory-made elements, handmade decorative overlays, so to speak. You can just slap on a little molding and it's done. It’s up to you to decide, since a new grille is not that expensive. Much depends on the material of manufacture, but more on that later.
Speaking of strengths, I am a proponent of buying or DIYing a new grille for several reasons.
- Availability. The price of parts for tuning the grille is low. Moreover, on Kia, Chevrolet Orlando, Lacetti, Renault Duster, Mazda, Lancer 10, Skoda and a number of other cars, the prices are equally good. You don’t have to spend a lot of money to have your VAZ 2105, Nissan X-Trail T31, Lifan x60, Chevrolet Cruze, Priora, Granta or the same UAZ Patriot transformed and sparkle with new colors.
- Installation methods. If you don't even know anything about removing the bumper and are worried about the risks of damaging the heating system when working near the radiator, the replacement can be done by specialists. St. Petersburg, Moscow and almost every city in the country has at least 1 car service center where they are ready to do everything for you efficiently and quickly. You can buy a tuning element and entrust its installation to specialists. Or put the work entirely on the shoulders of the masters. Many workshops are ready to make or order everything you need. It costs more, but you have a minimum of worries. Or do it yourself. Not the worst option either.
- External changes. Installing even a small grille instead of the factory one gives the car a completely different sound. A regular trim or a black grille with original cells perfectly changes the appearance of the car.
- Range. We are talking about both the design and the materials used to create the radiator grilles. Chrome, plastic, aluminum, stainless steel and other materials will allow you to get what you need.
As you can see, there are a number of reasons to start removing the old grille and installing a new original element in its place. Sometimes after such mini-tuning the car immediately looks like new. It can be a slant towards sport, elegance or brutality. It's up to you to decide.
So, let's tune our car? Then you need to choose a suitable new grille for yourself. The easiest way is to buy it specifically for your car. It is enough to know the article number and choose the color that matches your car.
Moreover, the finished grille may already have an emblem or badge that you like. That is, it is not necessary to save the badge of your car. You can literally stick anything on there.
The most important point is the material from which the upper and lower grilles are made. It could be:
- aluminum;
- plastic;
- stainless steel;
- carbon
Aluminum parts are the most expensive, while plastic is considered a budget option. Stainless steel can be called something in between.
Many people choose carbon. You will have to spend more money on it, but even in the photo the car with a carbon grille looks great. In fact, it's even better.