In this manual, we will examine in detail the procedure for removing and installing decorative front door trim on VAZ 2110-2112 vehicles. I would like to say right away that performing this procedure will not take you more than 10 minutes of time and you will need a minimum number of tools, namely:
- Flat blade screwdriver.
- Phillips or figured screwdriver.
A small digression before carrying out repairs. I recommend buying a set of plastic products in the store, which includes all the chips and clips for fastening the trim, carpet and other decorative parts of the interior. It is inexpensive, about 100 rubles, and will never be superfluous. And even more so when removing the casing, since there is a high probability of damaging them.
Photo report on the dismantling and installation of the casing
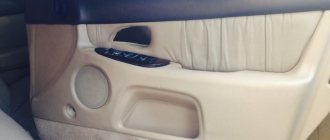
Now you can proceed directly to the work itself. So, open the car door on which all this needs to be done and unscrew the three screws securing the lower door pocket. Look clearly at the photo below:
Then you need to do the following:
- push the bottom part back slightly
- carefully move the pocket down, thereby removing it from the grooves in the casing itself
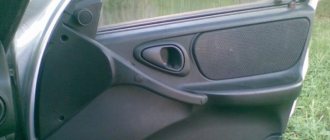
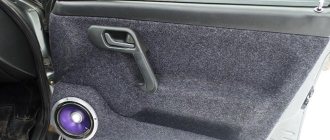
If you have front speakers installed in the doors on a VAZ 2110-2112, then you need to unscrew the 4 bolts securing them along the entire diameter:
Then we perform the following procedure:
- carefully push the speaker back to pull it out of its seat
- disconnect the power wires from the contacts on the inside
Now you can proceed further. We take a thin screwdriver or knife and carefully pry up the trim on the door closing handle, after which we simply remove it by hand.
As you can see, under it there are two more bolts that also need to be unscrewed:
Then you can remove the handle, since nothing else holds it:
- turn it up slightly
- and disengage with the door opening handle
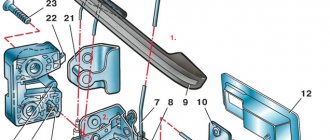
Almost everything is done. There are several points left, one of which is unscrewing the latch locking the front door of the VAZ 2110.
Now, carefully, starting from the bottom corner, we pry up the casing and also carefully try to tear it off the latches (plastic clips) that secure it to the metal part of the frame:
And then we move in small sections in a circle, but we must act carefully so as not to damage or break the upholstery itself. At the last step, we lift it slightly up to free it from the door lock control rod (on which the latch, which we have already unscrewed, is screwed on):
This repair procedure can be considered complete. Then we carry out those actions for the sake of which all this was started; for everyone here there will be their own goals. After completing the repair, install in the reverse order.
A few important points
I would like to note that any modifications to the VAZ-2110 car must be carried out in a place prepared for this. If you are going to upgrade the carburetor, it is advisable that the room is well ventilated, because you will be dealing with gasoline vapors. It is also better not to smoke while performing work; sometimes you even need to wear special glasses
It is also worth paying attention to the fact that it is advisable to have clean water and dry rags with you. All this will help you one way or another
When it comes to working with the engine, remember that if you are not sure about something, it is better to read about it again or find out from a mechanic you know, because you can only make things worse, and engine repair is not cheap. It is worth noting once again that if you are modifying the stove, then it is best to buy corrugations at a car dealership, as they will be more suitable for your purposes.
View gallery
Also, many car owners want to make the car a little quieter, so they install their own sound insulation for this. Here, too, it is advisable to go to a specialized store and not save money, then the result will please you. Remember that the VAZ-2110 car, which you will modify with your own hands, although it is the brainchild of AvtoVAZ, it is a pretty good and demanding car. Therefore, before adjusting the steering rack, add oil, perhaps the situation will improve. Before sinning on a faulty carburetor, change the fuel and air filters.
How to remove and reinstall the front door trim on a VAZ 2110, 2111, 2112
Step-by-step photo and video instructions for removing the trim on the front door on VAZ 2112, 2110, 2111 cars.
It is best to have a couple of pistons for fastening the door trim in stock, because... they can easily break during disassembly.
1. Using a thin screwdriver, press the trim of the window handle away from the socket. At this moment, you need to move it so that the protrusion on the cladding snaps away from the socket. After this, you can remove the trim and window handle.
2. After this, you can remove the socket itself.
3. Using the same screwdriver, press the lock of the plug and remove it from the inner handle of the armrest.
4. The inner armrest handle is held on by two screws. You need to unscrew them too.
5. We press the inner handle of the lock and at the same time turn the armrest handle up and remove it while removing the lock handle from the hole in the armrest handle.
6. The lock button is simply unscrewed with a screwdriver.
7. Now you need to unscrew the screw and remove the outside rear view mirror control mechanism from the lever.
8. The triangular overlay is held on by two pistons.
9. If you are removing the rear door, you need to unscrew the 3 screws securing the trim and remove it.
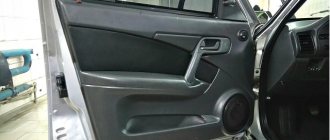
10. The door trim on the VAZ 2110 itself is held on by 8 pistons. The position of the pistons on the front door is indicated in the photo.
11. And on the back door. To remove the upholstery...
12. ... You need to use a screwdriver to press out the upholstery so that the pistons come out of the fastenings. Try to place the screwdriver as close to the pistons as possible - there is a chance that the pistons holders will simply come off.
13. Remove the spacer sleeve from the window lifter shaft.
14. Broken upholstery fastening pins should be replaced. The old piston is simply cut off. The new piston is inserted into the hole with the protrusion and, with light pressure, rotates in the hole until it is completely fixed in the holder.
15. The VAZ 2110 door trim is installed back in the reverse order of removal. Make sure that the end of the lock lock gets into the hole in the trim.
16. Using light blows of your fist on the upholstery, secure the pistons in the door.
17. The edge of the seal must remain outside. If it gets under the upholstery, take it out.
18. In order to remove the front door pocket, you need to unscrew 3 lower and 1 upper screws and it will simply come off. It is also installed back.
Why do doors sag?
There are several reasons that affect the reliability of door fixation and sagging:
- The hinges and axles are badly worn. The door of the vases began to close poorly, and when opening it required considerable force.
- The fastening has become loose and a metallic creak is heard when driving on uneven roads.
- The pairing of the door fixing elements was broken: the hinges were skewed, and cracks formed in the door body. This leads to uneven gaps and the appearance of water in the cabin after rain.
- The door was hit in an accident.
- The doors have not been installed or adjusted correctly.
How to fix sagging doors
Advice: Before carrying out work, it is necessary to determine the cause of the sagging.
Why the door sagged, a small test can help:
- With both hands you need to grab the bottom of the door and, with slight loosening, check the gap in the vertical plane. Play in the VAZ 2110 door hinge is not allowed.
- The door is grasped with hands from above and below. Then you need to try to turn it in a horizontal axis; there should be no movement of the door, no gap is allowed.
- A visual inspection is made of the places where the door hinges are fixed to the car body on a VAZ 2110 car, the hinges of the sagging door are compared with the same elements of a working one, the differences in them are determined and a conclusion is made.
Once the cause of the sagging is identified, repairs can begin. It could be:
- If the door sag due to excessive wear on the hinge axis, it is necessary to replace the pin in the VAZ 2110 door hinge.
- If the entire mechanism has signs of wear or wear, then the VAZ 2110 door hinge assembly needs to be replaced, then the price will be less than installing several new parts simultaneously with heavily worn elements.
After replacing failed parts, it is necessary to adjust the door position. For this:
Tip: To make the adjustment procedure easier, it is better to remove the mating part.
- The door is closed and its best vertical position is visually determined.
- If the door line runs parallel to the body, and the door itself is shifted down or up, it is necessary to slightly loosen the fixation of the upper and lower hinges and raise or lower the door. After this, secure the position with a fixing screw.
- If the corner of the door, the end of which is equipped with a lock, is located slightly below the desired level, while the door hinges on the VAZ 2110 are working properly, the fixation of the lower hinge is unscrewed and the door position is leveled. To do this, thin metal plates or washers are placed under the loop itself, as shown in the photo.
If the edge on which the door lock is located is pulled up strongly, then the fixation of the upper hinge is unscrewed, and the adjusting plates are placed under it.
Tuning and repair of VAZ 2110
Very often situations arise when you need to remove the door trim of a VAZ 2110. Either in order to install sound insulation, or to see why the window regulator does not work, or to install a speaker in the car door. So, in this article I want to show you how to do this quickly and without much difficulty.
I’ll say right away that performing this action is very simple, and you won’t need mountains of tools. Prepare only a knife (or flat-head screwdriver) and a Phillips screwdriver. I would like to warn you right away that it is advisable to buy new clips for the door trim, as they may break when removing the trim. Moreover, if you have already decided to remove the door cards, it would be a good idea to work on eliminating their creaking. You can read how to do this here.
How to make the “tens” engine better
Before increasing power, it is necessary to ensure the inflow and outflow of air from the environment, or rather, increase its quantity. To do this, the standard filter is replaced with a filter of zero resistance or low resistance. It’s worth noting right away that this will give you a few percent of power, about 5-6, which, in principle, is not bad. It is also worth changing something in the throttle assembly. Here it is advisable to use a damper with a larger diameter, for example 54 millimeters
Pay attention to the intake receiver, which will make your car more sensitive. The engine will pick up speed an order of magnitude faster due to the extended pipes
The modification of the VAZ-2110 engine does not end here, but only begins, since the most difficult part comes next, namely the camshaft.
The camshaft is responsible for the moment and duration of opening of the intake and exhaust valves. This indicator directly affects engine power. Of course, you can replace the standard camshaft with a new, more efficient one. It is worth paying tribute to the exhaust manifold, which is responsible for pushing out exhaust gases with the least resistance. In conclusion, you can perform chip tuning, but for this you will still have to contact an experienced electrician who understands this issue. In principle, at this point the modification of the engine of the VAZ-2110 car can be considered complete. Total power can increase by 20%.
Step-by-step guide: how to remove and install door trim on a VAZ 2110
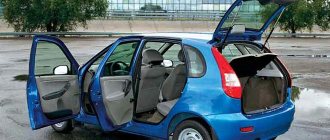
The four-door VAZ 2110 sedan is the flagship model in the Lada 110 family. The last car rolled off the assembly line in 2007 after a twelve-year production cycle. The door trim of the VAZ 2110 is made of durable, hard plastic, the material is resistant to wear and mechanical damage.
The disadvantage of the door trim is the same type of texture and three types of colors; most drivers prefer to tune the interior and change the trim to a more modern material.
Replacement options
Drivers have several options for replacing door trim, each of which has its own advantages and is chosen based on taste:
- Eurocard;
- European cladding;
- panels from the manufacturer;
- independent re-upholstery.
Factory trims from AvtoVAZ are replacement kits for the original trim. They are made of plastic and additionally covered with decorative inserts. The advantages are the exact overall dimensions, ease of installation of clips, and compliance with the door dimensions. Frequently used sheathing kits Lux 1 or Lux 2.
With European cladding, the door lining is made of high-strength polymers and comes in a variety of colors. Manufacturers are small companies specializing in car tuning.
Self-upholstery does not require large investments and is within the capabilities of every driver. The material you can use is textiles, natural, artificial leather, velor, etc.
Tools and materials
To reupholster yourself you will need to prepare:
- Sheathing material.
Experienced drivers recommend using vinyl, but keep in mind that the material shrinks significantly. Before purchasing, you must take measurements and leave at least 10 cm for allowances and internal bends. If genuine leather or suede is used, allow up to 5 cm for allowances.
- Scissors with a long blade.
- Glue. For repairs they use Moment, Master, Titan.
- A construction knife with a small blade and a sharp end.
- Construction or household hair dryer. It is not recommended to use a heating lamp as it may deform the material.
- Glue brushes: thin, wide.
- Set of clips.
For the VAZ 2110 they produce special sets of fasteners, the cost of a set of 10 clips is 30 rubles. Each door will require 8 clips. It is recommended to buy latches with a reserve. During installation, several clips often break, since the fasteners are consumer goods and the quality of the fasteners is not regulated. - Self-tapping screws. If you use independent re-upholstery of the cladding on the old casing, then use standard short self-tapping screws; when installing factory casing or Eurocard, purchase a set of long self-tapping screws.
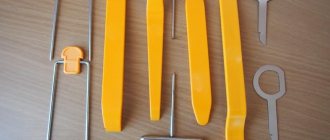
- Crosshead screwdriver.
- A thin screwdriver with a wide blade.
Lux 2 panels and Euro casings have standard places for speakers with a diameter of 17 cm. If the standard Lada audio system has smaller speakers, then you will need to select it to fit the size of the hole or add a rubber or plastic insert to the part to fit the speaker tightly to the mesh.
What to choose?
Sometimes you are amazed at the imagination and thoughts of those who are trying to save money on car repairs. If we talk about rubber seals, some advise using drip tubes instead, others go the other way, inserting window seals.
Do not follow such advice under any circumstances. They won't lead to anything good.
There are several truly correct and effective options, which we will introduce you to using the table.
| Option | Peculiarities |
| Ready-made kits from the manufacturer | They are designed specifically for the VAZ 2110 model. These are mass-produced rubber bands that fit perfectly on the dozen doors. Their design is double-circuit, which allows you to install additional seals if necessary. |
| Measuring rubber bands for VAZ | In stores you can purchase ready-made or soldered seals for each door. Or a solid tape, from which they will cut you a piece of the required length |
| Seals from Priora | Experts believe that these are the most effective and reliable seals. This is due to the three-chamber design with a steel fixing strip and high quality. These elastic bands do not wrinkle and keep their shape perfectly. |
| Rubber bands from GAZelle | A frequently encountered option that has similar characteristics to the standard elements for the dozen. The price is about the same |
When choosing the length of the required piece of seal, measure the internal length of the installed rubber bands on both doors separately. Take it with a reserve, because you can always cut off the excess.
The fixing elements should be caps and high-quality, effective glue. When purchasing the rubber itself, they will tell you which glue is best to use.
Dismantling
At a service station, a mechanic spends no more than 15 minutes to disassemble door panels. Self-replacement will go quickly if you adhere to the order of work and do not change the sequence.
Front doors
The work algorithm for the front and rear doors of the VAZ 2110 is slightly different. Before work, you must disconnect the negative terminal from the battery. If the standard trim is reinstalled on the Euro trim, then it is necessary to remove the window lifter lever.
How to remove the front door trim of a VAZ 2110 step by step:
- Wrap the screwdriver in a rag or cover the tip with electrical tape.
- Using a screwdriver, press the trim of the window handle away from its socket.
- Guide the screwdriver so that the panel comes out of the grooves.
- Dismantle the cladding and remove the socket.
- Using a screwdriver, press out the lock of the driver's door armrest plug.
- Remove the clamp.
- Unscrew the two screws that hold the handle.
- Press the inner handle of the armrest, turn it up, and remove the part.
- Unscrew the screw that holds the mirror mechanism and remove it from the lever.
- Remove the two fastening clips from their seat and remove the triangular trim.
- Carefully slide the screwdriver under the panel and unfasten the 6 clips.
If the driver's or front passenger's door is equipped with a power window, then after removing the handle lock, you need to disconnect the plug.
Rear doors
The differences in work when removing the door trim are based on the fact that power windows are rarely installed for rear row passengers. Removal of the rear door trim is carried out in the following steps:
- Use a thin screwdriver to pry the trim on the door handle and remove the part from the grooves.
- Unscrew the two bolts located under the trim.
- Carefully move the handle to the side, remove it from its seat, and pull it out.
- Unscrew the three screws securing the lower rear door trim panel.
- Remove the bottom panel.
- Unscrew the latch blocking the door from the inside.
- Pry off the cladding panel with a screwdriver; you can use a wooden wedge, bend it back and snap off the fastener clips.
The plastic clips must be reinstalled with new ones when assembling the updated door card.
Preparatory work
Some are satisfied with dismantling without removing the remaining components of the interior, but this takes extra time and complicates the process as a whole. In order not to add more work to yourself, it is recommended to clear the interior for free movement. Strictly observing the sequence, you need to remove:
- armchairs;
- glove box;
- steering wheel;
- disassemble the floor tunnel. To do this, you need to unscrew the screws and move the part back a little.
We dismantle the lower part in the same way. The next step is to remove the glove compartment, after which you should remove the relay and mounting block. As you disassemble, you need to mark all the wires
Particular attention must be paid to the speedometer
Self-upholstery
Before directly reupholstering, it is recommended to check the condition of the inner door panel, remove pockets of corrosion, check or replace sound insulation, replace rubber seals, so the doors will open better. For VAZ 2110, the service life of door seals is up to 3 years. The process of re-covering a door part yourself step by step:
- Clean the outside of the card. You can sand it with fine-grain emery for better adhesion of glue and leather.
- Attach the door card to the material, cut around the perimeter, leaving at least 7 cm around the edges.
- Treat the outer surface with glue and the inside of the future cladding with glue. Apply glue according to the manufacturer's recommendations. If an adhesive composition is used, then after coating you need to wait up to 10 minutes.
- Place the vinyl on the door card, constantly heating the material with a hairdryer, and level the surface so that the leatherette fills all the curves of the part: the space for the speaker, for the central panel, the recesses for the handles.
- Cut out all the holes that are covered with vinyl in the door card from the center and not reaching the perimeter, carefully wrap it on the wrong side, making sure that the edges of the fold do not exceed 2-3 cm. Trim off the remaining vinyl.
- After gluing the card, trim off the remaining vinyl, leaving at least 3-5 cm on the inside of the card perimeter.
After the glue has completely dried, install the door card on the car in the reverse order, having first changed all the clips.
The final stage is pasting
Next, using a hairdryer, the leather substitute is glued to the trim. Due to the effect of high temperature, our material will become more elastic, accordingly, all bulges and irregularities will be eliminated (that is, the work will be completed without “jambs”).
The edges of the leather are carefully folded and trimmed with scissors. The same work is done with the rear pair of doors. By the way, the hole for the door handle is processed in a similar way - first, 2 diagonal cuts are made, glue is spread on both sides and the material is bent inward.
Installation of a ready-made kit
Re-upholstering the cladding yourself does not always help save time or money. If you don’t have time to do this yourself, then you can use ready-made cladding.
The set of door elements Lux 2 from AvtoVAZ has additional sound insulation, a set of standard fasteners, mesh for speakers and screws. Installing a finished panel takes up to 20 minutes for an inexperienced driver. When choosing a casing, choose original replicas; if the set contains only four panels, then the speaker grids, caps and screws must be purchased separately.
The lower part of the door trim needs to be screwed in only with long screws; if the standard kit offers short ones, then you need to change the screws yourself.
Installation of Lux 2 cladding in steps:
- Remove the old card.
- Attach a new panel, check the gaps and the alignment of the fastener locations.
- If the car is equipped with a mechanical window lift, then the panel needs to be modified. Lux 2 does not have a hole for the handle of a mechanical lift.
- Secure the trim to the clips.
- Tighten all the bolts and secure the outer trim panels.
Noise Removal
Basically, the panel rattles both due to improper installation and because the three parts that make it up touch each other, which causes creaks and rattles in the cabin.
That is why sound insulation is necessary, which the manufacturers did not take care of properly, and it is up to the owner to finalize it. Modelin can be used as sound insulation. They can paste over:
- All places where three parts of the panel touch;
- Those parts of the panel where it comes into contact with the radio, on-board computer, etc.;
- All bolt holes are also covered with modelling. It won’t hurt to screw them in, but there will be additional sound insulation, as well as protection against heat loss;
- Sides of the glove compartment;
- "Black box" in those places where it comes into contact with the panel.
Sources
- vazweb.ru/desyatka/salon/torpeda.html
- drive2.com/l/525053636976313571/
- drive2.ru/l/8335986/
- drive2.ru/l/452409453484966614/
Cost and types of finished skins
At a specialized service station, the cost of reupholstering a door trim starts from 3,000 rubles. excluding the cost of the door card. Depending on the model, in 2022 the following prices for ready-made kits for the VAZ 2110 will remain:
Clips and nets for speakers must be purchased separately.
Fastening
The cost of one door trim piston is from 3 rubles. AvtoVAZ produces plastic fasteners in its workshops. Product code 2108-6302015, 21080630201500, width, clip length 1.5 cm.
The mount has a simple shape and holds the door panel trim using a plastic skirt. The manufacturer claims high quality parts, but in practice, when disassembling the door card, two of the six required clips break. When installing Euro sheathing, on average one clip breaks, this is worth taking into account.
0 0 votes
Article rating