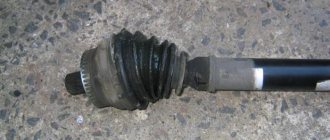
The outer CV joint on a Lada Priora car needed to be replaced after it began to crackle. I had to crawl under the car and there it was discovered that the boot was torn. And because of this, the CV joint failed. Replacing the boot requires removing the CV joint. But if the CV joint starts to crunch. It will also have to be changed.
Because dust and sand got into it. The rolling surface of the balls is worn. Simply replacing the grease and boot will not solve the problem. The CV joint will still crunch. And eventually it will jam.
Preparing to remove the outer CV joint
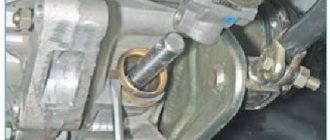
In order to remove the CV joint, you need to do a little preparatory work. This work consists of unscrewing the CV joint nut from the wheel side.
As you can see in the photo, the nut is covered by a cap; it must be removed, but this requires removing the wheel.
The car needs to be jacked up. And set additional stops so that the car rests on these stops and not on the jack.
Hanging the car is the most important procedure in all repairs. The car must be positioned in such a way that you can live under it. Drink coffee and watch TV. And you don’t worry about something falling on you from above. The jack is intended exclusively for raising and lowering the car. And if only the jack is under the raised car, it cannot be used.
If there are no factory stops installed with the jack. Wooden blocks or boards will do. You cannot lay bricks. They split and the car falls. In general, even if you spend the whole day securing a lifted car safely, it’s not a big deal. And much better than remaining crippled. Sorry for the digression. But we can't rush.
After hanging the car, you need to remove the wheel. to remove the protective cap. Then the wheel must be installed back. And lower the car until it makes full contact with the floor. This must be done in order to unscrew the CV joint nut. It tightens with great effort. And stalled. In the groove of the CV joint.
To unscrew it, you will need a powerful wrench. On which you can put the pipe as an extension. This is why you have to put the car on the floor so that there is support. And the gearbox did not turn over due to the applied effort. After the nut is unscrewed, the car must be returned to its jacked state and the safety stop must be securely positioned. And remove the wheel.
How to change the inner CV joint on Kalina, Priora, Nexia
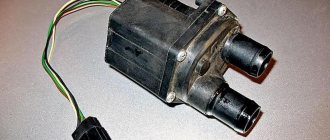
The inner CV joint is one of the most important mechanisms in the transmission system. Its purpose is to transmit torque from the transmission directly to the front wheels. Most modern front-wheel drive cars are equipped with this part, and each drive is equipped with two CV joints: internal and front.
Failure of this small part if not corrected in a timely manner can lead to wear and damage to other important parts of the transmission. To prevent such an unpleasant situation, the car owner must know:
- signs of CV joint failure;
- basic diagnostic methods.
And also be able, if necessary, to replace a damaged mechanism with a new one. This does not require extensive experience in car repair, therefore, if desired, almost anyone who confidently holds a wrench in their hands can cope with the task. Next, the features of replacing the internal CV joint will be described.
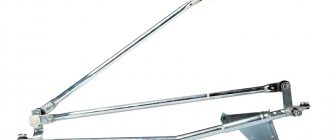
Removing the ball joint
It is necessary to disconnect the stand from the lever. To do this, you need to unscrew the ball joint. Either from the lever or from the stand. It is more convenient to unscrew the two bolts from the rack. Which secure the ball joint.
If you unscrew the nut from the lever, the ball joint will not come out. The finger is a cone. A puller is required for removal. Or you will have to apply strong blows to the junction of the lever and the finger. The boot may be damaged. After the bolts are unscrewed, it is imperative to pay attention to the ball joint. It shouldn't be loose. If you crank. It should sit tightly in the ball. If it dangles and there is play. The ball joint must be replaced immediately. To do this, unscrew the nut and use a puller to remove the ball joint pin. You can simply apply a few sharp blows with a hammer to the side of the lever. Where is the pale inserted?
Since the connection is conical. As a result of the impact, the hole will be deformed and the finger will be squeezed out. But this is a rough option. And it doesn’t always help to use a special puller. After the strut is disconnected from the lever, you can pull the CV joint out of the hub.
Installation of new hinges
After disassembling the drive, it is necessary to install new parts and reassemble the transmission in the reverse order. Replacement is done as follows:
- The small clamp is put on the axle shaft first, followed by a new boot. The clamp must be placed around the end of the casing and tightened. It is better to turn the boot in the other direction so as not to interfere with the installation of the hinge.
- Add SHRUS-4 lubricant to the hinge mechanism. According to the instructions, there should be at least 40 cm³ in the outer grenade, and 80 cm³ of thick lubricant in the inner grenade.
- Place the grenade on the shaft, making sure the splines match. Using a wooden adapter, press it as far as possible with gentle hammer blows.
- Pull the boot onto the grenade, apply a large clamp and tighten it. In the same order, the operation is performed on the other side of the axle shaft.
Now the drive assembly can be put into place. In order not to confuse the hinges, you should follow the mark placed on the axle during disassembly. The assembly is mounted into place from the inspection ditch, the splined part of the internal grenade being inserted first. To seat it in the slots all the way, you will have to rest the axle on the lower lever and apply several blows with a hammer through a piece of wood from the other side. Further assembly proceeds in reverse order.
Replacing the outer CV joint of the Prior
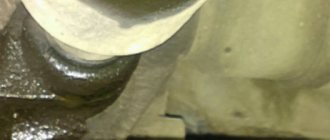
The CV joint sits on the shaft using a splined connection. The splines have two slots into which retaining rings are installed. On the inside, the ring limits the movement of the CV joint inside the shaft. And it is a rigid thrust ring. On the other side of the shaft, the CV joint retaining ring is springy and when the CV joint is installed, it is compressed. There is a slot in the inside of the splined part of the CV joint.
The ring gets into it and, straightening, stops the CV joint from coming out of the shaft. This connection ensures that the CV joint is in a fixed position and eliminates its beating. In order for the CV joint to come out, it is necessary to apply several sharp blows to the CV joint. As a result, the retaining ring will compress and the CV joint will freely come off the shaft. All that remains is to remove the remaining old grease from the torn boot from the shaft. And wash the spline connection.
Packing the CV joint with lubricant
Before installation, the CV joint must be filled with lubricant. Special CV joint oil 4 is used as a lubricant. Lubricant must be filled into the splined part until it begins to show from the balls.
This will fill the entire internal volume of the CV joint.
Replacing the CV joint boot on a Priora
Before installing the CV joint on the shaft, it is necessary to put the CV joint boot on. It is not necessary to remove the internal retaining ring. The boot is put on the shaft like a stocking. At the same time, he turns inside out. After the boot passes the locking ring, you need to turn it back out.
To install the narrow part of the boot on the shaft there is a ring-shaped extension. The boot should slip through it... and rest against it with its back side. this will look like a stopper for the boot. If it is installed before this expansion, the boot will quickly tear. And the replacement of the Priora CV joint boot will need to be repeated.
Installing the CV joint on the shaft
The CV joint must be inserted into the splined part of the shaft up to the outer retaining ring. After the CV joint rests against it, apply a slight sharp blow to the CV joint from the outside. Be sure to place a wooden block at the impact site. To avoid damaging the CV joint threads.
The outer retaining ring is compressed by the impact and the CV joint is pushed onto the shaft until it touches the inner retaining ring. As soon as the CV joint rests. The outer retaining ring will snap into place in the groove of the CV joint. It is necessary to put the boot on the CV joint. After the boot is in place. Clamps are installed.
How to tighten a clamp on a CV joint
Tightening clamps requires a lot of patience, especially if you don’t do it often. The clamp that comes with the kit. Most precisely suited for installation on the CV joint boot. Because after installation it has minor protrusions. Which do not allow catching grass, wire and all possible fibers.
The installation principle is quite simple. At the end of the clamp there is a slot with a protruding peak. it is necessary to hook the peak onto the protrusion on the clamp located exactly in the place that gives the normal tension of the clamp. There are two additional tabs on the clamp. Designed for gripping with pliers or pliers. With the help of these protrusions the clamp is tightened. A clamp with a smaller diameter can be pulled together almost without problems. Using pliers.
Their span is enough to reach the protrusions on the clamp. But I had to tinker with a larger diameter clamp. A larger span of something is required that can tighten the clamp. I couldn't find anything of that size at hand in the garage. I had to use old metal scissors, having previously sharpened the hooks on the tips of the scissors. And only after that it was possible to tighten and connect the clamp.
That is, it is very difficult to tighten the clamp on the CV joint without special tools.
So-called Euro clamps are sold separately in stores. Installing them is more convenient and faster. The clamp is connected using protrusions at the end. Then it is pulled together using regular pliers.
After installing the boot, you can insert the CV joint into the hub.
Installing the CV joint in the hub.
After the CV joint is installed on the shaft. It must be inserted into the hub. The stand is retracted again. The CV joint easily fits into the hub.
The ball joint is screwed to the rack with two bolts. Then you need to put the wheel back in place and lower the car to tighten the CV joint nut.
The tightening force is 225-247 N*m. The force is quite large, you don’t always have a torque wrench at hand. This nut is tightened as tightly as possible so as not to strip the threads. If tightened without a torque wrench. There is no need to be afraid of squeezing the bearing. Bearings are installed on the hub. Here the CV joint is simply attracted to the hub. And the large tightening force is associated with the loads that the CV joint transmits to rotate the wheel. Tightening prevents runout from appearing in the splined part of the hub and CV joint. After the CV joint is tightened. It is necessary to lock the nut.
Then remove the wheel again and put the protective cap back in place. Screw in the stabilizer.
Replacing the CV joint on a Lada Priora. The procedure is not complicated. This means that you can make repairs yourself, even if you haven’t done it before, without much effort. The only problem with the clamps is of course problematic. Therefore, it is better to take care in advance and purchase Euro clamps for the anthers
Disassembly procedure
The first operation is not removing the wheel, but unscrewing the large wheel bearing nut. It is caulked, so it will be much more difficult to loosen when the car is raised. After this, the wheel bolts are loosened and the car is raised with a jack.
Do not forget to place reliable supports under the rear wheels to secure the car.
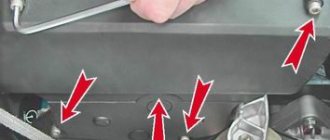
If the Priora has a metal sump protection installed, then it also needs to be removed in advance. In addition, it does not hurt to partially empty the gearbox oil sump to avoid liquid lubricant leaking through the open hole after removing the drive.
Further steps are carried out according to the following algorithm:
- Disconnect the steering rod from the rack using a puller. To do this, you need to unscrew the ball pin and put a squeezing device on it. Pressing out is done by tightening the bolt on the puller.
- Unscrew the 2 bolts holding the ball joint. You can turn the steering wheel all the way so that the hub is in a comfortable position.
- Use a sharp object to mark the axle shaft on the gearbox side, and then pull it out of the spline joint, holding the brake disc with your hands on both sides.
- Place a small container under the gearbox in case of oil leakage and remove the internal grenade from the splines. This is done using a mount whose blade rests on the gearbox housing. If manual pressure on the mount is not enough, then you can give it several gentle blows with a hammer to move the assembly from its place.
When the drive assembly is removed from the car, it must be completely disassembled and worn elements, including anthers, must be replaced. Disassembly begins with them, for which it is necessary to loosen the fastening clamps and move the rubber boot, and then clamp the axle shaft in a vice closer to the end with which work will be carried out.
When it is known that the grenade needs to be replaced, there is no need to stand on ceremony with it and you just need to knock it off the slots with a hammer, holding it with your hand at the other end, and then remove the boot. The second grenade is dismantled in the same way, only the axle shaft must be moved in a vice and clamped closer to the hinge. If, for various reasons, the grenade needs to be kept in normal condition, then it must be knocked down carefully, using a wooden handle.