Replacing a car's steering ends is a mandatory procedure that is performed when servicing a vehicle's suspension. These structural elements are responsible for turning the wheels.
Therefore, the condition of the tips must be constantly monitored to guarantee driving safety and decent maneuverability of the machine. Damage to the steering tips will result in a loss of connection between the wheels and the steering wheel, which can lead to irreparable consequences.
Structurally, the tips are hemispherical steel fingers, which are equipped with threaded connections for attachment to steering rods. These parts ensure a clear correspondence between the steering wheel turns and the front wheels of the vehicle.
Service life of tie rod ends
Despite the importance of tie rod ends as a part, their service life is very limited. Tips are not a technically complex part, but this does not reduce their importance in the steering of a car. The approximate service life for which the tips are designed is 10 times less compared to the same engine, and reaches 30,000 - 40,000 kilometers. At this point, many car enthusiasts may object, saying that according to the regulations, the tips are changed less often - on runs of 50,000 - 60,000 kilometers. And they will be right, but only partly.
The harsh reality and domestic roads literally leave a certain imprint on the car’s suspension. Poor quality road surfaces, high humidity, dust, dirt, chemicals - all this greatly affects the condition of the suspension and steering components. And the tips in this situation are no exception, so the problem of their breakdown on runs from 20,000 to 30,000 kilometers is quite common for many advanced car enthusiasts.
Recommendations for car owners
To check the serviceability of the tip, you need to ask an assistant to turn the steering wheel in different directions. At this time, you need to listen to the outgoing knocks. You can use a pry bar to check for play. If during the test you hear a knock and there is play, you must immediately take measures to eliminate the malfunction.
Experienced car owners who have encountered this situation more than once advise:
- store the car in a dry room, because with constant humidity, parts are subject to destruction;
- avoid driving off-road and on roads with poor surfaces;
- upon completion of the repair, especially if it was carried out by another person, check the tightness of the wheel bolts and the parts being replaced;
- buy original and high-quality spare parts from reliable suppliers;
- After all work related to the chassis of the car, adjust the wheel alignment.
Operating a vehicle with a faulty steering system can be dangerous for the driver, passengers and other road users. Therefore, you need to repair your vehicle in a timely manner and listen to the advice of experienced motorists.
Diagnosis of faulty steering tips
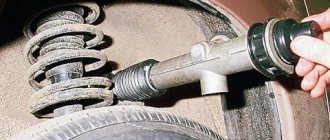
Diagnosing tie rod ends is quite simple; you only need a few tools, such as a jack and a wheel wrench.
First of all, you will need to jack up the car on one of the sides where the tips will be checked. After the car wheel is hung, it can be removed (optional) in order to facilitate the procedure for inspecting the tips.
To check the tips and tie rods, set the wheels straight and apply force to the pre-hung wheel at points “3” and “9” (just like on a clock), as if rocking the wheel in each direction. Moreover, from the inside of the wheel, with your free hand it is necessary to hold the steering tip at the place of its attachment to the steering knuckle.
If play is detected during this check, the tip is worn out and will need to be replaced. However, if no play is observed, then we repeat the checking process, but this time with our free hand we control not the steering tip itself, but the lower ball joint. With such a check, parasitic backlash should definitely appear.
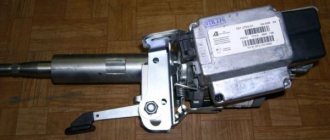
Some installation details
If both rods are changed, they must be tightened at the same time, making sure to fix the rack shaft. This will help prevent damage to the nut that holds the shaft inside the rack. During factory assembly, both rods are simultaneously screwed to the rack and tightened equally, without destroying the block or its stop.
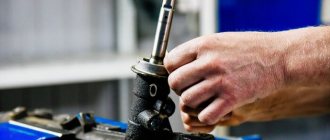
If it is possible to use a vice when replacing, you must carefully clamp one of the rods in it and tighten the second. To do this, it is advisable to use a torque wrench. During tightening, the rack body will rotate slightly. It's not scary. After tightening the rod, you should process its hinge, since burrs may remain on its plane after clamping in a vice.
Important! When installing parts without dismantling the steering rack, they should be tightened extremely carefully and correctly in order to obtain the required tightening torque, while avoiding the occurrence of increased torque on the rack shaft. The shaft has special flats for which it is secured with a key. But this is not always possible, since not all shafts have them; in addition, due to the peculiarity of their location, a special key is needed. Please note that it is strictly forbidden to use pliers to fix the shaft, as their jaws will damage the polished surface.
As you can see, the procedure for replacing rods is not complicated. Difficulties can only arise with tightening them, which is why motorists prefer to carry out this procedure in a car service center.
The process of replacing tie rod ends. Introduction and instruments
It is necessary to approach the work of replacing steering tips responsibly, because driving with faulty tips can lead to dire consequences. You should also pay attention to the attachment of the tips themselves to the steering knuckles.
There are two types of attachment of tips to steering knuckles:
- installed with the pin down into the steering knuckle - closed type (with a closed outer casing and no nut on top);
- installed with a pin on top - open type (with an outer casing equipped with fixing nuts).
Depending on what type of tips are installed on the car, the set of necessary tools will also vary. So, for closed-type tips installed with the pin down into the steering knuckle, you will need a special puller, using which the tip can be easily “squeezed” out of the steering knuckle. Some craftsmen do without a puller, using a hammer, but it is better to refrain from such manipulations.
So, to replace the work you will need the following set of tools:
- jack;
- wheel wrench;
- a set of open-end wrenches and socket heads;
- WD-40 or other similar lubricant;
- brush;
- puller (for closed type tips);
- hammer (just in case).
Elimination of parts deformation
When bending any element, there are two ways:
- It is trivial to take and cut it in half and thus create freedom of action for yourself. A radical method, of course, but you should understand that parts with defects should be replaced in any case, because this greatly affects your safety.
- Heating a part to deform it to its original position. With this method, you still need to understand that you need to do everything carefully, because you don’t want to damage parts that are in good condition or remove the paint from the car under the influence of high temperatures. After this, it is also still worth replacing the part, since it will no longer perform all its functions and may behave extremely unpredictably.
Purpose and operation scheme of the trapezoid
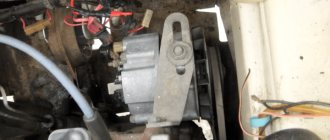
The rod system serves as an intermediary between the steering shaft and the steering knuckles of the front hubs. The task of the mechanism is to synchronously turn the wheels in one direction or another, obeying the rotation of the steering wheel. The trapezoid is located under the engine at the level of the bottom of the car, attached to the body stiffening elements - the lower side members.
The part of the steering mechanism in question consists of 3 main parts:
- the middle link is screwed to two bipods - a pendulum lever and a worm steering gear;
- the right link is attached to the swing arm of the pendulum and the steering knuckle of the front right wheel (in the direction of travel of the car);
- The left rod is connected to the gearbox bipod and the left front hub knuckle.
Trapezium levers mechanically connect the steering wheel with the mechanisms of the front wheels.
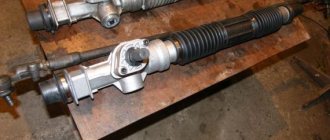
The middle link is a hollow metal rod with two hinges. Two side rods are prefabricated elements consisting of 2 tips - long and short. The parts are connected to each other by a threaded clamp, tightened with two bolts.
How does a trapezoid work:
- The driver turns the steering wheel, rotating the shaft and shank of the gearbox. The worm mechanism transmits fewer revolutions to the bipod, but increases torque (force).
- The bipod begins to turn in the right direction, dragging the left and middle rods with it. The latter transmits force to the right rod through the pendulum bracket.
- All 3 elements move to one side, causing the front wheels to turn synchronously.
- The pendulum arm, mounted on the second spar, acts as an additional hinged suspension for the system. In older versions of pendulums, the bipod rotates on a bushing, in new elements - on a rolling bearing.
- Ball pins at the ends of all rods allow the trapezoid to move in one horizontal plane, regardless of the compression of the front suspension springs.
The side lever consists of two tips fastened with a clamp
Increasing torque with a worm gear makes it possible to do without hydraulic and electric power steering. On the other hand, the driver physically feels problems with the chassis - as soon as the ball joint or rod end becomes sour, it becomes much more difficult to rotate the steering wheel.
Design and purpose of the node
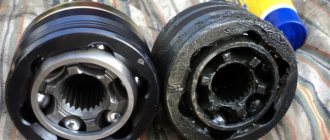
The ball joint is designed for reliable movable fastening of the wheel hub to the suspension arm. The ball joint consists of a ball pin, a housing and a plastic insert. The body of the ball joint is either spot welded from two halves with stamped, spherical recesses with a hole for a finger in one of them, or it is a thick-walled metal cup into which an insert with a finger is inserted, after which the bottom is placed, and the edge is rolled so that the structure does not disassemble. Sometimes the liner is not made, but the gap between the body and the ball is filled with softened polyamide plastic. An extruder is usually used for this. It is also used as the main equipment in companies for the restoration of ball joints. To protect the mating surfaces of the hinge from water and dirt, put a rubber boot on top.
True, the joint of the welded body is not airtight, so water gets into the body through it, even with a whole boot. Therefore, if the assembly body consists of two parts, it is advisable to fill it with lithol through a grease fitting.
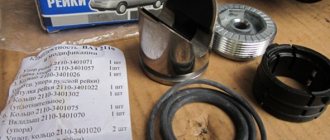
Recovery
- Emery or grinder.
- Extruder.
- An electric drill with a large chuck (so you can hold your finger in it to sand the ball with sandpaper).
- Metalwork yews.
- Welding machine (preferably semi-automatic).
- Compressor.
Restoration of supports can occur in two ways:
- Converting a non-separable hinge into a collapsible one, grinding the pin ball and replacing the liners.
- Repair by injecting softened plastic into the gap between the ball and the body using an extruder.
Of course, you shouldn’t buy equipment for a one-time repair, but you can quickly make a simple extruder with your own hands from an old brake master cylinder by attaching a lever to it to press the piston. You can heat it to soften the plastic with a torch or blowtorch.
Carrying out work
Repair and restoration in the first way begins with dismantling the supports. To disassemble a body welded from two cups, you need to drill out welding points on one of the cups and separate the cups using a chisel and hammer. On a body with an inserted bottom, grind off the flared edges using emery or a grinder, and knock out the bottom with a hammer to the end of the finger. An insert with a finger is inserted into the body of two cups, the halves are pressed against each other and several tack welds are made, trying not to overheat the insert. For a case with the bottom removed, measure the outer and inner diameters and make a steel ring in accordance with these dimensions, about 10 mm high with a thread inside and a plug screwed into it. Weld the ring to the body, cool, insert the insert with the pin into the body, screw in the plug, press the liner with it, drill a Ø 2 mm hole in the ring close to the plug and secure it with a cotter pin.
Do-it-yourself repair and restoration using the second method usually takes place without disassembling the unit.
A hole with a diameter of about 6 mm is drilled in the bottom of the body, its size depends on which extruder is available to you. The gap between the ball and the liners is cleared of dirt and blown with compressed air to remove sand and chips. Through a hole drilled in the bottom, using an extruder, softened plastic is injected into the gap between the pin ball and the body. Let it cool and the repair is ready. The disadvantage of this method is that you cannot see whether the geometry of the ball has been preserved and you cannot polish it to remove traces of corrosion, so the restoration results will be short-lived.