1
The above action should be performed in order to detect malfunctions when diagnosing or repairing the fuel system and specifically in the fuel supply system. Next we will talk about how to properly check the pressure in the ramp.
at home.
Signs indicating fuel system malfunctions:
- The engine is running rough or there are some interruptions in its operation.
- Idle speed floats, engine stalls at idle.
- Excessive fuel consumption occurs.
- CO in the exhaust is higher than normal.
If the car has similar indicators, the ECU at this moment works well, the problem is most likely in the fuel rail. To make sure that this is so, you need to check the pressure in the rail.
When can fuel consumption increase?
It is worth paying special attention to such a sign of a regulator malfunction as increased fuel consumption. The car will require more gasoline to operate if the valve in the regulator is faulty or, conversely, it does not hold fuel. In the first case, excess fuel is not returned to the tank; the car owner may notice pressure above 2.5 kg/cm2. As a result, more gasoline enters the combustion chamber of the engine, which is not completely consumed.
If the valve does not perform its functions, fuel “staggers” through the system. The pressure in the fuel system decreases, and as the speed increases, the engine feels a clear shortage of gasoline. The power unit becomes less responsive and powerful. A valve malfunction can be noticed when starting the car for a long time - during the process, the starter has to be turned for a long time until it creates the necessary pressure.
How to check fuel rail pressure yourself
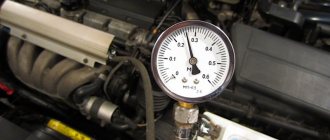
This procedure will require a pressure gauge, the maximum value of which is 7-10 atmospheres. It is not recommended to use a more powerful pressure gauge, since the error when measuring a small pressure will be too large.
Homemade device for measuring pressure in the fuel rail
You also need to have a hose with an internal diameter of 9 millimeters and tow used for plumbing work (it can be used to ensure a tight connection). After this, all joints should be strengthened with special clamps. If possible, you can facilitate and speed up this process by using a ready-made device for measuring pressure in the ramp
.
When is it necessary to change the regulator?
The main signs of malfunction of this part are described in the preface to the article, but I would like to add a little. The regulator is similar to a valve and has two positions: open (bleeds off excess pressure) and closed (pressure does not leave the system, remaining in it - typical when the engine is turned off, when the pressure should not leave the system so that after some time you can get into the car and start it without any problems). Over time, the regulator wears out and ceases to perform its functions.
Usually, it gets stuck in one position - it either becomes completely open or completely closed. Then the pressure in the system becomes constantly low (the freeze occurred in the “open” position), or it increases significantly (the regulator remains in the “closed” position). In both cases, the malfunction affects the ride quality and wear of parts, therefore, if a problem is detected, we recommend that you replace the failed part and continue to enjoy full driving of the car.
Important! If you are not sure that the problem lies in the regulator, then before replacing, we recommend checking the spare part for functionality. You will need a pressure gauge. The cost of this device in car dealerships ranges from 1000 rubles and more. We strongly do not recommend purchasing a device that is too expensive, since you probably do not intend to use it constantly for professional purposes. You can use a life hack: try driving to a service center and renting a pressure gauge, it will be much cheaper. We filmed the procedure for checking the regulator.
Be careful!
Before checking the pressure of the fuel system, you need to make sure that it is intact and there is no depressurization, otherwise the measurements will be inaccurate. First of all, you need to open the hood, then turn off the ignition.
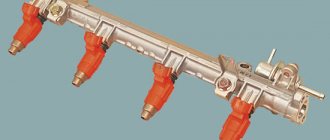
- Find the injector fuel rail.
- Remove the fuel pressure fitting plug and unscrew the nipple using a spool valve.
- Using rags and containers, remove any remaining fuel. Be careful to avoid contact with eyes.
- Connect the device hose to the fitting and secure it using the same clamp.
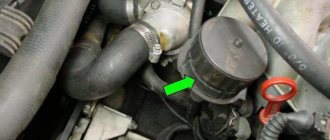
Regulator location
It is located in the side and at the top of the ramp; you can see its location in more detail in the photo below. The regulator is indicated by two arrows: the red arrow shows its approximate location, and the blue arrow shows the regulator itself. It is easy to find and quite simple and quick to change.
Where is the fuel pressure regulator on the VAZ 2115
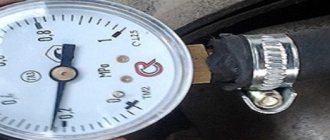
The pressure that should be in the fuel system:
- at the moment the ignition is turned on - at least 3 atmospheres;
- with idle speed - about 2.5 atmospheres;
- with the fuel pressure regulator tube removed, approximately 3.3 atmospheres;
- when adding gas, the pressure should increase to 3 atmospheres and drop to 2.5.
- After fuel enters the systems, turn off the ignition and monitor the pressure gauge readings. If the ramp is working properly, the pressure should be about 0.7 bar, and then stabilize at this mark.
- If the pressure drops to zero, this is a sign of a faulty fuel pressure regulator (FPR). It will be necessary to remove and replace it or install a new check valve for the fuel pump motor.
- Raise the rpm to 3000, watching the pressure gauge needle. If the arrow goes down, there is a problem with the fuel pump.
- If the fuel pump does not provide the required pressure, the strainer is probably clogged, and maybe the fuel filter of the pump is clogged.
- If the above signs are not confirmed, it is necessary to check the TPS, IAC, mass air flow sensor, and engine cylinder compression.
conclusions
After reading this article, you can easily take measurements in the fuel rail and compare the results with standard indicators of serviceability in the fuel system.
The article will describe a testing technique that does not require special devices.
From the tool you will need:
- Any mechanical pressure gauge with a maximum reading from 6 to 10 atmospheres (0.6-1.0 MPa)
- 8 or 9 mm fuel or oxygen hose
- Cap for unscrewing nipples on the wheel
- Two clamps
- Pliers
1. We took a regular gas pressure gauge with a scale of up to 1.0 MPa. It has a threaded connection and screws perfectly onto a 9 mm oxygen hose. You can use a mechanical one to check tire pressure. They are usually inserted into the fuel hoses by 8 mm.
2. Screw it into the hose and tighten it with a clamp:
3. Unscrew the plastic cap from the fuel rail. It should unscrew by hand, but if it hasn’t been touched for a long time, you may need pliers:
4. If the car has just been turned off, then the gas in the ramp is under pressure. First, it is recommended to release the pressure by pressing on the spool and placing a rag or a plastic “bottle” with the neck cut off. It is more convenient to bleed using a wheel cap.
5. Unscrew the nipple with the cap. It is similar to a wheel nipple:
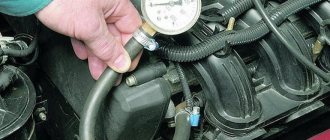
6. We put a hose with a pressure gauge on the threaded part and tighten the connection with a clamp:
7. Start the car and first of all make sure that there are no gasoline leaks from the connections. Then we look at the pressure gauge readings.
8. For fuel systems with “return” (a pressure regulator is installed on the fuel rail, from which a tube goes back to the tank), a pressure of 2.7 atm is considered normal (when re-gasping it should jump up to 3 atmospheres). However, a pressure of 2.5 atm is also acceptable. If the pressure is less, then the fuel system is faulty. Pressure pulsation (0.2 atm) indicates a clogged coarse mesh (located in the tank with the fuel pump).
9. Next, we check the pressure regulator. To check, disconnect the hose going from the regulator to the intake manifold. The fuel pressure should increase to 3.2 atm (at 2.7 initial). Up to 3.0 atm is also acceptable. If the pressure has not changed or changed only slightly (0.1-0.2 atm), then you need to check the fuel pump.
10. The maximum pressure developed by the pump is checked. To do this, use pliers to pinch the return fuel line (coming from the regulator). Different pumps show different pressures, but a new one should have at least 6 atm. A pressure of 5 atm indicates severe wear, but will still serve. If the pressure is less than 4.0 atm, the pump is faulty or the pipeline with the fine filter is clogged. If the fuel pump is working properly, and the pressure in the rail drops after the “return” is restored to less than 2.5 atm, and/or does not change when the regulator hose is disconnected, then the regulator is faulty. If, when the return line is pinched, the pressure rises slightly, and engine performance deteriorates significantly, then there is a high probability of injector leakage.
11. To eliminate the influence of the injectors, it is better to measure the pressure on the supply line itself by disconnecting it from the ramp and inserting it into a hose with a pressure gauge. If the pressure has risen to 5-6 atm, and with the “return” compressed it is significantly less, then the injectors are allowed to pass through. It is necessary to remove the ramp and check the condition of each individually.
12. You can check for clogging of the pipeline as follows. Remove the rear seat and unscrew the hatch. We see the fuel pump assembly underneath it. If the pipeline has quick-release connections, then we buy such a connection in the store (50 rubles).
13. If the pipeline is installed on threaded connections, you will have to buy the entire tube and cut off the tip:
14. Connect it to the pump outlet, and put a hose with a pressure gauge on the other end. Let's check the pressure again. If the pressure gauge readings increase to the normal 6 atm (after pumping gasoline several times by turning the key), then change the fine fuel filter and bleed (or flush the entire system).
15. Replacing the fuel filter is shown here:. The only difference is that after removing the filter, we direct the fuel supply hose into a plastic bottle (preferably transparent) and turn on the ignition with the key (the fuel pump turns on and fuel spills into the bottle). We inspect the condition of the fuel in the bottle. Then we install a new filter, remove the hose from the ramp and direct it into the bottle. We turn on the ignition several times and spill gasoline. We inspect the fuel in the tank again. If dirt is found after the filter, then washing the injectors is also required. We assemble the entire system and measure the pressure readings again. If the readings have not changed, then check the correct clamping of the “return” (you can try connecting a pressure gauge to the output of the regulator). If this does not help, then perhaps the blockage is serious and requires blowing with air under high pressure. It would be a good idea to check the entire pipeline from the tank for mechanical damage (dents, kinks).
16. Fuel systems without a return line are diagnosed in almost the same way. The main difference is that here the fuel regulator is located on the pump body. The fuel goes from the pump to the fine filter, and then goes to the regulator. Near the body, the fuel pipe bifurcates. One tip goes to the regulator, and the second goes to the fuel rail.
17. The main difference in the readings is the normal pressure at the ramp is 3.8 atm. When over-gassing it should jump up to 4 atmospheres. If the pressure is less, immediately check the pump. We connect a pressure gauge to the pump outlet and check the pressure. The pressure should also be at least 6 atm for a new one.
18. If the pressure is working, then check if the fuel filter is clogged. To do this, we restore the fuel line from the pump and connect to the tube suitable for the regulator. The easiest way to do this is to cut off the old tip from the fuel filter, install one end of it in a clip, and put a hose with a pressure gauge on the other. If the pressure is identical to the pump pressure, then the filter is clean. If a significant drop is visible, the filter must be replaced.
In this article we will consider the faulty state of the injector control system
and as an example, consider the fuel supply system.
How the fuel system works
Fuel is supplied to the ramp under excess pressure (6 atmospheres), which is created by the fuel pump.
Using the pressure regulator on the nozzle, a constant pressure drop of 3 atmospheres is maintained. At constant pressure and a linear characteristic of the injectors, the amount of fuel injected is determined by the duration of the injector control pulse. This is a theory. On a real engine, the pressure drop can be from 2.8 to 3.2 atmospheres. This is an acceptable range within which no deviations in engine operation are observed. Why is pressure variation possible? It is determined by the spread in the characteristics of pressure regulators.
How to check the fuel system?
Let's connect the pressure gauge to the fuel rail.
With the fuel pump turned on and the engine not running, the pressure should be 2.8-3.2 atmospheres. If the engine is idling, the pressure should drop to 2.2-2.5 atmospheres. When over-gassing, the pressure gauge needle should deviate into the zone of 2.8-3.2 atmospheres. Now let's check the operation of the injectors. With the engine not running, we will create the required pressure in the ramp (2.8-3.2 atmospheres), after which we will apply a series of test pulses to the first injector, monitoring the change in pressure. The above procedure must be carried out for all injectors. The pressure drop should be the same in all cases. If the results of checking the fuel pressure correspond to those described above, the fuel supply system is working properly.
What will happen if the fuel pressure in the rail is low?
(less than 2 atm.) or increased (more than 4 atm.)? The amount of fuel injected will change in proportion to the pressure deviation from the norm. In other words, the air-fuel mixture will become lean or rich.
It will be especially painful in engine control systems without oxygen sensor feedback, since the controller does not know about the malfunction and continues to calculate the fuel supply for a normal fuel pressure value. In control systems with an oxygen sensor, the controller can compensate for changes in the composition of the air-fuel mixture, but only within reasonable limits.
If the fuel pressure is incorrect, problems arise with starting the engine, dips appear when the vehicle moves, and fuel consumption increases.
Troubleshooting the fuel system
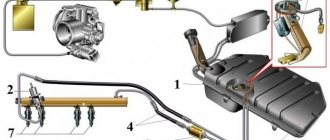
Let us recall the composition of the fuel supply system.
It includes: a fuel tank with a submersible fuel pump installed in it, a fuel filter, fuel lines (supply and drain lines), an injector ramp and a pressure regulator. Failure of any of these components may cause incorrect fuel pressure. Let's try to list the most common malfunctions for each component of the fuel supply system. Gas tank.
Through special pipelines, the gas tank communicates with the atmosphere, which prevents its deformation (flattening). If the connection with the atmosphere is broken, a vacuum is created inside the gas tank. In this case, the pressure in the fuel rail may be low.
Gasoline pump.
There may be several malfunctions:
- the fuel pump does not develop the required pressure, resulting in low fuel pressure;
- the check valve of the fuel pump does not hold pressure, as a result - a rapid drop in pressure after turning off the ignition;
- contamination of the fuel pump mesh filter, as a result - reduced pump performance, which affects the dynamic operating conditions of the engine.
Fuel filter.
A dirty fuel filter can lead to low fuel pressure due to reduced fuel line capacity. If the fuel filter is damaged (torn), dirt can enter the injectors with all the ensuing consequences.
Fuel lines.
Fuel lines may be pinched. If this happens to the supply line, then the fuel pressure will be reduced, if it happens to the drain line, it will be increased. In addition, the use of low-quality gasoline with a high tar content can lead to a decrease in the capacity of fuel lines.
Fuel pressure control.
There are regulators with a stuck diaphragm in the open or closed position. In the first case, the fuel pressure in the system will be reduced, in the second - increased.
Injectors.
The following types of faults are typical:
- the injector does not open, resulting in a lean air-fuel mixture;
- the injector is constantly open, resulting in an enriched air-fuel mixture;
- the injector works, but its characteristic has “floated away”, as a result - the air-fuel mixture is incorrect.
On-board diagnostics to identify faults
A malfunction of the fuel system leads to a deviation in pressure in the fuel rail.
As a result, the amount of fuel supplied to the cylinders differs from the calculated one, and the air-fuel mixture becomes depleted or enriched. In engine management systems with an oxygen sensor, the controller monitors the current composition of the air-fuel mixture. If the air-fuel mixture deviates significantly from the desired value, the controller perceives this condition as a malfunction, and one of two fault codes is recorded in the controller’s memory:
- P0171 - fuel system too lean;
- P0172 - fuel system too rich.
Increased or decreased pressure in the fuel rail
is just one of the reasons why codes P0171, P0172 can be recorded in the controller’s memory. The cause of a significant depletion or enrichment of the air-fuel mixture may be faulty mass air flow sensors, oxygen sensors, or injectors. Air leaks lead to an over-lean air-fuel mixture.
The fuel pressure value may be outside the permissible range, but the on-board diagnostics does not record anything. It’s a very real situation - on-board diagnostics are not omnipotent.
The vehicle's fuel system is designed to store, clean, supply fuel to the engine, create a fuel-air mixture and deliver it directly to the engine cylinders for combustion. Since the most important component in this process is the fuel-air mixture, the vehicle’s fuel system also includes an air purification system, which is supplied to the injectors through the intake pipe.
Measuring pressure in the VAZ fuel rail
How to properly check RTD
In order to independently check the pressure in the system, and therefore the correct operation of the regulator, you need to take a pressure gauge, the maximum pressure in which is up to 10 atmospheres. You should not use a device with a larger scale, as its readings will have a serious error.
It connects between the fitting and the fuel pipe:
- first turn off and cool the engine;
- locate the fuel rail under the hood;
- remove the plug from the fuel pressure fitting;
- unscrew the fitting nipple using a spool valve;
- wipe the surfaces if fuel splashes appear under the influence of residual pressure;
- pull a hose with a diameter of up to 9 millimeters onto the fitting and secure it with a clamp;
- Connect the second hole of the hose to the pressure gauge.
Next, you will need an assistant, because the readings from the pressure gauge need to be read at one of four moments:
- when the ignition is turned on, the pressure should be 3 atmospheres;
- at idle speed - 2.5;
- when squeezing the fuel outflow hose - 7;
- with the hose removed on the RTD – 3.3.
If on your VAZ-2115 the measurements show different indicators, then you need to replace the regulator with a new one. To do this, it is enough to detect it in the system, dismantle it, and then return the fuel line to its original state. In the VAZ-2115, the engine of which has 8 valves or another system, the RTD is mounted at the very end of the fuel rail.
It is important to check the integrity of the fuel system. If leaks are detected in it, then the pressure gauge readings should not be trusted. After checking under different conditions, it is worth turning off the engine and looking at the pressure gauge again; the pressure should be within 0.7 atmospheres. If the pressure drops completely, then the problem is definitely in the regulator.
Remember that a regulator will cost you much less than a large-scale repair of the fuel system or engine. It is precisely such global breakdowns that a failed RTD can lead to. The cost of this spare part is from 500 rubles. The final price of the repair depends on which manufacturer’s spare part you purchase. The cheapest parts are stock parts produced in Togliatti, and the most expensive are BOSCH components.