03 February 2016 Lada.Online 93 072 1
Is the car jerking, loss of agility or the engine is difficult to start? One of the reasons for such malfunctions may be related to fuel pressure. Let's look at the instructions for measuring pressure in the fuel rail, as well as features that may arise during this activity.
Checking the fuel pressure is carried out similarly for all Lada cars (Granta, Kalina, Priora, Largus, Vesta, Niva 4x4 and XRAY), because All these models have the same type of engines.
How to check the pressure in the fuel rail of LADA cars
Is the car jerking, loss of agility or the engine is difficult to start? One of the reasons for such malfunctions may be related to fuel pressure. Let's look at the instructions for measuring pressure in the fuel rail, as well as features that may arise during this activity.
Checking the fuel pressure is carried out similarly for all Lada cars (Granta, Kalina, Priora, Largus, Vesta, Niva 4x4 and XRAY), because All these models have the same type of engines.
The process of checking the pressure in the fuel system
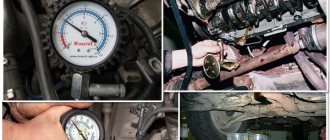
You will need: an air (or preferably a water) pressure gauge, onto which you need to put a hose with a diameter of 12 mm and tighten it with a clamp. The engine should be cold and the generator covered with a rag.
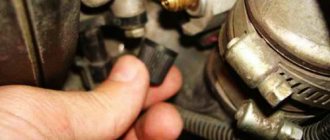
- Unscrew the cap of the control fitting on the fuel rail (fitting). Near the timing belt (on the right in the direction of travel), or on the left near the oil filler neck (for the VAZ 21129 engine);
- Unscrew the spool from the fitting using the wheel valve cap. At this moment, due to the residual pressure in the rail, gasoline will splash out (you can first relieve the rail pressure by removing the fuse from the fuel pump with the engine running and wait until it stalls).
- We put the pressure gauge hose on the ramp fitting and secure it with a clamp;
- Turn on the ignition. The fuel pump will turn on;
- We check the readings on the pressure gauge.
What pressure should be in the fuel rail? On VAZ 2110, 14-15, 99 models it should be in the range of 2.8 - 3.2 bar. On modern engines (Priora, Granta, Kalina, Vesta, XRAY, etc.) the pressure should be 3.6–4.0 bar. The process is also shown in the video:
Fuse and relay
Both elements can affect the fuel pump. How to check it? Simply remove the fuse cover.
See if there are burnt elements. There is a diagram on the lid that indicates which fuse is responsible for which electrical device. As for the relay, it may be located under the glove compartment or in the engine compartment. How to check the fuel pump relay? Everything is very simple. To do this, you need an assistant who will turn on the ignition at your command. At this time, you touch the relay with your hand.
It should click. If not, most likely it has become unusable. It also happens that a part does not work due to poor contact. Clean the terminals and check it again. If this does not help, replace the relay.
Troubleshooting
No pressure in the fuel rail? Causes:
- Clogged fuel filter;
- Clogged fuel pump filter;
- Fuel pump malfunction;
- Malfunction of the fuel pressure regulator (FPR). And with high blood pressure too.
If the pressure in the fuel rail gradually drops, the cause may be:
- leaking fuel pump connections;
- leaking injectors;
- fuel pump malfunction.
Let's check it like this. We clamp the leading rubber hose of the fuel rail:
- the pressure has become stable - the fuel module is leaking or the pump is faulty;
- the pressure drops - the injector(s) are leaking.
Checking the RTD. Connect the pressure gauge hose to the outlet fitting of the fuel pump and turn on the ignition:
- the pressure is low but stable - this means the RTD is faulty and is releasing pressure too intensely.
If the pressure in the fuel rail is within normal limits, we look for the causes of engine malfunctions elsewhere.
Share on social networks:
Found an error? Select it and press Ctrl+Enter..
Source
FakeHeader
Comments 28
Look in the rear left arch, there is a separator tank, there is a valve on top of it inserted through an elastic band. This valve flew out, and I washed the rust and sand fuel system three times until I accidentally discovered a valve dangling in the arch and a hole from it in the separator tank, everything that was on the road flew into it
Thanks, I'll take a look today
Look in the rear left arch, there is a separator tank, there is a valve on top of it inserted through an elastic band. This valve flew out, and I washed the rust and sand fuel system three times until I accidentally discovered a valve dangling in the arch and a hole from it in the separator tank, everything that was on the road flew into it
Do you have a photo? I don’t understand, we have an absorber under the hood and only the hose from it goes to the tank
Do not confuse the adsorber with the separator.
Look in the rear left arch, there is a separator tank, there is a valve on top of it inserted through an elastic band. This valve flew out, and I washed the rust and sand fuel system three times until I accidentally discovered a valve dangling in the arch and a hole from it in the separator tank, everything that was on the road flew into it
To prevent this from happening, you need to install fender liners!
:))))) God forbid, advise some grandfather. It must be assembled on the assembly line as expected and this will not happen
fender liners without screws novline, I installed these and everything is good! There seems to be information about them on the drive too, I advise you to look!
For some reason I am not a supporter of these mud collectors.
Rdt. When the gas is released, the pressure should not fall below 3.8 by 4 points. The RTD releases the pressure, and when the engine is stopped, the pressure in the fuel rail should not drop sharply to 0. It should remain at 2-2.5-3 bar (with the internal combustion engine not running)!
did you change the fuel filter?
Change the gas station, did you change the fuel too? check adsorber electromagnetic sensor
I changed the gas station, the same fuel (in the tank and fine cleaning)
How to check and adjust the pressure of the Priora fuel pump
Normal pressure of the Priora fuel pump is necessary for the process of supplying the combustible mixture to the carburetor and its normal spraying through the nozzles. The slightest disruption in the operation of this system leads to the fact that either an excessively saturated or lean mixture is supplied to the combustion chamber, which is why the engine operates abnormally. How to check the fuel pump pressure, and what should be done if it is abnormal?
Checking the fuel pump pressure
The first thing to do is to specifically check the operation of the pump. To do this, just turn the ignition key not to the extreme position and listen to whether the electric fuel pump turns on (and this is exactly the variation that is installed in the Lada Priora car). If you hear a noise for a few seconds, followed by a click, everything is fine.
Using a pressure gauge, the check is performed on the ramp - this is where the protective valve cap is hidden, which does not allow air to get in, but presses the fuel out with pressure. The first step is to unscrew the cap and check whether the rubber in it is broken - this may be the main reason for the inoperability of the fuel pump. If it is damaged, it is better to completely replace it; fortunately, it is cheap. Then the spool is twisted. Next, a pressure gauge is connected to the outlet of the safety valve from the pump. Normal pressure is in the range of 380-400 kPa. If it is lower, then either the pump has failed or there is a blockage in the system. If it is more, then it is quite possible that the internal pressure gauge of the fuel pump is faulty and it is simply pumping fuel excessively to the carburetor. Replacing it is easy.
Naturally, before checking the pressure, the ignition is turned on, but the engine itself is not. The pump itself will equalize the pressure to the desired parameter. If this is not done, then the pressure will be at the level of 1 atmosphere with a slight deviation, because pumping is not performed.
It should also be taken into account that all manipulations are carried out at reduced fuel pump pressure. To do this you will need:
- remove the rear seat and gain access to the pump (by removing several screws on the rubberized cover);
- release the lock and let the fuel run out completely (the engine will be in neutral gear and will stall literally after a few seconds);
- Next, you need to turn on the ignition and equalize the pressure;
- It is also recommended to turn on the starter for 2-3 seconds and immediately reset the ignition key to its original position (turn off the ignition).
What happens if the pressure deviates from the norm?
If the pressure in the fuel pump is too high, too much fuel will be supplied to the carburetor.
What happens if the pressure deviates from the norm?
If the pressure in the fuel pump is too high, too much fuel will be supplied to the carburetor.
The air will mix with it through the filter and burn in the cylinder. But if there is a lot of fuel and not enough oxygen, the mixture will not burn completely. At the same time, black smoke comes out of the exhaust pipe, and fuel drips from its end (may even be mixed with soot).
If the pressure in the system is very low, the mixture will be lean. There is too much oxygen. At the same time, the engine power is radically reduced; at idle speed the engine simply stalls, and the choke, of course, will not help, since it only regulates the operation of the throttle valve in the carburetor.
It is interesting that the on-board computer will not report a breakdown of the fuel pump - this is truly a huge mistake by VAZ engineers. In Priora, you can only read indicators when you connect a computer to the EMU unit, but not everyone can do this. And the indicators may not be true if the on-board computer itself is damaged. That's why checking with a pressure gauge on the ramp is the best option for checking pressure.
Methods for checking fuel rail pressure
The procedure for measuring the pressure in the VAZ 2114 ramp is carried out to identify a malfunction in the supply of gasoline to the injectors.
There may be several signs of a fuel system malfunction:
- instability in the operation of the car engine (motor trouble);
- increased volume of carbon monoxide at the outlet;
- unreasonably increased consumption of gasoline (increase to 30-50%);
- failures in the operation of the power unit;
- drop in engine power with a normally operating electronic control unit.
The first thing the car owner needs to do after identifying these malfunctions is to measure the pressure in the ramp.
Before work, you need to prepare the following tools and materials:
- pliers;
- screwdriver;
- sanitary linen;
- fuel or oxygen hose (internal diameter must be at least 8 mm);
- mechanical pressure gauge with a measurement limit of up to 7 atmospheres;
- several clamps;
- container for draining fuel;
- cap for twisting nipples.
Before starting work, you must ensure that the fuel system is tight. If you take measurements in the presence of microcracks or leaks, the results will be unreliable.
- We wrap plumbing flax under the pressure gauge nozzle, screw it into the hose and secure it with a clamp.
- Use your hands or pliers to remove the cap from the fuel rail.
- Using the cap, unscrew the nipple and put on a hose with a pressure gauge. We secure the connection with a clamp.
- We start the engine and record the pressure gauge readings.
- To check the pressure regulator, disconnect the hose leading from the regulator to the intake manifold. In this case, the pressure gauge should show an increase in pressure to 3-3.2 atm. If the pressure readings do not change, there may be a problem with the fuel pump.
- Now you need to measure what maximum pressure the pump develops. Using pliers, the return fuel line is pinched. The new pump should show at least 6 atm. If the pressure gauge registers 5 atm, then the pump is already very worn out, but can still continue to work for some time. The pump is clearly faulty if the reading is less than 4 atm.
- We check the condition of the pipeline. To do this, we find the fuel pump assembly (under the rear seat) and determine the type of connection. A quick-release connection can be purchased in a store for literally pennies. If the connection is threaded, then the entire pipe is purchased and the tip is cut off. We put a hose with a pressure gauge on one end of it, and connect the other to the pump outlet. Now let's check the pressure. If the pressure gauge shows 6 atm, then we simply flush the entire system and replace the fine filter. When replacing the filter, direct the gasoline supply hose into a previously prepared container and turn on the ignition. We carefully inspect the fuel that has spilled into the container, install a new filter and repeat the procedure again. If after the new filter the gasoline is dirty, be sure to wash the injectors.
Do-it-yourself fuel pressure measurement
Measuring fuel pressure is the first stage of diagnosis if the following symptoms are observed in your car:
- failures when starting off
- dips when pressing the accelerator pedal sharply
- Stalls when you press the accelerator pedal hard
- Unstable operation of a warm engine
- “light” spark plugs indicating a lean mixture
We will measure fuel pressure using a homemade and simple device called “Do it yourself”
To make it we need the following:
- fuel hose - 50 UAH/m. You should not use a non-fuel one, as it may not withstand a pressure of 4 bar and may not be gasoline-resistant.
- clamps 10-16 in the amount of four pieces - 16 UAH. for all
- quick-release double fuel fitting from VAZ 2110 - 30 UAH.
- cut-off fitting from an old fuel filter for injection cars - free
- pressure gauge - 60 UAH. It is advisable to purchase one with a measurement scale up to 6 bar. Considering that the pressure in our cars is 4 bar, you can get more accurate readings with such a pressure gauge.
- adapter from pressure gauge to hose with fitting - 15 UAH. It is necessary to connect the fuel hose to the pressure gauge. This stuff can be purchased at any plumbing store.
- Fum tape - 10 UAH. It is necessary to seal the connection between the pressure gauge and the adapter
That's all we need
Here is a pressure gauge with a scale up to 6 bar
And here is the entire structure assembled. I think the photo shows what to connect to what. We connect the hose from the cut-off fitting of the fuel filter to the direct outlet of the quick-release fitting, and connect the hose from the pressure gauge to the side outlet. It's not a tricky thing and comes together pretty quickly
The next step is to relieve the pressure in the fuel line. To do this, remove the fuel pump fuse from the fuse box in the engine compartment.
Now we go to the salon and start the engine. We wait until it stops due to lack of fuel. To be sure, we crank the engine with the starter one more time and make sure that it no longer starts. This means the fuel pressure has been released.
Press the latch and disconnect the fuel line from the ramp. If the engine is hot, then it makes sense to place a wet rag under the disconnection point.
There's just a little bit left to do. We connect our device. To do this, we put the quick-release fitting on the ramp until it clicks, and insert the other end into the fuel line hose until it clicks. That's it, the device is connected
Now put the fuel pump fuse back in and turn on the ignition. You may have to turn on the ignition several times for the pump to fill the line and build up pressure. We inspect the connections for leaks and, if everything is fine, then start the engine.
The pressure must be strictly 4 bar and not change when pressing the gas pedal sharply
Try to move away - the pressure should remain constant.
After stopping the engine, the pressure should not immediately decrease. For me it has been falling for quite some time. If this is not the case for you, then there are problems with the check valve in the pump or in the pressure regulator.
There are cases when the fault is floating and cannot be caught during measurements. Then I advise you to remove the rear sofa in the cabin and connect our device to the return drain fitting on the fuel module
It will turn out something like this
1 - hose to pressure gauge
2 - fuel line
Connecting it in the cabin will allow you to drive around with a pressure gauge for some time to “catch” the problem and control the pressure at this moment.
Here, in principle, are all the main nuances of this not complicated, but very useful event, called measuring fuel pressure.
I suggest watching a video on this topic
Fuel pressure
Peace and smooth roads to everyone
On this topic:
+18
When to change the fuel filter on Priora
As experts advise, you should not wait for the moment when various malfunctions begin to appear in the operation of the Lada Priora with 16 valves, which will certainly lead to the replacement of the cleaning element. It should be taken into account that the filter itself is not expensive at all, and replacing the fuel filter is quite possible even for a person who has no experience in this matter, the main thing is to know where this element is located and follow the replacement instructions. It is best for yourself to set the interval between filter replacements at around 10 thousand km. This is the best option. However, we list the signs that already indicate that it is time to change the filter element:
- The electric fuel pump begins to make a lot of noise. While driving, you are unlikely to hear this noise, but if the 16 valve engine is idling, you may notice a high-pitched buzzing noise. This indicates that the pump is working under increased load.
- So-called failures sometimes occur in the operation of the engine, this is especially felt when acceleration occurs. The reason for this is a clogged cleaning element. Due to a clogged filter, it also happens that the engine stalls, and then it becomes difficult to start.
If the check light comes on when starting on a cold engine
If, when you turn on the ignition, there is no characteristic sound of fuel pumping, and the engine icon lights up on the panel, then most likely the relay supplying power to the fuel pump is faulty.
The exact location of this device depends on the specific vehicle model and may be in the immediate vicinity of the fuel injection control unit or near the fuse box. The reasons why the relay does not operate can be either a malfunction of the device itself or a failure of the fuse protecting it.
A faulty fuel pump relay must be replaced with a new one, and if the fuse blows, it is imperative to determine and eliminate the cause of this problem, since possible short circuits in the electrical wiring can lead to a car fire.
If there are problems with starting, a cold engine runs unstably, then the fuel injectors are probably clogged or their electrical wiring is faulty. To fix the problem, you need to flush the injection device and eliminate damage to the electrical control circuits.
The reason that the check signal lights up after starting the engine may be a malfunction of the device for absorbing gasoline vapors - the adsorber.
This happens if the absorbing element (activated carbon) becomes unusable or the solenoid control valve fails.
Often the warning indicator lights up without any problems with the motor due to simple inattention. A fuel tank filler cap that is poorly tightened in a hurry reduces the pressure in the gas lines by allowing air to pass through. This leads to increased gasoline consumption, which the ECU evaluates as a malfunction and then the check lamp turns on on the panel.
Another reason could be a faulty air flow sensor. To ensure the optimal composition of the fuel mixture, the control unit controls air consumption using readings from the mass air flow sensor (MAF). If the air filter is not regularly replaced, the working element of the air flow control valve becomes clogged with dust particles, which leads to distortion of its readings.
In such a situation, the ECU switches to calculating the air consumed by the engine using indirect methods and warns the driver of a malfunction through the “Check” switched on. Also, if the mass air flow sensor fails, the engine does not start well at subzero ambient temperatures.
Replacing an air flow sensor is quite simple, but the cost of the part itself, depending on the make and model of the car, can reach 10 - 15 thousand rubles. Therefore, it is better not to skimp on routine maintenance of the machine and promptly purchase and install a high-quality air purification filter.
The occurrence of detonations during the combustion of gasoline in the cylinders is monitored using a knock sensor. If there is no information or a low signal level from the sensor, the ECU sends an error message to the dashboard.
Structurally, the sensor consists of a piezoelectric element and a resistor, so it cannot be repaired and can be replaced as an assembly.
The idle speed controller (IAC) is responsible for setting and maintaining the required speed in different engine operating modes. The regulator specially opens and closes the hole in the throttle body pipe for air dosing. As a result, the car can start moving immediately after starting the engine without a long warm-up.
Unstable operation of the engine at idle and an illuminated engine malfunction signal indicate a breakdown of the IAC and the need to replace it.
Signs of RTD malfunction
Fuel pressure regulator for VAZ 2110
No matter how reliable a mechanical RTD is, over time its parts wear out and malfunctions and malfunctions occur in the operation of this unit. And now we will look at the main symptoms of such problems.
- increased fuel consumption;
- drop in engine power;
- Unstable engine operation at idle speed;
- jerks and dips when accelerating and changing gears;
- inadequate response of the car to pressing the accelerator pedal;
Let's consider the causes of the main problems of RTDs. First of all, you should check the condition of the spring. Over time, it may lose its elasticity, and as a result, the valve opens earlier than necessary. As a result, fuel is returned to the tank in larger quantities than necessary. The pressure in the system drops and the engine loses power. In this case, the spring should be replaced if the design of the regulator allows it.
Sometimes, especially when working with domestic fuel, the membrane simply becomes clogged and cannot close completely or partially. This again leads to a decrease in fuel pressure in the system and all the ensuing consequences. In such situations, again if the design of the RTD allows, cleaning can be done. But repairs do not always help, since wear of the valve and its parts can cause the regulator to not perform its functions fully even after the breakdown has been eliminated.
Installing a new sensor
Before removing, be sure to relieve the fuel pressure in the rail.
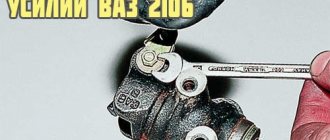
To do this, turn off the power to the fuel pump and start the engine. Or carefully unscrew the spool valve from the fitting in the ramp (this option will be more suitable if the internal combustion engine does not start at all). Next, you work according to this scheme: Disconnect the negative terminal from the battery. Disconnect the hose from the vacuum valve of the VAZ 2114. Unscrew the nuts and drain the gasoline. Please note that there may still be gasoline under pressure in the fuel system
Therefore, take precautions. Fix the tube and washer. Unscrew the bolt screwed into the clamping element. Remove the clamping element. Unscrew the nut that holds the drain hose and pressure sensor. Remove the bolts connecting the fuel rail to the pressure sensor. Dismantle the pressure regulator in the system. Install a new device in the reverse order.
As you can see, there is nothing complicated. The main thing in repair is to imagine what this or that element of the system is responsible for. And then you can quickly give an accurate diagnosis based on the signs
Install the new device in the reverse order. As you can see, there is nothing complicated. The main thing in repair is to imagine what this or that element of the system is responsible for. And then you can quickly give an accurate diagnosis based on the signs.
Sport fuel pressure regulator
The fuel pressure regulator VAZ 2110 2114 2112 2115 is used to maintain a continuous pressure difference across the injectors. When the pressure in the intake pipe increases, the pressure regulator increases the fuel pressure, thereby compensating for changes in engine load, and when the pressure in the pipe decreases, it lowers the fuel pressure and drains the excess back into the tank through the valve.
Fuel pressure regulator VAZ 2110 2114 2112 2115
A faulty fuel pressure regulator VAZ 2110 2114 2112 2115 can lead to engine damage, so you should be very careful about this important component of the car. The following signs indicate that the fuel pressure regulator requires repair or replacement:
The following signs indicate that the fuel pressure regulator requires repair or replacement:
• the engine of VAZ 2114, VAZ 2115, VAZ 2110, VAZ 2112 began to run unsteadily and unevenly;
• idling also causes a lot of problems - the engine constantly stalls, in addition, the crankshaft also behaves strangely - it rotates at an increased or decreased frequency (also at idle);
• the engine power of these models of VAZ cars decreases sharply, it does not “pull” as before, but begins to “freak out” during acceleration, and warms up more slowly, the movement becomes uneven, dips, jerks and other inadequacies appear;
• fuel consumption for both the VAZ 2110 2112 and the VAZ 2114 2115 is growing every day, just like the amount of exhaust vapors and fuel combustion products emitted into the atmosphere.
Checking the fuel pressure regulator on a VAZ 2114 2115 2110 2112 is not difficult, provided that you have the necessary tools, even a beginner can do it on their own. To do this, you will need a pair of keys (a 5-point hex and a 24-point regular wrench), you also need a pressure gauge, you can take a tire gauge.
If the pressure check did not show any deviations from the norm, then the problem is not in the fuel pressure regulator, but in another component of the VAZ car. Note: normal pressure is considered to be 284–325 kPa when the engine is running and plus 20–70 kPa when the vacuum hose is disconnected from the pressure regulator.
Preparatory work before replacing the fuel filter
Before replacing the filter on the popular LADA Priora in our country, of course, you need to buy a new one. We offer you a list of catalog numbers of the required element: 21230-1117010-02 or 21230-1117010-00, additionally 21230-1117010-01, you can purchase a filter for VAZ 9s and 10s using exactly the same numbers. When purchasing, do not forget to pay attention to the fittings for fastening the fuel hoses. They should always be smooth, and there should be a protrusion on each side for snapping plastic or spring clips into place.
Replacing the fuel filter on the Priora we are considering with a 16-valve engine is divided into several stages:
- Preparatory stage. Includes the purchase of a new filter and tool preparation.
- The stage at which pressure is relieved in the fuel system.
- Removing the old/installing a new filter element.
- Starting the power plant and making it operational.
Troubleshooting
No pressure in the fuel rail? Causes:
- Clogged fuel filter;
- Clogged fuel pump filter;
- Fuel pump malfunction;
- Malfunction of the fuel pressure regulator (FPR). And with high blood pressure too.
If the pressure in the fuel rail gradually drops, the cause may be:
- leaking fuel pump connections;
- leaking injectors;
- fuel pump malfunction.
Let's check it like this. We clamp the leading rubber hose of the fuel rail:
- the pressure has become stable - the fuel module is leaking or the pump is faulty;
- the pressure drops - the injector(s) are leaking.
Checking the RTD. Connect the pressure gauge hose to the outlet fitting of the fuel pump and turn on the ignition:
- the pressure is low but stable - this means the RTD is faulty and is releasing pressure too intensely.
Read more: Gazpromneft super 10w oil 40 reviews
If the pressure in the fuel rail is within normal limits, we look for the causes of engine malfunctions elsewhere.
Preparatory stage
You will not need any skills when replacing the filter, you will not need specialized devices, just a key to “10”, know where the element to be replaced is located, and how to change it correctly, and for this there are detailed step-by-step instructions. To carry out the work, you need a lift or inspection hole, since the filter is located on the bottom of the car in the rear. Stock up on rags. Also prepare an unnecessary container. Inspect the fuel hoses and fasteners, pay attention to their integrity. If necessary, clean them from dust and dirt.
Separator design
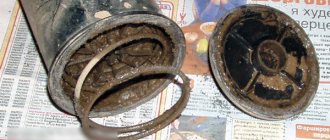
The VAZ 2114 gasoline vapor separator is a small, completely sealed tank made of metal or impact-resistant plastic. It is installed in the right rear part of the car on a special bracket. Using a hose system, it is connected to the gas tank (from where vapors flow through drain pipes) and to a two-way valve. The total volume of this device is 7 liters.
Once in this tank, the vapors accumulate in it and, due to increased concentration and cooling, condense. Drops of condensation settle on the walls and bottom, after which they gradually flow back into the gas tank. The same vapors that did not have time to condense flow towards the two-way valve. From its name it is easy to guess that it works in both directions at once - “for the intake” of atmospheric air into the tank and “for the release” of fuel vapors outside.
Despite the obvious simplicity of the fuel ventilation system and the minimum of parts located in it, it still breaks down, leading to rather unpleasant consequences.
So, signs of a vapor separator failure may include:
- smell of fuel inside the cabin;
- the smell of fuel near the car (and a lot of time has passed since refueling);
- gasoline stains near the neck of the tank;
- drops of fuel on the ground after a long stay.
Replacing the fuel hose on a Priora
"Attention. The vehicle's fuel system is under pressure even when the vehicle's ignition is turned off (residual pressure remains). Therefore, before carrying out work related to maintenance or repair of the fuel system, it is necessary to relieve the pressure!”
Now let's look at how to change the fuel hose on a Lada Priora. In order to dismantle the product you will need:
- The first, preparatory stage of the work will be releasing pressure. To do this you will need to remove the rear seat. Unscrew the fastening points of the metal hatch and remove it. Unplug the power plug from the fuel pump connector.
- Move into the car interior. Start the engine and let it run until all the fuel runs out and it stalls.
- After that, try to restart the engine, allowing the starter to operate for 3.4 seconds.
- Open the hood. Find the fuel hose.
- Now we need to find the connection point between our hose and the inlet metal tube, which enters the engine compartment from under the bottom of the car.
Next, you need to press on the special plastic fastener and, holding it in this position, pull the hose in the opposite direction. To disconnect the second end, you will need to find the metal tube connected to the fuel rail. In this case, the connecting fastening is different from that indicated in the previous step. You will need a 10mm wrench, with which you will need to unscrew the special fastening nut. - When installing a working product, do not forget to install new o-rings, which serve to seal the connecting points. It is prohibited to use old rings, and install new ones only when the ambient temperature is above zero.
Where is the fuel pressure regulator located?
To find the installation location of the fuel pressure regulator, let’s figure out what it is and what it is needed for. This will help in further searches and diagnostics.
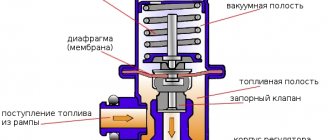
The first thing you need to know is that there are two main types of RDTs - mechanical (old type) and electrical (new type). In the first case, this is a vacuum valve, the task of which is to transfer excess fuel under excessive pressure back into the fuel tank through the corresponding hose. In the second, it is a fuel pressure sensor that transmits relevant information to the ECU.
Typically, the fuel pressure regulator is located directly on the fuel rail. Another option for its placement is the fuel return hose of the power system. Another option is to locate the regulator directly in the fuel tank on the pump module. In such systems there is no fuel return hose as unnecessary. Such an implementation has several advantages, including simplified design (no extra pipeline), excess fuel does not enter the engine compartment, fuel heats up less and does not evaporate as much.
How does the fuel pressure regulator work?
Structurally, the old-style valve (installed on gasoline cars) has its own body, inside which there is a valve, a membrane and a spring. The housing has three fuel outlets. Through two of them, gasoline passes through the pressure regulator, and the third outlet is directly connected to the intake manifold. At low (including idle) engine speeds, the fuel pressure in the system is low and it all goes into the engine. As the speed increases, the corresponding pressure increases in the manifold, that is, at the third terminal of the RTD, a vacuum (vacuum) is created, which, at a certain value, overcomes the resistance force of its spring. This creates the movement of the membrane and the opening of the valve. Accordingly, excess diesel fuel gets access to the second output of the regulator and goes back into the fuel tank through the return hose. Due to the described algorithm, the fuel pressure regulator is often called a check valve.
As for the fuel pressure sensor, it is a little more complicated. So, it consists of two parts - mechanical and electrical. The first part is a metal membrane that bends under the influence of force caused by pressure in the fuel system. The thickness of the membrane depends on the pressure for which the fuel system is designed. The electrical part of the sensor consists of four strain gauges connected according to a “Winston bridge” circuit. Voltage is applied to them, and the more the membrane bends, the greater the output voltage from them will be. And this signal is sent to the ECU. As a result, the electronic control unit sends the appropriate command to the pump so that it supplies only the amount of fuel required at the moment.
Diesel engines have a slightly different fuel pressure regulator design. In particular, they consist of a solenoid (coil) and a rod, which rests against the ball to shut off the reverse flow. This was done for the reason that the diesel engine vibrates very strongly during its operation, which affects the wear of the classic (gasoline) fuel regulator, that is, partial and even complete compensation of hydraulic vibrations occurs. However, its installation location is similar - in the engine fuel rail. Another option is on the fuel pump housing.
Resetting pressure in the Priora fuel system
A device such as the fuel pump in LADA Priora always maintains the required pressure in the system. When the car is already in the pit, this very pressure needs to be released, otherwise fuel will spill.
Replacing the filter with a new one in Lada Priora