Articles
When replacing some parts of the car, it becomes necessary to relieve pressure in the fuel system (TS). Reset must be carried out when replacing fuel system elements (filter, pump, hoses, etc.) in order to prevent a sudden release of gasoline from the hoses.
All work on the fuel rail is carried out only with the engine not running . The operating system maintains a pressure of 30 MPa.
Replacing the fuel filter
The manufacturer recommends replacing the fine fuel filter every 30,000 km.
Its condition depends on the quality of the gasoline: the dirtier the gasoline, the faster the filter becomes clogged.
Jerks when the car moves, first at high and then at low speeds, most likely indicate a clogged filter.
A decrease in filter throughput is also indicated by an increased noise level of the electric fuel pump.
The fuel filter is installed at the bottom in a bracket fixed to the fuel tank, so it is more convenient to work with the car mounted on a lift or inspection ditch.
Removal
1. Relieve fuel pressure.
After the pressure is released, a small amount of fuel remains in the fuel line.
2. Use a rag to wipe the fuel filter and the fuel pipes connected to it.
Before disconnecting the tip of the tube from the filter, prepare a small, wide container to drain any remaining gasoline from the fuel line.
Squeezing the two clamps, remove the tip of the fuel supply pipe from the filter fitting
We also remove the tip of the fuel outlet pipe
4. Remove the filter from the holder.
Installation
Install the new filter in reverse order.
Pay attention to the arrow marked on the filter housing indicating the direction of fuel flow.
It should be directed towards the front of the car.
Where is the filter located on Priora and which one to choose
The fuel filter is located at the rear of the vehicle, above the rear beam next to the gas tank. It is supported on a special bracket. To replace the filter, you will first need to relieve the pressure in the system so that when you remove the filter, gasoline from the system does not spray you and everything around.
Which filter to choose
Depending on the year of manufacture, fuel filters with or without a latch were installed on the priors. A domestic filter from BIG is installed from the factory. If it is not possible to purchase it, there are analogues.
- Filter BIG-320BK without latch from 250 rub.
- Filter Poliston PT-320 with latch
- Filter BIG-3198 with latch
- Filter SCT ST 342 with latch
- Filter GUR-320BK with latch
All filters mentioned above are designed for a 1.6 liter engine. The choice of filter depends on the type of filter being installed, with or without a latch, as well as on your financial capabilities.
How to relieve pressure in the fuel system of Kalina and other cars
The need to relieve pressure in the fuel system arises when certain vehicle elements directly connected to the engine are replaced. For example, replacing a fuel pump, filter or hoses must be accompanied by a pressure release procedure, which makes it possible to avoid a sudden release of fuel from the hoses.
Relieving pressure on fuel-injected cars, including our Kalina, is quite simple. The only tools you will need are an awl and a shaped screwdriver.
ATTENTION! A completely simple way to reduce fuel consumption has been found! Don't believe me? An auto mechanic with 15 years of experience also didn’t believe it until he tried it. And now he saves 35,000 rubles a year on gasoline! Read more"
Rule number 1. Never attempt to relieve pressure by loosening vehicle connections while the engine is running or after the engine has been stopped for a short period of time. The fact is that there is still a working pressure of 30 MPa in the system. This could cause you to get scalded or splash yourself and your car with fuel.
Rule number 2: Before you relieve pressure, you must turn off the fuel pump.
Well, of course, it is important to remember the following: the pressure in the system after stopping the engine drops automatically no earlier than after 180 minutes.
How to relieve pressure: several options
Pressure relief must be carried out according to the instructions. The latter implies several options. Let's take a closer look at them.
- turn off the engine;
- let it cool for 3 hours;
- The pressure will automatically drop on its own.
Method two, when there is no time to wait:
- open the mounting block and find there the relay or fuse responsible for the operation of the fuel pump;
- remove it;
- start the engine and wait until it stalls (until the fuel in the chamber runs out);
- put the fuse in place.
- on many modern cars there is a control valve under the hood covered with a protective cap - you need to unscrew it;
- press the control valve spool with an awl or screwdriver;
- a little fuel will come out, which will mean the release of high pressure;
- wipe off any remaining gasoline with a dry cloth;
- return the cap to its place.
- put the gear lever in neutral speed;
- fix the handbrake;
- dismantle the rear sofa in the cabin;
- Disconnect the block with wires from the pump;
- start the engine and wait until it stalls;
- put the block in place.
Method five (if you urgently need to relieve pressure):
- de-energize the battery;
- remove the safety device responsible for the operation of the fuel pump;
- attach the terminal to the battery;
- start the engine and wait until it stalls;
- put the fuse in place.
If you own a car with fuel injection, remember! It is necessary to periodically check the pressure on the fuel frame, because if it is absent, it will negatively affect the operation of the engine. Start-up, acceleration, operation in idle mode - all this must be carefully checked.
How to check the pressure in the injector fuel rail
In addition, there are several signs indicating a lack of pressure in the ramp.
- If the car starts to consume more gasoline.
- If the engine troits.
- If there is a noticeably high CO content in the emissions.
Tired of paying fines? There is an exit!
Forget about fines from cameras! An absolutely legal new product - NANOFILM, which hides your license plates from IR cameras (which are installed in all cities). More details at the link.
- Absolutely legal (Article 12.2.4).
- Hides from photo and video recording.
- Installs independently in 2 minutes.
- Invisible to the human eye, does not deteriorate due to weather.
- 2 year warranty
About pressure drop
When it comes to pressure problems, it looks something like this:
- when the engine is running in idle mode, 2.8 atm is displayed, stable pressure, builds up quickly;
- after turning off the engine, the pressure instantly drops to 2.5 atm;
- after a minute or two it drops again to 2 atm;
- after 10 minutes – 1.6 atm.
Why does the pressure drop? There are definitely problems in the fuel system, and, as a rule, this is due to the fact that the check valve of the pump does not hold. This is why the pressure drops so quickly after the ignition is turned off.
In extreme cases, it is possible that the DDT pressure sensor fails. Methods for checking both options are given below.
Reducing pressure in the power system on injection VAZs
Welcome! It is very often necessary to reduce the pressure in the power system before replacing the parts that make the car work, that is, before replacing the fuel pump, it is imperative to reduce the pressure in the power system, because if this is not done, then when the high pressure fuel pipes are disconnected from the fuel pump, a sudden ejection may occur jets of fuel from these same pipes due to pressure in the system.
Note! In order to reduce the pressure in the power system, you will need to stock up on: A thin flat screwdriver, or instead you can take an awl or even a regular Phillips screwdriver, and you will also need to stock up on a regular rag to wipe your hands after the remaining The fuel in the system will splash a little!
Why do you need to reduce the pressure in the power system? This has already been said a little earlier, but let’s look at this issue in more detail. First, let's look at what the power system consists of, so it consists of a fuel tank, a fuel pump, as well as injectors, a fuel rail and much more. But sometimes something from the power system has to be replaced with a new one due to wear of parts, and because of various other problems, but in order to remove something, you will first need to reduce the pressure in the power system, and only then change this part, and otherwise, the fuel that remains under pressure after removing one or another part will simply splash out (the smallest part), splashing the car and yourself at the same time.
So, to prevent this from happening, it will be necessary to reduce the pressure in the power system before removing this or that part, and you will learn how to do this in more detail below.
When do you need to change the pressure in the power system?
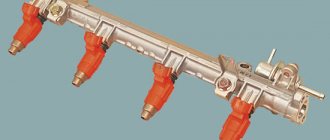
It only needs to be reduced when you remove the fuel rail, injectors, fuel pump, fuel filter, fuel pressure regulator and all other parts that relate to the engine power system. For more details on which parts relate to this system, see the photo below:
Note! In this image you see parts that relate to the engine power supply system, but just always remember one nuance, you only need to reduce the pressure in the system when you are working with fuel elements such as high pressure fuel pipes, that is, if you decide to remove the air damper then there is no need to reduce the pressure in the power system at all, because you are working with a part that is responsible for air, not fuel!
How to reduce the pressure in the power system of a fuel-injected car?
Note! Before you start, you should definitely know that in the fuel injection power system the pressure is 30 MPa (3 kgf/cm2). Based on these values, always remember that under no circumstances should you loosen the connection of the high-pressure fuel pipes while the car’s engine is running, or immediately after stopping it. But there is one interesting factor: after the car has been turned off and left unstarted for two to three hours, there is no need to reduce the pressure in the system at all, since during this time it itself drops to almost zero and rises sharply after starting engine!
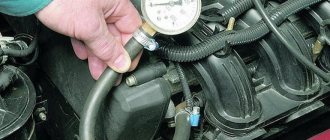
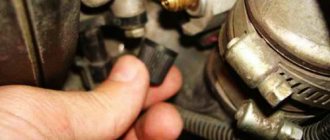
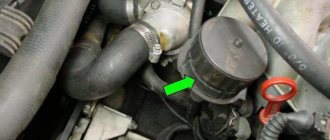
1) In order to reduce the pressure, first open the hood of the car and then find the control valve in the engine compartment, which will still be closed with a protective cap that is very similar to a wheel nipple cap.
2) After the protective cap is found, take it and turn it completely by hand and after unscrewing the cap, a control valve will appear before your eyes, in the center of which there will be a spool (Indicated by an arrow), you will need to press on this spool using which be it with an awl or a screwdriver, or even with a wrench.
Fuel pump Niva Chevrolet device
First, check the pressure in the fuel supply system by connecting a pressure gauge to the valve on the ramp in the engine compartment (see “Reducing fuel pressure in Niva Chevrolet”).
If the pressure in the system is less than 250 kPa (2.5 kgf/cm2), replace the fuel filter (see “Replacing the Niva Chevrolet fuel filter”).
If this does not help, try removing the pump and washing the mesh of its receiver (see “Repairing the Niva Chevrolet fuel pump module”).
If in this case the pressure does not increase, the fuel pump must be replaced.
You will need a “10” wrench (it is more convenient to use a socket wrench).
1. Disconnect the wire from the “–” terminal of the battery.
Fold the right side of the rear seat cushion forward.
Bend back the cut-out part of the sound insulation, under which there is a hatch cover above the fuel tank.
Remove the two fastening screws and remove the hatch cover.
Disconnect the wiring harness block from the pump adapter block.
After releasing the spring clips, remove the fuel hoses from the pump nozzles.
To prevent excess vapor pressure from displacing gasoline from the pump nozzles, remove the filler cap
Unscrew the eight nuts securing the pump (there are spring washers under the nuts).
Lift the pump up, tilt it to remove the fuel gauge sensor float from the hatch, and remove the pump along with the pressure ring.
If the pump O-ring remains on the tank, remove it and inspect it.
Replace a severely compressed, lost elasticity or torn ring.
If, when removing the pump, the storage cup remains in the tank, remove it and.
. Before reinstalling the pump, secure it to the pump body with pistons.
Place the O-ring on the pump and...
. install the pump in the tank, oriented correctly relative to the fuel hoses
When tightening the pump mounting nuts, press the ring with the pump, overcoming the resistance of the spring installed in the pump
Read more: How much does a Qashqai 2018 cost?
If the car was produced after 2009, then look at this article - Repair of the Niva Chevrolet fuel pump module
Every car engine cannot operate without fuel. It doesn’t matter at all what kind of engine is installed - injection or carburetor; without supplying the required amount of fuel, it will not work.
The Chevrolet Niva has distributed fuel injection and is equipped with an electric drive. This means that in most cases, if the fuel pump fails, the cause should be sought in the electrical circuit of the car.
Removing and replacing the fuel pump on a Niva Chevrolet
- The negative terminal is removed from the battery.
- It is necessary to reduce the pressure level in the power system. One way to unscrew the valve on the fuel rail.
- You need to get to the back seat and fold back the cushion on it on the right side - the fuel pump is located there.
- Having discovered the sound insulation, with a special cutout for the fuel tank hatch cover, you need to bend it.
- Remove this cover by first removing the screws.
Location of screws securing the decorative cover of the fuel pump
The decorative hatch has been removed and the fuel pump is visible
Hose clamps close up
The fuel pump mounting nuts are marked with arrows
Installing a new or repaired fuel pump is done in the reverse order.
Replacing the Chevrolet Niva fuel filter
- Using a 10mm socket, unscrew the plastic TF protection.
- Disconnect the fuel inlet and outlet hoses (there will be 2 clips on the sides of the snap connections that need to be pressed into the connector when removed). Despite the lack of pressure in the line, some gasoline will flow out of the hoses.
- Loosen the nut of the metal clamp tightening the bolt (if the nut is stuck, the bolt will most likely turn while turning, so in addition to a 10mm socket, you will also need a 10mm spanner).
Read more: Lumbar support for car seat
- Remove the old fuel pump from the clamp and pour the remaining gasoline in it into a container prepared in advance.
- Install a new filter. Remember that the arrow on the filter housing indicates the direction of fuel flow. All that remains is to install the hoses until the connectors click and assemble the remaining elements in the reverse order of removal.
After replacing the fuel filter on your Chevrolet Niva yourself, turn on the ignition several times for 5-8 seconds so that the fuel pump fills the system with fuel before starting the engine for the first time.
Video:
The fuel pump is broken, what should I do?
It is a very unpleasant moment when a fuel pump failure occurs, for example, on a highway or near a traffic light.
The situation becomes most tense at times of heavy traffic. If such a nuisance happens and there is no one to help, then the first thing you should do is roll the car off the roadway and try to “reanimate” the fuel pump.
Symptoms of a problem
In the arsenal of automotive tools of any caring driver there should be, along with the keys, a tester, even if in the form of a simple warning lamp and two wires.
The first sign of a malfunction on an injection engine is that the fuel pump motor is “silent” when the ignition is turned on. Accordingly, all attempts to start the engine in this case will not be successful.
In any unclear situation, remove the terminal. Very useful advice, by the way!
The driver will be very lucky if a very simple method helps, which should be taken first. To do this, remove the terminal from the battery for a while, and then put it back in and secure it. Perhaps the fuel pump will start working again.
Read more: Evb3561sv w 65 m0
Checking the power supply at the fuel pump terminals
Well, if this does not happen, continue to look for the problem. Here you should tinker and try to get to the pump itself, and use a tester or test lamp to check whether there is power at its terminals.
One end of the tester wire is installed on the car body - this will be “ground”, and the other - on the terminal connector of the fuel pump. If there is voltage, then, unfortunately, it is impossible to avoid replacing the electric motor, and if there is no voltage, the troubleshooting should be continued, already in the electrical circuit of the car.
The fuel pump screen is clogged
Not severe contamination of the filter mesh. It could be worse!
In this case, the engine starts, but does not develop full power.
Troubleshooting in an electrical circuit
The electric motor of the fuel pump rarely fails during normal operation.
Burnt contacts on the fuel pump
The main reason for this malfunction is the inexperience of the driver who does not monitor the fuel level in the gas tank, that is, when the fuel is almost completely gone. Gasoline pumps extremely do not like to work in the absence of fuel.
how to relieve pressure in the fuel line? [Archive] - AvtoSaratov
View full version: how to relieve pressure in the fuel line?
I decided to change the filter in the fuel pump, but I already have experience in changing it, when a friend changed it on the 14th, when they unscrewed the pipes from the fuel pump, gasoline began to gush into the cabin. I don’t even want to repeat this story, but the manuals for the 9th family describe how to relieve pressure for carb cars, but not for injection ones. Who knows how, tell me?
When they changed the fuel filter at the station, they first opened the gas tank cap and told me to relieve the pressure in the system. Nexia car, injector.
Pull the fuel pump fuse and start the car. When it stalls, that’s it, there is no gasoline in the line.
When they changed the fuel filter at the station, they first opened the gas tank cap and told me to relieve the pressure in the system. Nexia car, injector.
So I tried, for the 14th it definitely didn’t work, at least it didn’t reset in five minutes.
Pull the fuel pump fuse and start the car. When it stalls, that’s it, there is no gasoline in the line.
So there are two tubes, one through which gasoline is supplied to the engine and the second through which, as I understand, what is not burned returns, and from it it is the one that gushes the most.
When the pump does not work, there is nothing to return.
I decided to change the filter in the fuel pump, but I already have experience in changing it, when a friend changed it on the 14th, when they unscrewed the pipes from the fuel pump, gasoline began to gush into the cabin. I don’t even want to repeat this story, but the manuals for the 9th family describe how to relieve pressure for carb cars, but not for injection ones. Who knows how, tell me?
Remove the fuel pipes under the hood by supporting something. Not much will leak out.
Remove the fuel pipes under the hood by supporting something. Not much will leak out. And what leaks out will certainly end up on the hot manifold.
as already said, the easiest way is to start the car by turning off the fuel pump; when it stalls, you can safely change
There is a valve at the end of the fuel rail; unscrew the cap and press on it. Just be careful, you might splash gasoline in your eyes, press on it little by little and everything is ok))) Once they poured gasoline into a can to start a fire :crazy:
There is a valve at the end of the fuel rail; unscrew the cap and press on it. Just be careful, you might splash gasoline in your eyes, press on it little by little and everything is ok))) Once they poured gasoline into a can to start a fire :crazy:
+++ the simplest option :good:
There is a valve at the end of the fuel rail; unscrew the cap and press on it. Just be careful, you might spray gasoline in your eyes, press on it little by little and everything is ok))) Once they poured gasoline into a can to set the car on fire :crazy: +++ the simplest option :good:
on the new 10 and priors there is such a valve in the gas tank
Anthrax. PLAGIARISM :blind:
On the new 10 and Priors, there is such a valve in the gas tank, also on the ramp, do not confuse it with the pressure regulator. We talked about a fitting for measuring fuel pressure, VO.
Anthrax. PLAGIARISM :blind: Re-read the highlighted text more carefully.
Re-read the highlighted text more carefully. I saw everything, but why did I repeat my post, it turns out that I set the car on fire. This is how people are brought to prison with false scribblings:blum3:
I changed it myself 1. Opened the gas tank 2. Started it 3. Removed the terminal from the fuel pump 4. waited until it stalled 5. turned the starter twice (just in case)
Well, then I changed the filter
If you're going to change the filter in your garage, just don't start your car in the morning. The pressure in the line drops to almost zero within about 3-4 hours after stopping the engine.
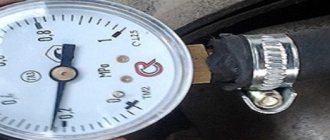
Procedure: relieve pressure in the fuel line by connecting a hose with a connector to the valve (similar to the nipple of a car camera in the photo in the red circle). You can use a hose and connector from the pump, lowering the end of the hose into a container to collect fuel. clean the collet connectors from contamination (red arrow in the photo) spray on the bolt of the clamp securing the filter to the bottom WD40, unscrew the fastening bolt (in the yellow circle in the photo) insert an open-end wrench between the filter housing and the connector, pull it with a wrench, resting against the filter housing, in the direction indicated green arrow, connector to the side and remove the hose from the filter fitting. do the same with the other connector (indicated by the red arrow) https://www.volvo850.ru/gidfoto/fuelfilter.jpg https://www.volvo850.ru/gidfoto/fuelfilter3.jpg * install a new fuel filter, pay attention to the direction flow (indicated by a blue arrow in the photo). The filter housing also has an arrow indicating the direction of fuel flow. * On the 70 series, the fuel filter is located a little differently. In the yellow circle is the screw that secures the filter to the bottom of the car. (torx 25) https://www.volvo850.ru/gidfoto/fuelfilter1.jpghttps://www.volvo850.ru/gidfoto/fuelfilter2.jpg And here’s how the fuel filter works. Can you imagine now what is happening to the fuel pump mesh in the gas tank? Maybe it’s worth taking a look there and throwing its contents into the trash. Think about it in your spare time.
see also
“Peter - AT” INN 780703320484 OGRNIP 313784720500453
The Priora stopped driving as it should; when accelerating, it was as if they were holding the tail of the car; when it started moving, it failed. I exchanged consumables (spark plugs, coils, fuel pump, filter, DPZ, IRR, washed the injectors myself) I installed the pump from a known-good car - the same result. Later I got a fuel pressure gauge and took measurements
Look in the rear left arch, there is a separator tank, there is a valve on top of it inserted through an elastic band. This valve flew out, and I washed the rust and sand fuel system three times until I accidentally discovered a valve dangling in the arch and a hole from it in the separator tank, everything that was on the road flew into it
Thanks, I'll take a look today
Look in the rear left arch, there is a separator tank, there is a valve on top of it inserted through an elastic band. This valve flew out, and I washed the rust and sand fuel system three times until I accidentally discovered a valve dangling in the arch and a hole from it in the separator tank, everything that was on the road flew into it
Do you have a photo? I don’t understand, we have an absorber under the hood and only the hose from it goes to the tank
Do not confuse the adsorber with the separator.
Look in the rear left arch, there is a separator tank, there is a valve on top of it inserted through an elastic band. This valve flew out, and I washed the rust and sand fuel system three times until I accidentally discovered a valve dangling in the arch and a hole from it in the separator tank, everything that was on the road flew into it
To prevent this from happening, you need to install fender liners!
:))))) God forbid, advise some grandfather. It must be assembled on the assembly line as expected and this will not happen
fender liners without screws novline, I installed these and everything is good! There seems to be information about them on the drive too, I advise you to look!
For some reason I am not a supporter of these mud collectors.
Rdt. When the gas is released, the pressure should not fall below 3.8 by 4 points. The RTD releases the pressure, and when the engine is stopped, the pressure in the fuel rail should not drop sharply to 0. It should remain at 2-2.5-3 bar (with the internal combustion engine not running)!
did you change the fuel filter?
Change the gas station, did you change the fuel too? check adsorber electromagnetic sensor
I changed the gas station, the same fuel (in the tank and fine cleaning)
it means the star is coming to the catalyst
Kats cut out, firmware for Euro2
DMRV means))) damn there are a lot of reasons for “being held by the ass”!
The pressure was restored, another pump was replaced, the reason “does not work” was the licked key of the kv star, the damper was loose and gave incorrect readings
Change the RTD... The pressure should be 3.8 But in general, before changing anything, you need to do diagnostics and not mindlessly change everything from one extreme to another
The RTD on the Priora releases pressure above 4 atm, right?
Change the RTD... The pressure should be 3.8 But in general, before changing anything, you need to do diagnostics and not mindlessly change everything from one extreme to another
It’s impossible to find a diagnostician during the day, they’ll charge 2k for checking (whether they’ll find it or not is unknown)
My friend lives in Surgut. Also a diagnostician. Has scanners and programs. If it is not very far from you, I recommend it. He won’t take extra, and he won’t take money for unresolved problems.
If I find anything here, in the rage I might roll it to Surgut
Change the RTD... The pressure should be 3.8 But in general, before changing anything, you need to do diagnostics and not mindlessly change everything from one extreme to another
Before changing the RTD, you should check the BN; it breaks 15 times more often than the RTD. You need to measure the fuel pressure head-on, directly. It should be at least 7-8 atm. If this is the case, the RTD is changed (if the corrugated hoses in the module are in good working order and there are no leaks) If the pressure is 1 11 m
Is the car jerking, loss of agility or the engine is difficult to start? One of the reasons for such malfunctions may be related to fuel pressure. Let's look at the instructions for measuring pressure in the fuel rail, as well as features that may arise during this activity.
Checking the fuel pressure is carried out similarly for all Lada cars (Granta, Kalina, Priora, Largus, Vesta, Niva 4x4 and XRAY), because All these models have the same type of engines.
How to reduce the pressure in the power system of a fuel-injected car?
Note! Before you start, you should definitely know that in the fuel injection power system the pressure is 30 MPa (3 kgf/cm2). Based on these values, always remember that under no circumstances should you loosen the connection of the high-pressure fuel pipes while the car’s engine is running, or immediately after stopping it. But there is one interesting factor: after the car has been turned off and left unstarted for two to three hours, there is no need to reduce the pressure in the system at all, since during this time it itself drops to almost zero and rises sharply after starting engine!
1) In order to reduce the pressure, first open the hood of the car and then find the control valve in the engine compartment, which will still be closed with a protective cap that is very similar to a wheel nipple cap.
2) After the protective cap is found, take it and turn it completely by hand and after unscrewing the cap, a control valve will appear before your eyes, in the center of which there will be a spool (Indicated by an arrow), you will need to press on this spool using which be it with an awl or a screwdriver, or even with a wrench.
Note! When you press this spool, pressurized fuel will suddenly burst out of the control valve itself. By the way, this fuel can be poured into a container prepared in advance for this (This is only if you do not want to dirty the car engine), or you can go another way way, without draining the fuel into any container, but simply after splashing out, take it and wipe the places where the fuel has spilled dry with a rag! (Be sure to make sure that there are no traces of fuel on the engine, otherwise, due to fire getting on them, the engine may simply burst into flames and, as a result, completely burn out along with the car, so be careful)
3) Finally, when the pressure in the system has been reduced, take the cap in your hands and screw it back onto the control valve.
Operating principle of RTD
The valve design and operating principle depend on the type of fuel system of a particular vehicle. There are 3 ways to supply gasoline from the tank to the injectors:
- The pump together with the regulator is installed inside the tank; fuel is supplied to the engine through one line.
- Gasoline is supplied through one tube and returned through another. The fuel system check valve is located on the distribution rail.
- The circuit without a mechanical regulator provides for electronic control of the fuel pump directly. The system contains a special sensor that registers pressure; the pump performance is regulated by the controller.
In the first case, the return flow is very short, since the valve and electric pump are interlocked into a single unit. The RTD, located immediately after the supercharger, dumps excess gasoline into the tank, and the required pressure is maintained throughout the supply line.
Reference. The first scheme with a regulator inside the gas tank has been implemented on all Russian-made VAZ cars.
The second option is used in most foreign cars. A valve built into the fuel rail allows excess fuel to flow into the return line leading to the tank. That is, 2 gasoline pipes are laid to the power unit.
There is no point in considering the third circuit - instead of a regulator, there is a sensor whose functionality is checked using a computer connected to the diagnostic connector.
A simple fuel pressure valve installed in the fuel pump unit consists of the following elements:
- cylindrical body with pipes for connecting the supply and return lines;
- a membrane connected to a locking rod;
- valve seat;
- spring.
The amount of pressure in the supply line depends on the elasticity of the spring . While most of the fuel goes into the cylinders (high load on the engine), it keeps the membrane and valve stem closed. When the crankshaft speed and gasoline consumption decrease, the pressure in the network increases, the spring compresses and the membrane opens the valve. The fuel begins to be discharged into the return line, and from there into the gas tank.
The fuel pressure regulator installed in the rail operates on a similar principle, but reacts faster to changes in load and gasoline consumption. This is facilitated by connecting an additional pipe of the element to the intake manifold. The higher the crankshaft speed and the vacuum on the spring side, the stronger the membrane presses the rod and closes the passage of fuel into the return line. When the load decreases and the speed drops, the vacuum decreases and the rod releases - the return flow opens and excess gasoline begins to be discharged into the tank.
Symptoms of element failure
During the operation of the car, a car owner may encounter two types of RTD failure:
- The pressure drop in the rail is below the permissible level - the regulator directs most of the fuel through the return line to the gas tank.
- Increase in pressure to maximum - the element does not allow fuel to flow into the return line.
Note. As a rule, the first malfunction is accompanied by a rapid drop in pressure in the system after the electric fuel pump is turned off.
It is quite simple to track the signs of the first malfunction - the power unit is sorely lacking fuel for normal operation in all modes. Symptoms appear as follows:
- cold starting is difficult, the engine runs extremely unstable until it warms up;
- “dips” during acceleration and jerks when moving uphill;
- the car often stalls at idle;
- Gasoline consumption per 100 km increases.
Causes and Troubleshooting
If the above symptoms are detected, you should check the performance of the RTD using one of the suggested methods:
- measure the pressure in the fuel rail, its value should be at least 3 bar;
- find the return hose and carefully press it with pliers while the engine is running;
- disconnect the vacuum pipe leading from the manifold from the regulator.
The most reliable way is to measure with a pressure gauge. The device is connected to the fitting on the fuel rail, the test is performed with the engine running. If the pressure is below 3 Bar, additionally check the fuel pump - the unit may have lost performance. For diagnostics, you will need a tee with a pressure gauge embedded in the supply line. If the pump produces 3 Bar or more, change the RTD.
The reasons for valve failure look like this:
- the spring has lost its elasticity and allows the membrane to bypass fuel at low pressure;
- pollution with low-quality gasoline;
- rod jamming.
Due to the design features (the element body is rolled), repairing the fuel pressure regulator is impossible in most cases; the part will have to be replaced. The option of washing and blowing helps only with blockages inside the element.
Squeezing the return line is done at idle speed of the engine, preferably “cold”. If engine performance stabilizes, there is a problem with the RTD or pump. To determine the “culprit”, you will still need to measure the supply pressure. Try removing the vacuum tube from the manifold at higher speeds - if the valve has become unusable, the behavior of the power unit will not change.
Topic in the “Audi Repair” section, created by Audi RT, April 25, 2007.
You are using an outdated browser. This and other sites may not display correctly. You need to update your browser or try using a different one.