When is it time to change?
The gasket serves to seal the connection between the head and the cylinder block. There are several types of it:
- Asbestos. The main advantage: minimal shrinkage and excellent recoverability.
- Metal. These are some of the most reliable and high-quality consumables.
New metal cylinder head gasket
- Non-asbestos. Used as repair kits. Main advantages: elasticity, heat resistance, elasticity.
The procedure for replacing the cylinder head gasket on a VAZ 2112 16 valves is indicated in the manual, but this is not the main reason. There are a number of signs that determine the need for replacement:
- leakage of engine oil or antifreeze in the connection area;
- white steam present in the exhaust gases indicates that antifreeze has entered the cylinders;
- when exhaust gases enter the cooling system, foam appears at the neck of the expansion tank;
- the presence of oil stains in the coolant indicates a leak in the connection;
- the presence of a white coating on the oil dipstick indicates that there is antifreeze in the engine oil; this may be due to a damaged gasket.
Changing the cylinder head gasket on an 8-valve VAZ-2110 engine
Some owners of domestic cars do not know that the cylinder head gasket needs to be changed every time the cylinder head is removed . You should never install an old part, since this spare part is disposable.
Replacing the cylinder head gasket on an 8-valve VAZ engine is almost the same as the same work for a 16-valve engine, so this article will also be useful to owners of cars with more modern engines.
What is a cylinder head
The cylinder head is one of the main components of the machine.
What role does she play? Its purpose is to control fuel combustion processes in the engine, as well as to remove exhaust gases. VAZ 2110 car with internal combustion engine 16 valves
As the name may suggest, the cylinder head is the engine cover. This element is secured to the block with large pins. Tightening the pins is one of the main procedures that determines the performance of the motor, but we will not consider this process.
Replacement intervals for the cylinder head gasket on the VAZ-2110
It is very difficult to predict the exact service life of a gasket.
The most important thing that interests owners is the replacement interval for this part.
It is very difficult to say how long a particular gasket will last.
- Manufacturer of the part.
- The quality of the material from which the gasket is made.
- The conditions under which these parts were stored.
Since the gasket is made of rubber, storage conditions directly affect its service life. For example, a part purchased at the market, which was stored for a long time in a damp and unheated container, will be worse than the same spare part purchased in a store.
The main function is to ensure maximum sealing of the cylinder block with the cylinder head. If you do not monitor the condition, the engine life will be significantly reduced.
Signs of a broken gasket
Foam around the expansion tank cap is one of the signs of a cylinder head gasket failure.
You can find out that the seal of the connection is broken for the following reasons:
- White vapor appears in the exhaust gases.
- You may notice oil stains in the antifreeze.
- Leak in cylinder head connections.
- There is a large amount of oil in the pan.
- You may notice foam around the filler cap.
Although it seems that it is very difficult to notice the vapors in antifreeze, this can be done by placing a bag over the neck of the open expansion tank. If there are gases in the antifreeze, the bag will inflate.
When is it time to change?
Even an experienced specialist will not give you the answer to this question. This is because when certain elements fail, the cylinder head of an 8 or 16 valve engine is repaired, rather than replaced.
The only reason for replacing the head can only be its deformation, which does not allow the unit to be adjusted correctly.
In addition, these may be cracks that, for one reason or another, cannot be eliminated. In all other cases, the unit is repaired.
Cylinder head of VAZ 2110 disassembled
Articles
The gasket costs pennies compared to the labor of replacing it.
Before you start replacing the gasket, you should purchase this gasket. Although any car store will select a suitable spare part for you, it is better to know its part number. The most suitable gaskets for the VAZ-2110 are:
- VATI gasket , which has the article number 21083100302020.
- Part VICTOR REINZ . This item is of higher quality than the original. Its article number is 613666000 .
- TRIALLI gaskets , which have the article number GZ.
It’s better to immediately buy a better quality spare part than to bother with disassembly again later.
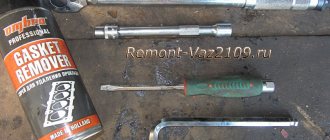
Tools
It is better to change the gasket in the garage.
Although this part can be replaced right near the house, it is better to carry out all replacement operations in the inspection hole. To replace you will need the following tools:
- Set of sockets for ratchet. Heads must be from 10 to 19;
- Torx key;
- Several screwdrivers;
- Candle key;
- Torque wrench.
A special liquid WD-40 , which will help when unscrewing soured bolts, will also not be superfluous As the practice of such repairs shows, during disassembly it is often necessary to use other tools, so having them will never hurt.
Replacement procedure
The replacement process occurs as follows:
- First you need to disconnect the battery; to do this, remove the negative terminal.
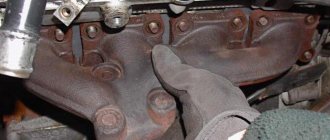
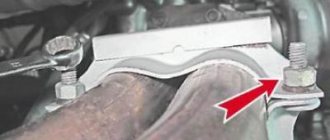
- You need to disconnect the exhaust pipe from the muffler.
Unscrew the 4 nuts securing the muffler to the exhaust manifold.
Having disconnected the hoses, unscrew the nuts securing the fuel pump and remove it.
Before this, we install the first cylinder at TDC and lock the crankshaft flywheel with a toothed lock.
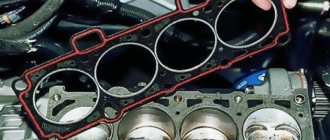
After this, all that remains is to unscrew the bolts and remove the block head . After removing the old gasket, you need to carefully inspect the contact surfaces of the head and cylinder block. There should be no dirt or residue from the old gasket on them. All obvious signs of contamination must be eliminated.
Installing a new part
The new part to be installed must be undamaged, dry and clean.
When installing, you need to make sure that the hole intended for the passage of oil is located between the third and fourth cylinders.
Before installing the cylinder head, you must ensure that the valves of the first cylinder are closed . The bolts must be tightened according to a certain pattern, in four stages.
Tightening sequence for cylinder head bolts.
Tightening torques for 8-valve engine
The bolt tightening torque is as follows:
- First they are tightened to 20 Nm .
- Then up to 69.4–85.7 Nm .
- At the third stage, the bolts are turned 90 degrees.
- At the last stage, you need to turn the bolts completely 90 degrees.
The rest of the assembly process occurs in the reverse order of disassembly. A prerequisite is to check the valve clearances and adjust the timing belt tension.
Installation of pistons and connecting rods
The next step is to install the pistons on the connecting rods. Pistons and connecting rods have a certain direction in relation to the engine. The arrow on the pistons indicates the forward direction, that is, they should be directed from the flywheel towards the front cover.
There are numbers on the connecting rods; they should face forward in the same way.
Taking this direction into account, we connect the piston and connecting rod using a piston pin. Before installing the pin, the piston must be heated; just place it in hot water for a few minutes. In the piston, the pin is locked on both sides by retaining rings.
Replacing the cylinder head gasket of a VAZ 2110 (8 valves)
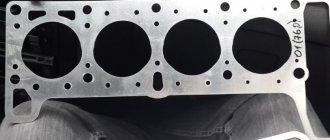
The cylinder head gasket is a perforated sheet made of iron and asbestos, sometimes of aluminum paronite, along the edge of which there are holes for chambers and connection bolts. The purpose of the gasket is to seal the connection between the cylinder blocks. At the same time, it serves to maintain oil pressure in the general engine system and inhibits the mixing of coolant with engine oil.
The photo report below clearly shows the process of changing the cylinder head gasket on a VAZ 2110 car. On a car with a carburetor, it is not the injector that needs to be disconnected, but the carburetor.
Signs indicating cylinder head failure
Nowhere is it said what the service life of the cylinder head gasket is, so its service life is influenced by many factors, such as the operation of the car, the driver’s driving style, the car model and others. But there are certain factors by which it is possible to identify a breakdown.
- Formation of drips at the connection between the block and the head.
- Light impurities and the resulting foam that occurs when connecting to the cylinder head remain on the oil dipstick.
- The color of the exhaust changes to light blue, this indicates the penetration of water into the combustion chamber of the block.
- Formation of oil stains in the coolant tank.
- Hot gases enter the cooling system, causing an increase in engine temperature.
What you need to know when changing the cylinder head
The first step is to set the crankshaft to TDC, then close the two valves of the 1st cylinder. It is best to replace the removed fastening bolts, since after several uses they are pulled out, the metal is strained, after which it breaks. When the bolt length increases to 135.5 mm, they must be replaced.
The gasket must be replaced whenever the engine head is removed, even if it is not damaged or damaged.
It is necessary to tighten the bolts with a tightening torque of 20 Nm in the first stage, and 69-85 Nm in the second stage, and in the third stage the tightening force of the bolt reaches 90 degrees.
The actions when changing the gasket on a VAZ 2110 with a 16-valve engine are similar to those with an 8-valve engine. Here it is worth paying attention to some points:
- The first step is to remove the dismantling.
- When removing the pulleys from the timing belt, two pulleys are marked and they are removed.
- The fuel rail is removed.
- Tightening occurs according to the instructions for a 16 valve engine.
Necessary tools when changing gaskets for a VAZ 2110 car
To carry out work to replace the gasket, you need to drive the car into a pit, this will make it more convenient to work, while preparing a set of tools in advance:
- Ratchet sizes 10,13,17 and 19.
- Torx key.
- A simple screwdriver.
- Special key for candles.
It is also worth taking care of the components: Gaskets included in the TRIALLI kit, item number GZ1017022, costing 500 rubles; Gasket for cylinder head VICTOR REINZ number 613666000, the cost will be approximately 280 rubles; The original cylinder head gasket is VAZ number 21083100302020, its price is 140 rubles.
Prices are indicated for Moscow and the region as of 2022.
We install the piston of the first cylinder to the TDC position of the compression stroke, fix the camshaft pulley, and remove the spark plugs.
Using a 10mm wrench, unscrew the two bolts securing the cable bracket, and then remove the bracket. We get rid of the ventilation hose, as well as the hose installed on the valve cover fittings. Using a 10mm wrench, unscrew the two nuts securing the valve cover and get rid of it.
Using a 10mm wrench, unscrew the bolts holding the front timing cover, one located in the center and two on the sides. We remove the timing cover.
The mark applied to the camshaft toothed pulley must coincide with the installation lug located on the rear cover of the timing drive; using a 17mm wrench, remove the pulley.
Armed with a 10mm wrench, remove the fastening nut on the protective casing and remove the casing.
The timing belt also requires replacement.
Disconnect the sensor connector indicating the oil pressure level.
Using a 10mm wrench, unscrew the two nuts and bolt securing the plug. Using a 13mm wrench, remove the 6 nuts securing the rear camshaft bearing housing. Remove the bearing housing.
Armed with a 14mm wrench, you need to remove the four nuts holding the housing in front of the camshaft and also remove it.
Unscrew the four nuts located on the muffler mount.
Using an E14 Torx head, unscrew the ten bolts located on the cylinder block and remove the block itself.
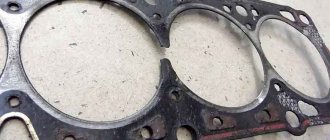
Burn marks are visible on the gasket.
Remove the old cylinder head gasket.
After changing the gasket, tighten the cylinder head bolts according to the diagram.
Source
Preparatory stage
Before replacement, you should place the car in an inspection hole and completely turn off the on-board power supply. After this, you will need to unscrew the crankcase protective elements in order to drain the oil from there.
It is important to remember that such operations can only be carried out on a cooled engine in order to avoid the risk of injury when replacing valves on a VAZ-2112
Dismantling the cylinder head
Removing the cylinder head
On the VAZ-2112 engine, it is highly recommended to carry out preliminary dismantling of the cylinder head. In this case, the valve guides can, in principle, not be touched, but in this case it will be necessary to dismantle various equipment, namely:
- disconnect the connector under the fuel pump hatch so that it stops pumping;
- start the engine and wait until it stalls;
- remove the air filter by loosening the clamps and disconnecting the connector, as well as unscrewing the screw with a “10” wrench.
Chemicals for cleaning
The bearing housing in the VAZ-2112 fits tightly to the cylinder head cover, and the connection between these two elements must remain sealed for normal operation of the vehicle. To maintain the desired properties, Loctite-574, KLT-75M or other similar sealants should be applied to the edge of the housing.
In principle, the cylinder head gasket does not necessarily need to be lubricated during the replacement process, since applying grease or graphite can ultimately lead, on the contrary, only to unpleasant consequences. There are VAZ-2112 owners who prefer to use graphite lubricant to treat valve stems, but this should not be done either, since this procedure is carried out exclusively with engine oil.
Valve replacement and seat repair
Valve fixing plate
Replacing valves on a VAZ-2112 (16 valves) is not as complicated a procedure as many people imagine it to be. All you have to do is do everything according to the instructions:
- All components of the cylinder head are removed and the wires are disconnected.
- The cylinder head cover is removed.
- All carbon deposits are completely removed from the cylinders. To simplify this procedure, you can use a special brush attached to a drill.
- All valves are loosened and removed with tweezers. To do this you will need to tighten the spring.
- Special diamond chips are applied to the edge of each valve.
- The valve is installed back in its place.
- The cylinder head is being assembled.
In most cases, car owners have problems treating the edge of the valve with special chips. This procedure is carried out as follows:
- a rubber pipe is threaded onto the guide valve;
- the part is scrolled until a uniform mark is visible on its edge;
- All remnants of lapping paste are carefully removed.
If after performing this operation it was not possible to achieve the desired result, you should replace the used valve with a new spare part.
If, after dismantling the VAZ-2112 valves, you see that a large amount of carbon has accumulated in the channels, before replacing it, you should completely remove it from there using a special sanding felt or a flat screwdriver.
You can see the master’s work more clearly in this video:
Replacing valve stem seals
Ideally, the valve stem seals should be changed after dismantling the cylinder head, but in practice, not every car owner will be able to implement such conditions. It should be understood that this procedure is quite lengthy and takes a lot of time, which should be prepared in advance.
The procedure itself is carried out like this:
- The negative terminal is removed from the battery.
- High voltage wires are disconnected.
- The candles are unscrewed.
- The first piston is clamped in order to prevent confusion in the valve timing.
- The valve cover is removed.
- Various wires going to the pads are disconnected.
- The mounting screws are unscrewed, after which the ignition coil is removed.
- The throttle is removed. Many people simplify this procedure, preferring to dismantle only the drive cable. If the entire throttle assembly is removed, it should be examined for contamination, since in most cases it is also cleaned in parallel with the repair.
- The screws are unscrewed, after which the fixing hose of the power steering is moved to the side.
- The mounting screws are unscrewed and the valve cover is removed.
- The mounting screws of the rocker arms are unscrewed, after which they are removed from the structure.
- “Desiccation” is performed.
- The caps are being repressed.
- The structure is carefully assembled in the reverse order.
Signs of failure of the cylinder head gasket of a VAZ 2110
There are no specific warranty periods for the use of a cylinder head gasket. Its durability is influenced by such factors as: the degree of operation of the engine, its model, driving style and other reasons. However, there are several symptoms by which you can determine that the gasket has failed:
- at the junction of the block and the head there are leaks of engine oil or coolant ;
- using an oil dipstick, foreign light impurities or foam-like emulsion , which occurs when antifreeze penetrates through the connection with the cylinder head;
- the color of the exhaust changes to bluish-white, which indicates water entering the combustion chamber of the cylinder block;
- presence of oil stains in the coolant reservoir;
- The engine temperature rises due to the breakthrough of hot gases into the cooling system, which immediately heat the coolant.
Tips for replacing the cylinder head gasket
Removal and installation of the cylinder head gasket is carried out with the crankshaft set to TDC. It is also necessary to ensure that both valves of the 1st cylinder are closed.
It must be remembered that the cylinder head gasket must be changed after each removal of the engine head, even if this is not due to its unsuitability.
The procedure for replacing the cylinder head gasket on a VAZ 2110 on a 16-valve engine is generally similar to how to change the cylinder head gasket on an 8-valve engine, but has several nuances :
- The receiver must be dismantled.
- When removing timing belt pulleys, a mark is placed on two pulleys and two pulleys are removed.
- The fuel rail is removed.
- The order and tightening torques are carried out in accordance with the requirements for a 16-valve engine.
In what cases is it necessary to tighten the block?
It becomes necessary to tighten the bolts if the cylinder head was removed to change the gasket or repair some components. Also, some car owners recommend tightening after a certain period of operation of the car or after a certain mileage of the VAZ 2110. It is important to know that before installing the head it is always recommended to install a new gasket.
Reinstalling an old one, even if it is in good condition, may not give the desired result. A new gasket is inexpensive and for VAZ 2110 cars they are sold in almost all car stores. You also need to know that the bolts that secure the cylinder head wear out over time and, under constant stress, can even stretch to some extent. Re-installation of bolts is permissible, but only when their length is no more than 9.5 centimeters.
The length should not exceed 9.5 centimeters
They are also free from damage and rust. But since they are inexpensive, it is better not to skimp and purchase a new set of bolts.