03 February 2016 Lada.Online 93 082 1
Is the car jerking, loss of agility or the engine is difficult to start? One of the reasons for such malfunctions may be related to fuel pressure. Let's look at the instructions for measuring pressure in the fuel rail, as well as features that may arise during this activity.
Checking the fuel pressure is carried out similarly for all Lada cars (Granta, Kalina, Priora, Largus, Vesta, Niva 4x4 and XRAY), because All these models have the same type of engines.
Measured (estimated) the pressure in the fuel rail
I’ve never done anything like this, but in order to collect evidence in the investigation of the case “why in the morning, when starting the engine, a new car stalls (or there is a drop in engine speed),” I decided to measure the pressure in the fuel rail.
The pressure gauge was taken from an old foot compressor for inflating wheels. I didn’t find a gas-resistant tube, as it should be, but I found a tube from a shower stall and decided to take a chance in the hope that it would withstand 3...3.5 ATM for a short time... I took off the adsorber valve to make it easier to get to. I removed the plug and unscrewed the nipple. I tightened the tube to the ramp and pressure gauge with clamps. When I unscrewed the nipple, gasoline flowed out of my nose.
At first glance, the pressure in the system is normal. I suspect that the old pressure gauge is lying, its needle is not even at zero, so let’s call this experiment not a measurement, but an assessment.
1. When the ignition is turned on, the pressure reaches approximately 3 atm, but then gradually drops. When the ignition is turned off, it drops quickly.
2. When starting the engine at idle, the pressure remains about 2.8 atm, which is close to normal.
3. If, with the engine running, you drop the vacuum tube from the manifold to the fuel pressure regulator (I seem to have a traditional fuel circuit with a return line), then the pressure increases to 3.4 atm.
My thoughts. The pressure regulator (at least IN THE EVENING) works normally. Why does the pressure in the rail drop when the ignition is turned on and off, if the engine is not running? This is a question: is it supposed to be like this or is the check valve in the fuel pump poisoning? So, I have another suspect...
Troubleshooting
No pressure in the fuel rail? Causes:
If the pressure in the fuel rail gradually drops, the cause may be:
Let's check it like this. We clamp the leading rubber hose of the fuel rail:
Checking the RTD. Connect the pressure gauge hose to the outlet fitting of the fuel pump and turn on the ignition:
If the pressure in the fuel rail is within normal limits, we look for the causes of engine malfunctions elsewhere.
Share on social networks:
Found an error? Select it and press Ctrl+Enter..
Source
What elements make sense to repair?
O-rings, clamps and flexible hoses are typical consumables. Their service life is short, and repairs are impractical. Connecting hoses cost within a few hundred rubles, connecting elements are even cheaper, so it is much easier to replace them with new ones.
Steel pipelines are a completely different matter. The Chevrolet Niva user manual states that the damaged part of the fuel line can be repaired. Repairs are made by replacing the damaged area with a reinforced hose. The decision on the feasibility of repair is made based on measuring the length of the damaged section of the gas pipeline.
Checking the pressure in the fuel rail on VAZ and Lada cars with an injection engine
The article will describe a testing technique that does not require special devices.
From the tool you will need:
1. We took a regular gas pressure gauge with a scale of up to 1.0 MPa. It has a threaded connection and screws perfectly onto a 9 mm oxygen hose. You can use a mechanical one to check tire pressure. They are usually inserted into the fuel hoses by 8 mm.
2. Screw it into the hose and tighten it with a clamp:
3. Unscrew the plastic cap from the fuel rail. It should unscrew by hand, but if it hasn’t been touched for a long time, you may need pliers:
4. If the car has just been turned off, then the gas in the ramp is under pressure. First, it is recommended to release the pressure by pressing on the spool and placing a rag or a plastic “bottle” with the neck cut off. It is more convenient to bleed using a wheel cap.
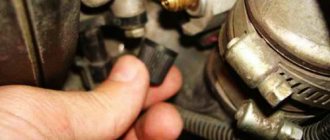
5. Unscrew the nipple with the cap. It is similar to a wheel nipple:
6. We put a hose with a pressure gauge on the threaded part and tighten the connection with a clamp:
7. Start the car and first of all make sure that there are no gasoline leaks from the connections. Then we look at the pressure gauge readings.
8. For fuel systems with “return” (a pressure regulator is installed on the fuel rail, from which a tube goes back to the tank), a pressure of 2.7 atm is considered normal (when re-gasping it should jump up to 3 atmospheres). However, a pressure of 2.5 atm is also acceptable. If the pressure is less, then the fuel system is faulty. Pressure pulsation (0.2 atm) indicates a clogged coarse mesh (located in the tank with the fuel pump).
9. Next, we check the pressure regulator. To check, disconnect the hose going from the regulator to the intake manifold. The fuel pressure should increase to 3.2 atm (at 2.7 initial). Up to 3.0 atm is also acceptable. If the pressure has not changed or changed only slightly (0.1-0.2 atm), then you need to check the fuel pump.
10. The maximum pressure developed by the pump is checked. To do this, use pliers to pinch the return fuel line (coming from the regulator). Different pumps show different pressures, but a new one should have at least 6 atm. A pressure of 5 atm indicates severe wear, but will still serve. If the pressure is less than 4.0 atm, the pump is faulty or the pipeline with the fine filter is clogged. If the fuel pump is working properly, and the pressure in the rail drops after the “return” is restored to less than 2.5 atm, and/or does not change when the regulator hose is disconnected, then the regulator is faulty. If, when the return line is pinched, the pressure rises slightly, and engine performance deteriorates significantly, then there is a high probability of injector leakage.
11. To eliminate the influence of the injectors, it is better to measure the pressure on the supply line itself by disconnecting it from the ramp and inserting it into a hose with a pressure gauge. If the pressure has risen to 5-6 atm, and with the “return” compressed it is significantly less, then the injectors are allowed to pass through. It is necessary to remove the ramp and check the condition of each individually.
12. You can check for clogging of the pipeline as follows. Remove the rear seat and unscrew the hatch. We see the fuel pump assembly underneath it. If the pipeline has quick-release connections, then we buy such a connection in the store (50 rubles).
13. If the pipeline is installed on threaded connections, you will have to buy the entire tube and cut off the tip:
14. Connect it to the pump outlet, and put a hose with a pressure gauge on the other end. Let's check the pressure again. If the pressure gauge readings increase to the normal 6 atm (after pumping gasoline several times by turning the key), then change the fine fuel filter and bleed (or flush the entire system).
Checking the pressure and replacing the pressure regulator in the VAZ-21214 engine power supply system
Checking the pressure in the fuel system of the VAZ-21214 injection engine
We carry out the work on a cold engine.
The pressure in the fuel frame is checked with a special pressure gauge, but if you don’t have one, you can use a regular pressure gauge.
We put an oil and petrol resistant hose (with an internal diameter of 12 mm) onto the threaded fitting of the pressure gauge and secure it with a clamp.
We unscrew the protective cap on the rear end of the fuel rail.
Using the wheel valve cap, unscrew the spool from the fuel rail fitting (for clarity, we show the operation on a removed ramp)
Gradually releasing the fuel pressure, remove the spool.
We put the pressure gauge hose on the ramp fitting and secure it with a clamp.
We start the engine and when it is idling, check the fuel pressure, which should be 2.8–3.2 bar (2.8–3.2 atmospheres)
Remove the vacuum hose from the fuel pressure regulator.
If the regulator is working properly, the fuel pressure should increase by 0.2–0.7 bar (0.2–0.7 atmospheres).
If the regulator is faulty, then see below how to replace it.
Replacing RTD Niva Chevrolet
To work you will need:
- Hexagon 5.
- Open-end wrench 24.
- Screwdriver.
Before removing the regulator, it is necessary to relieve the gasoline pressure in the fuel hose. To do this, unscrew the gasoline drain nut and lower it down the tube.
The device can be removed in literally four steps:
After dismantling the old device, use a screwdriver to remove the O-ring and check its integrity. A damaged seal should be replaced with a new one.
Installation of the fuel pressure regulator is carried out in the reverse order of removal.
Before you start using the car, you should make sure that the RTD is working properly by checking the pressure in the fuel rail in different modes. This will help you ensure that the problem is resolved and the machine is ready to use.
Removing the fuel pressure regulator
A small announcement on the design of the regulator:
The regulator consists of a valve with a diaphragm, pressed by a spring to a seat in the regulator body.
When the engine is running, the regulator maintains the pressure in the injector rail in the range of 284–325 kPa.
The regulator diaphragm is affected by fuel pressure on one side, and pressure (vacuum) in the intake pipe on the other.
When the pressure in the intake pipe decreases (the throttle valve closes), the regulator valve opens at lower fuel pressure, allowing excess fuel to flow through the return line back into the tank.
The fuel pressure in the rail decreases.
As the pressure in the intake pipe increases (when the throttle valve opens), the regulator valve opens at a higher fuel pressure and the fuel pressure in the rail increases.
We carry out the work on a cold engine. Disconnect the negative cable from the battery
Disconnect the fuel pressure regulator vacuum hose from the receiver.
Using a 17mm wrench, unscrew the drain tube nut, gradually releasing the pressure.
Hold the hose fitting with a wrench of the same size
The connection between the hose and tube is sealed with a rubber ring
Using a Phillips screwdriver, unscrew the clamping bar screw.
Using a 24mm wrench, loosen the nut securing the drain tube to the pressure regulator
Use a 5mm hex to unscrew the two screws securing the fuel pressure regulator to the rail.
Separating the regulator from the ramp
Unscrew the nut and remove it.
The connection between the ramp and the regulator is sealed with a rubber ring.
In photos 6–10 the receiver is removed for clarity
The connection between the fuel pressure regulator and the pipe is sealed with a rubber ring
Install the regulator in reverse order
If necessary, replace the O-rings and lubricate them with engine oil.
The tightening torque of the regulator mounting screws is 8–11 Nm, and the drain pipe mounting nuts are 20–34 Nm
Location, structure and principle of operation
The fuel pressure regulator (FPR) is located between the fuel pump and the rail. It consists of the following parts:
- Three fittings: inlet, outlet (to the ramp) and for supplying fuel to the tank.
- Frame.
- Membrane.
- Valve.
- Spring.
- Valve holder.
The diaphragm divides the regulator into a fuel chamber and a spring chamber. The first receives gasoline, and the second is connected to the intake manifold.
The membrane is pressed against the valve by a spring. On the other hand, it is affected by the fuel pressure in the system.
The regulator works like this:
- Gasoline presses on the membrane.
- If the pressure force exceeds the force of the spring, the latter is compressed.
- The membrane moves back, opening the bypass valve.
- Part of the gasoline is sent to the tank through the return pipeline.
- The pressure decreases and the valve closes.
No pressure in the fuel rail, reasons
The presence of a certain pressure in the fuel rail of an injection engine is one of the conditions for its operation.
Using the example of the fuel rail of the fuel injection system 2111 of the VAZ 21093 (21083, 21099) car, we will consider the signs and reasons for the disappearance or decrease in gasoline pressure in it.
Signs that there is no pressure in the fuel rail
Car engine does not start
The starter turns, but there are no or infrequent sparks in the cylinders.
The car engine starts and immediately stalls
After starting, the engine makes a few revolutions and stalls.
Unstable engine speed at idle
The engine jerks, shakes, and tries to stall when idling.
Dips, jerking and jerking after pressing the gas pedal
When pressing the gas pedal, instead of the expected increase in speed and pickup while the car is moving, the driver feels that the engine is trying to stop and stall - failure or several such attempts extended over time - jerking and jerking.