28.06.2021
| (Votes: 1, Rating: 5) |
Issues discussed in the material:
- Antifreeze level sensor tasks
- Operating principle of the antifreeze level sensor
- Checking the antifreeze level
- Signs of a malfunctioning antifreeze level sensor
- Replacing the coolant level sensor
- Opinion of car owners on the operation of the antifreeze level sensor
The antifreeze level sensor is not installed on all cars, but it is a very useful monitoring device. If before starting the engine, in a parking lot, it is easy to check the coolant level by lifting the hood and looking at the expansion tank, then this will not work when driving.
Unfortunately, on some brands of cars this sensor often “acts up”, so it is necessary to periodically check its performance. From our material you will learn on what principle the coolant level sensor works, how to find out that it is faulty and replace it if necessary.
Coolant level sensor: device, repair, replacement, how to do it yourself
Popular antifreeze level sensors for turbo-injection cars "Stralis", TGS, "Transporter" are reliable. Failures are usually associated with a power outage and can be easily repaired. A device with a damaged housing seal cannot be repaired and requires replacement. You only need to measure the antifreeze in the tank when the engine has cooled down. The surface of the refrigerant should be located between the indicator marks on the wall of the container.
Overheating a car engine can lead to serious consequences. To warn of a breakdown, there are antifreeze level and coolant temperature sensors on the expansion tank. The signals from these devices monitor the parameters of the coolant and warn of an emergency.
Where is the coolant level indicator located?
The device monitors the presence of coolant in the vehicle's expansion tank. When the tank is empty, the device gives an alarm - the cooling system indicator lights up. The coolant level sensor is located in the buffer plastic tank. The part plays an important role in protecting the car engine from overheating and breakdown.
Popular antifreeze level sensors for turbo-injection cars "Stralis", TGS, "Transporter" are reliable. Failures are usually associated with a power outage and can be easily repaired. A device with a damaged housing seal cannot be repaired and requires replacement. You only need to measure the antifreeze in the tank when the engine has cooled down. The surface of the refrigerant should be located between the indicator marks on the wall of the container.
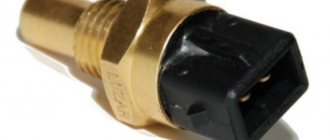
Sensor device
An electromechanical device determines the sufficiency of coolant volume in the vehicle cooling system.
Main types of coolant volume control:
- The reed indicator measures the position of the device mirror using a magnetic float. At the lowest point, the electrical circuit is closed and an alarm signal is activated.
- Electrode devices measure conductivity and control coolant volume.
- The ultrasonic coolant level sensor works by monitoring the height of the coolant mirror. And if there is a deviation from the norm, it gives a signal about a malfunction.
- Hydrostatic sensors respond to changes in coolant pressure at the bottom of the tank.
Cars are usually equipped with reed switch type antifreeze level sensors. The reliable design of the device allows long-term operation in chemically aggressive environments.
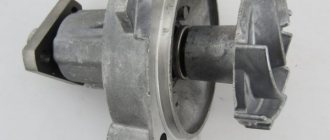
Coolant level sensor
Essential elements
The coolant level sensor device is located inside a plastic “canister” of antifreeze. The device is included in the electrical circuit of the car and sends an alarm signal to the panel. The main element of the device is a sealed reed switch indicator. The coolant volume is measured by a float moving along a vertical rod.
The operating principle of the coolant level sensor is to change the magnetic field from the height of the coolant mirror in the tank. The contacts are controlled by springs that close the circuit when stretched. The circuit also includes an alarm in the form of a light bulb.
Principle of operation
Protecting the machine’s engine from overheating is a critical task, so the coolant in the buffer tank is constantly monitored.
The principles by which the coolant level sensor works in the system:
- creation of an electromagnetic field in the sealed housing of the device;
- change in current resistance in the winding when moving the ring float;
- closing of contacts by springs in the absence of coolant in the expansion tank;
- transmission of an alarm signal to the screen.
Cars are often equipped with reed switch indicators due to reliability.
Level sensor repair
The device has a non-removable sealed design. Any mechanical damage to the housing leads to malfunction of the device. Usually in this case it is necessary to change the indicator to a new one. The cost of the device is significantly less than repairing a broken car engine. Replacing the coolant level sensor is not difficult; you can do the work yourself.
If the old device does not respond to changes in coolant volume, then you need to inspect the body of the device in good lighting for cracks and chips. Next comes checking the integrity of the wires and external contacts. If, upon inspection of the main elements of the coolant level sensor, no damage was detected, then the internal mechanism is most likely broken. In this case, the device cannot be repaired and must be replaced with a new one, taking into account the car model.
Diagnostics
The level indicator must be checked after the coolant has cooled. Hot coolant expands, so it takes up more volume in the tank. If visually the liquid mirror is below o, and the signal light does not light, then the control device may be faulty.
A sign that the system is not cooling is a noisy engine, with the cooling fan turning on frequently. It is necessary to diagnose the electrical circuit, if necessary, eliminate breaks and clean the contacts from oxides. If the old device still does not work, then install a new one.
How to replace
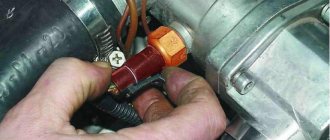
The cause of the car engine exceeding operating temperature may be a broken coolant control indicator. A faulty device does not respond to the lack of antifreeze or antifreeze in the expansion tank. First of all, check the electrical wiring and body of the device for external damage.
If there is no deviation, then installation of a new sensor is necessary. The machine is placed in a dry room where there is good lighting. Next, remove the battery terminal, remove the wires from the plug, and disconnect the device from the tank. The new coolant monitoring device is assembled in the reverse order.
Device installation diagram
Typically, the liquid level sensor has a standard output for connection to the vehicle's electrical circuit. There is no need to empty the expansion tank of coolant. After connecting the coolant level sensor to the circuit, you need to connect the battery. Add antifreeze to the position between the marks on the side wall of the container. Then start the car and make sure that there is no signal about the lack of coolant.
Where is the coolant temperature sensor located and how to replace it?
An antifreeze temperature measuring device is installed in every vehicle, as it is an integral part of the cooling system of any engine. Today we will tell you about where the coolant temperature sensor is located, how to understand that it is faulty and how to replace it yourself.
Data from the device is used by the vehicle control system to change basic engine settings depending on:
- frequency of rotation of the crankshaft;
- direct quality of the components of the gasoline-air mixture.
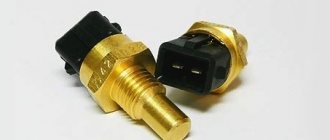
Operating principle of the sensor
Most vehicles are equipped with a ratiometric coolant temperature gauge. The operating principle of such a device is the interaction of the field of a permanent magnet with the magnetic field of the measuring windings. As a rule, there are three such windings, and voltage passes through them. In turn, the permanent magnet is connected to an arrow, which shows the driver the temperature status.
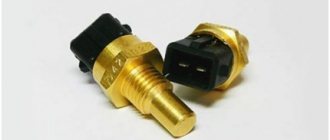
New antifreeze temperature sensors
The coolant temperature gauge sends information to the engine control unit. This data is then used to adjust the electronic gasoline injection and regulate the ignition timing. Depending on the type of engine, the device can be used to activate the cooling fan, which is installed directly on the antifreeze (coolant) radiator. This information can also be displayed on the instrument panel if this function is present in the vehicle.
In other words, the operating principle of the antifreeze temperature sensor is to ensure prompt warming up of the engine when it starts and maintain operating temperature during operation. If the operating temperature of the engine changes, the resistance of the sensor also changes. Depending on the design of the element, a change in temperature is accompanied by a decrease or increase in resistance.
Where it is located?
The coolant temperature sensor (hereinafter referred to as DTOZH) in all vehicles is usually installed in the same place. In particular, next to the thermostat housing in the intake manifold. But sometimes its location depends solely on the car manufacturer. However, there are cars where you may not find it in this location. Very rarely, engineers from manufacturing companies install these devices directly in the cylinder head.
Old temperature sensor
But this is not the limit. Sometimes car developers even install two devices on the car: one in the engine cylinder block and one near the thermostat. And some manufacturers put an element in the electronic control unit, and a second one for the radiator cooling fan. Therefore, if the coolant temperature gauge does not work on your car, and you do not know where it is located, then only the operating instructions can help you.
In any case, the element will be installed so that its end is in direct contact with the coolant, and it is located next to the thermostat. Only in this way can his signal be correct. If the antifreeze level in the system is too low, the device may not read correctly.
Replacing the sensor
Replacing the DTOZH is not a labor-intensive process, but the location of the element can cause difficulties. If you are ready to replace it yourself, then just follow the specific steps indicated in the instructions. And if you are unsure of your abilities, it is better to entrust this matter to a master at a service station.
Antifreeze temperature indicator converter
Symptoms of a problem
Of course, in order to know for sure that the DTS has failed, it is necessary to determine its malfunction. Next, we will tell you how to check the coolant temperature sensor.
If the element has failed, the following signs may indicate this:
- vehicle controllability has deteriorated;
- when driving on a cold engine, you will feel the exhaust quality is incorrect (you will be able to hear it);
- Gasoline consumption increases per 100 kilometers;
- deterioration in the quality of the exhaust gas composition if the engine system refused to switch to closed mode.
As practice shows, DTOZh malfunctions appear as a result of poorly executed electrical wiring (if any wire is “broken”). Problems may also arise if the wires or connections are oxidized and rusted. Sometimes even the sensor itself is quite working, but the problem lies in the wires. That is, if the temperature at the DTOZH is lower than the operating temperature, this may indicate an open thermostat: as is known, in this case the engine warms up more slowly.
DTOZh resistance measurement
If the thermostat is not working or it was incorrectly selected for a specific vehicle model, then the DTOZH will also show a low operating temperature. There can be many problems associated with this device; thermostat malfunction and wiring are only some of the possible breakdowns. For what reasons may the DTOZh not work correctly:
- the input from the DTOZH to the engine control unit has failed;
- there is a very low level of antifreeze in the system;
- cooling fans are out of order;
- the engine began to function at auto-start (the control unit cannot “understand” why the engine runs for a long time and does not warm up);
- The heater radiator works in enhanced mode. This element of the system will strongly cool the liquid, which contributes to jumps in the DTOZh arrow on the car’s instrument panel. As a result, the control unit will accept the sensor information as invalid.
It is also worth noting that replacing the DTOZH is advisable if the device is shorted or open. Checking this malfunction will not take much time - here you only need to measure the internal resistance using a voltmeter. If the resistance is normal, then the problem most likely lies in the wiring or control unit.
Installing an antifreeze temperature sensor
What is needed for replacement?
If you decide to replace the DTOZH yourself, then keep in mind that to do this you will need to drain the antifreeze. You may have recently replaced it, so replacing it is not advisable. But if the antifreeze was changed a long time ago, then it makes sense to replace it and along with it the coolant level sensor. What you will need to replace it at home:
- pan for draining used coolant;
- the antifreeze itself (if you decide to change that too);
- Screwdriver Set;
- new DTOZH (avoid purchasing sensors of unknown manufacture - buy only original ones);
- sealant;
- pit or overpass;
- set of wrenches.
New antifreeze temperature sensor
Step-by-step instruction
How is the coolant temperature measuring device installed? Below are step-by-step instructions for replacing the element:
- we drive onto a pit or overpass;
- open the hood and find the coolant reservoir;
- unscrew the tank cap, then climb under the bottom and find a lid for draining used antifreeze;
- place a tray under the lid. If you decide to replace the antifreeze, then open the lid and wait 5-10 minutes until all the liquid has drained out. The need for replacement is determined by the level of contamination. In the event that a complete replacement of antifreeze in your car is not necessary, then it is enough to drain so much liquid so that its level remains below the sensor itself;
- when a sufficient amount of antifreeze has drained, tighten the drain cap under the bottom;
- find the place where the DTOZH is located.
Depending on the mounting method, the sensor can be installed on latches, on a thread, or using a clamp. If it can be removed by hand, then simply unscrew the latches and dismantle the element. If necessary (if the sensor is attached with a clamp), take a Phillips or slotted screwdriver and unscrew the screw, or do it with a wrench (if it is screwed); Removing the coolant temperature sensor - take a new DTOZH, install it in place of the old one, having previously lubricated the mounting location with sealant. This is done to avoid leaks or damage;
- when the element is installed, pour old (or new) antifreeze back from the pan, check that there are no air pockets;
- At this point, the sensor replacement can be considered complete.
Video from Denis Rem “Replacing the coolant temperature sensor in an Audi A3”
This video describes the step-by-step process of replacing the antifreeze temperature sensor in an Audi A3.
Did you find this material useful? What do you know about temperature sensors? Tell our readers about it!
DIY level sensor
Older car models do not have coolant volume measuring devices. Therefore, there is a risk of engine damage if coolant is lost from the system while driving. The solution to this problem is to make your own coolant level sensor.
A simple circuit of the device is electrode, when two conductors are in a conductive liquid and open the circuit when the tank is empty. To send an emergency signal to the network, connect an incandescent lamp or a bell.
A more complex version of the antifreeze level sensor is made with your own hands on microcircuits, with several indicators connected to one controller. But it is better to entrust this work to car service specialists.
Source
Design and principle of operation of the VAZ sensor
The sensor is installed in the expansion tank and has the following structure. It is based on a special contact - a reed switch. In the language of electricians, a reed switch is a contact that is placed in a sealed shell. It is made from a special material that has pronounced ferromagnetic properties; most often, permalloy wire is used as such a material. Also, this device has special spring contacts.
When the coolant level in the expansion tank increases or decreases, the magnetic field changes, the spring contacts come into contact and close the electrical circuit. When the coolant level decreases, the magnetic field strength of the reed switch drops and, under the action of springs, the contacts return to their original position. Thus, an increase or decrease in level closes special contacts that perform the following functions in the electrical circuit:
Regardless of the function, a circuit is activated that turns on a special lamp on the instrument panel. Currently, this lamp is triggered when the coolant level drops, that is, the contacts are open and the lamp circuit is turned on. And when they touch, the circuit turns off and the lamp goes out.
How to check the device for serviceability
Insufficient coolant level sensor in the expansion tank - check and replacement
So, you have noticed that your engine often gets very hot, or other negative signs associated with the cooling device have been discovered. To begin with, you should check this device, and there are two ways, which we will take a closer look at.
The first option is to remove the device
- With the engine running, check the readings shown on the instruments. If the arrow is at the maximum height, then the engine is still in a cold state. Here you should break the contacts on the device and look: if the arrow points down, then it’s time to replace the coolant temperature sensor of your car.
- When the pointer remains in the same place, try to examine the system contacts; a short circuit often occurs in them. Then the problem can be fixed much faster.
- Another type of failure: the engine heats up evenly, and the instrument needle begins to jump in one direction or another. There is a high probability that the issue is with fuses that are inoperative.
- If the fuses are working, it is necessary to close the contact to ground, and again, if the arrow sharply goes up, you can safely state that there is a malfunction in the operation of the DTOZH.
Second option
- You need to take a multimeter and turn it on in resistance mode.
- Then arm yourself with a thermometer that has notches above one hundred degrees Celsius.
- Take a durable container that will not deform when the coolant is heated to a high temperature.
- After that, you need to connect the probes of the device to the sensor.
- Having made the necessary connections, the DTOZH is placed in a prepared heat-resistant container and heated.
- Here you should monitor the performance of two devices at once.
Below is the data by which you can determine the health of the sensor. The method allows you to check a new device before installing it in place of a faulty device.
The first indicators are temperature C, the second indicate resistance in Ohms.
- 30 – 1350-1880
- 50 – 585-820
- 70 – 280-390
- 90 — 155-196
- 110 — 87-109
How to check the coolant level?
Drivers rarely rely on sensor readings. Experienced car enthusiasts control the level by visually inspecting the expansion tank. The normal coolant level when the engine is not warmed up should be between o and “min”. As the temperature rises to nominal (operating) levels, a slight increase in the antifreeze level is allowed.
While driving, if a coolant leak occurs, the driver may not know about it. After all, no one will stop at certain intervals on the road and inspect the expansion tank. In this case, the sensor will do all the work for the driver.
If a coolant leak occurs or its level drops below the minimum level, the sensor will work and the driver, using a special lamp, will know the need to stop and find out the reason for the drop in coolant level. Thus, timely warning and prevention of engine overheating is achieved.
Malfunctions, repair and replacement of the coolant level sensor
The use of a sensor has significantly simplified the process of monitoring the coolant level. But what to do if the sensor fails?
Unfortunately, this phenomenon is completely unpredictable, which is why you can only rely on the sensor if it is new. The frequency of sensor replacement is determined by the driver, based on operating experience. It is important to carry out this procedure in a timely manner before it fails. This will extend the life of the engine and save you from constant inspections of the expansion tank.
There is only one way to determine if the reed switch is faulty - the lamp does not light up when the coolant level drops. In special cases, the lamp may not work, or the fault lies in the wiring. However, if you are confident in the performance of the last two elements, then this means that it is time to change the reed switch.
Replacement
It is not difficult to replace the DTOZH with your own hands on an injection VAZ 2109. Follow the step-by-step instructions to resolve any issues that may arise.
Removing the device
- First of all, check the condition of the fuses. It is not uncommon for them to burn out, which causes a failure of the coolant temperature sensor.
- Wait until the car has cooled down completely. Under no circumstances should you replace the DTOZH on a hot engine.
- Disconnect the wires going to your DTOZH. You just need to do this in a situation where, when you turn on the ignition, the temperature indicator needle begins to rise sharply and sometimes reaches the maximum level.
- If no changes occur with the arrow, the fault is not with the sensor itself, but with the wire going to it.
- If the needle starts to drop when you turn on the ignition, the coolant temperature sensor has failed and needs to be replaced.
- There is no need to remove half of the units to get to the DTOZH. Access to the device is free, there should be no problems.
- Drain the coolant from the system. This is an excellent reason to at the same time change the antifreeze for a new one, if necessary. If the coolant is fresh, use a clean container to drain it.
- Disconnect the wiring from the sensor.
- Using a socket, unscrew the regulator so that it can be easily removed by hand.
- Clean the device landing area. This usually accumulates a decent amount of dirt and dust, which can cause the new antifreeze temperature sensor to not work correctly.
- To clean, use any rag that does not leave behind lint or threads.
- Treat the nest with a degreaser.
- Insert the new regulator. The mistake of many is that, supposedly to increase the reliability of the installation, they seal the sensor with sealant. You shouldn’t do this, because this way the DTOZH can only work worse.
- Replace the power cord. Only if the check shows that it has a break or is damaged, it is better to replace the wire immediately. We do not recommend repairing it with electrical tape.
- Pour coolant back into the system. Even if you changed the coolant a couple of months ago, it is better to replace it with a fresh one at the same time. It definitely won't get any worse.
- Start the engine and check the operation of the new TOZ sensor.
How to change the coolant sensor
1. Open the hood and disconnect the battery terminal.
2. Remove the plug with wires from the external connector of the sensor and unscrew the sensor.
Many manuals suggest draining the coolant. This operation is not necessary since this action does not in any way affect the element replacement process. That is why draining the coolant is impractical and only increases the work time.
3. Install the new sensor and tighten its mounting cover. Connect the plug with wires to its connector.
4. Connect the battery terminal.
This completes the replacement of the coolant level sensor. As you noticed, this is not a complicated procedure at all and is performed without the help of car service specialists.
Source
Replacing a non-functioning sensor
If this element stops functioning, it must be replaced. It is necessary to carry out such work on a cold engine, since it involves completely emptying the expansion tank reservoir.
- To begin work, you need to open the hood and depressurize the cooling system. This is done by opening the filler cap.
- Remove several bolts securing the expansion tank to the fender body.
- Place a small container where you can drain the remaining refrigerant, and then remove the clamp of the lower pipe of the cooling system.
- Drain the antifreeze into a container, then remove the tank completely and put it aside, so it will be more convenient for you to work with the element.
- Place this tank on the table, remove the fixing bracket holding the sensor in the recess of the tank.
- Rotate this element in several directions, thereby freeing it from its seat. This part is secured with a rubber O-ring.
- After dismantling the sensor, it is necessary to clean the installation cavity and then lubricate it with oil.
- Install the new sensor into the seat, then secure it with the retaining ring.
The work can be considered completed only after the mechanism is completely assembled. It should be assembled in the reverse order of disassembly, not forgetting to add the required level of antifreeze to the system.
Engine cooling system
Any driver, both beginner and experienced, knows very well that the most important element of any car is the engine. No car can move without an engine. Since the motor operates with flammable substances, it is subject to the release of a large amount of heat. The heat generated from burned fuel has a detrimental effect on the condition of engine mechanisms and can lead to their premature failure.
To prevent engine overheating, they use closed cooling systems, which are a system of pipes and channels. This system moves coolant, which receives heat from the engine and is cooled in the radiator. After this, it is returned back to the engine, and the cycle continues throughout the entire operation of the installation.
To relieve excess pressure in the cooling system, an expansion tank is provided. As the coolant temperature and pressure increase, the gas resulting from the excess pressure escapes through the hole in the expansion tank.
The second purpose of this tank is to control the coolant level. It is in this that the coolant level sensor is installed.
Why does the temperature light on the car panel light up?
Not so long ago, cars were designed quite simply. Look at the dashboards of any old car - speedometer, tachometer and a couple of indicators. But everything is changing. Machines are becoming more and more advanced in technical terms. Accordingly, the dashboard becomes more complicated. It became difficult to figure it out on my own. And salespeople at a car dealership often skimp on their responsibilities. They say, you don’t need to pay attention to these icons, they’re lit and leave it to yourself. But that's not true.
If the temperature sensor is on, you should immediately pay attention to it.
Indicators signal dangerous changes in vehicle operating parameters. Therefore, the motorist must not only know why the engine temperature light is on, but also be able to take the necessary measures.
Your temperature indicator lights up
This light comes on when you turn on the ignition. This is fine. But a few seconds after the engine starts running, it should go out. If it continues to light, the coolant level in the cooling system is too low or there is a malfunction in the system itself. It happens that the indicator lights up directly while driving. This again may be a consequence of a lack of antifreeze. Another option is that the cooling system can no longer cope with the increase in the temperature of the unit.
It is worth noting that the color indication of different brands of cars may vary greatly. For example, blue indicates a low engine temperature, and red indicates a high temperature. You can learn about these subtleties from the operating instructions for a particular car.
Why is engine temperature so important?
The internal combustion engine, which is installed in modern cars, is not the simplest unit. It consists of a large number of both individual mechanisms and entire systems. The operation of the “iron heart” of a car is influenced by many different factors. But the temperature regime is one of the key ones.
If the temperature of the unit is less than optimal, the process of formation of the fuel mixture in the cylinders will suffer. As a result, we have a decrease in internal combustion engine power and accelerated wear. Engine overheating is even more dangerous. It leads to deformation of the cylinder head, the cooling and lubrication systems will lose their tightness. A drop in antifreeze level and increased oil consumption is not the worst option. The consequence of overheating may well be loss of elasticity of the piston rings, damage to the cylinder walls and a seized engine as the final sad result. In any case, it will not be possible to do without lengthy (and costly) repairs.
What to do
So what should you do if the temperature indicator lights up? First of all, you must immediately turn on the heating system (this will remove some of the heat from the unit). Calmly, without sudden acceleration, choose a quiet place and stop. Before turning off the engine, you need to open the hood and make sure the fan is working to cool the radiator.
The temperature lamp may be on due to a faulty thermostat.
Now you can turn off the ignition. Touch the radiator. Cold? Most likely the thermostat has failed. Does your hand feel warm? The radiator silted up or the pump “flew”. Don't forget to check the drive belt tension.
Take a break - the internal combustion engine should cool down. If you open a hot engine, you risk being burned by steam from the radiator neck. A sign of sufficient cooling will be the restoration of softness of the water pipes. Now you can open the radiator and bring the coolant level to normal. You cannot add antifreeze to a hot engine! The block head may crack.
Now slowly, without pressing the gas pedal too hard, drive to the garage. It is better to drop off fellow travelers, if any.
If the temperature sensor is on, do not accelerate too much.
So, if the engine temperature indicator lights up, you need to:
turn on the heating; stay; check the fan with the engine running; shut down the unit; estimate the temperature of the radiator; check the tension of the drive belt; wait until the engine cools down; add coolant; Drive carefully to the garage. https://www.youtube.com/embed/xW-UeQKWXmQ
https://youtube.com/watch?v=xW-UeQKWXmQ
Summarize
A lit engine temperature light indicates a serious problem. Ignoring this signal will lead to serious damage to the vehicle and very expensive repairs.
General position
It's no secret that the engine in any car is the main part of its design. When creating the car, engineers took into account all the necessary points related to ensuring the safety and reliability of all transport elements.
One of the important features of the entire design is the coolant level sensor.
Thanks to this part, reliable control of the required amount of antifreeze in the expander system is ensured. The operating principle of this part is quite simple, since simplicity of design is the key to reliability.
Diagnostics and repair
Checking the functionality of the sensor is quite simple. In most cases, the system immediately notifies you if it malfunctions using a light signal on the dashboard. Typical symptoms of a malfunctioning temperature and coolant level sensor:
- Atypical position of the mechanical indicator or certain codes during automatic vehicle control;
- Interruptions in engine operation at idle speed;
- Inability to start the engine;
- The radiator lights up during operation;
- Loud, unusual engine sounds during operation.
Design and principle of operation of the VAZ sensor
The sensor is installed in the expansion tank and has the following structure. It is based on a special contact - a reed switch. In the language of electricians, a reed switch is a contact that is placed in a sealed shell. It is made from a special material that has pronounced ferromagnetic properties; most often, permalloy wire is used as such a material. Also, this device has special spring contacts.
When the coolant level in the expansion tank increases or decreases, the magnetic field changes, the spring contacts come into contact and close the electrical circuit. When the coolant level decreases, the magnetic field strength of the reed switch drops and, under the action of springs, the contacts return to their original position. Thus, an increase or decrease in level closes special contacts that perform the following functions in the electrical circuit:
Regardless of the function, a circuit is activated that turns on a special lamp on the instrument panel. Currently, this lamp is triggered when the coolant level drops, that is, the contacts are open and the lamp circuit is turned on. And when they touch, the circuit turns off and the lamp goes out.
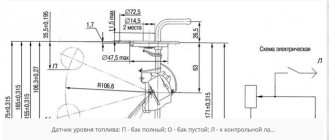
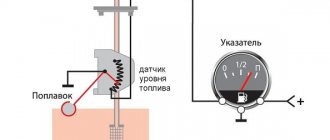
Operating principle and measurement
Basically, the car uses float fluid level sensors. When the coolant is at normal levels, the magnetic ring acts on the reed switch (this is a magnetic switch equipped with contacts). At this moment, the sensor contacts open, the resistance is within 3300 Ohms. When the washer fluid level drops, the float together with the magnet drops to the level of the reed switch, and it closes the sensor contacts. At this moment, a signal is heard on the dashboard, the contacts of which are closed to ground.
Photo – sensor readings
In this case, conductometric sensors and other coolant measuring devices are polled by the control unit every second. If the meter malfunctions or there is insufficient resistance, there is not enough data to determine the level.
Photo – fuel level sensor
How to check the coolant level?
Drivers rarely rely on sensor readings. Experienced car enthusiasts control the level by visually inspecting the expansion tank. The normal coolant level when the engine is not warmed up should be between o and “min”. As the temperature rises to nominal (operating) levels, a slight increase in the antifreeze level is allowed.
While driving, if a coolant leak occurs, the driver may not know about it. After all, no one will stop at certain intervals on the road and inspect the expansion tank. In this case, the sensor will do all the work for the driver.
If a coolant leak occurs or its level drops below the minimum level, the sensor will work and the driver, using a special lamp, will know the need to stop and find out the reason for the drop in coolant level. Thus, timely warning and prevention of engine overheating is achieved.
DIY coolant level indicator
It’s unlikely that it would ever occur to anyone to screw up the engine of their car. Agree, it’s not at all difficult to disable an engine; there are more than enough ways. A classic is considered to be engine failure due to imperceptible loss of coolant from the cooling system . It is for this reason that most modern cars are equipped not only with a coolant temperature , but also with a coolant level sensor. However, this solution to the problem is a salvation for those who bought a new car, but what about those whose car is deprived of such a useful missing “bell”? In my article today, I will tell you how to make a sensor with your own hands that would monitor the coolant level.
I tested my invention on my VAZ-2104.
The principle of the invention is that when the antifreeze level drops sharply, a light on the dashboard will light up.
Let me reassure you right away that you won’t have to do any super modifications.
What you will need for this:
1. Expansion tank (VAZ-2110) with a liquid level sensor;
2. Standard set of tools;
3. Modified (homemade) fastening belt.
So, let's start installing the expansion tank from the “ten” to the “four”.
The tank is somewhat different from the original “Zhiguli” tank; the “ten” tank has three fittings: two small ones on top and one larger one on the bottom. One of these holes should be plugged since you will only need two of the three. The upper hose (steam removal, black, which connects the expansion tank to the radiator filler hole) is from Oka. The photo shows a modified version of the radiator cap without a valve; the new “homemade” scheme does not provide for the presence of this valve, since its function will be performed by the expansion tank cap, which has valves.
Connect the large fitting located at the bottom of the expansion tank to the lower fitting of the radiator tank using a standard plastic hose from the car. Everything seems to be so, there is only one thing. Our radiator has plastic tanks, therefore, the cross-sections of the fittings do not fit the “tenth” expansion tank. What we have? The red hose fits normally with the lower fitting of the expansion tank, but does not fit the fitting located at the bottom of the radiator tank. At the same time, the black hose from Oka has a slightly too small cross-section for the upper radiator fitting.
Replacement
It is not difficult to replace the DTOZH with your own hands on an injection VAZ 2109. Follow the step-by-step instructions to resolve any issues that may arise.
Removing the device
- First of all, check the condition of the fuses. It is not uncommon for them to burn out, which causes a failure of the coolant temperature sensor.
- Wait until the car has cooled down completely. Under no circumstances should you replace the DTOZH on a hot engine.
- Disconnect the wires going to your DTOZH. You just need to do this in a situation where, when you turn on the ignition, the temperature indicator needle begins to rise sharply and sometimes reaches the maximum level.
- If no changes occur with the arrow, the fault is not with the sensor itself, but with the wire going to it.
- If the needle starts to drop when you turn on the ignition, the coolant temperature sensor has failed and needs to be replaced.
- There is no need to remove half of the units to get to the DTOZH. Access to the device is free, there should be no problems.
- Drain the coolant from the system. This is an excellent reason to at the same time change the antifreeze for a new one, if necessary. If the coolant is fresh, use a clean container to drain it.
- Disconnect the wiring from the sensor.
- Using a socket, unscrew the regulator so that it can be easily removed by hand.
- Clean the device landing area. This usually accumulates a decent amount of dirt and dust, which can cause the new antifreeze temperature sensor to not work correctly.
- To clean, use any rag that does not leave behind lint or threads.
- Treat the nest with a degreaser.
- Insert the new regulator. The mistake of many is that, supposedly to increase the reliability of the installation, they seal the sensor with sealant. You shouldn’t do this, because this way the DTOZH can only work worse.
- Replace the power cord. Only if the check shows that it has a break or is damaged, it is better to replace the wire immediately. We do not recommend repairing it with electrical tape.
- Pour coolant back into the system. Even if you changed the coolant a couple of months ago, it is better to replace it with a fresh one at the same time. It definitely won't get any worse.
- Start the engine and check the operation of the new TOZ sensor.
Malfunctions, repair and replacement of the coolant level sensor
The use of a sensor has significantly simplified the process of monitoring the coolant level. But what to do if the sensor fails?
Unfortunately, this phenomenon is completely unpredictable, which is why you can only rely on the sensor if it is new. The frequency of sensor replacement is determined by the driver, based on operating experience. It is important to carry out this procedure in a timely manner before it fails. This will extend the life of the engine and save you from constant inspections of the expansion tank.
There is only one way to determine if the reed switch is faulty - the lamp does not light up when the coolant level drops. In special cases, the lamp may not work, or the fault lies in the wiring. However, if you are confident in the performance of the last two elements, then this means that it is time to change the reed switch.
Coolant level sensor prevent your car engine from boiling
Fuel level sensor FLS for VAZ 2108, 2109, 21099 cars
If the coolant level sensor, which is located in the expansion tank of your vehicle, is faulty, the risk of overheating of the car engine increases significantly. For this reason, you should always monitor the functionality of the specified element.
Antifreeze level sensor - what is it?
The most expensive and truly important component of any modern vehicle, of course, is its engine.
Everyone understands this very well, but not every motorist pays due attention to the engine of his car. But engine failure entails long-term downtime of the car, caused by the need for complex (and, of course, expensive) repairs.
Often the cause of a breakdown of the “heart” of a car is boiling of the engine. This phenomenon is quite easy to prevent if you constantly monitor the signals sent by the coolant pressure sensor.
It is a sealed switch (reed switch) made of a special material with ferromagnetic properties (permalloy wire is most often used).
This mechanism has spring contacts, which, when the magnetic field strength increases, come into contact with each other (the contacts close). After the field strength decreases, the contacts open (the springs return to their original position). There are three types of reed switches that can operate on:
How to check the coolant level?
Experienced drivers quite often check the antifreeze level visually, not always relying on the sensor. Carrying out such a check is not difficult at all. You just need to look at the expansion tank (depending on the vehicle, it can be located in different places on the car) to determine the insufficient (low) coolant level.
On a cold engine, the coolant should be between the minimum and maximum marks marked on the reservoir. And on a well-warmed-up engine, a slight increase in the level above the maximum mark is allowed. On a fully functional car, the coolant level sensor immediately sends a signal about a decrease in the volume of antifreeze. The driver sees it on the instrument panel (the warning light lights up) and tops up with antifreeze or other cooling compound.
Note! Experts do not recommend adding a cooling composition to the system on a very hot engine. You need to wait until the engine cools down and only then add antifreeze.
In addition, it is undesirable to add only water to the tank. Don't skimp on antifreeze, as it has special properties that protect cylinder heads made from aluminum from rusting.
Varieties by type
There is a wide range of criteria by which level sensors can be classified. Starting from the principle of operation and ending with the method of signal transmission. However, all sensors can be divided into two large groups – contact and non-contact.
Contact
A contact sensor is a device that requires physical contact with the surface being measured to function. As a rule, such sensors are used under conditions of exposure to factors that significantly complicate measurements - high temperature or pressure. They are also widely used for working with foaming liquids, where the top layer can introduce a significant error when measuring by other methods. All contact devices can be divided into the following types according to the principle of operation:
- Capacitive - consist of two plates immersed in liquid. Measurements are made on the principle of a capacitor, whose capacitance will vary depending on the height of the liquid filling of the space between the capacitor plates. Often used for containers with small volumes of liquid. They are characterized by low measurement accuracy, but operate without moving parts, which significantly increases their reliability.
Rice. 3. Capacitive sensor
- Hydrostatic - based on Pascal's law. Measures the difference in hydrostatic pressure in the tank, which depends solely on the height of the liquid column. They have good accuracy, but can only be used in containers where the pressure is comparable to atmospheric pressure. They are not suitable for liquids with variable densities.
Rice. 4. Hydrostatic sensor
- Bypass - use the principle of communicating vessels; in such sensors, information about the level of the measured liquid is displayed most clearly. When the column height in the main tank changes, the sensor will display this data on its own level gauge. However, such models are not used in conditions above +250°C and in environments that increase their own viscosity with decreasing temperature.
- Magnetic sensors are a subtype of float sensors, since the liquid level is measured by a float moving along a hermetically sealed tube. There is a reed switch inside the tube, which is triggered when a float with a magnet approaches or moves away.
- Reflex microwave - the operating principle of such sensors is based on reflectometry technology depending on the time interval. The directional wave emitter sends a signal, and the sensor perceives the speed of return of the pulse.
Rice.
5. Reflex microwave liquid level sensor The main disadvantage of these models is the need to immerse the device throughout its entire depth, which is not always convenient for large tanks. But, unlike other liquid level sensors, reflex models do not depend on the presence or absence of foam, solid particles floating in the thickness or on the surface, or dielectric constant.
Contactless
Non-contact sensors are devices that do not require physical contact with the surface being measured to function. Such devices are used in aggressive liquid environments, where rapid wear of sensor elements is possible due to the influence of active components. They are also installed in viscous liquids and environments with high viscosity. All contactless sensors are conventionally divided into the following categories:
- Ultrasonic is one of the most common types of non-contact liquid level sensors. The principle of operation is based on the ability of a liquid to reflect the ultrasonic spectrum of radiation. An ultrasound generator, inaudible to the human ear, sends a signal from the top point to the interface between the media. When it encounters a liquid, the signal is reflected and returned to the sensor, where it is sensed by the sensor. Depending on the time of movement of the ultrasound, a conclusion is made about the level in the tank.
- Microwave radar - similar to the previous option, except that the object of measurement is not ultrasound, but microwaves.
Rice.
6. Radar microwave liquid level sensor A significant disadvantage of radar-type sensors is their susceptibility to gas cushions that can accumulate above the surface of the liquid.
- Radioisotope - use gamma radiation to control the liquid level, particles are directed into a controlled reservoir.
Rice.
7. Radioisotope sensor Due to the danger of exposure to living organisms, it is the most expensive and least common option. When using it, additional safety measures are required for operating personnel.