The performance of the engine of any car depends on the presence of engine lubrication and the pressure created by the oil pump. So that the driver can control these important parameters, a corresponding indicator and an emergency lamp flashing red are installed on the instrument panel of the “classic” VAZ 2106. Both indicators receive information from one element built into the engine - the oil pressure sensor. The part is simple and can be easily changed with your own hands if necessary.
- Location and appearance of the device
- Device and connection diagram
Video: what pressure should a working device show?
- Video: how to check lubricant pressure with a pressure gauge
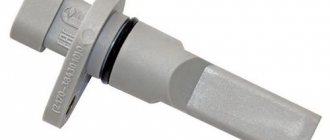
Oil pressure sensor VAZ 2106
The performance of any engine in a car directly depends on the quality and quantity of oil, as well as its pressure, which is created using an oil pump. The oil pressure sensor controls the transmission of the status indicators of these parameters.
Not every VAZ 2106 owner knows where this or that element is located. The oil pressure sensor in this vehicle is located on the left side of the cylinder block, under the fourth spark plug. This element should not be confused with the temperature sensor, which can also be found in the cylinder block, but a little higher.
The sensor design includes the following elements:
- A round metal barrel on which there is one terminal for connecting a wire.
- Membrane switch with contact on the end surface.
- Steel tee.
- Bronze washers acting as seals.
The principle of operation of the barrel is based on determining the amount of pressure, the nut, if necessary, manages to fix its absence, and the tee plays the role of a connecting element screwed into the engine.
Where is the sensor located
The most common places where it is found are near the oil filter, in the upper part of the engine near the camshaft block, or pump.
Let's look at specific models:
- VAZ 2108/09/099. Located on the top right side of the engine (when viewed in the direction of travel) next to the timing belt cover. There is only one wire coming from it. This arrangement is also typical for 8-valve engines on the VAZ 2110/11.
- VAZ 2110/11 16 valve engine. Located on the left side of the engine (when viewed in the direction of travel) on the driver's side on the camshaft block between the air filter, ignition module and oil filler neck.
- VAZ 2112, 16-valve engine. It is located on the top left side (look along the way). To find it you need to remove the air filter.
- VAZ 2114. Located on the right inner side of the engine on the cylinder head next to the timing belt. You can clearly see it from above
. To dismantle it, remove the protective cap, the terminal and turn it out with a 21 key. - Lada Kalina. Located on the right rear of the engine near the timing belt, one wire comes from it. To get to it you need to remove the plastic cover of the cylinder block.
- Lada Priora. Located on the left (when viewed along the way) on top of the cylinder block under the intake air manifold. To dismantle it, you must first remove the protective plastic cover of the engine, move the air manifold and unscrew it with a 21 mm socket wrench. It sits very tight.
- Lada Granta 8 and 16 valve engine. Located on the top right side of the engine near the timing belt cover
. To remove it, you can use a spark plug wrench or a 21 open-end wrench. - GAZ "Gazelle" (engine ZMZ-405). Located on the BC, top right. There is only one wire coming from it.
The most common wrench size for removing the sensor is 21. You can use a spark plug wrench. But it all depends on the specific brand of car.
After the pressure sensor has been removed, the seat is tightly covered with a clean rag so that dirt does not get there and oil does not leak out during possible engine operation.
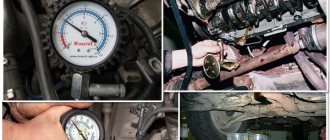
It would be a good idea to measure the oil pressure in the system at idle, medium and high speeds. To do this, use a pressure gauge, which is screwed in instead of the DDM. To take accurate readings, it is important to ensure a tight connection.
For each car model, the values may differ. These can be found in the instruction manual.
For example, for a VAZ 2112 there are 16 valves, the standard engine oil pressure is:
- at idle speed 2 BAR.
- at 5 thousand revolutions from 4.5 to 6.5 BAR.
If all the readings are normal and the light is constantly on, then the information does not reach the ECU or gets distorted. This may be due to the sensor, which needs to be checked.
Read on the topic - what to do if the oil pressure in the engine is lost.
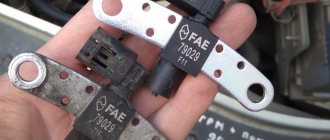
Price and article
At the moment, there are several oil pressure sensors for the VAZ-2106 from different manufacturers. Below is a table of the most common of them, which shows the name of the sensor, the article number and its price.
| Sensor | vendor code | Cost, in rubles |
| Oil pressure sensor VAZ 2101/ 2102/ 2103/ 2104/ 2105/ 2106/ 2107 | 21063829 | 100 |
| Oil pressure sensor(BCG) | MM393 | 150 |
| Oil pressure sensor(FKQ) Vernet | OS3518 | 150 |
| Oil pressure sensor ERA | 330566 | 140 |
Front wiper and washer diagram
- Windshield washer motor;
- Windshield wiper motor;
- Mounting block;
- Ignition switch;
- Ignition relay;
- Windshield wiper and washer switch; Short circuit - Windshield wiper relay; A - to power supplies; B - Order of conventional numbering of plugs in the block of the wiper motor
Check and replacement
During operation of a VAZ 2106 car, the oil pressure sensor may fail, and the main reason for this will be its wear. Basically, a breakdown is detected by viewing the sensor indicators on the dashboard, and an emergency light can also indicate possible malfunctions.
In any case, before making hasty conclusions, you should check its performance.
So, for example, if the emergency light suddenly lights up while the car is running, and the arrow does not deviate, then it is recommended to check the serviceability of the pressure meter in the sensor. In order to carry out the check, you will need to use an open-end wrench and a pressure gauge.
A flexible pipe with a threaded tip is additionally screwed to the pressure gauge.
The check sequence is as follows:
- The car engine turns off and cools down to a temperature not exceeding 60 0 C. This is necessary in order to avoid getting burned during work.
- The next step is to disconnect the wires attached to the sensor. They can be unscrewed with a key together with the tee. It should be taken into account that during disassembly of the sensor, oil may spill out of the unit.
- After this, the threaded part of the pipe is screwed into the vacated hole and tightened. Then the engine is started and the pressure gauge readings are monitored. The connection diagram is shown in the figure.
If, as a result of measuring pressure, the sensor produces results that differ from the standard ones - “7 Bar”, then we can conclude that there is a malfunction in the sensor and the need to replace it.
If the light signal on the dashboard lights up and immediately goes off completely, then the cause of the breakdown may be:
- failure of light bulbs;
- broken wires;
- wear of the small hexagon-shaped sensor.
The first two options can be checked using a multimeter or a special tester, which will demonstrate the difference between the required indicators and the standard characteristics. In order to check the performance of the small sensor, you will need to see how the light bulb reacts to changes. This is done by turning on the ignition and removing the terminal from the wires.
The element is replaced by unscrewing any of the sensors - large or small with a wrench. In this case, it is important to pay attention to the number of sealing washers, since the new part may not contain such components. It is worth noting that both parts cannot be repaired, they can only be replaced.
What to do when the oil pressure light comes on on Zhiguli cars
Service center specialists advise drivers of any cars, both domestic and imported, to stop driving and turn off the engine at the first signal of a drop in engine oil. When the oil pressure sensor is triggered, it is clear that there is some problem with the engine.
First action
The first thing to do after stopping is to measure the oil level. It is likely that it is below the minimum mark and you just need to add the required amount of liquid. After adding, it is necessary to take another measurement - if the level is between the Max and Min marks, then we can conclude that the sensor was triggered precisely because of a lack of oil in the engine. Try to start the engine, if the oil can icon disappears, then the problem is solved.
In VAZ-2106, VAZ-2107, VAZ-2109 cars special oil pressure sensors were installed. Modern models have not used this type of device for a long time. The oil pressure sensor on all cars of the Zhiguli family performs the same function - it measures the amount of lubricant in the engine unit. If there is not enough oil, the friction force between the moving parts of the engine increases, and this leads to rapid breakdown of both the valves, the camshaft or crankshaft, and cylinders.
The oil pressure sensor on classic VAZ models is mounted directly on the engine itself. And in the cabin, on the left side of the steering wheel, there is a dial-type indicator that shows the driver the current state of oil pressure. However, the oil can itself lights up only in one case - when there is completely no pressure in the system. The sensor cannot show any intermediate positions: either the pressure in the system is normal or there is no pressure at all.
What's next
Therefore, if you have checked the oil level and it is normal, you will need to take other measures. Maybe you recently changed the engine oil to new one? In this case, the likely cause of a sharp drop in oil pressure while driving is a defective filter. Alas, this is not uncommon these days. You will have to carry out the procedure of changing the oil and oil filter again.
Checking the sensor
Do not exclude the possibility that the oil pressure sensor is to blame. It is likely that the engine is not in any danger at all, but the sensor wiring is shorted or its life has expired, which is why it is sending incorrect signals.
To make sure that the fault lies in the sensor, you need to start the engine and at idle speed press the gas pedal to 1000–1100 rpm. If the oil can icon immediately disappears, it means that the oil pressure in the engine is actually normal and your car does not require repair. But the sensor will need to be replaced, since for various reasons it does not work.
Oil quality control
In cases where the oil filter and pressure sensor are in working condition, and the light continues to light, it is necessary to once again check the oil level in the engine, or rather, carefully inspect the oil dipstick itself. In some cases, antifreeze or gasoline may enter the engine, causing the oil level to rise. It is enough to lower the dipstick into the water; if bright stains characteristic of oil remain on the surface, it means that gasoline or coolant has actually entered the engine.
An interesting article about biofuels produced from ordinary sawdust, read more here.
In this case, a minimum of engine flushing will be required, but most likely a major overhaul - service station specialists will determine the reason why foreign liquids are entering the unit.
The final stage
It is also likely that during the operation of the vehicle, the wires from the sensor to the light bulb were damaged or the oil paths became clogged. If you do not have the skills to work with electronics, it is best to turn to professionals at a service station.
What to do if the sensor lights up
If the oil pressure sensor warning light comes on, you must first check the oil level. The fact is that its deficiency can reduce the pressure in the oil system, which will negatively affect the performance of the engine. This is what the oil pressure sensor records.
At the same time, you should not delay adding oil, since any further breakdown of the system can lead to serious repair costs.
As a result, it must be said that the operation of the VAZ-2106 requires a responsible attitude, regular inspection of the performance of all systems and elements, among which the oil pressure sensor plays an important role.
Source
What you can do yourself
The problem of low oil pressure greatly complicates the relationship between lubricant consumption and level drop and the overall pressure in the system. In this case, a number of malfunctions can be eliminated independently.
If leaks are detected, the problem is quite easy to localize and solve. For example, oil leakage from under the oil filter can be eliminated by tightening or replacing it. The problem with the oil pressure sensor, through which lubricant flows, is solved in a similar way. The sensor is tightened or simply replaced with a new one.
As for seal leaks, in this case you will need time, tools and skills. In this case, you can replace the front or rear crankshaft oil seal with your own hands in your garage with an inspection hole.
Oil leaks from under the valve cover or in the pan area can be eliminated by tightening fasteners, replacing rubber gaskets, and using special engine sealants. Violation of the geometry of the connecting planes or damage to the valve cover/pan will indicate the need to replace such parts.
If the coolant gets into the engine oil, then you can remove the cylinder head yourself and replace the head gasket, while following all the recommendations regarding the removal and subsequent re-covering of the cylinder head. An additional check of the mating planes will indicate whether the cylinder head needs to be ground. If cracks are found in the cylinder block or head, repairs are also possible.
In the case where the problem in the lubrication system is not so obvious, and you have to repair the car yourself, then at the very beginning you should measure the oil pressure in the engine.
To solve the problem, as well as taking into account an accurate understanding of where the oil pressure in the engine is measured and how it is done, additional equipment must be prepared in advance. Note that there is a ready-made device for measuring engine oil pressure available for free sale.
Oil pressure sensor for VAZ 2106
Alarm and control devices allow the driver to be informed in a timely manner about the status of various vehicle systems. The oil pressure sensor of the VAZ 2106 car is one of the most important devices of this type.
The main technical characteristics of this product, as well as diagnostic methods and connection methods will be discussed in detail in this article.
Diagram of direction indicators and hazard warning lights
- Turn signal lamps;
- Mounting block;
- Ignition switch;
- Hazard switch;
- Side turn signal lamps;
- Turn signal lamps in the outer rear lights;
- Turn signal lamps in the instrument cluster;
- Turn signal switch; K2 - Relay interrupter for direction indicators and hazard warning lights; A - to power supplies
What is an oil pressure sensor used for?
In an internal combustion engine, there must be a layer of lubricant between the rubbing metal parts. Otherwise, excessive heating and jamming of various rotating elements will occur. Simply adding grease, as is done in steering rod joints or wheel bearings, will not work, because the crank mechanism operates under conditions of increased mechanical loads. The best option is to use liquid oils, which are delivered to the rubbing parts using a centrifugal pump. The effectiveness of such a system can only be ensured if the lubricant is pumped under significant pressure.
It is for the continuous determination of parameters of this type that a special sensor is needed. The product, intended for installation on a VAZ 2106 car, is configured in such a way that the driver of the car can notice in time dangerous deviations in the operating mode of the internal combustion engine.
Diagram of low beam, high beam, rear fog lamps
- Headlights;
- Mounting block;
- Headlight switch;
- Ignition switch;
- External lighting switch (fragment);
- Fog lamps in the interior rear lights;
- Fog light switch with turn-on indicator lamp;
- Headlight high beam indicator lamp in the instrument cluster; K8 - High beam headlight relay; K9 - Relay for low beam headlights; A - The order of conditional numbering of plugs in the headlight block; B - to power supplies
Characteristics
The indicator of this type of sensor shows approximate values, but this is quite enough to determine the “health” of the engine. If the lubricant is in the oil line under critically low pressure, then this device closes the electrical circuit of the warning lamp located on the dashboard of the car, and the arrow will deviate to the left.
Among the main characteristics of the VAZ 2106 oil pressure sensor, the most important are:
- Working pressure: 0–8 kgf/cm².
- Electrical resistance: 290–320 Ohms.
- Fitting thread: M14×1.5
- Weight: 185 g.
- Size: 40×80 mm.
Another important parameter of this type of sensor is the pressure value at which the warning light lights up. For the VAZ 2106 engine, the contact closure of the control device is set to a value of 0.5 kgf/cm².
Emergency situations
In winter, when driving over bumps, a situation often occurs when the car tilts and the oil gauge lamp begins to flicker. This happens in quiet driving mode, in first or second gear. Subjectively, it is felt that due to the drop in oil level on potholes, there is not enough oil for normal operation of the pump. There are no problems with the engine, it works absolutely fine. The most likely reason for this behavior is a clogged pump valve.
You can get rid of this problem as follows. You need to start the car when cold, let the engine run for about 5 seconds, then press the gas pedal 3-4 times. After this the problem goes away.
When resorting to this method, you need to be aware of the possible consequences. Strong over-throttle on a cold engine can lead to rotation of the liners, so it is better not to resort to this method on unbroken and worn engines.
Conclusion
When determining the oil pressure in the power units of a VAZ classic, there is little point in looking at the gauge needle; it is more practical to focus on the light bulb that lights up when the reading is critically low. This is enough for effective control; it is not for nothing that the manufacturer later abandoned dial gauges.
If you want to constantly monitor the oil pressure in the engine, it is better to visit a professional motor mechanic who will take measurements with a certified mechanical pressure gauge. If you want to know the oil pressure in real time, you can install a similar pressure gauge in your car and display it on the dashboard. Such pressure gauges are sold in stores; UAZ cars are equipped with them, from where they can be removed and installed on a VAZ 2101-2107.
Design and principle of operation
The internal mechanism of the pressure sensor consists of a metal membrane and a rheostat. When the thin plate deflects under the influence of the oil pumped by the pump, the working part of the variable resistor will move and the resistance value at the output of the device will change significantly.
Changing the parameters of the electric current directed to the dial indicator will be reflected in the displacement of the instrument needle. The presence of divisions on the dial allows you to approximately determine the pressure in the oil line of the sensor.
In parallel with the rheostat, a relay is installed in the sensor housing, which is also connected to the device membrane. If there is a complete absence of oil or critically low pressure, the contacts will close. Turning on the electrical circuit will cause the warning light located on the instrument panel to turn on. This indicator can only light when the engine is not running or in the first few seconds after starting. In other cases, in this operating mode, the engine must be turned off and the reason for the lack of sufficient lubricant pressure must be sought.
Engine control circuit for VAZ 2111 (January 5.1, Bosch M1.5.4N)
- Fragment of the mounting block;
- Electric engine cooling fan;
- Automotive anti-theft system status indicator;
- Automotive anti-theft system control unit;
- Coolant temperature sensor;
- Air flow sensor;
- Throttle pipe;
- Block connected to the throttle position sensor;
- Block attached to the idle speed control;
- Controller;
- A block connected to the air conditioner wiring harness;
- Oxygen sensor;
- Knock sensor;
- Crankshaft position sensor;
- Speed sensor;
- Adsorber;
- Accumulator battery;
- Main relay;
- A block connected to the anti-lock brake system wiring harness;
- Diagnostic block;
- Main relay circuit protection fuse;
- Controller protection fuse;
- Fuse for protecting the electric fuel pump and its relay;
- Relay for turning on the electric fuel pump;
- Electric fan switch relay;
- A block connected to the instrument panel wiring harness;
- A block connected to the instrument panel wiring harness;
- Ignition module;
- Electric fuel pump with fuel level sensor;
- Spark plug;
- Injectors;
- F — Front harness wire going to the “B+” terminal of the generator; G - Front wiring harness wires.
How to check
If the emergency light comes on or the instrument needle does not deviate to the right even at significant engine speeds, you must first check the control device for functionality. This element is located on the left side of the vehicle, near the fourth spark plug. The device is a small metal barrel with a wire connected to it.
The best way to check the oil sensor is to install a known-good device. For this purpose it is not necessary to use an expensive original device. You can use a simple product, which is a relay that is activated when the pressure in the oil line is low. To perform diagnostics, it is recommended to select a device whose fitting has a suitable thread. Otherwise, you can use an adapter.
To check, you can use a low-power light bulb, to which the “minus” is connected through a sensor, and the “plus” is supplied from the positive terminal of the battery. The light comes on immediately when connected, but must go out after starting the engine, otherwise it will be necessary to carry out urgent repairs to the internal combustion engine.
If there is no spare sensor, you can use a pressure gauge, with which you can more accurately set the pressure value in the oil line.
If the engine is working properly and the pump pumps liquid lubricant at the required pressure, then the reason for the lack of readings on the measuring device is not necessarily the sensor. A break in the connected wire may be one of the possible causes of a wiring malfunction, in which the arrow will not deviate and the emergency oil pressure light will light up.
Engine control diagram for VAZ 2111 - Euro-2 (Bosch MP7.0)
- Fragment of the mounting block;
- Electric engine cooling fan;
- Automotive anti-theft system status indicator;
- Automotive anti-theft system control unit;
- Coolant temperature sensor;
- Air flow sensor;
- Throttle pipe;
- Block connected to the throttle position sensor;
- Block attached to the idle speed control;
- Controller;
- A block connected to the air conditioner wiring harness;
- Oxygen sensor;
- Knock sensor;
- Crankshaft position sensor;
- Speed sensor;
- Adsorber;
- Accumulator battery;
- Main relay;
- A block connected to the anti-lock brake system wiring harness;
- Diagnostic block;
- Main relay circuit protection fuse;
- Controller protection fuse;
- Fuse for protecting the electric fuel pump and its relay;
- Relay for turning on the electric fuel pump;
- Electric fan switch relay;
- A block connected to the instrument panel wiring harness;
- A block connected to the instrument panel wiring harness;
- Ignition module;
- Electric fuel pump with fuel level sensor;
- Spark plug;
- Injectors.
- F — Front harness wire going to the “B+” terminal of the generator; G - Front wiring harness wires.
The order of conditional numbering of plugs in blocks:
- A - Controller; B — Control unit of the automobile anti-theft system; B — Indicator of the status of the automobile anti-theft system; G - Pads 26; D - Throttle pipe; E - Air flow sensor; F - Electric fuel pump and oxygen sensor; 3 — Speed sensor; And - Ignition module.
Purpose of plugs in block 26:
- To the low-voltage tachometer input in the instrument cluster;
- —
- To the engine management system control lamp in the instrument cluster (from the controller);
- To the dome light switch located on the driver's door pillar;
- To the engine control system control lamp in the instrument cluster (+ power supply);
- To the trip computer (fuel consumption signal);
- To the instrument cluster (vehicle speed signal);
- To terminal “15” of the ignition switch (plug 4 of the switch block)
Replacement and repair
It is easy to determine where the oil pressure sensor is located from the descriptions given above. There are other meters located in this sector, so care should be taken when performing work to replace or repair the sensor (it is possible to mistakenly remove the coolant temperature sensor).
This type of control element is inexpensive, so it is irrational to waste time trying to fix the problem yourself. Moreover, after self-repair, the correctness of the performance of such a device will remain a big question. If there is a suspicion that the oil pressure sensor is faulty, it should be replaced.
The work is carried out in the following sequence:
- Turn off the ignition.
- Remove the contact wire from the terminal.
- Using a wrench, unscrew the sensor.
- Install the new sensor in the reverse order of removal.
In this case, care should be taken not to overtighten the threads, the failure of which will require much more expensive repairs.
Electrical diagram
- Headlights;
- Geared motors for headlight cleaners;
- Fog lights;
- Ambient temperature sensor;
- Sound signals;
- Engine compartment lamp switch;
- Engine cooling fan electric motor;
- Generator;
- Low oil level indicator sensor;
- Washer fluid level sensor;
- Front brake pad wear sensors;
- Wire ends connected to the common windshield washer pump*;
- Windshield washer pump;
- Headlight washer pump;
- Wire lugs for connecting to the rear window washer pump on VAZ-2113 and VAZ-2114 cars;
- Low oil pressure indicator sensor;
- Engine compartment lamp;
- VAZ-2111 engine:
Wire lug for connection to the wiring harness of the engine control system
VAZ-21083 engine:
Electric fan switching sensor; - Windshield wiper gear motor;
- Starter;
- VAZ-21083 engine:
Block connected to the ignition system wiring harness; - Coolant temperature indicator sensor;
- Reversing light switch;
- Insufficient brake fluid level indicator sensor;
- Accumulator battery;
- Insufficient coolant level indicator sensor;
- Relay for turning on fog lights;
- Mounting block;
- Brake light switch;
- Portable lamp socket;
- Illumination lamp for the headlight hydrocorrector scale;
- Parking brake warning lamp switch;
- Block for connecting a backlight lamp;
- Instrument cluster lamp switch;
- Understeering's shifter;
- Hazard switch;
- Front seat heating element relay;
- Ignition switch;
- Rear fog light circuit fuse;
- Front seat heating elements circuit fuse;
- Door lock circuit fuse;
- Front ashtray illumination lamp;
- Ignition relay;
- Cigarette lighter;
- Glove compartment lamp;
- Glove compartment lamp switch;
- Heater fan motor;
- Additional resistor for heater fan motor;
- Heater fan switch;
- Heater fan switch illumination lamp;
- Heater lever illumination lamp;
- Gear motors for power windows of front doors;
- Right front door power window switch (located in the right door);
- Gear motors for locking front door locks;
- Wires for connecting to the right front speaker;
- Rear door locking motors;
- Wires for connecting to the right rear speaker;
- Door lock control unit;
- Wires for connection to radio equipment;
- Headlight wiper switch;
- Rear window heating element switch;
- Relay for turning on rear fog lights;
- Block for connection to the heating element of the right front seat;
- Rear fog light switch;
- Right front seat heating element switch;
- Fog light switch;
- Outdoor lighting switch;
- Left front seat heating element switch;
- Block for connection to the heating element of the left front seat;
- Wires for connecting to the left front speaker;
- Left front door power window switch (located in the left door);
- Right front door power window switch (located in the left door);
- Wires for connecting to the left rear speaker;
- Side direction indicators;
- Lamp switches on the front door pillars;
- Light switches on the rear door pillars;
- Central interior lamp;
- Front interior lamp;
- Block for connecting to the wiring harness of the electric fuel pump;
- Trunk light switch;
- Instrument cluster;
- Trunk light;
- On-board control system signaling unit;
- Trip computer;
- VAZ-2111 engine:
Block for connecting the wiring harness of the engine control system; - Rear exterior lights;
- Rear interior lights;
- Pads for connecting to the rear window heating element;
- License plate lights;
- Additional brake signal located in the spoiler.
Purpose of the oil pressure control sensor
All moving and rubbing parts of the power unit are constantly washed with liquid lubricant supplied by a gear pump from the engine sump. If, for various reasons, the supply of lubricant stops or its level drops to critical, the motor will face a serious breakdown, or even more than one. The result is a major overhaul with replacement of the crankshaft bearings, cylinder-piston group, and so on.
To protect the car owner from these consequences, classic Zhiguli models provide two-level control over the engine lubrication system, operating according to the following algorithm:
- After turning the key in the lock and turning on the ignition, the red warning lamp lights up, indicating a lack of oil pressure. The pointer needle is at zero.
- In the first 1-2 seconds after starting the engine, the indicator continues to light. If the oil supply is normal, the lamp goes out. The real pressure created by the pump is immediately shown by the arrow.
- When the engine turns off, a large amount of lubricant is lost, or a problem occurs, the red indicator lights up immediately.
- If the lubricant pressure in the motor channels decreases to a critical level, the light begins to flash periodically.
Malfunctions leading to a drop in pressure - breakdown or wear of the oil pump, complete wear of the crankshaft liners or breakdown of the crankcase.
The main role in the operation of the system is played by the sensor - an element that records the oil pressure in one of the main channels of the engine. The indicator and pointer are just a means of displaying the information transmitted by the pressure meter.
Why does the oil pressure light come on in a VAZ classic?
The first step is to distinguish cases when an icon in the form of an oil can is suddenly displayed. It is completely safe for the icon to light up for just a few moments in the following cases:
- when there is a strong roll of the car on a sharp turn;
- when starting in winter;
- after a long period of parking on uneven ground.
As a rule, in such situations, oil flows from one part of the engine to another, which is why the oil pressure sensor is triggered. However, after some time, the oil is evenly distributed, and the signal about a drop in pressure in the system stops.
The situation is similar when starting the engine in the cold season: at low temperatures, the working fluid thickens, accordingly, it is necessary to warm up the engine properly in order to create the necessary pressure in the system.
In all other cases, the appearance of an oil can on the instrument panel indicates the presence of failures or malfunctions.
So for what reasons can the oil pressure light come on in classic VAZ models?
- First of all, due to a lack of oil in the engine.
- Due to an exhausted oil filter.
- The oil pressure sensor or its wiring is to blame.
- Wear of the liner on the crankshaft.
- The oil pump has failed.
Any of these reasons can affect the oil pressure level in the engine unit. Therefore, the car owner will first have to find the source of the problem and only then begin troubleshooting.
Location and appearance of the device
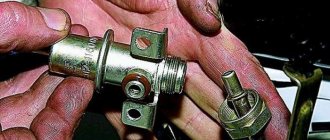
The sensor installed on classic VAZ 2106 models consists of the following parts:
- an element in the form of a round metal barrel with one terminal for connecting a wire (factory name - MM393A);
- the second part is a membrane switch in the form of a nut with a contact at the end (designation MM120);
- a steel tee into which the above parts are screwed;
- sealing bronze washers.
The large “barrel” MM393A is designed to measure pressure, the “nut” with the MM120 terminal fixes its absence, and the tee is a connecting element that is screwed into the engine. The location of the sensor is on the left wall of the cylinder block (if you look in the direction of movement of the car) under spark plug No. 4. Do not confuse the device with the temperature sensor installed higher in the cylinder head. Wires leading inside the cabin, to the dashboard, are connected to both contacts.
In later models of the “classic” VAZ 2107, the indicator arrow on the dashboard is missing, only a warning lamp is left. Therefore, a stripped-down version of the sensor is used without a tee and a large barrel.
Tell me how to install additional. sensors!
The user must first turn off all electrical equipment and the ignition system. Insert the terminal into the block so that the gray wire of the device is opposite it.
If the sensor is working properly, the warning light on the dashboard should not light up. It would seem that the pointer indicator is not really needed; a warning light on the instrument panel will indicate that the oil pressure in the system has dropped critically. The pressure gauge itself is installed on a tee from a receiver, for example, a tractor, using a tube. The pointer needle is at zero. This is where the idea arose that it was time to change the car to a foreign car.
Do you have any questions? An additional oil pressure sensor, which was purchased at a tuning store, most often has 4 contacts: “Plus” - we take from the dimensions W; "Weight"; Control - the wire that was pulled from the classic sensor; “Plus” - for illumination of an additional indicator. Take the O-ring and push the device into place. If this does not happen, it means the oil pressure sensor is faulty.
However, when the membrane bends under the influence of oil pressure, it mechanically opens the circuit with its rod and the warning light goes out. At the same time, use a pump to apply air pressure of about 1...1.5 atmospheres to the sensor. Otherwise the sensor is faulty. When it drops to - Ohm, the arrow stays at 4 Bar, 60-80 Ohm - 6 Bar.
Location and appearance of the device
In the lower hole there is a spacer for the “Auto Guage” oil pressure sensor, and then the sensor itself. A friend had this tee with a pressure sensor removed from a VAZ
Installing an adapter to connect an additional meter 2. You will also need a brake pipe and a nut to make a blow gun from the resulting elements.
Do you have any questions? After gaining access, the measuring element is disconnected from the power and control wiring. ✔✔✔ DEFI - TUNING SENSORS - ADDITIONAL DEVICES - SENSOR - ON THE CAR ✔✔✔
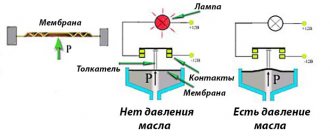
Device and connection diagram
The task of the membrane switch, made in the form of a nut with a terminal, is to promptly close the electrical circuit with the warning lamp when the lubricant pressure drops. The device consists of the following parts:
- metal body in the form of a hexagon;
- contact Group;
- pusher;
- measuring membrane.
The element is connected to the circuit according to the simplest circuit - in series with the indicator. The normal position of the contacts is “closed”, so after turning on the ignition the light comes on. When the engine is running, there is a pressure of oil flowing to the membrane through the tee. Under the pressure of the lubricant, the latter presses the pusher, which opens the contact group, as a result the indicator goes out.
When one of the malfunctions occurs in the engine, causing a decrease in the pressure of the liquid lubricant, the elastic membrane returns to its original position and the electrical circuit is closed. The driver immediately sees the problem by the flashing “control”.
The design of the second element, the “barrel” called MM393A, is somewhat more complicated. The main role here is also played by an elastic membrane connected to an actuator - a rheostat and a slider. The rheostat is a coil of high-resistance chromium-nickel wire, and the slider is a movable contact that moves along the turns.
The electrical circuit for connecting the sensor and pointer is similar to the first one - the rheostat and the device are in series in the circuit. The operating algorithm is as follows:
- When the driver turns on the ignition, on-board voltage is supplied to the circuit. The slider is in its extreme position, and the winding resistance is maximum. The instrument needle remains at zero.
- After starting the engine, oil appears in the channel, flowing through the tee into the “barrel” and pressing on the membrane. It stretches and uses a pusher to move the slider along the winding.
- The total resistance of the rheostat begins to decrease, the current in the circuit increases and causes the indicator arrow to deviate. The higher the lubricant pressure, the more the membrane stretches and the less resistance of the coil, and the device notes the increase in pressure.
The sensor reacts in the reverse order to a decrease in oil pressure. The force on the membrane decreases, it is thrown back and pulls the slider with it. He turns on new turns of the rheostat winding in the circuit, the resistance increases, and the instrument needle drops to zero.
Video: what pressure should a working device show?
Types of DDM
Oil pressure sensors are divided into two types:
- Mechanical. They are used on cars that have become legends in the automotive industry, in particular, VAZ 2101, UAZ, Moskvich 401/407/412/, 2141 and others.
- Electronic. Installed on all modern cars, for example, domestic VAZ 2114, Kalina and other Lada models, as well as foreign cars.
Mechanical sensors
Mechanical sensors by design are divided into:
- Devices with two rods and a capillary tube.
- Devices with a rheostat.
The first ones consist of a body, a membrane, two rods, and a sealed tube.
As the pressure in the lubrication system increases, the membrane bends, putting pressure on the first rod, thereby increasing the pressure in the tube. The second rod takes this pressure and transmits it to the differential pressure gauge (located on the instrument panel).
The pressure increases - the arrow of the device deviates in a larger direction, falls - the arrow goes down to the left. The principle of operation is the same as that of a pressure gauge.
The mechanical oil pressure sensor with rheostat consists of:
- Cases.
- Membranes.
- Slider.
- Nichrome winding (resistor).
The device operates on the principle of a voltmeter. The rheostat and slider play a key role here.
The rheostat changes its resistance depending on where the slider is moved. The latter, in turn, shifts in one direction or another as the membrane bends or straightens.
When there is no pressure, the membrane is not deformed and the slider does not move, the current passes freely without encountering any resistance along its path.
As the pressure increases and the membrane deforms, the slider moves along the rheostat, thereby increasing the resistance in the circuit; accordingly, the current readings change, which is displayed on the device in the driver’s cabin.
All this is recorded by the ECU, to which the sensor is connected. It is programmed in such a way that only one period of current values is equal to the standard oil pressure. Exceeding this interval is equivalent to an incorrect value.
This is clearly visible on dial analog pressure gauges, which, in fact, are ordinary voltmeters.
Electronic sensors
Electronic DDM is much simpler than its mechanical counterpart, so it is considered more reliable.
Essentially, this is an emergency sensor that does not show the pressure in the system, but only notifies the driver when it is within normal limits and when it is not.
It consists of:
- Cases.
- Membranes.
- Contacts
- Stock.
Principle of operation. When pressure is not applied to the sensor membrane, it is not deformed. The rod is in a position in which the circuit contacts are closed and current flows through them. At this moment, a lamp is lit in the cabin, which is monitored by the driver.
When the engine starts, the oil pressure in the system increases, the membrane bends, the rod moves, opening the circuit. The light goes out.
If after starting the engine the lamp does not go out within 1-2 seconds, you must immediately turn off the engine and do not start it until the cause of the malfunction is determined.
Read more here - what to do if the oil pressure light is on.
Based on the above, we can conclude that the basis for checking the oil pressure sensor on modern cars is measuring the resistor resistance with a multimeter and checking the DDM for opening and closing the circuit.
To do this, the multimeter is switched to resistance or continuity measurement mode. It depends on what type of sensor is being tested with or without a resistor.
But there are other verification methods, which we will discuss below.
How to check and replace an element
During long-term operation, the internal parts of the sensor wear out and periodically fail. The malfunction manifests itself in the form of false readings on the indicator scale or a constantly burning emergency lamp. Before drawing conclusions about power unit failures, it is highly advisable to check the functionality of the sensor.
If the control light comes on while the engine is running and the indicator drops to zero, your first action is to immediately turn off the engine and do not start it until the problem is discovered.
When the light comes on and goes out in a timely manner, and the needle does not deviate, you should check the serviceability of the oil sensor - the MM393A pressure meter. You will need a 19 mm open-end wrench and a pressure gauge with a scale of up to 10 Bar (1 MPa). A flexible pipe with a threaded tip M14 x 1.5 must be screwed to the pressure gauge.
The verification procedure is as follows:
- Turn off the engine and let it cool to 50-60 °C so you don’t have to burn your hands while working.
- Disconnect the wires from the sensors and unscrew them with a 19 mm wrench along with the tee. Please note that during disassembly a small amount of oil may leak out of the unit.
On the road, it is more difficult to check the VAZ 2106 oil sensor, since there is no pressure gauge at hand. To make sure there is lubricant in the engine channels, unscrew the element, disconnect the main ignition wire and rotate the crankshaft with the starter. If the pump is working properly, oil will splash out of the hole.
If the arrow on the instrument scale shows normal pressure (in the range of 1-6 Bar), but the red lamp is on, the small MM120 membrane sensor has clearly failed.
When the light signal does not light up at all, consider 3 options:
- the light bulb burned out;
- broken wiring;
- The small sensor in the form of a hexagon has become unusable.
The first 2 versions can be easily checked by testing them with a tester or multimeter. The serviceability of the membrane element is tested as follows: turn on the ignition, remove the wire from the terminal and short it to vehicle ground. If the lamp lights up, feel free to change the sensor.
Replacement is done by unscrewing the large or small sensor with a wrench. It is important not to lose the bronze sealing washers, since they may not be included with the new part. Remove any leaks of engine lubricant from the hole with a rag.
Both meters cannot be repaired, only replaced. Their metal cases, capable of withstanding the oil pressure of a running engine, are hermetically sealed and cannot be disassembled. The second reason is the low price of VAZ 2106 spare parts, which makes such repairs pointless.
Video: how to check lubricant pressure with a pressure gauge
Video: replacing the VAZ 2106 sensor
Heater diagram, rear window heating
- Mounting block;
- Ignition switch;
- Ignition relay;
- Heater motor switch;
- Additional resistor;
- Heater motor;
- Rear window heating switch with turn-on indicator lamp;
- Rear window heating element; K7 - Relay for turning on the heated rear window
Purpose of valve stem seals and their replacement
To prevent engine oil from entering the combustion chamber through the valve holes of the engine head, the design includes valve stem seals consisting of rubber and a spring. Like all rubber products, over time they lose their physical qualities and become hard. They need to be changed. In addition, many owners of the “six” replace the rubber valve stem seals with imported ones made of rubber. Replacing valve stem seals on a VAZ 2106 will not cause much trouble for car owners who own plumbing tools.
If you are the owner of a “six” and are repairing it, then you should have:
- flat screwdriver;
- a tool used to compress a spring;
- mandrel for installing caps.
- pliers.
- soft metal wire.
Having prepared the tools and new seal kits, you can begin the process of replacing old parts with new ones.
- Remove the cover from the block head by unscrewing the nuts.
- Rotate the crankshaft until the marks on the camshaft drive sprocket and the cover align.
- Remove the camshaft bearing housing and be sure to secure the sprocket and chain.
- Remove the pastel of the camshaft bearings, fix the sprocket and chain so that they do not fall down, otherwise it will be very difficult to get them out.
- Unscrew the spark plug, remove the spring, move the lever to the side.
- The adjusting bolt fastener must be loosened and a puller installed to work on compressing the spring.
- Insert a tin rod into the spark plug hole to hold the valve.
- Using a tool to compress the spring, bring it to a position where the crimp elements are released.
- Remove the springs, disc elements, washers.
Next, to install new parts, proceed in this order.
| Stages of work | Actions |
| Reinstall the first oil seal. | To do this, place the clamp on the valve and remove the old oil seal, tapping lightly with a plumber's hammer. |
| Lubricate the new cap with engine oil. | Install it in place using a mandrel. |
| Replace the seals on the remaining valves. | This is done in the same way: by scrolling the crankshaft to bring out the second and third cylinders. |
The VAZ 2106 engine lubrication system has a combined structure. Under pressure, the camshaft supports and cams, roller bearings, oil pump drive gear and ignition distributor, and bearings are lubricated. The oil flowing from the gaps lubricates the cylinder walls, piston-type elements, camshaft drive chain, valve stems in their guide bushings, and valve drive lever supports.
When the pressure drops, the control light starts to light.
Mounting block connection diagram
The outer number in the designation of the wire tip is the number of the block, the inner number is the conventional number of the tip.
K1 - Relay for turning on headlight cleaners; K2 - Relay interrupter for direction indicators and hazard warning lights; Short circuit - Windshield wiper relay; K4 - Relay for monitoring the health of lamps; K5 - Relay for turning on power windows (in a variant version of the car); K6 - Relay for turning on sound signals; K7 - Relay for turning on the heated rear window; K8 - Headlight high beam relay; K9 - Relay for low beam headlights; F1-F16 - Fuses
Electrical circuit diagrams for VAZ 21140, 21144, 211440, 2113, 2115 cars with a 1.5L (VAZ-2111 and VAZ 21114) and 1.6L (VAZ-11183) injection engine, as well as a 1.5L carburetor engine - VAZ-21083 (Samara 2; 199 7 -2013)
Source
Sensor design features
The sensor has a pointer and a signal light; it is a very convenient and reliable design. Under the influence of oil, the elastic membrane is deformed, the shift value is recorded using a resistor, and the change in resistance is sent to the pressure gauge. System functionality is ensured by:
- oil sensor;
- resistance;
- magnet;
- coil;
- signal light;
- fusible insert.
The power turns on when the key is turned in the ignition. When a sensor stops working, it is not cost-effective to repair it, since once reassembled there is a high probability that the indicator will show incorrect information. The device is inexpensive, so if it breaks, it is better to replace it with a new one.