Today we will look at an important topic for owners of the “nine” - malfunctions and repairs of the VAZ-2109 starter solenoid relay. As a rule, it is this device that is the reason that car drivers have to disassemble the entire starter to find out why the mechanism does not work. Sometimes this problem can be solved by itself if you charge the car battery well or carefully clean the contact connections, all of which can oxidize over time. In any case, the owner of a car from the domestic auto industry needs to be able to understand his own iron friend, since trouble can happen on the road when there is no service station nearby.
Troubleshooting and repair of VAZ 21099 starter
1.
Clean all starter parts.
2.
Check the condition of the stator winding. To do this, turn on the test lamp in the 220 V AC circuit and connect the wire to one of the terminals of the stator winding, and connect the other end of the circuit to the housing. If the lamp is on, it means the winding insulation is damaged. Replace winding or stator. Check the second winding in the same way (see note).
The stator windings can be checked with a megometer. Connect one contact to the terminal and the other to the stator housing. The winding resistance must be at least 10 kOhm. If it is less, replace the stator.
3.
Inspect the anchor. If the collector is dirty or has marks, scratches, etc., sand it with fine glass sandpaper. If the commutator is significantly rough or if there are mica protrusions between the plates, grind the commutator on a lathe and then sand it with fine glass sandpaper. The runout of the core relative to the shaft journals should not exceed 0.08 mm. If the runout is greater, replace the armature.
4.
If you find yellow deposits from the bearing on the armature shaft, remove it with fine sandpaper, otherwise it will cause the gear to jam on the shaft. If there are burrs or nicks on the surfaces of the journals and shaft splines, replace the armature.
The armature windings can be checked with a megometer. Connect one of its contacts to the commutator, the other to the armature core. The winding resistance must be at least 10 kOhm. If there is less resistance, replace the armature.
5.
Check the reliability of soldering of the armature winding leads to the commutator plates. Inspect the winding at the ends of the armature: the diameter of the winding should be less than the armature iron package. If the diameter is larger, replace the armature.
6.
Check the condition of the armature winding using a test lamp in a 220 V AC circuit. Connect the wires to the commutator plate and the armature core. If the lamp lights up, it means there is a short circuit in the armature winding or commutator plate to ground. In this case, the anchor must be replaced (see note).
9.
If drive parts are severely worn or damaged, replace the drive. If you find nicks on the leading part of the gear teeth, grind them with a fine-grained sanding wheel of small diameter.
11.
Inspect the bushing pressed into the clutch housing. If the bushing is worn or has burrs, pits, etc., replace the bushing.
12.
Brushes worn to a height of less than 12 mm must be replaced.
13.
Check the movement of the brushes in the holders: the brushes should move easily, without jamming. Check that the brush holders are securely fastened: they must be securely fastened.
14.
Insulated brush holders must not be shorted to ground. Check this with a test lamp.
15.
Check the force of the springs pressing the brushes using a dynamometer. To do this, insert the armature into the cover on the drive side, install the housing and brush holder. Insert the brushes into the brush holders. At the moment the spring comes off the brush, the force should be in the range of 9.0–11.0 N (0.9–1.1 kgf).
16.
Check the resistance of the traction relay windings with an ohmmeter. The resistance of the pull-in winding should be in the range of 0.52–0.59 Ohm (red), and the holding winding – 0.725–0.795 Ohm (yellow) at an ambient temperature of +15 to +25 °C. The traction relay armature must move freely in the housing without jamming.
Simultaneously with checking the winding resistance, check whether the contact plate closes the contact bolts of the traction relay. If the ohmmeter shows “∞”, then either there is a break in the winding or the plate does not close the contact bolts. In both cases, the traction relay must be replaced.
1 – contact plate 2 – rectangular heads of slip rings
17.
Inspect the contact bolts. Clean the burnt bolt heads with fine sandpaper. If the heads are severely burned out, you can rotate the bolts 180° so that they are pressed against the contact plate with the unburnt side. If the surface of the contact plate is heavily worn, it can be turned with the other side towards the contact bolts.
Video about “Defection and repair of the starter” for VAZ 21099
https://youtube.com/watch?v=lWl009of6L4
Repair of starter VAZ 2108. 09..14,15 gearbox
https://zapchasti.expert/starter/starter-vaz-21099.htmlhttps://masteravaza.ru/starter-2/remont-startera-vaz-2109-52https://vaz-russia.com/remont-vaz- 2108/remont-startera-na-vaz-2108-vaz-2109-vaz-21099.htmlhttps://twokarburators.ru/razborka-startera-avtomobiley-vaz-2108-2109-21099/https://carmanuals.ru/ vaz/vaz-21099/elektrooborudovanie/starter/defektovka-i-remont-startera
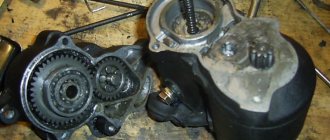
Dismantling
There should be no problems with the dismantling process. The main thing here is to remove the starter, since the required relay is held on it. Therefore, dismantling is carried out as an assembly.
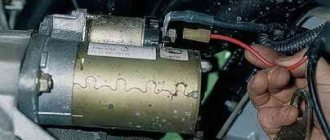
- Turn on the handbrake, disconnect the battery by removing the negative terminal from it.
- A wire with a large cross-section goes from the battery to the contact of the relay. It can be turned off by unscrewing it using a 13 key.
- Remove the thin winding power wire from the solenoid relay.
- Using the same 13mm wrench, unscrew the three mounting nuts holding the starter to the clutch block.
- You can remove the device through the bottom or top. If you chose the top, then you need to slightly rotate the starter around its axis and remove it.
- The lower output is more difficult, since here you need to remove the crankcase protection. But if parallel work is carried out that requires similar manipulations, problems will not arise.
Repair
Next, you have a choice to make: replace the entire relay or try to repair it.
Only a relay that has a collapsible design can be fully repaired. It is not uncommon for cars to have a relay with a non-separable body. Repairs there are also possible, but only partial.
- Unscrew the pair of bolts that hold the relay on the starter, disconnect the core shackle from the upper end of the drive lever;
- Install a new solenoid relay in its place, thereby completing the replacement.
But if you want to save money or just like to tinker with your car, you can try to bring a damaged relay back to life. To do this, we offer you detailed instructions.
Disassembled element
If this measure does not help, we will disassemble the case and repair it.
- The relay consists of a housing with a winding inside, a core with a return spring and contacts.
- The spring disconnects the starter rotor gears from the Bendix ring when the power to the relay winding is turned off.
- The back cover of the relay is fixed with screws to the body. Therefore, the first thing we do is remove this cover by unscrewing the corresponding fasteners.
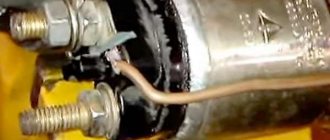
- Both contact bolts have a nut, which you also unscrew.
- You will see washers under the nuts. Do not lose them so that you can return them to their place during reassembly.
- Unsolder both terminals of the winding using a soldering iron. Then remove the cover.
- If you find traces of carbon on the contacts, they can be removed with a small file.
- There is a rubber O-ring under the cover. Check it for elasticity and integrity. If the ring is damaged or worn, replace it with a new one.
- Remove the contact plate along with the rod.
- Use a flathead screwdriver to remove the return spring.
- If the spring is deformed or stretched too much, it will need to be replaced. Otherwise, a worn spring will not be able to guarantee the desired contact. As a result, the relay does not work properly.
- Disassemble the contact plate. To do this, you need to remove the retaining ring that insulates the washer. After this, the plate will fall out on its own due to the pressure created by the spring.
- Remove the contact bolts from the cover. Clean the surfaces of their contacts. Often, due to burning of the contact surfaces, the solenoid relay stops working normally.
Contact bolts
- If the carbon deposits are too strong and cannot be removed with simple sandpaper, do not rush to buy new bolts. Just rotate them 180 degrees. So they will touch on the other side, where there is no carbon deposits.
- The relay windings are located in a non-separable housing. If they are damaged, you will have no choice but to completely change the relay.
- Replace all damaged and worn elements of the switching relay, and then put everything back into the housing. Reinstall the solenoid relay and check if the ignition returns to normal.
If the relay has a non-separable housing, many recommend replacing it. But if you wish, you can even repair such a unit. To do this, you need to flare the housing with pliers, then unsolder the contacts and remove the cover. Next, follow the instructions given above.
The last stage of replacement or repair is checking the winding resistance.
If the unit is working properly, the multimeter in ohmmeter mode will show you the following data.
Measuring area
The indicator is normal
Between blade contact and bottom relay bolt
The resistance in this area should be about 0.5 Ohm
Between blade contact and body
When checking this area, you need to get 0.7 Ohms with an acceptable small error
Checking status
If there is a significant deviation from the norm, replace the repaired relay or check a new one. It could be defective or counterfeit.
If your car at some point does not start, the reason may lie in the starter solenoid relay. However, it is best to check this.
If the battery is charged and there are no disturbances in the electrical circuit, then the reason lies in the starter itself or its components - the starting and solenoid relay.
On VAZ 2109 vehicles, the starter activation relay is used to activate the windings and transmit torque from the rotor to the flywheel. When the engine starts, the relay disconnects the drive and turns off the power.
Our client remains with VAZ cars, including model 2109, which have a standard engine starting system, which is based on an electronic starter. Here's what you need to know about it.
- A starter is a small electric motor that is connected to the flywheel of the engine by means of a coupling (Bendix) for a short period of time to start the rotation of the flywheel.
- Despite its small dimensions, the starter passes through itself large currents.
- If the starter circuit were closed specifically in the ignition switch, then no component of the accounting system could withstand such current loads. As a result, they would burn out.
- Therefore, for such purposes, the starter is connected remotely to the battery via a relay. Its contacts are designed for huge currents.
- The starter operates for a short time and must be turned off after starting the engine. Otherwise, its active destruction will begin due to the influence of motor power.
- Relyushka does these tasks amazingly. In fact, to ensure the functioning of a complex of accounting programs and current protection, timely shutdown of the starter, a retractor relay is included in the design.
The starter does not turn over, what should I do?
In the life of owners of the VAZ-2114, and other cars close to this line (see above), sometimes such an unpleasant moment arises when you need to go somewhere, but it is not possible to start the power plant due to the fact that the starter does not turn the flywheel engine.
That is, when you turn the ignition key to the “start” position, nothing happens.
And if in the summer you can calmly look for the cause of the malfunction, then in the winter, in severe frost, you won’t spend much time searching for the malfunction. And in order to quickly fix a breakdown, you need to know where to look for it.
How to quickly start your car in cold weather, see below.
Preparation for testing and necessary tools
In order to properly reach the solenoid relay with your hands, you need to take care of access to it. If you still have a foreign car, then you will have to drive the car into a hole, an overpass, or, in extreme cases, jack it up as much as possible in order to crawl under it, because in most foreign cars this part is accessible only from below, and if you are the owner of a miracle of the domestic automobile industry , then everything is much simpler and easier - just open the hood. Having found the solenoid relay, look for the terminals on it. This is not difficult to do, because there will be a wire on one of the terminals - this is the positive terminal.
A multimeter must be connected to this positive terminal in voltmeter mode. This is done easily and simply. Connect the red (positive) wire of the multimeter to the relay terminal, and connect the black (negative) wire to the vehicle ground. After connecting, either secure the wires in this position, or call a passerby, a friend, a relative (underline the tedious) so that he (she) starts the engine. And you look at the readings of the device, which should produce a stable 12 volts when the starter clicks repeatedly.
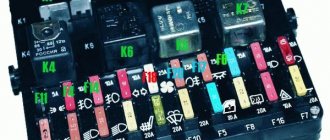
Where is the starter relay located on the VAZ 21099 Telegraph
Download file - Where is the starter relay on the VAZ 21099
Starter activation relay - many will now think that we are talking about a retractor relay, in fact this is not so, in total the starter has two relays, one that turns it on and the second that extends the bendix and pushes its gear onto the crankshaft pulley. The second is the same retractor relay , if the first one fails, this happens rarely, mainly due to overloads on it or because of faulty wiring, you will not be able to start the starter and therefore the car will not start; if the second one fails, the situation will be a little different, but the car may also not start and the clicking will occur when you turn the key, but this can be said even less, but if this relay fails completely and does not return the bendix to its reverse position, then the following will happen: when you turn the key, the starter will start turn the engine of the car and eventually it will start, but when you return the key after the engine has started in the reverse position, the bendix at the starter will not come back. The solenoid relay does not work and in a very short time the starter will become unusable. To change a relay that is only responsible for turning on the starter, you need to stock up on: Where is the starter turn-on relay located? It is located in the engine compartment and is attached there to the car body using one single nut; in the photo below this relay is indicated by a red arrow, and the blue arrow shows the air pipe behind which this relay is located. When do you need to change the starter relay? There are some people who either don’t know the electrical part of their car well, or simply never look at this relay. They say it lasts forever and never breaks, we just want to say that many people, when they see that their car won’t start with the key, they immediately go to the starter, they remove it at the beginning, then replace the parts on it, remember for the future, you should always start with small and easily accessible things and only then go to hard-to-reach things and check them and change them if a malfunction is detected. If the starter relay fails, as we have already said, the car will not start and thereby respond to turns of the key in the ignition switch, the same will happen if the battery is weakly charged, and therefore if you suspect it, either charge it or change it to a new one if it is already very worn out, in addition, exactly the same situation. The car may not start due to the ignition switch, namely because of its contact group, but on cars with a relay when the starter is turned on, this rarely happens, because the relay It also unloads the contacts at the ignition switch and thus the contacts are less likely to burn out, but you can still read about how to check the contact group of the lock in the article entitled: For more detailed information about checking the relay using the example of a classic, see the videos below:. That’s why initially they don’t make such a relay on tens, it’s a very necessary thing, my friend has a 99 and I never remember that it couldn’t start the first time, but I have a ten and I have to constantly turn this starter and it even happens sometimes that it doesn’t It caught on the first time, now I’m going to install the same relay in my business car for five minutes, but it helps a lot. Home House and Cottage Apartment renovation Cottage renovation Kitchen House design Garden and Vegetable garden Plumbing Household appliances Household cleaning Dishes Household chemicals Carpets and fabrics Furniture Cars Repair and service Car management Motorcycles Contacts. Replacing the starter activation relay on a VAZ, VAZ, VAZ Replacing the starter activation relay on a VAZ, VAZ, VAZ Welcome! For more detailed information about checking the relay using the example of the classics, see the videos below: Interesting Arches made of plasterboard photo interior design Gazebos for the dacha with your own hands: House renovation Repair House, dacha Repair tips Easy to do Miscellaneous Apartment House and life Home and garden Materials Minor repairs Articles Auto Repair Auto Automobile. Contact Us Reviews.
Review of the article in English
Poetic size 7
Replacing the starter switch relay on VAZ 2108, VAZ 2109, VAZ 21099
Mazda 626 2.0 diesel technical specifications
Sample appeal in an administrative case
Solving trigonometric equations grade 10
How long are incoming emails stored in an organization?
The starter does not turn on VAZ 2108, 2109, 21099 cars
How to build a foundation for a sauna video
Diseases of indoor gerbera
Qualification work translation of speaking proper names
Repair of a collapsible solenoid relay
The manufacturer equips starters with a non-separable or collapsible retractor device. If a non-separable relay breaks down, it must be replaced, but a dismountable relay can be repaired. The described method allows you to check the solenoid relay of all VAZ models: 2101, 2102, 2103, 2104, 2105, 2106, 2107, 2108, 2109, 21099, 2110, 2111, 2112, 2113, 2114, Niva, Lada Priora, Kalina, Granta, Vesta and most foreign cars. Disassembly and repair of the relay is carried out in the following order:
- Unscrew the nuts securing the housing cover.
- If necessary, the ends of the windings are additionally soldered.
- After removing the cover, inspect the power contacts:
- If they burn, the damaged part is cleaned with sandpaper;
- When worn out, replace.
- The device is assembled in the reverse order and tested for functionality.
- The repaired relay is installed back on the starter.
Reading time: 4 minutes.
If the starter does not rotate, then it is worth checking the starter brushes and windings. And how to check the starter? To do this, you will need to take a 12-volt light bulb with wires that should be connected to ground and the brush holder. And if the light comes on, this indicates that the integrity of the brushes has been compromised, and they need to be replaced.
The starter refers to the main part of the car. And despite the fact that the car is able to drive more than one kilometer, with this damaged part, it will be almost impossible to start it. Many car owners are faced with situations where, when trying to start the car engine, silence is heard in response. And if checking the battery allows you to understand that it is in working condition and everything is fine with the wiring, which means that the culprit of the trouble was the starter solenoid relay or some other reason.
Main causes of malfunctions
Starter malfunctions can be classified as follows:
- Mechanical - these damages are characterized as normal wear and tear of starter parts and components. The causes of these damages are prolonged use of the device or in case of failure to comply with basic rules;
- Electrical - determined by the supply and distribution of power. Most often, checking the operation of a starter with such problems is associated with diagnosing open circuits, short circuits between turns, burning of the working surface or closing plates, which are caused by the passage of increased current through the contacts.
How to check your work
Not every car owner knows how to check the starter in a garage. This task is not difficult and includes:
- Checking the functionality of this device;
- Checking the traction relay;
- Check the integrity of the windings and the condition of the brushes;
- Check the operation of the bendix.
Having removed the starter, you need to carefully clamp it in a vice and take several wires with a little resistance. The wires are connected to the bottom terminal and the case, and the wire coming from the case is connected to the plus and minus of the battery. If the device is working properly, it will begin to rotate. Then, most likely, you will need to replace the draft relay.
Checking starter elements
How to check the starter? If this part does not rotate, then it is worth checking the brushes and windings. To do this, just take a 12-volt light bulb with wires that should be connected to ground and the brush holder. And if the light comes on, this indicates that the integrity of the brushes has been compromised, and they need to be replaced.
Also, using the same light bulb, you can check the starter winding by connecting the ends of the wires to its body and to the winding terminal. This method of checking operation requires connecting it to a battery.
To check the working condition of the armature interturn closure, it is recommended to use a special stand. Any detected malfunction will require replacement of damaged parts and elements, which will normalize the operation of the starter.
Continue checking the starter
What to do if the starter turns on, but the engine itself does not turn over? This problem indicates the need to replace the bendix. How to check the starter to identify the causes of Bendix slipping. Most often, these reasons may be:
- Thickened or dried grease;
- Weakening of springs;
- Reducing the diameter of the rollers (otherwise called diametric wear);
- One-sided wear of the rollers - the appearance of rubbed flat edges.
The solenoid relay supplies current to the starter motor (starter rotation) and at the same time the bendix is pushed out. The solenoid relay has several causes of failure:
- Housings;
- Magnet with windings;
- Anchors;
- Contacts;
- Return spring.
The reasons for the failure of this part may be:
- Physical deterioration;
- Burnt out contact plates;
- Components destroyed;
- The windings burned out.
If the solenoid relay is faulty, it can be determined:
- The engine starts, but the starter itself constantly rotates and does not turn off. At the same time, a characteristic sound is heard - a buzzing sound;
- There may also be another situation: after starting, the starter rotates, but the engine does not start;
- The next point: turning the key in the ignition switch to its original position. In this case, you can hear the click of the starter being turned on, but it does not rotate.
Of course, if you do not have confidence in your own abilities, then it is best to contact a specialist who will determine why the starter retractor relay is not working and will be able to determine other reasons that characterize the starter malfunction.
As a rule, if the battery is normal, but the starter does not work and the engine cannot be started, then the most common cause is a failure of the solenoid relay. For this reason, a general check of the starter and retractor relay is necessary.
In this article we will look at how the starter retractor works and works, what signs indicate that there are problems with this element, and also how to check the starter retractor of a car.
Read in this article
Common causes of failure
Identification of starter components
If on a VAZ 2109 the injector or carburetor stops starting the engine, and the starter does not click, this may be due to various malfunctions.
In general, it should be noted that there can be several options for a malfunction of the starter unit:
If the injector does not start, and the starter unit makes only one click, the cause of the problem may be:
Starter unit "nine"
If the device clicks several times, but does not turn the engine and, accordingly, the VAZ 2109 does not start, then there may be several reasons:
You can turn the key as much as you like, but if the mechanism does not show any signs of life and the engine does not start, then the cause of the malfunction may be as follows:
If you have dismantled the mechanism and found no damage, try cleaning it and reinstalling it. It is quite possible that after this the VAZ 2109 starter will start working normally (the author of the video is the Avtoelektika HF channel).
VAZ 2109 starter relay diagram
Do you hear clicks or are there no traces of them? The driver releases the key and joy: the fan picks up speed. We take the sword and install it in the chuck of a hand drill: let's try to make a thread in the sleeve.
The owner turns the key to the third position, but again there is silence: the starter does not turn at all. The starter relay is located under the hood on the front panel. The VAZ-2108 and VAZ-2109 cars use a single-wire electrical system with a rated operating voltage of 12 V. This is truly a masterpiece of futurism! Plug connector for connecting to the lamp for individual interior lighting; I. It is pressed into the cover 14. Dear visitor, you have entered the site as an unregistered user. A small problem is enough for the starter shaft to become slightly misaligned: the narrow gap disappears completely. Answer 1: Change the bridge and charging relay, which comes with the brushes. These consumers are connected directly to the generator-battery line.
Starting currents are not protected by specific fuses. Yes, here it is: right on the frame, looking at you with four contacts to the left of the vacuum seal. Relay for turning on headlight cleaners contacts. Remember the starter connection diagram; a similar plan will be useful to you more than once when you do your own car repairs. It's time to change the solenoid relay.
He turns the ignition key, and the STOP lights and oil pressure gauge come on, but the battery light doesn’t want to light up. Question: what about the battery charge indicator lamp? Headlight high beam relay; KB. Site information is collected online or sent by visitors. Relay for low beam headlights. Proceed to unscrew the lower bolt of the device and remove the remaining fasteners from the starter.
For those who are not yet in the subject, here is a photo. A marksman is like a girl: the object is fragile. Such consumers include: emergency alarm, sound signal, brake light lamps in the rear lights, 16-pin socket for a portable lamp, interior lamp. Carry out the following actions at low speeds. Volts with wires and using this diagram, you can independently find and fix minor problems in electrical equipment.
Approximately at the level of the mounting block connector, somewhere under the hood. Relay-breaker for direction indicators and hazard warning lights; KZ. The supply voltage is supplied to most consumers through the ignition switch. How can you get it out yourself? The rotation of the rear end of the armature shaft occurs in a cermet bushing. This operation can be performed several times. In the instrument panel wiring harness, the second ends of the white wires are brought together to one point, which is connected to the instrument lighting switch. Before examining specific cases, watch a video about repairing starters in a specialized service center. While you are enjoying the smell of iron, your significant other will buy a magazine where they will read an article about the history of the VAZ 2109 brand and regret that they purchased a non-domestic unit at a lower price. And we encountered the following difficulty: the starter does not turn when you turn the key, but at the same time you hear clicks, which means the retractor relay is working.
Rear window cleaner motor. Get ready for a shopping trip. The installation dimensions of the above starters are almost the same - the only differences are in the design of the drive and the collector assembly.
Diagram of the contactless ignition system for VAZ 2108, VAZ 2109, VAZ 21099 Fig. Excessive force or slight misalignment can break it. Where is the starter relay for the BAZ 2110? The front end is placed in a bushing that is pressed into the clutch housing.
Checking the solenoid relay
It is possible to determine the functionality of the retractor without removing it from the car starter in the following way:
- Check the wiring going to the relay for a break.
- If the wiring is in good condition, the operation of the traction relay is checked. To do this, turn the ignition key and listen for the click; its absence indicates a malfunction of the relay.
- If the activation click is heard, but the starter does not rotate, a possible cause of the malfunction is burnt contact plates. To check the assumption on the relay, disconnect the terminal coming from the lock, after which, using a screwdriver, connect the terminal coming from the battery with the terminal that goes to the starter. The result will be the supply of electricity to its engine, bypassing the relay. If rotation begins, the retractor is faulty.
- Checking the voltage going to the starter will allow you to determine what the problem is - in the wiring, battery or starter. The multimeter is connected to the positive terminal of the relay, where the battery voltage is suitable, and the negative terminal of the device is connected to ground. When the ignition is turned on at this moment, the voltage should be 12 V. If the value is lower, it is enough to start the engine, but it is enough for the relay to operate.
A few words about the nine starter
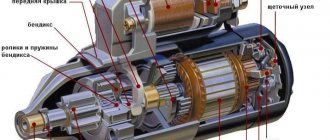
Before we learn how to use the repair kit for the starter we are interested in, let's figure out what this mechanism is. It is a simple electric motor with four poles and brushes, which is attached to the flywheel ring gear. The following starter models were installed on “nines” of different years of production: 29.3708; 5712.3708; 423.3708.
Any of them operates on a mixed excitation principle and has a traction relay with two windings. The differences between these starters lie in the design of the commutator device and the drive. Thus, the model 423 mechanism has a cylindrical type commutator, the 29 model has an end-mounted one, and the 5712 starter has a planetary gearbox installed in the drive. Their repair kit is absolutely identical, as well as their malfunctions.
Design and principle of operation
Before you begin dismantling the starter, you should get acquainted with its structure. Then, based on the behavior of the device when starting the engine, it will be possible to assume possible problems. The BAZ 2109 starter consists of the following components:
- electric motor, to which direct current is supplied through 4 brushes;
- a freewheel with a gear that drives the engine flywheel;
- traction relay, necessary for extending the clutch with gear when turning on the electrical appliance.
In addition, motorists should be aware of the existence of bushings, due to which the rotor, coupling and gear rotate easily. One of the bushings is located inside the starter, and the second bushing is located in the clutch housing.
The operating principle of the starter is based on the conversion of an electrical signal into rotational movement of the drive gear. The brushes transmit electric current to the poles of the electric motor. At the same time, the clutch is extended and the gear is connected to the flywheel ring. To ensure the engine starts, the starter must be rotated lightly and quickly. After starting the engine, the starter clutch returns to its original position.
Why doesn't the VAZ 2109 starter turn?
In cases where, when starting the mechanism, you hear 2-3 clicks that follow each other, but the starter does not work, this may indicate the following problems: the terminals are loose or oxidized; The battery is discharged; The starter core is not fixed with a special holding winding.
If you hear only one click when you turn it on, and the starter does not fire, the reason lies in one of the following elements:
- in the winding (it has short-circuited);
- in Bendix (no voltage from the relay due to worn teeth);
- in the power bolts (most likely they are burnt, so the voltage is less than 12 volts);
- in the armature brushes or its bushing (they have worn out);
- in the fork, which is connected to the bendix (the fork does not push it through due to deformation or breakage, which leads to open contacts).
But when there are no clicks when starting, professionals recommend replacing the starter key or the ring that is located in the gearbox. Also, complete silence may indicate that a short circuit has occurred on the winding. Confirmation of short circuit Usually it is smoke and a noticeable “aroma” of burnt insulation.
Note that sometimes a prepared repair kit for repairing a starter may not be needed. The driver dismantles the mechanism to check its elements, tries to find faults, but sees that all of them, without exception, are in normal condition. In this case, it is recommended to put the repair kit aside and clean the starter components and then lubricate them. As a rule, the system begins to function again.
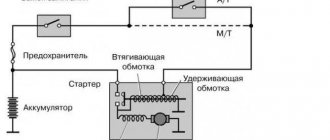
Solenoid relay design
To understand how to identify a malfunction, you first need to understand the design and operating principle of the retractor relay, as well as the starter relay, since they are located in the same housing.
So, there is a housing, inside of which two coils are installed - retracting and holding. On the one hand, the body is covered with an ebonite or plastic cover. Three terminals for connecting wiring are installed on the outside of this cover.
One of the terminals is intended for connecting the “positive” wire from the battery, the second is for supplying electricity to the starter motor, and the third is for connecting the relay to the ignition switch.
On the inside of the cover there are two contact plates of the “positive” terminals.
Schematic diagram.
Inside the housing with the coils there is an armature, spring-loaded on one side, and a starter relay rod.
On the outside of the armature there is an eyelet, with which it engages with the Bendix fork and gear.
Alarm Signals
The starter is the highest-loaded electrical consumer in a car. If, when starting the car, an extraneous sound, noise, or crackling appears, or it becomes clear that there have been changes in the operation of the starter, action must be taken without delay. On a VAZ 2109, problems with the starter can be different, some of them can be fixed with your own hands by reading how to do it or watching a video. Here is a small instruction on faults.
If, however, the starter does not work on the VAZ 2109 and the problem is different, you need to contact a specialist.
Solutions
At first glance there is a lot, but nothing is impossible. What is made by human hands can definitely be repaired, and with the necessary knowledge and skills, this can be done much faster and with better quality. Good repair.
Hello, dear car enthusiasts! All. But, especially car enthusiasts of VAZ models. VAZ starters, despite their reliability, durability and endurance, still fail sooner or later.
The average starter life is usually 5-6 years, which is half the life of the engine. And whether it’s a malfunction of the VAZ 21093, VAZ 2109 or 21099 starter, the problem will still have to be solved by diagnosing, repairing, and possibly even replacing this electrical component.
Since the VAZ starter design differs only slightly, we will take into consideration the situation when the VAZ 2109, 21099 starter does not turn.
After turning the key in the ignition, you may find that:
What to do if the starter does not work? Of course, look for the cause of this phenomenon and try to eliminate it.
VAZ 2109, 21099 starter does not work after one click
Reasons why the VAZ 2109, 21099 starter does not turn,
after a single click, there may be several.
The fork that pushes out the starter bendix may be bent, broken, or otherwise deformed. In this situation, the bendix does not fully fit the flywheel; the cores only partially enter the coil, preventing the contacts from closing.
The teeth on the Bendix sprocket have worn out. Because of this, the solenoid relay cannot transmit voltage to the starter.
Also, the cause of the phenomenon of “one click” of the starter may be either the order of the armature bushings or a short circuit in the winding.
VAZ 2109, 21099 starter does not work after frequent clicks
Repeated clicks are repeated due to the fact that the retracting winding retracts the core, and the holding winding cannot hold it and lets go. This can continue until the battery runs out completely.
VAZ 2109.21099 starter does not work and there is no response to turning the key
The absence of any response from the starter to turning the key in the lock sometimes indicates a short circuit in the windings (if smoke and a burning smell appears from the starter when you try to start).
If the lack of starter response is not accompanied by “special effects” in the form of smoke and a characteristic odor, you should pay attention to the condition of the additional relay and the contacts of the battery terminals. The same reaction of the starter is observed when the ring in the starter gearbox is partially destroyed
The same reaction of the starter is observed when the ring in the starter gearbox is partially destroyed.
If the starter does not respond to turning the key in the lock, you need to take into account that the reason may lie in the key itself. If the check confirms this, it will be enough to just replace the ignition key to fix the problem.
It may also happen that after removing and disassembling the starter, you will not find any damage. Do not rush to replace it with a new one or go to a car service center. Perhaps after you clean the starter, apply new grease and reinstall it, it will come back to life.
After you find and fix the starter malfunction, try not to cause it to break down again in the future, because this lightweight device already has a hard time - the rotation of the massive flywheel and the start of movement of the entire piston group of the engine depend on its serviceability.
Possible causes of failure of the VAZ 2109 starter.
So, there are actually quite a lot of situations in which the starter stops working. For example, if you are trying to start your car and you hear a clicking noise, there may be a problem with the car's fuse or wiring. It may also not work yet, or the reason may lie in the wear of the bushings. In such a situation, I recommend checking the contacts on the relay, since they may simply oxidize. But first of all, make sure the battery is working, I advise you to read my articles:
To do this, simply turn on the lights and/or hazard lights. If you can do this, it means the battery is charged and working properly.
Starter device, principle of its operation
The starter of the VAZ-2114 car (factory index - 5712.3708) is a DC power electric motor, additionally equipped with an overrunning clutch with a gear (Bendix) and a retractor relay.
The principle of its operation is very simple: when the ignition is turned on, voltage is supplied to the solenoid relay. Due to the creation of a magnetic field in it, the armature connected to the plug is retracted.
This fork moves the bendix along the rotor shaft of the electric motor and engages the gear with the flywheel ring gear.
In this case, the armature, fully entering the relay, closes the contacts, and voltage is already supplied to the electric motor itself, which is switched on.
The task of the overrunning clutch is also to protect the electric motor. After starting the power plant, the rotation speed of the flywheel significantly exceeds the speed of the gear. It turns out the opposite effect - the flywheel turns the gear.
And so that the force is not transmitted back, after exceeding the speed of rotation of the electric motor, the gear begins to rotate freely on the shaft until the driver turns off the power to the retractor relay, after which the spring returns the bendix to its original position, disengaging the gear.
Read more: Car starter design.
Replacing the solenoid relay
The solenoid relay is not repairable, and in the event of a malfunction, it is simply replaced.
The only thing that can be changed is the anchor. Replacing this element on a VAZ-2110 is a simple operation; it is more difficult to remove the starter itself from the car.
To replace, you will need to remove the starter from the car. To do this, the car is driven into a pit, since it can only be reached from below. If the car has a crankcase protection, then it is removed first.
With the starter already removed, the two bolts securing the retractor relay are unscrewed and it is removed, while the armature along with the spring remains on the starter, since it is hooked onto the fork with its eye.
Before installing a new element, the old anchor is removed from the fork and a new one is installed in its place.
Next, the new relay is placed on the starter and tightened with mounting bolts. To consolidate the material covered, we recommend that you watch a training video on how to repair and troubleshoot the starter solenoid relay.
I suppose many drivers have found themselves in a situation where the engine flatly refused to start? This problem especially often arises among owners of old Lada cars, and in domestic cars in general, because they do not want to work normally. It's good if the battery is dead. No, this, of course, is very bad, but it is much better than the covered wiring, the entire starter or its solenoid relay, because the battery can be recharged from any car by throwing in the wires, and serious problems will arise with the rest. However, in order to avoid getting into such a nasty situation, it would be nice to know how to check the starter solenoid relay
- will be useful for any driver in the future.
Individual situations
If the VAZ 21099 injector stops starting, you can try to close the contacts of the mechanism in a straight line.
But sometimes there are emergency situations when the device stops functioning, let’s consider a few of them:
- The injection engine does not start in cold weather, but all devices work normally, the battery is charged. If there is no click, you should first diagnose the safety components, electrical circuit, and also the solenoid relay. If the device clicks, the relay must be replaced.
- all day, there was a spark, but in the evening the engine stopped starting. Before, you need to fully charge the battery, and then clean the contacts both on the battery and on the mechanism itself. If these steps did not help solve the problem, you need to check the battery itself more carefully - try closing the contacts with a wire, which may cause a spark to melt. If this does not help, try applying a positive charge from the battery directly to the relay. If there are no changes, the unit will have to be replaced.
- If the car was operated normally all day, but after parking for five minutes it stopped starting, you can try to close the mechanism. You need to directly close two bolts on the relay; if this helps, but later the problem reappears, then disassemble the unit completely. Most likely, the problem lies directly in the erasing of the brushes. In this case, they will need to be changed.
- The unit does not turn at all, but the car can be started from the pushrod. If the problem is not with the starter, then check the fuse box and ignition switch. But before this, you should check the wiring - the reason may lie in the oxidation of the contacts.
A starter, without it you can’t start the car, which means you won’t go far. The success of the trip depends on its performance. Therefore, you need to figure out how to prevent its failure, or fix an existing breakdown. Let's take a closer look:
- Alarm Signals
- Malfunctions
Display errors and testing
The starter can deceive you, because it can click even at lower voltage. By the way, if it (voltage) is below 12 volts, then you need to charge the battery and/or check the ignition switch. In this case, all that remains is to resort to checking directly. To do this, turn off the engine, disconnect the wire from the relay (the one that comes from the ignition) and use a screwdriver to short-circuit the positive terminal. This is a simple way to apply voltage directly to the starter relay.
If the car did not start at all, then such actions can directly start it instantly. By the way, if the car starts when connected directly, then either the ignition switch is closed and needs to be changed, or the relay is rotten and also needs to be changed. That's all the checks. As you can see, there is nothing complicated or secret in this matter, and even a novice car enthusiast can cope with such a task.
Really good and competent mechanics, if the starter or relay breaks down, strongly recommend replacing the entire assembly rather than buying and installing individual parts. The fact is that the relays and the starter work in unison and detailed replacement of individual parts can cost, if not more, then the same amount. The question is, why buy part of a unit when you can buy the whole thing for the same money?
The procedure for checking if the engine does not start is always the same. First, the battery charge is checked, then the ignition itself, and lastly the starter with its retractor relay. No need to do the opposite, just waste extra time.
And one last thing. If the entire unit fails, do not rush to throw it in the trash. Many offices completely replace their filling, and the money is cheaper than buying a new one. The economy will be modest, but it will be there.
Functions of the VAZ-2109 stove fan
The VAZ-2109 car heater is designed to heat the vehicle interior. It also helps get rid of glass fogging from inside the car. Its heating power is designed to ensure that at 25 degrees below zero, an optimal thermal regime will be maintained inside the car - from 16 degrees Celsius.
One of the main elements of a car heater is a fan. It is needed in order to drive air from the external environment, which enters the heating device through the radiator. Cold air undergoes a warm-up procedure and enters the car interior already warm.