All car owners, without exception, are well aware that the trouble-free operation of their car directly depends on the correctness and regularity of the relevant service work. That is why it is necessary to carry out such maintenance on a regular basis. Changing the oil of a VAZ 2112 in an engine with 16 valves will extend the service life of the engine and save the car owner from the need for complex, expensive repairs of the power unit.
Getting ready for replacement
You can perform this procedure for changing the oil in service workshops or independently. Such maintenance of this engine is not difficult, which will allow every car owner to perform it, saving on the services of professional craftsmen.
It should be remembered that the quality of the service work performed directly depends on the quality of the consumables used. That is why it is necessary to take a responsible approach to choosing an oil that must fully comply with the requirements of the car manufacturer.
A VAZ 2112 with a 16-valve engine can be filled with inexpensive domestic semi-synthetic oil, which will allow you to save some money. At the same time, the lubricant ensures high-quality engine operation and cooling of its moving parts.
Theory: oil and everything about it
“Whoever owns the information owns the world!” - says one famous phrase. But we don’t need the whole world, but theoretical knowledge about oil won’t hurt. So, let's begin.
Is the oil good or not?
To determine whether you need to change the oil or whether it’s still good, you need to pay attention to several factors:
Checking your oil level regularly can say a lot. In particular, about the need to change the oil or repair the engine. If the oil decreases rapidly, the engine needs repair. If the engine oil level suddenly increases, this also means that the engine needs to be repaired.
This effect is observed in the event of a rupture of the cylinder head gasket, cooling jacket or fuel pump membrane.
Pay attention to the color of the oil. New good oil has a yellow, almost transparent color
If the oil on the dipstick is black or gray, it needs to be changed, since it has already lost its properties or will lose it in the near future.
Advice! It is advisable to check the engine oil level every day, or before each time you leave the garage (if you don’t drive that often). The oil can deteriorate at any time and the sooner repairs are made, the better the engine will be preserved.
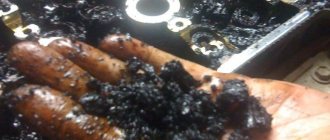
Pay attention to the consistency of the oil on the dipstick while checking. If you find particles of metal dust or metal shavings in the oil, this is a signal that you need not only an oil change on your VAZ 2111, but also engine repair.
If problems such as those described above are detected, it is recommended to contact a service station for further engine repairs. You can try to repair it yourself, but only if you have certain repair skills. Otherwise, a service station is better. After all, the price paid to the craftsmen for repairs and the price of possible damage after poor-quality self-repair can differ significantly.
When to change the oil according to the documentation?
Regarding this issue, the oil must be changed after 10-12 thousand kilometers of the car or 1-1.5 years of operation. It all depends on the quality of the oil poured in, but these are the indicators from the factory. If the oil has passed the required mileage, but does not show any signs of malfunction, then it is still better to change it. After all, the oil’s loss of operational properties, such as cooling, lubrication and carbon removal, may not be noticeable. Although the documentation indicates a mileage of 10,000, there is an opinion that it is worth changing the oil even earlier. Why? It all depends on the engine. How often are major repairs done? Yes, when the engine “dies down” and you won’t be able to go anywhere. That is, the resource of an old worn-out engine is significantly less than a new or repaired one. Accordingly, the service life of the engine oil is reduced.
Hence the conclusion! Keep an eye on the condition of your car's engine and then you will have to change the oil less often and the car will be more reliable.
What oil should I use?
There is no clear answer to this question. It depends on what purposes and under what conditions the car is used. Let's consider the options:
- Mineral motor oil is not suitable for the VAZ 2111. It has already outlived its usefulness and cannot be used in modern engines. The price is, of course, low, but it corresponds to the quality and performance properties of the oil.
- Semi-synthetic oil is more suitable for the VAZ 2111. Its cost is a little more, but it is worth it. This oil will last longer than mineral water and will preserve the engine much better. Oils of different classifications will allow you to choose the one that is suitable for your temperature regime.
- So, in temperate climates, 10W-40 oil is usually used. If the climate is colder, then it is recommended to use a thinner oil - semi-synthetic with a different designation or even synthetic oil.
- Synthetic oil. It is not advisable to use it in moderate climates and normal operating conditions. It justifies itself in two cases: street racing or just a boosted engine for fast driving, or a cold, harsh climate.
- Manufacturer. Do not buy too expensive oil - using it in a VAZ 2111 engine is the same as pouring 98-octane gasoline into a Zaporozhian car. Buy goods from trusted manufacturers, domestic or foreign, but verified!
Advice! Do not buy oil that is too cheap, as it may turn out to be a fake. At best, replace it with a new one, at worst, repair the engine or replace it.
What kind of oil should I use?
At the request of this automaker, the oil should be changed every fifteen thousand kilometers or once a year, whichever comes first.
If the car is operated primarily in the city with a large number of engine hours, servicing of the power unit must be performed after a mileage of ten thousand kilometers.
The oil sump volume of this power unit is 3.5 liters, so we can recommend that you buy a 4-liter canister, which will be enough in the future for possible topping up of oil during the operation of the car. Do not forget about the need to also purchase a new filter element, which should be purchased at the original spare parts store.
Many experts recommend additional flushing of the engine with a special cleaning solution, which is poured into the engine after draining the old oil. The engine with the flushing composition is started and the engine is allowed to idle for 5-10 minutes. After washing, the cleaning composition is drained and new oil is poured into the engine. This flushing will allow you to clean the engine of coked resinous deposits formed during the combustion of lubricant during vehicle operation.
You can purchase such special cleaning fluids at the same time as oil. They are affordable and easy to use.
Necessary tools and materials for oil change
To change the oil you will need the following tools:
- wrenches “10”, “17” and “24”;
- oil filter remover;
- wheel wrench;
- containers for used oil;
- gloves;
- bedding on the ground;
- rags;
- new filter and oil.
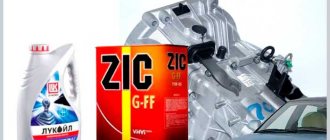
Suitable components: Semi-synthetic motor oil “Lukoil Lux 10W-40”, (5 l) article number - 19299. Price about 1100 rubles. Original oil filter for the Lada engine 21080101200508. Price 180 rubles. Analogues: BM FO2108 – 140 rubles, JS Asakashi C0065 – 150 rubles.
Prices are current for the summer of 2017 for Moscow and the region.
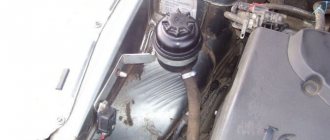
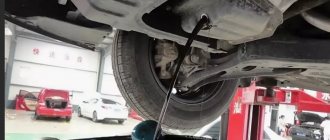
We warm up the engine, warm oil will drain faster. We put the car on a jack and remove the right front wheel.
Step-by-step instruction
- To carry out oil change work, you need to slightly warm up the engine, which will allow you to easily drain such fluid oil. All work is done on a lift or garage pit. With some skill, the car owner will be able to change the engine oil by placing the car on a flat surface. You will only need to carefully unscrew the drain plug, placing a suitable flat container under the leaking oil.
- We drive the car onto the overpass, warm up the engine, after which you can drain the oil from the engine. To unscrew the drain plug you will need a #17 open-end wrench. Carefully unscrew the plug in the pan and wait for the technical fluid to drain from the crankcase. As a rule, this takes 10 minutes. After this, we wipe the oil pan and screw back the drain plug.
- If you plan to flush the engine immediately after the old lubricant has been drained, you need to pour flushing liquid into the engine and let the power unit idle for about 10 minutes.
- Next, drain the liquid and begin replacing the filter. The oil filter can be removed with a special puller or you can pierce the filter element housing with a flat screwdriver. If you use a screwdriver for these purposes, then you need to pierce the filter as far from the thread as possible.
- Carefully unscrew the old filter and drain the remaining liquid from it. Next, screw in the new oil filter, having previously lubricated its rubberized gasket. The filter must be tightened three-quarters of a turn. You should not tighten its thread as much as possible, since it will be difficult to replace it in the future.
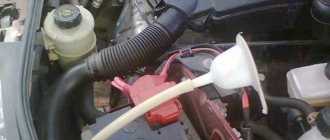
- To add fresh engine oil, you need to manually unscrew the oil filler cap, then carefully pour approximately 3.3 liters of lubricant into the engine through a funnel. We check the level with a dipstick, which should be between the maximum and minimum marks.
- You should also check the tightness of the drain plug and filter, after which you should start the engine and let it idle for about 5 minutes. The first few seconds after the engine is started, the low pressure warning light may come on. However, literally after 10-15 seconds the pump will provide the necessary pressure in the system, and the control lamp will go out.
- We turn off the engine, after which you will need to wait about half an hour, check the oil level and, if necessary, top it up to normal.
This completes all work on changing the engine oil in the VAZ 2112. All work will take you no more than an hour, and you can save several thousand rubles, which you would invariably pay if such a service was performed in a repair shop.
Checking the oil level in the internal combustion engine and gearbox.
Where are the oil filler necks located? We check and top up.
You will need: motor oil
, funnel, clean rag.
Oil filler plug 1 of 8-valve engines is located on the cylinder head cover. Oil level indicator 2 (dipstick) is located in the middle of the cylinder block behind the radiator of the cooling system.
This is how the oil level indicator (dipstick) and oil filler plug are located on a 16-valve engine mod. 2112.
Before checking the oil level after a trip, turn off the engine and wait 5-10 minutes for the oil to drain into the pan. Oil level
in the engine crankcase should not exceed the “MAX” mark, otherwise leaks through gaskets and seals, as well as increased oil consumption, are possible.
1.Remove the pointer (dipstick), wipe it with a clean cloth and put it back in place.
2.Remove the pointer (dipstick). The oil film level should be between the “MIN” and “MAX” marks. If the oil level is near or below the MIN mark, add oil.
3.Rotate the oil filler cap 90° counterclockwise and remove it.
4.Install a funnel into the neck and pour oil into the engine, monitoring the oil level using the indicator. Wait 2 minutes before removing the pointer
3 minutes, when the oil drains into the crankcase.
5.Once the oil level
reaches the required value, close the filler cap by turning it clockwise 90°
Checking the level and adding oil to the gearbox.
gearbox oil
, a syringe for filling transmission units or a funnel, a clean rag.
The oil level indicator is located in the left part of the engine compartment under the engine thermostat.
Before checking the oil level after a trip, stop the engine and wait 5-10 minutes for the oil to drain from the shafts and gears into the gearbox housing.
1.Remove the oil level indicator from the gearbox.
2.Wipe the pointer with a cloth.
3.Insert the pointer into place until it stops and remove it again. The oil level, determined by the oil film, should be between the upper and lower marks on the indicator.
4.If the oil level is below the minimum mark, add oil through the hole under the indicator to the maximum mark on the oil level
or a little higher. Insert the pointer into place.
Checking the level and adding brake fluid.
You will need: brake fluid, a clean rag.
The reservoir is installed on the brake master cylinder in the left rear part of the engine compartment.
1.Check the brake fluid level in the reservoir. It should be located between the “MIN” and “MAX” marks.
2.Unscrew the reservoir cap and place it on a clean cloth. Be careful: brake fluid may drip from the float.
3.Wrap the reservoir neck with a clean rag and add brake fluid to the “MAX” mark. Then close the tank cap.
4.Check the operation of the low brake fluid level sensor installed in the reservoir cap. To do this, turn on the ignition, then press the button on the tank lid.
5.In the instrument cluster, the warning lamp for the emergency condition of the service brake system should light up. If the lamp does not light up, contact a specialist; most likely, the sensor is faulty.
Your reviews, comments, questions and answers on LADA-10.ru
Everyone can participate in the discussion about the causes of the malfunction and other problems. If you know what to answer, write and thereby help other VAZ 2110 owners in searching for the truth.
Comments on the LADA-10.ru website were launched on January 11, 2012
We also have Lada
The site was created in 2010 — 2019
gg.
In accordance with the law on copyright and related rights, reprinting of any site materials is possible only with the permission of the administration (Contacts)
and by indicating a direct link
lada-10.ru
Source
Articles
- 2108-1012005, -07, -08 or 2105-1012005 – filter for engines 21124 and 21120;
- 2112-1009146 – neck cover (until 2003);
- 1119-1009146 – neck cover (from 01.2003);
- 2101-1009140 – cover gasket;
- 2108-1009156 – conical plug M22x1.5 (all internal combustion engines 2110-2112);
- 2112-1009045 – oil dipstick (21120 and 21124);
- 2112-1104252, -03 – O-ring for the dipstick.
Analogs (oil filter)
- PATRON PF4050 or PF4047
- BOSCH 0 451 103 274
- KITTO C0065 or C0024
- WIX FILTERS WL7168
- MEYLE 714 322 0001
- STELLOX 20-50023-SX
Types of motor oils
Historically, mineral-based oils obtained from the distillation of petroleum were the first to appear. Sometimes it was mixed with castor oil (for example, this technology was used by Castrol, hence its name).
Such oils were sufficient for use in low-powered engines, although they had noticeable disadvantages: their viscosity depended significantly on temperature, mineral oils quickly oxidized and polluted the engine.
If the first problem was solved by creating seasonal oils (summer and winter), then the second was solved only by frequent replacement.
The development of the chemical industry has made it possible to stabilize and improve the properties of motor oils: thanks to viscosity modifiers, it was possible to create all-season mineral oils; a large number of anti-friction and detergent additives allow mineral oils to work successfully in highly loaded engines.
The payoff for the low price of mineral oil is the preservation of a weak point - a low resource, because, in addition to useful work, additive packages also counteract the negative qualities of the base oil itself.
Synthesis of base oil allows you to obtain a significantly higher quality product, but at a significantly higher price.
Synthetic motor oils, depending on the production technology, may have different compositions.
Polyalphaolefin oils are the most common - the technology for their production is the cheapest. However, in a number of qualities they are superior to polyester oils - for example, their volatility and flammability are much less, and their viscosity is more stable.
Manufacturers often use polyester oil as an additive to the polyalphaolefin base to improve the quality of the oil at a lower cost than all-polyester oil.
Mixing a synthetic base oil with a mineral oil produces the so-called semi-synthetic. In fact, such oils usually contain no more than 20% synthetic base oil. Such measures make it possible to obtain a more stable motor oil, increasing its service life compared to mineral oil, and also to stabilize its viscosity.
2163-13-05a-02
To prevent oil leakage from the oil pan, a thin layer of rubber is vulcanized along the surface of the washer hole.
To prevent oil leakage from the oil pan, a thin layer of rubber is vulcanized along the surface of the washer hole.
To prevent oil leakage from the oil pan, a thin layer of rubber is vulcanized along the surface of the washer hole.
Let's examine the puck. If the rubber seal is damaged, replace the washer with a new one. If you do not have a new standard washer, you can install a copper washer with a hole diameter of 18 mm under the plug. Drain the oil for at least 10 minutes. We wrap and tighten the drain plug. We remove oil leaks from the engine oil pan.
Leaks and problems
Oil burning on a Lada Vesta with a 1.8 liter engine, marked 21179, is a common problem. The manufacturer AVTOVAZ knows about this, but does not admit that this is a problem, but states that it is a design feature.
At the same time, the manufacturer allows an oil consumption of 0.7 liters of oil per 1000 kilometers. And at high speeds or sporty driving style. When the crankshaft rotates at high speeds, that is, the tachometer needle is above 3000 rpm when driving. Zhor can reach up to 1 liter.
Moreover, this does not depend on the mileage; the car can start eating oil from scratch, that is, immediately after purchase. By the way, oil burns on 1.6 engines are much less common.
There is another problem, which is also quite widespread, when car owners notice oil in spark plug wells. If the car is under warranty, then we simply go to the dealer to have it fixed.
If there is no longer a guarantee, then we do the following. We take the solvent and thoroughly wipe the spark plug well. Inside the wells themselves you can find 2 small grooves; they need to be sealed with sealant. Apply the sealant to your finger and try to rub it into the grooves; remove the residue with a rag. This is a simple way to eliminate this leakage.
Source
Instructions for changing engine oil on a Grant with an 8 and 16 cl engine
So, unscrew the oil filler cap. Next, loosen the drain plug on the pan.
We place a container under it to drain the old oil and drain it until the oil begins to drip in small drops.
Next, we place the container under the oil filter and use pullers to unscrew it. For ease of replacement, we recommend disconnecting the crankshaft sensor block so as not to accidentally damage it with the puller.