Good afternoon, dear reader.
This article will review the rules of the road that apply to the use of vehicle headlights and lights in various driving situations.
Lighting devices are designed both to illuminate the road ahead of the car (to avoid collision with an obstacle) and to indicate the car itself (to avoid collision with other vehicles).
Unfortunately, many drivers do not know the rules for using headlights and flashlights, and therefore do not use all the opportunities provided to them.
- in good visibility;
- at night on an unlit road;
Possible causes of malfunction
So, if the low beam in one of the headlights of a Lada Kalina does not light up, then the reason most likely lies in a burnt-out light bulb.
Replacing it will not be difficult for every car owner. However, unfortunately, there are a number of other reasons for this malfunction, the most common of which are the following:
- The contacts in the plug block are oxidized or burnt;
- The fuse has blown;
- Open circuit;
- The relay has failed.
Below we will look at how to fix all these problems.
H7 standard bulb
Replacing the lamp
Replacing the low beam on Kalina is quite simple. Moreover, you will only have to spend a few minutes of your time on this.
The only thing is that before replacing old lamps, you need to purchase new ones of the H7 standard. It is advisable to install new bulbs on two headlights at once so that they provide the same glow.
Removing the plug
Replacement instructions are as follows:
- First of all, you need to remove the rubber plug located on the back of the headlight. To do this, you must first open the hood.
- Then you need to remove the positive and negative terminals from the contacts.
Releasing the latch from the landing
- Next, you need to press the spring bracket with your own hands and remove it from the seat.
- After this, you need to remove the old light bulb and put a new one in its place.
- Then you need to replace the bracket, put the terminals on the contacts and install the plug.
When replacing light bulbs, you need to pay attention to the quality of the contacts. If the contacts are oxidized or burnt, they must be cleaned. Fuse and relay block Lada Kalina
Fuse and relay block Lada Kalina
Replacing the fuse
If, after replacing the lamps, the low beam headlights in the Lada Kalina still do not work, you should check the fuses. They are located in the mounting block under the steering wheel.
The lamps are protected by different fuses:
- Right lamp – F12
- Left lamp – F13
It must be said that it is not always possible to visually identify a blown fuse. Therefore, even if it has no external defects, you should check the voltage at the terminals with a test lamp or multimeter.
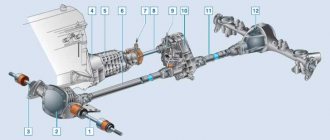
Lada exterior lighting diagram
Open circuit
If the fault cannot be eliminated, then you need to find an open circuit.
You can do this as follows:
- If there is no voltage at the fuse terminals, you need to ring the wire that goes from F13 to contact No. 56 of the lighting control unit, since you can turn on the low beam headlights on Kalina using switch No. 5.
- If the wire is intact, but 2 headlights do not light, then switch No. 56 must be replaced. However, you should first check whether voltage is supplied to the switch itself.
- If voltage is supplied to fuses F13 and F12, you should check whether there is voltage at the relay output. Let us remind you that the low beam relay in the Lada Kalina is located in the mounting block.
- If there is no voltage, you should check the area from F12 to contact No. 56 of switch No. 4, which is located on the steering wheel, as well as the area from terminal No. 56a to terminal 1 of relay K7. It is also quite possible that switch No. 4 or the relay itself is not working.
Replacing the latter is not difficult, since it is simply inserted with contacts into the socket.
In the photo - lighting relay Lada Kalina
In cases where there is voltage at the relay output, you should check the wiring of the machine from the mounting block to the headlights according to the diagram.
As we can see, finding an open circuit or a faulty part is not difficult. To do this, you only need a low beam circuit on Kalina and a multimeter or test light. These are, perhaps, all the main reasons for this malfunction on the Lada Kalina car.
Controversial situations and ways to resolve them
Although the amount of the fine by modern standards is not so large, if the driver is right, it is worth trying to prove it, at least as a matter of principle. Especially if the inspector simply begins to “put pressure” on the driver without any particular reason.
To begin with, when the inspector discovers a malfunction of the headlight (as, indeed, any similar one), it is worth politely informing that the movement was in the direction of the technical station. service or parking to correct this problem. Or simply pretend that the headlight burned out just about during the trip, but when it started it was properly performing its function. In this case, the driver can only get away with a verbal warning.
But it is worth remembering that with one working headlight you can only go to the place where the problem is corrected.
Fine for not turning on low beams
Good afternoon, dear reader.
This article will consider the fine for not turning on low beam headlights, as well as fines for other violations of the rules for using lighting devices.
Let me remind you that starting November 20, 2010, all moving vehicles must have either daytime running lights, low beam headlights, or fog lights on, regardless of the time of day and visibility conditions.
However, quite often there are cars on the roads whose drivers forgot to turn on the low beams during the day. In addition, every day we come across moving cars in which one of the lighting devices (headlight or side light) does not light up.
This article will discuss fines for drivers of the vehicles listed above.
Fine for not turning on low beam headlights
To begin with, let me remind you that in order not to receive a fine for improper use of lighting devices, you just need to turn on the low beam headlights every time you get into the car. Current traffic regulations permit the use of low beams (together with side lights) day and night in all weather conditions.
In addition, low beam headlights are a sufficient condition for not receiving a fine for improper use of lighting devices. So, if your car has low beam headlights on and all the light bulbs in the headlights are working, then a traffic police fine related to lighting devices cannot be imposed.
If you violated the rules for using lighting devices, then the punishment will be a warning or a fine of 500 rubles (Article 12.20 of the Administrative Code).
However, let's look at situations in which a fine can still be imposed on the driver:
- When starting to drive, the driver forgot to turn on the low beam headlights. The situation is quite typical for daylight hours, because... Headlights that are not turned on during the day may not be immediately noticeable.
- In a car equipped with daytime running lights, the driver forgets to turn on the low beam when it gets dark.
- The driver forgets to switch the high beam headlights to low beam when entering an illuminated street in a populated area, or when approaching an oncoming vehicle.
- Use of the rear fog lamp in any conditions other than poor visibility.
Agree, the size of the punishment for the violation in question is not large. Nevertheless, I would like to remind you that when absolutely any traffic accident occurs, a driver who incorrectly uses lighting devices automatically becomes one of the culprits.
For example, in the event of a collision between cars, one of which is moving on the main road with the headlights turned off, and the other on a secondary road in compliance with traffic regulations, the drivers of both cars will most likely be found to be at fault for the accident. Those. each of them will be able to receive only half of the compensation from the insurance company.
At the same time, turning on the low beam or daytime running lights by the first driver will allow him to remain innocent and receive full compensation from the insurance company for car repairs.
Fine for a non-working headlight
Let's look at another situation that is quite common on domestic roads - only one headlight or one side light on a car does not work.
In this case, the driver does not violate the rules for the use of lighting devices, as in the previous case, but the requirements of the list of faults and conditions under which the operation of vehicles is prohibited.
Please pay attention to clause 3.3. of this document:
3.3
External lighting devices and reflectors do not work in the prescribed mode or are dirty
3.3. External lighting devices and reflectors do not work in the prescribed mode or are dirty.
It prohibits the use of a vehicle if the headlights are not working or the light fixtures are dirty.
In this case, the punishment is provided for in Part 1 of Article 12.5 of the Code of Administrative Offenses and can also be issued in the form of a warning or an administrative fine in the amount of 500 rubles.
In addition, you should pay attention to paragraph 2.3.1. rules of the road, which prohibits driving with the headlights and tail lights off or missing in the dark or in conditions of poor visibility. Well, finally, I suggest you watch a funny video about a driver who forgot to turn on the low beam headlights:
Well, finally, I suggest you watch a funny video about a driver who forgot to turn on the low beam headlights:
Good luck on the roads!
pddmaster.ru
How is a violation recorded?
The issue of imposing a fine for not turning on the low beams is dealt with by traffic police officers from the moment the violation is detected until the punishment is imposed.
As a rule, after identifying a violation on the spot, a resolution on administrative liability is drawn up.
Not in all cases you should agree with the traffic police officer.
You can prove a traffic violation for low beam headlights during the day if:
- there are witnesses to the offense;
- driving recorded on video;
- The driver himself admits his guilt.
Therefore, if no evidence is presented, the driver can safely defend his truth. Such materials are easily challenged in court.
If the fact of a violation is undeniable, one should strive to reduce everything to a warning. That is, do not conflict, talk about driving without a penalty, remind about the possibility of warning, etc.
Selecting the lighting mode
Structurally, the headlights are divided into low and high beams. What is the difference? When the low beam is turned on, the light beam is forcibly cut off vertically, in order to prevent blinding oncoming traffic. The high beam does not have this feature. Because of this, when driving on high beam, you see the road a little further than when driving on low beam.
Here's what the rules say about choosing a lighting mode:
Rules. Section 19. Clause 19.2. High beam headlights should be switched to low beam: - in populated areas, if the road is illuminated; - when passing oncoming traffic at a distance of at least 150 m from the vehicle, and also at a greater distance, if the driver of the oncoming vehicle periodically switching the headlights indicates the need for this; - in any other cases to eliminate the possibility of blinding drivers, both oncoming and passing vehicles.
If blinded, the driver must turn on the hazard warning lights and, without changing lanes, reduce speed and stop.
And now in practice.
For beginners, you can switch at a greater distance: when the lighting changes, visibility deteriorates, and if you switch in advance, your eyes will have more time to adapt, which will reduce the likelihood of an accident. Fog. Remember: when driving in fog, forget about high beams. When you turn on the high beam, in the fog, a white wall appears ahead. Driving only on low beam, or even better, use fog lights with a special light spectrum. In all other cases, you can safely turn on the high beams.
Why are headlights needed during the day?
There are several reasons why you should turn on a lighting fixture:
- Often a traffic police officer stops a driver because the lights are out. And, in addition to a fine for driving without headlights, this becomes a reason to look for other violations;
- Of course, this is a security issue. Both the other driver and the pedestrian see you. This will avoid many troubles on the road;
- When the lights are on, the instrument panel in the cabin also lights up. Such information is important for the motorist.
Control block
The simplest and most reliable connection method is the use of a control unit and the abandonment of a relay. This is a fully thought-out unit that does not require any complex manipulations.
But the big problem is that most often motorists come across a Chinese controller. They do not comply with GOST and have low build quality.
If you use control units, then only these:
These manufacturers have proven themselves to be excellent, and the units they offer really work efficiently and effectively. Moreover, the first one on the list is a domestically produced solution.
The second two blocks are German, sold complete with DRLs, and therefore cost significantly more.
How do you solve the problem with connecting DRLs, which have actually become a mandatory element?
Thank you for your attention! Subscribe, leave comments and ask your questions!
(11 ratings, average: 3.64 out of 5)
Daytime running lights (DRLs) in headlights, fog lights, turn signals, installed separately, and wherever they are not installed. Are there any rules at all that govern the installation of DRLs? Can I install DRLs myself? They also say that they consume several times less energy, and therefore you save on gasoline.
What are DRLs and what are they for?
“Daytime running lights” have nothing to do with side lights. This new concept appeared in the rules due to the fact that modern cars began to be equipped with them. This term refers to external lighting devices designed to improve the visibility of a moving vehicle from the front during daylight hours. On new European cars you can often find lights in the headlights that stand out structurally. Most DRLs are LED bulbs. When using daytime running lights, it is not necessary to turn on additional light signals (fog lights or low beams).
DRL installation rules
Requirements for daytime running lights APPROVED by Decree of the Government of the Russian Federation dated September 10, 2009 No. 720 Extract from the technical regulations ON THE SAFETY OF WHEEL VEHICLES
6.19 Daytime running lights
6.19.1 Installation Optional on vehicles. Prohibited on trailers. 6.19.2 Number Two. 6.19.3 Installation diagram No special regulations. 6.19.4 Placement Rules for placing DRLs (GOST) 6.19.4.1 Width - the point of the surface visible in the direction of the original axis, furthest from the average longitudinal plane of the vehicle, must be no more than 400 mm from the edge of the overall width of the vehicle. The distance between the inner edges of the two visible surfaces must be at least 600 mm. This distance can be reduced to 400 mm if the overall width of the vehicle is less than 1300 mm. 6.19.4.2 In height - at a distance from 250 to 1500 mm above ground level. 6.19.4.3 In length - on the front of the vehicle. This requirement is considered fulfilled if the emitted light does not interfere with the driver directly or indirectly as a result of reflection from rear-view mirrors and/or other reflective surfaces of the vehicle. GOST placement of DRL 21106.19.5 Geometric visibilityHorizontal angle beta = 20° outward and inward. Vertical angle alpha = 10° up and down from the horizontal. 6.19.6 Direction Forward. 6.19.7 Functional electrical diagram If installed, daytime running lights should turn on automatically when the engine start/stop control is turned to the “on” position. It must be possible to activate and deactivate the automatic daytime running lights without the use of a tool. The daytime running lights must turn off automatically when the headlights are turned on, except when the headlights are turned on for a short period of time to signal road users.6.19 .8 Control signal Optionally in closed loop form. 6.19.9 Other requirements None.
Requirements of UNECE Regulations No. 48 and No. 87: the area of luminous elements must be in the range from 250 to 2000 mm², luminous intensity - from 400 to 1200 cd (for Russia - up to 800 cd).
In the end, taking all this into account, I got it like this: - turn on automatically from the ignition - turn off when you turn on the low beam.
Stopping and parking a car
At night on an unlit road
Must be included:
- parking lights.
It is prohibited to use:
- fog lamp.
Other lighting devices can be used.
In case of insufficient visibility (during dark or daylight)
Must be included:
- parking lights.
Other lights, including the rear fog lamp, may be used.
What is the fine for faulty headlights?
It is immediately worth noting that according to the traffic rules, the movement of vehicles with non-working lighting devices is prohibited. This applies to all lighting elements - from the size light bulb to the license plate illumination, so it is better to make sure from time to time that everything is in order.
Punishment for non-working headlights is provided for in Article 12.5 of the Code of Administrative Offences. Violation involves a fine of 500 rubles, regardless of which light bulb does not work. Naturally, if both headlights stop shining, you cannot continue driving under any circumstances; for this, you may even be deprived of your license, as this creates the risk of an accident.
What to do if the headlight suddenly stops working
Recommended actions:
- calling a tow truck;
- towing by other vehicles;
- waiting for daylight.
During the day, the Rules allow you to reach a service station or parking lot with unlit lighting equipment.
If none of the proposed options is suitable, the motorist proceeds in the following sequence:
- Turns on the hazard warning lights and stops the vehicle on the side of the road.
- Checks the functionality of the DRL, PF and side lights.
- If the lights are working properly, it lights up all available ones and starts driving at low speed in the right lane. If the lights are not working, the car must be removed from the roadway (clause 19.4), and if this is not possible, it must be marked with a warning triangle or a flashing red light (clause 9.11).
If all on-board lighting turns out to be inoperative, take the following measures:
- attach to the bumper using improvised means or hold a flashlight in your hands;
- install a warning triangle with reflectors on the shelf near the rear window.
After this, they begin to move at low speed. It is advisable to line up behind another slowly moving vehicle - a truck, for example. This solution will help avoid a collision with an oncoming car.
In order not to be left at night without light, you should read the instructions regarding replacing relays and lamps, and also have several spare parts with you.
When is tuning necessary?
The quality of roads in the countries of the former USSR, especially in the periphery, leaves much to be desired. Long-term operation of the vehicle in such conditions leads to a violation of the factory settings of the external lighting elements. Gradually, the settings get lost, causing the head optics to direct beams of light in different directions - up or directly under the wheels of the car.
Consequences of incorrect headlight adjustment:
- the driver has to strain to see the unlit part of the road surface;
- if the reflectors of the optics are raised at a large angle, passengers of oncoming cars suffer from glare;
- insufficient illumination of the roadside can lead to an accident - the driver will not notice an obstacle or a person walking along the edge of the road in time.
When you need to adjust your headlights yourself:
- if you notice multidirectional light streams (for example, the left headlight shines down, the right one shines up);
- drivers of oncoming cars constantly signal about blinding by briefly turning on the high beams;
- after repair, replacement or removal of front optics units;
- after being hit by the front of a car as a result of an accident;
- when installing rims or tires of other sizes;
- after replacing the front “sagging” springs;
- during the installation of fog lights (FTL).
If you happen to change burnt out light bulbs, then you do not need to adjust the position of the light fixtures. Another thing is the installation of new types of elements (xenon, LED) instead of standard halogen bulbs. In this case, it is advisable to adjust the low beam headlights.
What color of side lights is allowed according to traffic regulations?
If the color of the light device does not meet the standard requirements established for the type of vehicle, the traffic regulations prohibit the operation of such a vehicle.
Requirements for external lighting of vehicles are established by GOST 8769-75. The terms of the standard determine that the front dimensions must emit a white color, and the rear dimensions must emit a red color (Clause 2.5.6).
We recommend: Selecting and changing the fog lamp bulbs yourself
Requirements for the color of side markers are established by GOST R 41.91-99: it must be yellow.
Methods for connecting fog lights
Connecting PTF can be done in several ways. The simplest one is if the car is equipped with fog lights from the factory, that is, the electrical circuit consists of all the necessary components: connectors, switch, connecting wires, fuse, relay.
Installation, in this case, consists of installing the headlights and connecting them to the power supply. This method can be used when the car is fully equipped, if you need to replace installed fog lights or to improve the lighting system.
If the basic configuration of the car does not include foglights, you will have to install the wiring yourself. To do this, you need to purchase the necessary components: a set of wires, a relay, a switch, etc. You can purchase a ready-made kit for installing fog lights. Know how fog lights are included in a car's electrical circuit (video author: Morgan One).
Some drivers doubt whether it is possible to connect fog lights to headlights. This cannot be done, since the switch and wiring in the side lights are not designed for the current consumed by the headlights.
Having purchased a universal kit for connecting fog lights, you can connect the fog lights yourself using the following algorithm:
Laying the wires must begin by dismantling the dashboard and connecting the relay. First you need to find the wire going to the instrument lighting. Following these wires, you can find a block that has a free connector to connect the fog light relay into. The second step is to connect the switch. If there is a free button on the dashboard, connect the headlights to it. If there is a free button, then you need to install a new one. The next step is to connect the relay to the battery. The wire from the battery must be connected to pin 87 of the relay
It is more convenient to run the wire under the pedals. It is important to include a fuse in the electrical circuit when installing. This will protect the lamps from burning out and will save you from a fire in the event of a short circuit
The fuse rating is calculated based on the power of the headlights. If you take 60 W bulbs, then the current to power the headlights will be: 2 * 60 W / 12 V = 10 A. The fuse must be selected with a high rating. In this case, it is necessary to use a fuse with a rating of 15 A. Now we mount the PTF in the bumper. Before installing the fog lights, you need to mark the locations for the headlights according to the requirements. It is better to install PTF on a removed bumper. After installation, the headlights must be securely fixed using the fasteners that come with the mounting kit. The negative wire must be shorted to ground (car body), the positive wire must be connected to the 30th contact of the relay. At the final stage, the relay is installed in its seat and secured. The instrument panel returns to its original location.
Photo gallery
1. PTF installation kit
2. Set of wires for connection
3. The process of pulling the wire to connect
4. Installation of the power button After installing the PTFs, you need to check their operation and adjust them. If your headlights are raised too much, they will lose their effectiveness when driving in bad weather conditions.
Hazard lights: what they are for and when to turn them on
The so-called “emergency light” is also a combination of the operation of several lighting devices, and therefore belongs to the section in the traffic regulations that regulates the use of various modes of operation of car headlights. What should you consider when activating the emergency alarm mode?
The very first thing is, of course, emergency situations in which not only emergency lights are involved, but also an emergency stop sign. The latter must always be in your trunk, otherwise you will violate traffic rules. Regardless of where the emergency breakdown of your car occurred, in a vacant lot or on the highway, you need to protect yourself and other road users by marking your car in accordance with the traffic rules. A warning triangle is installed on the route to your car 15 or 30 meters from it, depending on the location of the breakdown.
Settings
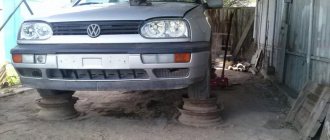
If it is not possible to set up the system at a car service center, you can do it yourself. To do this, you will need a flat area with a wall or a solid fence opposite it. This is a prerequisite for any adjustment option.
Low beam
In this case, it is easier to use a universal method, which is almost the same for all cars. Only the distance from the wall to the car can differ, most often it is 7.5 meters, but some models are placed 5 meters away; it is better to clarify this point separately in order to correctly adjust the light. Next you need to prepare the markup.
- The car is driven close to a wall or fence, then marks are made on the surface clearly in the middle of the low beam headlights and opposite them. These will be the main guidelines.
- Then you can drive the car away and start drawing. Two more marks are placed 5 cm below the center of the headlights and connected by a horizontal line. Vertical lines are also drawn through the points to provide a clear reference point.
- The central axis of the machine is determined and also marked on the wall. The end result should look something like the diagram below.
All parameters are determined individually, since the size of the cars and the location of the headlights are always different.
Next you can start setting up
It is important that at least half a tank of gasoline is filled in the car, and that a person is sitting in the driver’s seat or there is a load approximately equal in weight to the driver. The easiest way to adjust headlights near a wall is this:
The car is located at a distance of 5 or 7.5 meters, and the center line should coincide with the middle of the hood
It is important to position the car correctly. The hood is opened and a screwdriver or other tool is prepared for adjustment. The light is turned on and one headlight is covered with cardboard or any other opaque element. The upper edge of the light flux (it is clearly visible) should be located along the line
If it is displaced, adjustment is made with the corresponding screw that regulates the light in the vertical plane. Adjustment in the horizontal plane must be done so that the place where the luminous flux begins to rise is at the vertical mark opposite the headlight.
This is what the adjusted light output looks like.
The second method is in many ways similar to the first, but in this case you will need to place the machine at a distance of 10 meters from the wall. In this case, the horizontal line is drawn 12 cm below the center. Some argue that increasing the distance allows for greater tuning accuracy, so if you have the space, you can try this option.
Video: A visual example of setting up the headlight.
High beam
The high beam headlights do not have clear lines, they distribute the light evenly, so the adjustment will be much easier. The preparation process is almost the same as with low beam, the main guideline will be a horizontal line 5 cm below the center of the headlights and vertical lines opposite the bulbs.
In this case, you need to adjust the light so that the center of the beam falls at the intersection of the vertical and horizontal lines of the corresponding headlight. Here accuracy is not so important, since long-range lighting is used only when there is no oncoming traffic. If the low and high beam are combined in one bulb, then adjusting one option is enough for the headlight to work as it should.
High beam is distributed differently than low beam.
In the video they set the high beams on a Hyundai Tucson.
Fog lights
In this case, there are no screws for adjustment and the position of the light flux can only be changed in the vertical plane. Before you begin, you should loosen the fog lights. They often oxidize, so it is advisable to treat them with a penetrating lubricant in advance.
A line is drawn on the wall; its height should be 10 cm below the location of the fog lights. After this, the car needs to be driven 7.6 meters, positioned opposite the markings and the headlights turned on. In this case, the upper limit of the light flux should coincide with the line; only this position will ensure normal visibility in fog.
Fog lights also require adjustment to function properly.
Cameras have learned to detect turned off headlights - is this true?
Yes. Just as cars themselves have long been able to see the lights on oncoming cars, which is used in systems for automatically switching headlights from high to low and vice versa, cameras for automatically recording violations are also able to see the beam of light emitted from the car. In addition, video and photo recording tools have already taught us to determine where the headlights themselves are located on the car.
However, just recently one of the developers and installers of fixation devices reported that it was their cameras that had learned to recognize when the lights were off.
However, all this becomes important for us as car enthusiasts from the point of view of specific financial risks.
Lada 2107 › Logbook › Automatic switching on of low beam headlights after starting the engine.
After the last car (Subaru Forester SF5), in which the headlights turned on and off when the engine was started, I had to get used to pressing the button every time before starting to drive. In just over a month of owning the 7, there have already been times when I forgot to turn on the headlights, fortunately I didn’t get a fine. It was decided to make minor modifications to the car to automate the inclusion of low beam headlights. There are quite a lot of different options on the Internet for obtaining this effect, both homemade and factory-made buns. Since it’s more interesting to do everything yourself, I decided to assemble a simple circuit using relays. For myself, I decided that my light should turn on only after the engine starts, not to disrupt the operation of the standard circuit, and so that when I turn on the light through the standard button, my “circuit” should be disassembled. To implement this task, the following were purchased: 1) 4-pin relay - 1 piece 2) 5-pin relay - 2 pieces 3) 4-pin relay block. — 1 piece 4) relay block 5 contacts. - 2 pcs. 5) holder for a fork fuse 6) wires, corrugation, electrical tape Most likely there will be those who will say that it could have been done simpler, that three relays are a lot and could have been connected differently, but for me the circuit I came up with is simpler and more convenient. Naturally, I do not claim that this is how this modification should be carried out) The principle of operation and the role of each relay. 1) The first relay is connected with contact 30 through a fuse to the battery. One contact of the coil is to ground, the other is to the 15th contact of the ignition switch, the 87th contact is connected to the 30th contact of the second relay. 2) The second relay has a 30th contact, as already written above for the first relay, one coil contact to the 15th contact of the ignition switch, the second end of the coil to the oil pressure sensor. Contact 87A is connected to the 30th contact of the third relay. 87 The second relay contact is not connected to anything. 3) The third relay with the 30th contact to contact 87A of the second relay, one coil contact to ground, the second to 12V from the size. Contact 87A is connected to the standard relay for turning on the low beam headlights, namely to contact 85 (if I’m not mistaken).
As a result, after turning the key to the “ignition” position, the first relay transmits voltage from the battery to the second relay. The second relay, while the engine is not started and there is ground on the oil pressure sensor, opens contacts 30 and 87A, thereby not passing 12V to the 30th contact of the third relay. After starting the engine and increasing the oil pressure, the ground on the oil pressure sensor disappears and contacts 30 and 87A of the second relay close again. The third relay transmits voltage to the standard low beam headlight relay until the low beam headlights are switched on using a standard button, which in the first position supplies 12V to the dimensions, as a result of which the third relay opens contacts 30 and 87A.
When connecting to a standard relay, I decided to put a diode in the gap of the standard wire, which I took from an old PC power supply. Maybe it was unnecessary, but it makes me feel better =D
Connection points. 1) 15th contact of the ignition switch, on which 12V appears when the key is turned to the “ignition” position. Blue wire (double thicker and thinner). 2) Oil pressure sensor. The connection to it was made in the engine compartment. 3) Connection to 12V dimensions. For the left headlight, this is a yellow wire going to the headlight unit in the engine compartment, directly next to the headlight unit itself. 4) Connection to the standard low beam headlight relay. Gray wire with a red stripe Block Ш1 (black) going to the fuse and relay block under the hood. You can only gain access to this wire from the interior by disassembling the control panel.
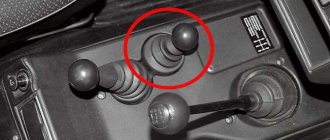
Rules of paragraphs 6 and 7 of Article 19
Rotating lighting devices (called a spotlight or searchlight) are turned on, according to paragraph 6, only outside the city or other populated area and only when there is no oncoming traffic. The exception is specialized vehicles moving around the territory of a populated area with flashing blue lights, accompanied by sound signals established by the rules. This vehicle must move in the direction of the object that is the reason for the performance of the official task, which is determined to be urgent.
Paragraph 7 specifies the rules for operating rear fog lights. They are turned on if necessary to reduce an emergency situation in conditions of poor visibility on the road. A ban is imposed on connecting this lighting equipment to brake lights.
Xenon or LEDs: which lamps to choose
Now let's look at what is better, xenon bulbs or LEDs.
Even if we discard all legal restrictions, if it is necessary to improve car lighting by replacing the standard halogen, the question arises, which is better, a xenon lamp or diode bulbs. So, it is important to understand that every decision has both pros and cons. Xenon lamps are capable of shining brightly and illuminate the road well. In this case, you should select the correct lamps according to the “temperature”. In short, 4300K xenon produces a more yellow glow, 5000K is closer to a blue-white light, while, for example, 6000K has a bluish-white glow.
So, the latest 6000K version illuminates a dry road well, but the light is “lost” in the rain, on wet asphalt, etc. In turn, xenon 4300K is optimal for rain, snow or fog, but on dry asphalt it may seem that it does not shine so brightly. It turns out that the best xenon lamp will be a high-quality 5000K option.
It is also important to understand that if xenon is installed in a headlight instead of halogen, and without modifications, such headlights will inevitably dazzle drivers of other vehicles. It is noteworthy that adjustments do not solve the problem completely. For this reason, it is recommended to install lenses in the headlights. Of course, costs increase, since the headlight will need to be disassembled and modified.
- With LEDs, things are also not so simple. First, the LED headlight has a special design. If you install such a lamp in halogen optics, the choice of solutions is limited and the price is higher. However, even if you can find such light bulbs, they are relatively easy to install, but the problems are not solved.
It is still recommended to modify the headlight. Since the LED lamp is bright, the situation resembles regular xenon without lenses in standard halogen optics. Glass with a reflective pattern refracts the light flux, causing stray light, which can lead to blinding of oncoming drivers.
As for LED lenses, such solutions exist, but the cost is quite high, and the quality of light compared to lensed xenon is questionable. The reason is the peculiarities of the LED light bulb itself, which illuminates the lens on the sides. If you remake the optics for lenses, it is easier to install a bilens and xenon.
In any case, to answer the question of what affects the quality of headlight light, you must consider the following:
- condition of the headlight and optics adjustment;
- type of lamp (halogen, xenon, LED lamps);
- characteristics of the headlight bulb itself (power, glow temperature);
- quality of finishing (presence or absence of a lens in the headlight), polishing of the optics, painting of the reflector, etc.
- correct installation of lighting equipment, etc.
Do you prefer stylish, cool headlights? Then you need other lamps!
make the appearance of your car more stylish and modern . Their glow temperature is up to 5000 K , which is similar to the hue of xenon lamps . This is achieved by applying a blue filter to the bulb of the lamp, which blocks the red range of the emitted light and the color turns out whiter. OSRAM Cool Blue Intense halogen automotive lamps are ideal for use in headlights with clear lenses - the silver dome of these lamps optically merges with the reflector, resulting in an overall homogeneous composition.
How to use them correctly
Having dealt with the controls for the optics of high and low road lighting, it is worth understanding the advisability of using this or that light. The legislation specifies factors that determine the type of headlights used:
- place - populated area, country highway, tunnel;
- time - daytime or nighttime;
- degree of illumination - illuminated or unlit road;
- finding transport in motion, stopping or parking;
- distance to other traffic participants driving motor vehicles.