A large number of car owners prefer to repair their vehicles themselves, using tool kits and a regular garage. Some people even do this in the yard, although this option is not the most acceptable. But certain repair work requires lifting part or the entire car, otherwise it will not be possible to get to the problem unit. If we talk about car services, then there is specialized equipment in the form of powerful lifts, as well as equipped inspection pits, from where a technician can easily get to the required part, remove it, replace or repair it. Few ordinary motorists own a service station, and therefore you need to look for alternative options for lifting your car so as not to overpay for car service services only because of the lack of means to lift the car. But if you decide to take on such work yourself, follow all safety rules very strictly. Not every method discussed will be right for you. Analyze carefully and take into account your technical and physical capabilities. There's no point in taking unnecessary risks. Sometimes it’s really better to go to a trusted car service center.
Methods for lifting a car for repairs.
How to properly lift a car on a lift?
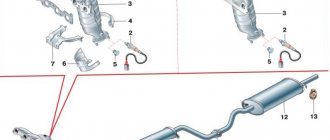
It is best to place support platforms under box-shaped body elements. We remember that the lift
should not rest against the bottom until the support pads touch the designated places on the body.
To prevent spontaneous movement of the lift
, they must be blocked using clamps.
Interesting materials:
How to view yesterday's sites? How can I watch a video that I watched on VK? How to view Pinned in telegram? How to view CCTV footage? How to install adblock in chrome? How to put an apostrophe on the Ukrainian keyboard? How to put an apostrophe on top? How to put an apostrophe in English? How to put an apostrophe at the top? How to park a car in transit?
Security issue
Quite often, car owners are faced with a problem when they do not have a special overpass, lift or pit in the garage for repair and restoration work. For many, the only option is to use a jack. But this method can hardly be called absolutely safe. Before you get to work and crawl under a raised vehicle in your own garage, there are a few things to consider that are directly related to your safety.
- Before starting any work that requires lifting the car with a jack, be sure to check that it is in good working order. Jacks can gradually wear out and fail. Therefore, before each procedure of using a lifting device, you need to make sure that nothing is broken and that the jack is able to fully perform its tasks.
- Match the weight being lifted to the capabilities of the jack. Each jack is designed to lift a certain weight. And motorists often violate this requirement, which leads to serious and dangerous consequences. Before loading the device with the weight of a vehicle, make sure it can support it. Therefore, it is very important to choose jacks with a reserve load capacity.
- Stands. A simple but effective homemade remedy to increase your own safety. Wooden boards or bars are used as stands. Usually 2-4 pieces are enough. First, the car is lifted with a jack, and then stands are installed under the car. This makes the car much more stable.
- Wheel chocks. These are special designs that prevent the car from rolling away. You should not rely completely on the handbrake. Even with a perfectly flat surface during repair work, you can jerk the car and it will roll. Literally a few centimeters of displacement is enough for the car to be torn off the jack. Think in advance about how to lock the wheels.
- Using several jacks at the same time. If the machine is heavy, or you need to lift not just part of the machine, but the entire machine, you should use several lifting devices at once. At the same time, safety stands are used.
- Telephone availability for communication. Always keep it handy. Situations can happen different. And if you suddenly get pinned under a car, which we hope never happens, you can call and call for help.
Safety comes first. Before carrying out any repair work in your garage that requires lifting the car, create all conditions for safe work. This is not so difficult to do, but it is extremely important for the safety of your health and life.
Features of sites with different surfaces
Coarse sand or fine granite chips (1-4 mm) are poured under paving slabs, bricks, flagstones, rubber tiles. Please note that for car parking, tiles need to be at least 50 mm thick (for paths, you can take from 30 mm). One more point: the smaller the size of the tiles used to pave the parking lot at the dacha, the less noticeable will be the inevitable “game” of the levels of the bricks.
Different coatings for summer cottage parking lots have their own installation characteristics.
Natural stone and concrete slabs
If you decide to make a parking lot from natural stone cut into slabs, it should also be 4-5 cm thick. You should not lay too large pieces: there is a high probability that they will break. They should not be placed closely, but leaving gaps of a couple of millimeters. The gaps are filled with sand, to which you can add abrasion-resistant lawn grass seeds. If you make the same paths, it will turn out beautifully, organically, and there will be no dirt.
With natural stone everything looks very decent
If the grass doesn’t appeal to you (it’s more difficult to clean, you have to cut it somehow), fill the gaps between the slabs with a mixture of sand and cement (1 part cement, 3 parts sand). Sweep it off the stones so that there is nothing on them and water the area (not with a stream, but with small drops, and so that it does not flow). The mixture will turn into concrete. It will take a certain amount of time to gain strength: 7 days at a temperature of +20°C to achieve 50% strength and another two weeks for complete “ripening”. Until the strength reaches 50%, it is advisable that there are no rainfalls during this period, and if they start, cover the area with polyethylene. Water itself is not scary, but streams that can wash away fragile concrete are scary.
This option has only one drawback: the high price of the stone. To reduce costs, you can use ready-made paving slabs in large format: 50*50 cm or so. They are also laid on a gravel-sand bed. Everything is the same, only the slabs are of artificial origin and have a clear geometry.
Concrete
For a concrete site, you will need to install formwork around the perimeter. Then you will need to make a reinforcing frame in the form of a cage from a metal rod. A rod with a diameter of 10-15 mm is taken, a lattice is folded from it in increments of 10-15 cm, and tied at the joints with a special wire (knitting). The resulting mesh is placed on stops so that it is raised above the compacted crushed stone by 3-5 cm, and the layer of concrete on top should also be at least 10 cm (preferably 15).
If a concrete parking lot at a dacha is made for two or more cars, expansion joints will be required. To do this, wooden planks 0.7-1 cm thick are laid edgewise on a grid of reinforcement. The width of the planks is equal to the height of the concrete layer (they can be used as guides when leveling the concrete mixture). They are laid in increments of 2 meters.
Concrete parking for a car at the dacha in the process of being manufactured
In the case of concrete, you will have to wait quite a long time for your parking lot to start using. The concrete must stand for at least 28 days. And this is if the temperature does not drop below +20°C. At the same time, you need to ensure that the surface does not dry out. To do this, you need to water the area, and to prevent the water from drying out quickly, throw matting, old bags, etc. on top, throw a piece of polyethylene on top. This coating helps maintain humidity, equalizes temperature (local overheating is harmful) and protects the surface from drops that are inevitable when watering.
If you can’t wait that long, add an “accelerator” to the concrete. An additive that accelerates the hardening of concrete. The period may be reduced to 7-10 days. But carefully read the features of caring for such concrete.
Green lawn parking
When constructing a green parking lot, special grates are placed on a layer of gravel, the gaps of which are filled with fertile soil and sown with grass seeds. To park a passenger car, and sometimes even a jeep, a grate with a height of 10 cm is sufficient. If heavy vehicles (trucks with materials) are to be placed on the site for unloading, a grate is needed with a height of at least 15 cm.
The difference in the cost of gratings for green parking is significant. But the difference in price is usually justified: some eco-parking lots do not sag and look normal, while others crumple, turning the surface into a mess of soil and grass. Therefore, when choosing gratings, do not go for cheapness.
Lawn parking for cars at the dacha
Taking care of a grass parking lot is not very convenient: the rake gets stuck in the grate, and not every lawn mower can operate safely. Therefore, many owners of such sites are disappointed. But recently, another trend has appeared - instead of soil and grass, medium crushed stone is poured into the grates, and the top is covered with small crushed stone or pebbles. How is this option better than a regular bulk site? The platform is not pressed under the wheels of even a heavily loaded vehicle. This option is ideal for clay soils.
Our verdict
As you can see, all methods work. Which of them to use depends on the circumstances and possibilities: is there a hill nearby on which you can arrange a diagonal hanging, is there a shovel in the car or something for building the same overpass, for use as a support. Here we will give some advice: in our forests and fields there is enough all kinds of garbage that can be used for these purposes. For example, the same bricks and blocks for support were found quite by accident already at the shooting site. The boards, of course, are prepared, but having them in the winter season is a good habit.
Tire fittings in the Automotive Business ad database
What kind of crushed stone is needed
The answer to this question has already been briefly mentioned here - any answer except limestone. By filling the area with river gravel, you will get a soft, reliable surface on which you can walk barefoot.
Crushed granite has sharp corners; walking on such a surface without shoes is not comfortable, and it is more expensive than other types.
Limestone will not withstand constant moisture, it will gradually decompose, the site will end up with a deep rut with constant water, there is no point in using it, savings are inappropriate here.
Layers: general sequence
After you have selected a parking space for your car at the dacha, mark out the selected dimensions of the site (taking into account the drainage system). Next we work in this order:
- We remove a layer of soil 30-35 cm deep.
- We remove all the stones, roots, and level it (it’s not necessary to go into the horizon, but there shouldn’t be any holes or humps).
- We take a tamper and compact the soil.
Example of layers for a parking lot made of paving slabs - We spread geotextiles. Its dimensions should be 0.7-1 meters larger than the dimensions of the site, the edges should wrap around the edges of the pit for parking a car. When installing drainage, a drainage pipe is wrapped in “excess” geotextile. And so, the edges can be hidden under the grass, pressed with a border, or sprinkled with a layer of gravel.
- Pour a layer of sand, level it, tamp it down. When compacted, the layer is 10-15 cm. To make compacting easier, the sand is wetted with water.
- Add a layer of crushed stone. It is advisable to use two fractions: large and medium. A layer of coarse gravel (20-40 mm) is laid on the sand, leveled, and compacted. Its thickness is 10 cm when finished.
- A layer of medium gravel (5-20 mm). Leveled, compacted. Its thickness is also approximately 10-15 cm.
For now, an exotic option for our summer cottages is rubber coating.
In general terms, these are all the rules and features of arranging a parking lot in a country house. More precise layer sizes depend on the structure of the soil and the planned load. For example, for loose (sands and sandy loams) and unstable (peat bogs) soils, to give greater stability, a road mesh can be laid at the bottom of the pit. It will eliminate pushing.
Second example: a layer of geotextile can be laid between sand and gravel. The bottom layer (at the bottom of the pit) is necessary to stabilize the base and also to prevent plants from sprouting. Intermediate layers provide more reliable plant protection and also prevent layers from mixing. In this case, even a heavy vehicle will not leave a rut.
Replacing wheels and tires with a larger diameter is effective, but not enough
If the wheel arches allow it, you can get an additional 1-1.5 cm of ground clearance by replacing the original wheels with larger ones. It is enough to add one inch to the radius of the wheel circumference to increase the ground clearance by about 1 cm. You can also replace the tires. For example, if your factory size is 205/55 R16, you can purchase 205/65 R16 tires. This will increase the height of the profile by about 1 cm, which will also provide a small plus to the clearance.
The advantages of this method are obvious:
There is no need to buy new wheels. Sometimes it will be better to find used original wheels for your car. Manufacturers often offer a range of wheels for their vehicles, in which you can find the right sizes. But it is not recommended to take wider wheels. It won't bring you much comfort or confidence, and will completely change the quality of control. And also such wheels will greatly increase fuel consumption. Follow factory width requirements.
Undermining
Technology: if you have a shovel or the soil allows you to dig with improvised means (for example, there is sand under the wheels, there is a small piece of plywood or a piece of board), you can dig under the wheel and unload it in this way. Of course, before this you need to provide support.
After replacing the wheel, the hole should be filled, but it is unlikely to provide good support, so the question arises of how to remove the car from the support. There are several options:
- dig up the support itself;
- provide for the possibility of easy dismantling of the support (for example, it is a column of several bricks - it is enough to knock out one or two intermediate bricks);
- make a small rise/overpass in front of the replaced wheel (following the principle of the previous method);
- slightly lift the body (enough for the suspension travel) to remove the support, but in this case you will need an assistant.
Advantages:
- an assistant is not required.
Flaws:
- it will take time to dig/bury a hole and remove the car from its support;
- It will be difficult to dig a hole without a shovel;
- you still need some kind of tool, as well as support;
- This method is only suitable for replacing a wheel - the previous ones allow you to lift the body itself, which can also be used for other repair work.
Suspension “bad roads”: we use the package ourselves
Many motorists have always been interested in the concept of the “bad roads” package, which is offered in showrooms for many brands and models of cars. In fact, it's just a set of suspension parts with slightly different characteristics. In particular, the package includes a different type of strut and spring, sometimes including spring stands certified at the factory. There are several important features of using such a package independently:
The modifications are quite simple, you need to buy struts and springs, replace them and enjoy the additional 2-2.5 cm of ground clearance. You can easily combine the first and second steps and get about 4 cm of increase below the bottom point. At the same time, the costs will be quite tolerable, since the struts will change sooner or later, as well as tires and wheels. Next time your struts need replacing, look into the bad roads package.
Site type
Parking for your car can be open or covered. Open parking is the most budget option. A canopy will cost significantly more - pipes, a canopy, and additional work will be required. But we must remember that a canopy is not a closed garage and will not significantly protect the car from heat and ultraviolet rays. The height of the canopy should not be high, otherwise all the meaning of its installation is lost. During snowfall, a high canopy will not save the roof of the car from a thick layer of snow. The optimal height is 2.5 meters.
A garage is a reliable shelter, parking, and a place to store all household tools. But in terms of money, it is the most expensive structure; if you do not have construction skills, you will have to hire builders. The garage is being built on the site itself; there must be free space for this. Otherwise - near the yard, nearby, open, inexpensive and fast. If your health allows it, you can do everything yourself.
Ways to lift in the garage
If repair work is planned to be carried out in a garage, then you need to think about how best to lift the car when a powerful lift is not available. There are several methods for lifting a vehicle in a garage. And sometimes there is no need to lift anything at all, since many of these rooms have holes. They are the ones who help car owners carry out repairs and maintenance work on their own, without turning to car service specialists for help, thereby significantly saving their budget. But the problem becomes relevant again when you don’t know how to lift a car in a garage without an inspection hole. It is not available everywhere, so we have to look for alternative solutions. If there is no hole, you can use:
- jack;
- stands;
- with improvised means.
Each method should be described separately so that you can take into account important nuances and follow certain rules.
Using a jack
Almost every motorist has a jack. This device should come as a basic package when purchasing a car. If the car was taken from the secondary market, and there was no jack there, one of the primary tasks of the new car owner is to buy a good lifting device. The danger of a jack lies mainly in violating the rules for its use. Some drivers simply overload the device, not calculating the load on the mechanism from too much weight of the car. Others buy low-quality models that cannot withstand even several cycles of operation under load. But there is another problem: when the jack is good, its quality does not raise any questions, it still breaks on the car. This is due to improper installation of the device. There are 2 key rules to follow here.
- The supporting place on which the jack is installed must be firm and level. If the surface is curved or loose, the stability of the lifting mechanism will be disrupted and the machine may collapse at any time. When garages use concrete or wood floors, there are no problems. But if there is ground under the wheels, be sure to first place a lining made of durable material under the jack itself. A sheet of metal or wooden boards will do.
- The jack should rest against the vehicle side members. In the thresholds of cars, designers provide for the presence of special grooves into which the jack is inserted. But here the metal is often quite soft, which is why it begins to dent after frequent use. The spars are much more stable and therefore able to withstand multiple load cycles.
Diagonal hanging
Technology: we find a small steep hill or other suitable elevation - and drive up it with one wheel, causing a diagonal hanging. For example, if we drive with the front left wheel, the left rear will come off the ground, and the right front will be seriously unloaded (after all, the front axle is more loaded).
If necessary, you can lift the front wheel off the ground, increasing the lift, adjusting the trajectory of the ride, or even turning the car around and driving up the hill in reverse. If there is no suitable slide, you can try to construct a homemade overpass.
Advantages:
- the simplest and fastest way to lift the wheel off the ground;
- no additional devices or tools are needed at all;
- no assistant needed.
Flaws:
- it is not always possible to find a suitable hill or replace it with a homemade overpass;
- On some models (with poor geometric cross-country ability, long-travel suspension), it is not easy to arrange diagonal hanging, especially in conditions that are poorly suited for this.
Why did the jack break?
In fact, damaging it is a piece of cake. Most often, a breakdown occurs when the jack is placed on a soft surface, tilts during operation and folds unsuccessfully under the weight of the machine (the threshold can also damage). So we recommend installing a base (at least a board) under it on soft surfaces.
By the way, sometimes buyers of old cars are not even aware of the condition and completeness of the standard tool for changing wheels. When inspecting the car, we saw a “spare wheel” - and okay. Therefore, our advice: take 10-15 minutes to check the operation of the same jack and the condition of the spare tire, at least the pressure in it. There have been cases when drivers had everything they needed to change a wheel, but could not do anything due to soured fasteners!