Good day to all. I'm tired of reading about non-working stoves and installing diodes where needed and not needed... I decided to share my useful experience in strengthening a classic body. We will talk about strengthening the side members in the area of the engine compartment and engine shield. One trouble prompted me to take these actions, but more on that later. I’ll immediately make a reservation that the policy of my modifications is: “The car should not have unique spare parts, because this complicates the process of replacing the latter.” This means that, whenever possible, you need to modify the car with parts that, in the event of a malfunction, can be purchased and replaced, rather than creating them anew. This does not apply to load-bearing parts of the body =) Strengthening the beam and levers on a civilian car is not necessary and cannot be done. Because when hitting an open well, hitting a curb, jumping from a springboard, etc. It’s better if a lever or beam bursts/bends/wraps, but the body remains alive.
On a fine evening, a crack was discovered on the spar in the area of the steering gearbox.
The next week was spent looking for information on strengthening this and other places in the front part of the body. Since I try to do everything myself, especially a car as basic in design as a VAZ, another repair was started.
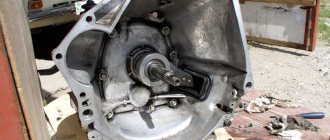
I bought a sheet of 1.5 mm cold steel (size 3X1.5 meters, enough for 3 such reinforcements). Then I cleared the car of everything that was bothering me: I removed the box, disassembled the suspension, took out the engine (I washed it and replaced the gaskets and seals). Then I drilled holes for bushings to attach the beam to through bolts and at the same time moved the beam 15 mm forward. Then I sawed the “TV” to fit the shniva-radiator (otherwise it was fastened “just to hold it”). Using cardboard and masking tape, I began to make “patterns” for the side members. Then I transferred them to metal.
I’ll tell you a little more about the process of transferring the beam. This is done to increase such a contradictory suspension tuning angle as “caster”. We will not delve into “why is it needed” and “what should be its optimal value.” There is information for these questions on the WWW.
So, first we order bushings from any turner, 6 pieces with internal
13 mm, and 4 pieces with
f
8.5 mm.
The outer diameter of the bushings depends on the original workpiece, mine is
21 mm. I chose the length with a margin - 15 cm.
Next, use a grinder to cut off the original bolts that secure the beam. Using a caliper, set aside 15 mm from the HORIZONTAL holes for fastening the beam on the left and right in the spar. You need to set the radiator frame aside, set aside 15 mm from the CENTER of the hole (mathematics will help you do this). Next, we drill a through hole with a crown f
21 mm.
The diameter may be different, it all depends on what bushings you use. We insert a bushing with an internal diameter of
13 mm into it, insert a bolt into it and fasten the beam with 2 bolts (one on the left, one on the right).
Now we take a pencil/marker/nail (eventually) and mark on the body, along the lower vertical holes in the beam, the places where we will drill. Drill from bottom to top (trying to drill vertically) through 4 holes f
13 mm.
Then we enlarge the resulting holes in the upper part of the spar to f
21 mm using a crown or reamer (only the top one, leave
f
13 mm at the bottom).
Since the beam has moved, that means the stabilizer must do it too. Similarly, we measure the same 15 mm from the factory stabilizer mounting bolts. We also drill through holes from bottom to top .
8.5 mm, we also increase the resulting hole in the upper part of the spar to a bushing diameter
of
21 mm.
We adjust the length of the bushings and the shape of the lower plane to the location (the spar has bends, so the lower plane of the bushing is not perpendicular to the axis of the bushing). We insert the bushings and bolts (to attach the beam, I took the rear shock absorber bolts from the classics) and try to assemble the suspension. If everything fits, great! If it doesn’t fit, they drilled it crookedly somewhere. We fix the jambs. By the way, I had a lot of them.
What does strengthening mean?
ATTENTION! A completely simple way to reduce fuel consumption has been found! Don't believe me? An auto mechanic with 15 years of experience also didn’t believe it until he tried it. And now he saves 35,000 rubles a year on gasoline! Read more"
To carry out tuning in terms of strengthening with your own hands, you need to have a good understanding of the design features of the car. On the VAZ 2107, the body diagram is not so complicated, so studying it will not be difficult.
The car body has long been one of the favorite positions among tuning devices. It is this part of the car that designers and tuning specialists most often pay attention to if they want to change and modernize something.
When designing a body, designers are faced with several tasks. Engineers must consider factors such as body weight and rigidity. Priority is given to issues of passive safety, the body diagram of the VAZ 2107 is carefully studied. Finding a compromise between these factors is not so easy, but computer modeling comes to the aid of modern designers.
Note. Despite the general progress of automotive engineering, tuning specialists have to independently correct the shortcomings and obvious shortcomings of the designers.
Strengthening the body is not a desire for modernization, but an extreme necessity, especially in the conditions of Russian roads. Yes, this is not an exaggeration. The condition of the road surface in our country leaves much to be desired. A heavy load is placed on the car frame; it is subjected to periodic shocks and, as a result, falls apart.
Strengthening in this case will be similar to prevention. The frame is strengthened, which increases its ability to withstand bumps, holes and other irregularities that abound in rural, and what is there to hide, the central roads of our homeland a hundredfold.
There is no need to underestimate the effect of strengthening. For clarity, the car body can be compared to a cardboard box from purchased home appliances. There are foam inserts inside it. They not only protect the contents of the box from impacts, but also maintain the integrity of the box geometry. If, in addition, you put transverse and longitudinal stretch marks inside, which will press tightly against the walls of the box, the latter will be able to withstand colossal loads, maintaining the integrity of the entire structure.
It's the same with the car body. Even if the rigidity of the body is high, vulnerable parts of the car will deform under heavy loads if they are not strengthened.
Basic work when repairing a part
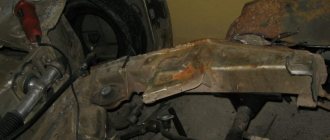
If the rigidity of the steering system fixation is violated, a crack will form in the area of the lower fixation bolt on the left front side member. As a result, there is a backlash in the body in relation to this design, which has a negative effect on wheel toe adjustments. If there is no crack, but play has appeared, then we can talk about the presence of a defect on the amplifier, inside the VAZ 2107 spar. It is impossible to fix the problem using conventional welding. It is forbidden to weld along the fixation plane, as the correct installation of the steering mechanism will be disrupted.
Auto mechanics recommend getting to the inner plane of the VAZ 2107 spar. To do this, you will need the following tools: keys, welding, grinder, screwdriver, pencil, ruler. You can approach the mechanism from the side of the mudguard. First, the front left wheel is dismantled by unscrewing the lower bolt securing the steering mechanism.
https://youtube.com/watch?v=ft7NO8ComGQ
Further repairs involve drilling out several welding points. The exact quantity depends on the parameters of the window that is cut using a grinder. The amplifier is removed in the same way.
3 points appear around the hole and are drilled. With their help, the spacer sleeve of the amplifier is attached. Often this element no longer adheres to the inner wall of the VAZ 2107 side member, so it is removed along with the amplifier plate.
Now you can see the crack that has appeared on the amplifier itself. This defect can be eliminated by welding and installing a reinforcing lining. The same mounting bolt is used to install the spacer sleeve. In this case, the nut is screwed on from the side of the steering mechanism, which is in its place (it should not interfere with repair work on the VAZ spar). The bushing is welded with 3 points. After removing the bolt, the window is welded using the same pads. All welding points are treated with special anti-corrosion materials.
DIY reinforcement
The most important indicator of body strengthening is torsional rigidity. It is measured in Nm/deg. And the higher this value, the stiffer the body is considered. In addition, this indicator is also affected by the type of car body. As you know, hatchbacks are much stiffer than 3-volume sedans, which is what our “seven” is.
Note. The number of doors is also important, as is the location of the internal combustion engine, which also greatly affects the rigidity of the body.
The body rigidity of the VAZ 2107 sedan is 7200 Nm/deg. For comparison, the Daewoo Lanos hatchback has the same figure of 10,500 Nm/deg. As for other modern foreign cars in the expensive segment, such as Alfa Romeo or Citroen C5, their body rigidity is equal to 20 thousand Nm/deg.
Spacers and braces
So, what can you do to increase body rigidity? The best method involves installing spacers and guy wires.
Installing spacers on the front pillars gives a good effect, although according to some motorists, they did not notice any real improvements. On the contrary, tests carried out more than once prove the opposite - with front struts, cornering and changing lanes on the road are much more confident, regardless of speed.
But most importantly, spacers help reduce the degree of deformation of the body, which will have a beneficial effect on the durability of the metal frame.
On the “seven” you can install stiffer (reinforced) struts, although it is believed that among VAZ models, the suspension on the VAZ 2107 is stiffer. In a general sense, this is still a soft suspension.
It is advisable to purchase spacers only from well-known companies; handmade models do not inspire confidence. Although they can be used, you just have to select them according to the “seven”, otherwise problems and difficulties may arise during installation.
And it makes sense to put spacers on the rear pillars. This will create reinforcement for the entire rear of the 7's metal frame. In principle, the “seven” does not need rear struts as much as, for example, the VAZ 2108 and modifications released later. On VAZ models, initially the rear seat is assigned the role of increasing body rigidity, but on the 2112, for example, the seats fold out, which indicates low rigidity.
What does the rear strut give to the “seven”:
- The movement of the upper geometric points of the body will be reduced
- Overall stiffness will increase
- Vehicle handling will be significantly improved
- The result will have a positive effect on the durability of the body.
In addition, this type of tuning is considered budget-friendly, which is ideal for doing it yourself, and easy to install (no complex work required). In addition, such reinforcement also looks beautiful in appearance.
Note that installing lower struts can also provide significant assistance in strengthening the body. Only this installation is considered difficult.
Amplifier behind the seat back
There is another method of rear amplification, which involves installing the amplifier directly behind the back of the rear seat. This innovation will help increase body rigidity by 20-25 percent.
Shield amplifier
To significantly reduce the play of the steering rack housing in the connecting elements, it is recommended to install a shield reinforcement for the front of the car. Such a device not only increases the rigidity of the front of the “seven”, but also reduces the amplitude of movement of the steering rack housing.
Interestingly, the shield reinforcement increases rigidity in the transverse direction twice as effectively as in the longitudinal direction. The transverse rigidity of the front end is increased by 5 times, the longitudinal rigidity by 2 times.
Subframes
Another innovation involves the installation of subframes. They generally increase body rigidity. If you manage to install a subframe model with additional support for the internal combustion engine, then the car’s suspension will also be strengthened.
Subframes tend to be difficult to install, especially on frameless sedans. We'll have to digest some details of the front part of the VAZ 2107.
TKB (tubular safety cage) is intended for professional and “civilian” use. It is better not to mess with the first ones, since they are suitable for competitions, are expensive and have a complex design. But “civilians” are just our case.
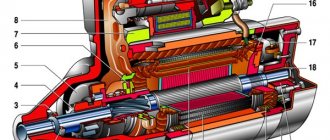
Body structure of the VAZ 2101
Before we begin tuning the body of the VAZ 2101, I consider it necessary to take a detailed look at this most important part of our vehicle. So, the body of the VAZ 2101 is a rigid spatial truss made of steel, which consists of sequentially assembled, non-separable elements:
So, the body of the VAZ 2101 is a rigid spatial truss made of steel, which consists of sequentially assembled, non-separable elements:
| 1 | Base (bottom) assembled with front part and rear panel |
| 2 | "Plumage" of the front part |
| 3 | The left and right sidewalls are in line with the rear “tail” |
| 4 | Roof |
The base is a trough-shaped, all-stamped panel with a tunnel in the center. The tunnel has two functions:
- Protects the elements placed in it from damage (in our case, the driveshaft is located in it);
- Increases underbody resistance to torsion/deformation, as do side members welded along the base*.
Spar* is a stamped steel beam with a box-shaped section.
Profile view
In the front part they are combined into a single whole:
- The front side members serve as power elements carrying the front suspension with the power unit;
- Front shield;
- Panel;
- Wings;
- Mudguards.
The rear section also contains mudguards and a luggage compartment panel.
Side view
The left and right sidewalls consist of outer and inner panels connected to each other:
- The outer panel consists of the C-pillar, A-pillar, B-pillar, sill and rear fender;
- The internal panel includes many power elements (strut amplifiers, etc.).
View from above
And finally, the all-stamped structure, reinforced with cross members, is called the roof of the car.
The elements of the body shell are made by stamping from thin sheet steel. The low weight, high strength and durability of such a design fully comply with the basic requirements of the functionality inherent in it.
Next, its removable elements are mounted to this resulting one-piece welded body:
- Trunk lid;
- Hood;
- Doors;
- Front facing;
- Decorative elements, etc. accessories.
But there is no point in flattery going into extraneous “wilds”; let’s continue the conversation about strengthening the body of classic vases.
Professional enhancement
Now about the professional way to strengthen the body. This implies an increase in weld seams. As a rule, on the conveyor, body parts of the “Seven” are connected using point technology. This makes the body weak and not durable enough. From the same spacers, it may not withstand and fall apart.
By welding additional metal-type plates and reinforcements into insufficiently rigid areas of the body, the overall reinforcement can be significantly influenced.
Front end reinforcement
It is advisable to boil the front end first. You can buy a TV consisting of 2 parts and weld them together carefully. Lay the welds, install the front engine support bracket, add a gusset, install strong crabs.
It also makes sense to weld the seams of the side members. From the inside, steel linings will have to be installed on the side members to further strengthen them.
You can make a window outside the spar, and then insert a piece of channel and boil it. Or simply cover the entire spar with metal cladding.
Be sure to strengthen the cups. The seams are boiled, a plate is placed on top of the cup, which significantly strengthens the part, preventing it from tearing when driving over bumps. Both front and rear cups are upgraded.
The suspension mounting elements are strengthened. The seams of the slopes are boiled and a gusset is added.
Such professional modernization gives the same significant effect as installing a subframe. Only in this case the weight of the car does not increase and ground clearance is not lost. It is more convenient to carry out this work from the pit.
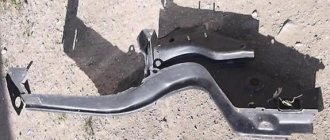
Reinforcement of the rear body
Now let's talk about how to strengthen the back. Particular attention here should be paid, of course, to the beam. It is this that should be strengthened first. In principle, the fastening itself does not raise any doubts about its strength, but welding with the body leaves much to be desired.
Note. The beam is connected to the body as follows: it sits on studs, which in turn are welded into a triangle bracket. The latter is also welded between the interior floor and the side member.
- We climb into the salon, where we find this same triangle;
- Cut it out by indenting 5 mm inward;
- Drill out the studs;
- We make an additional steel triangle from 2 mm iron;
- We weld it into the body;
- We make holes in it for the bolts, on which we place the beam.
Now you don't have to worry about secure fastening. The beam sits firmly, is held on by bolts that can be removed if necessary and replaced. The connection with the car floor is significant, the triangle is reinforced.
As you can see, it is not necessary to contact professional services regarding body strengthening, where the price of the work may seriously surprise you. The instructions presented above, video review and photo materials will give a clear understanding of doing the work yourself. Be patient and careful and you will definitely succeed!
Forget about fines from cameras! An absolutely legal new product - Traffic Police Camera Jammer, hides your license plates from the cameras that are installed in all cities. More details at the link.
- Absolutely legal (Article 12.2);
- Hides from photo and video recording;
- Suitable for all cars;
- Works through the cigarette lighter connector;
- Does not cause interference to radios and cell phones.
Repair of the front side member on a VAZ 2101 – 2107 car
Spars on VAZ “classic” cars, i.e. VAZ from the first to the seventh models have the same design. The weak points of these side members are the mounting points for the steering mechanism, cross beam, stabilizer bar mounting and on the right side of the pendulum mounting. By design, these places cannot be called weak, since it is in these fastening points inside the spar that amplifiers are installed, but they also do not withstand our road conditions and the service life of these vehicles.
Since the beginning of this spring, several cars have already been received for repair of side members at the place where the beam is attached and the steering mechanism is attached. Basically, cracks on the side members are discovered by technicians when diagnosing the chassis and refuse to adjust the wheel alignment angles until these defects are eliminated. The main cause of cracks is loose fastenings, road conditions, and, as they say, metal fatigue.
Most often, the rigidity of the steering mechanism fastening on the left front spar is broken and a crack appears in the area of the lower mounting bolt, resulting in a backlash of the body relative to the spar, which significantly affects the violation of wheel toe adjustment. In the initial stage, there may not be a crack, but play has already appeared, this indicates that there is a crack on the amplifier, inside the spar. All this means that this defect cannot be eliminated by simple welding on the outside of the spar, and it is impossible to weld along the mounting plane, since the correct installation of the steering mechanism will be disrupted.
In this situation, an operation is required to penetrate the internal cavity of the spar, the procedure for which we will familiarize ourselves with. Read more »
gaingak.livejournal.com
Rail saver repair tool
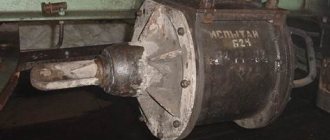
Tim Gerhards, an American auto body repair specialist who has been working in this field since 1986, has come up with a tool that helps remove dents and bends in side members by attacking the imperfections from the inside. This is a fairly new invention. The tool is called Rail saver (literally translated as spar saver). It is a metal body, to one end of which a hydraulic cylinder connected to a pump is screwed. There is a metal pipe inside the housing.
p, blockquote 23,0,0,0,0 –>
p, blockquote 24,0,0,0,0 –>
A hydraulic cylinder acts on one end of this pipe, and at the other end there is a wedge, which gradually lifts the part of the body where the wedge is also located. It turns out something like a long jack, which is inserted inside the spar to the place where the bend is located and the bend or dent is applied from inside the spar. Anvils of different shapes, which are included in the kit, can be screwed to the place in the tool that rises. Thus, this tool can work on dents and folds caused by the displacement of the side member from the inside.
p, blockquote 25,0,0,0,0 –> A tool for straightening the side members from inside the Rail saver is placed inside the side member. The arrow shows the place where the fold is located, which the tool will straighten.
If necessary, the unevenness is tapped from the outside with a hammer, and the tool for straightening the side members acts as support. Since a hydraulic cylinder with a pump is used to operate the tool, it is possible to remove deformation on the metal of a spar of any thickness without much effort. The most important thing is to correctly position the tool in the right place. To do this, you need to measure the location of the deformation and position the tool inside the spar to the desired length. There is a measuring scale on the body of the instrument.
p, blockquote 26,0,0,0,0 –>
Depending on the size of the spar, you can place wooden blocks in its cavity to position the tool as best as possible.
p, blockquote 27,0,0,0,0 –>
The Rail saver tool has been tested and approved by General Motors for repair of salvage vehicles at authorized service centers. The advantage of this tool is that it eliminates the need to cut segments in the spar to access the reverse side of the damage. There is no need to heat the metal, especially since modern high-strength steel is sensitive to heat and is significantly weakened and loses its properties.
p, blockquote 28,0,0,0,0 –>
The design of the Rail saver tool is quite simple and if it is thoroughly understood, you can make such a tool yourself.
p, blockquote 29,0,0,0,0 –>
On the left, at the top of the tool body, you can see a wedge on which another wedge acts, lifting it. The pipe with the wedge inside the housing is pushed by a hydraulic extension. The place with the wedge, which rises when exposed to hydraulics, must be installed opposite the fold, inside the spar. Special anvils/supports can be screwed to this part of the tool. p, blockquote 30,0,0,0,1 –>
Process technology
The VAZ 2106 body is straightened immediately before painting the restored part:
- The surface to be treated is cleaned of dirt, washed, dried and degreased. Remove old paint from the working surface.
- Use frequent gentle blows of a hammer to smooth out the dent. If the defect is deep, then the process is performed from the edge of the damage, and gradually moves towards its center. Metal substrates are placed on the reverse side of the area to be restored. They must have the appropriate shape.
- Metal breaks are repaired using a welding machine. Next, the weld is ground.
- The area restored from damage is covered with putty. It levels the work surface.
- The putty part is sanded and painted.
The putty should be applied in a thin layer. Otherwise, the paint will become covered with numerous cracks and begin to fall off.