As a rule, Osram lamps are installed in the PTF from the factory. The cost of the original H11 12v/55 Osram lamp is about 500 rubles and more. This lamp has an extended service life and lasts 2-3 years. Depending on your preferences, you can install either an identical lamp or other types in the PTF:
If your fog light bulb on your Ford Focus 3 has burned out, it’s not a problem at all, since replacing it will not be difficult even for a novice car enthusiast. The PTF is equipped with H11 12v/55W lamps, exactly the same as in most cars, so there should be no problems with purchasing lamps. In that manual, I will tell you which lamps are best to choose and how to replace them yourself.
The peculiarity of this type of optics is that the light incident from the devices does not lend itself to crystallization due to the presence of moisture droplets in the air. The usual location of the PTF is the front bumper of the car, below the headlights.
Repair of adaptive headlights of Focus 3 Restyle
Everyone has long known about the problem with the adaptive headlights of the Focus 3 2015+. Almost immediately after purchase, with a mileage of 3000-4000 km on my car, the right headlight stopped returning to its original position after a right turn. She went into safe mode, turning to the right and going down. Disputes began with the dealer, which did not bode well. Computer diagnostics did not reveal any errors. I had to remove several kinks, which were sent to the Ford dealership and they approved the warranty replacement of the headlight, after which it was replaced.
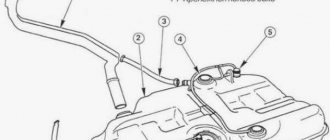
Now, with about 50 thousand kilometers left, the same symptoms began to appear, and since the warranty had long expired, I decided to repair the headlight myself. I will not explain how the headlight is removed. Everything is elementary there. Next, we remove the rubber plug located behind the xenon lamp and see that nothing is available to us (Photo 1).
Photo 1. Location of the xenon lamp in the adaptive headlight of the Focus 3 Restyle
For further work we will need to remove the lamp. There is a black plastic ring around the lamp that needs to be turned clockwise. It turns very hard (Photos 2 and 3). The third photo shows the lamp from the back side to make it easier to understand what to twist.
Photo 2. Removing the xenon lamp in the adaptive headlight of the Focus 3 Restyle
Photo 3. Xenon lamp in the adaptive headlight of Focus 3 Restyle
Next, disconnect the connector with three wires, being careful not to pull too much on the wires. It is in the area of this connector that they fall off. If you have several wires left in your hands, then you can only figure out which wires are which ones with the help of a tester. They are all the same color (Photos 4 and 5).
Photo 4. Lens control connector in the Focus 3 Restyle adaptive headlight
Photo 5. Lens control connector in the Focus 3 Restyle adaptive headlight
Next, carefully remove the fixing bracket from the connector we need (Photo 6).
Photo 6. Latch for the lens control connector in the Focus 3 Restyle adaptive headlight
After this, carefully bending the stoppers, we take out the torn pins one by one and solder the wires to them (Photos 7 and 8). We assemble everything in reverse order.
Photo 7. Lens connector pin lock in the Focus 3 Restyle adaptive headlight
Photo 8. Details of the lens connector in the adaptive headlight of Focus 3 Restyle
How to Remove the Fog Light on a Ford Focus 3
How to remove fog lights on a Ford Focus | Motorist's benefit
This publication will discuss how to independently replace the fog light on a 4th generation Ford Focus. To remove the headlight from the tools you only need a screwdriver with a Torx tip and this is a brand new PTF. In my case, I purchased a spare part from the Hi-Drive manufacturer, its catalog number is FL-732.
To get to the Ford Focus PTF mount and dismantle it without much effort, you must first remove the headlight. It is attached with 2 Torx screws, after unscrewing them, of course, remove the headlight housing and put it aside.
After a while, we find the fog lamp socket at the bottom with our hands, turn it 90 degrees and remove it together with the lamp.
Now we unscrew the screws of the front fastening of the fender liner, bend it slightly so that a hand can fit through, after that we take out the fog light housing, it is secured with spring latches, and in its place we install the newest one.
Related publications:
Replacing PTF on Ford Focus 3 from A to Z
Good day! My question is, what is the procedure for changing fog lights on a Ford Focus 3 (broken by a stone from under the wheels), do you need to remove the headlight or are they changed in some other way? (Andrey)
Have a nice day, Andrey. When one of the fog lights is ready to fail, women like it, the element should be changed. Below we will talk about how this is done.
How to replace PTF with FF3
So, purchase a set of fog lights in advance; a personal computer also requires special edgings; if they are not there, buy additional ones. New PTFs come complete with a control unit, which must be installed in the cabin, but since you already have one, the unit will not be useful to you. Therefore, you can easily go to any vehicle disassembly and try to purchase the missing light there. Having prepared what remains for our client to do, what you will need, proceed to the replacement.
1. Dismantle the broken PTF 5. Remove the headlight to access the PTF socket 3. Install the newest “fog light”
- First, open the hood of the car. The broken PTF needs to be dismantled, removing the glass that remains for our client to do, do it carefully. You will also need to remove the headlight itself. Use wrenches if your goal is to remove the screws that secure the headlight. Set it aside.
- After which you need to install new (or new) fog lights. First, you will try to install the PTF through the engine compartment, but we hasten to warn you that this will not work. To install the foglights, you will have to remove the engine crankcase protection. Having done this, you can easily install the PTF at the destination of the old or old ones.
- When installation is complete, the trim ring must also be installed. The functionality of the parts is checked from the interior. What happens is that the control unit refuses to accept the new PTF, then you will have to change the second one, and then install a new unit in the car.
- If there is anything left for our client to do in order, then only the details remain. You will need to update the software for the on-board computer, this is in this case if the headlights do not turn on. Obviously, you can test this function without the help of others; unfortunately, we still recommend that you seek help from specialists. These are masters who are 100 different from a representative of the company. It is better if they specialize in diagnosing and servicing Ford vehicles.
- After this fact, the entire assembly occurs in reverse order, the headlights are installed at their destination. As we now understand, there are no obstacles to the process.
description, removal and installation of fog lights
The purpose of fog lights is to illuminate the road when visibility is poor during bad weather. If they begin to shine dimly or have mechanical damage, then they need to be replaced. The article is devoted to PTF, instructions are given on how to replace fog lights on a Ford Focus 3.
Content
[ To uncover]
[Hide]
Features and design of PTF
During rain or fog, the light from an ordinary light bulb reflects from water droplets and creates a kind of wall in front of the car, which reduces visibility. Fog lights emit a wide horizontal light that is pressed against the road surface. They also help the driver when driving on winding roads; when turning, they illuminate the side of the road, making it easier to maneuver.
PTF light for cars
Currently, fog lights have appeared that have a corner lighting function. A specific headlamp lights up depending on the steering angle or when the turn is turned on. This way the corresponding side is illuminated.
The design of the PTF is similar to that of a conventional headlight:
- frame;
- bulb;
- reflector;
- diffuser
To illuminate the road during rainy weather or fog, the upper boundary must be clear, that is, the beam should not be higher than the horizontal plane. For high-quality illumination of the road surface, the beam and plane must be located as close as possible to the road surface, but the distance from the ground should not be lower than 25 cm. PTFs are always installed symmetrically, either below the headlights, or at their level, but above 25 cm from the ground and no closer than 40 cm to the side dimensions. The fog lights turn on along with the side lights (the author of the video is MirDHO - World of Daytime Running Lights).
In a parabolic reflector, the lamp is at the focal point, so the beam is directed by the reflector along the central axis. A horizontal stripe is formed thanks to the diffuser, which expands the light beam. A special screen prevents light from projecting upward.
Detailed instructions for replacing fog lights
Replacing fog lights is a simple procedure. The detailed instructions below will help even a novice car enthusiast complete the replacement.
New and old PTF
Tools and materials
To carry out the procedure, you need to prepare the necessary tools and materials:
- headlight or set of fog lights;
- TORX screwdriver;
- flat screwdriver;
- jack;
- clean rags.
Replacement procedure
It is more convenient to carry out the replacement in a viewing hole or a lift; if this is not possible, then the car can be raised using a jack. The procedure for Ford Focus models 1, 2 and 3 is similar.
- To get to the Ford Focus fog lamp, you need to dismantle the headlight optics.
- Fog light is now available. We turn it 90 degrees and take it out along with the light bulb.
- The top molding should then be removed. It needs to be pryed up with a flat screwdriver from below and, by unlatching the latches on the side, removed.
- Next, you need to remove the fog light plug, carefully overcoming the resistance of the clamps.
- To remove the PTF, you need to unscrew the two side screws that secure the headlights. After unscrewing the screws, we remove the headlight from the bumper niche.
- Next, by pressing the latch, disconnect the plug with the wires.
- We install the new headlight in its original place.
- Then the fog lamp plug and molding are returned to their place.
After replacement, you need to check how the headlights shine and, if necessary, adjust with an asterisk; for this, there is a special hole in the fog lamp plug.
Thus, you can replace the fog lights yourself, both on the first Ford Focus and on other models.
Asking price (with gallery)
Video “Replacing fog lights on Ford Focus 2”
This video demonstrates how to change the PTF on a Ford Focus 2 (the author of the video is Dmitriy Trade).
av-to.info
Ford Focus Sedan 2012, 125 l. With. - spare parts
Ford Focus, 2014
Comments 19
How are the lamps shining? Are you happy? I want to buy the same ones for myself, is it worth taking or not?
In principle, I’m happy, in clear weather everything is super, they shine like xenon at 4.8 thousand K. Even the guys at 3 tricks came up to me and asked how I installed the xenon in the near one... I answered that these are halogens, but the expensive ones shine under the xenon! But in cloudy weather, in rain, in fog, I would like it to be brighter, but you can drive without straining your vision too much! If you don’t plan to install xenon, then these lamps are a great option! I recently activated the xenon, so maybe I’ll install it soon! I didn’t want to mess with blocks with decoys!
Are they 5 volt in size? Doesn’t it give any errors?
yes 5 volt! There are no errors! But what errors could there be?
Is it possible to change the PTF bnz lamps when removing the headlights? Can you crawl up from below?
If there is no crankcase protection, then you can crawl up! But I have it, I had to remove the headlights!
Is it possible to change the PTF bnz lamps when removing the headlights? Can you crawl up from below?
headlight on two screws, nothing complicated, the main thing is not about, , , , , fastening where these screws are screwed in
So what about fogging?
the holes in the plugs helped! no fogging!
The other day I installed exactly the same set in low beam, high beam and PTF) it looks beautiful and there’s enough light) and I’ve already tried it on the night highway, it shines great!
Well done! Congratulations! I’m also happy with the light and beauty like an elephant)))
Tell me how to change the light bulbs in the PTF. I don’t even know which side to approach them from.
You remove the headlight, unscrew 2 bolts, pull out the headlight, disconnect the terminal and then you can crawl up to the PTF lamp, here you will have to sweat, it’s hard to crawl there with your hand, but it’s possible to remove the lamp terminal with one movement towards the engine and towards you, the wire on the left is short, so Carefully, at the bottom, you insert the lamp into the terminal, without touching the base with your hands, I do it with gloves, and you insert everything into place in the reverse order, the main thing is to get into the grooves like antennae, there is no other way to insert it there. It’s easier with the right side, the wire is long there, so I’d advise you to start with the right PTF, just look at the fastening there so that you can then do it correctly on the left side!
Installing a set of standard fog lights
Today I bought a kit for installing PTF, I will install it this weekend. I have a “trend”, then I’ll write about how it all went and post a photo.
remove the headlight by unscrewing two bolts
Where the left fog is, there is a bundle with a plug, we take it out.
we pull back the grille or you can remove it, there are holes there and we snap in the caps that come with the wiring.
To install the fog lights you need to remove the protection, because You can't get them through the engine compartment. put.
Then the craftsmen flash it, and we put everything back together.
Lamps for front fog lights H11
Do they come with wires?
more than 10 thousand for the set?
What needs to be changed so as not to change the light switching unit itself?
Igor537kr
If you are talking about this Adding the “Scandinavian light” function to ff3, then in my opinion you are mistaken. If you look at the picture in this topic and in that one, then an extra button appears on the left.
And the instrument brightness buzzer is added. (right)
some kind of nonsense. In theory, the bracket should be included with the headlight. I can imagine the price they quoted for installation, probably around 8-10 thousand. IMHO, don’t rush to install it from the officials. Now the first independent installations will begin and all the information will be on the forum.
for comparison, on FF1 only the kit for installing PTF costs 6 thousand. I bought non-original headlights (on FF1) for 700 rubles. the main brackets were included in the kit.. you also had to order the plastic pins separately; they were inexpensive. and all the information was on the forum.
I’m sure that from PTF to FF3 everything will be about the same
How to change a light bulb
Now it's time to get to work. To do this we will need a powerful flat head screwdriver or a Torx 30 wrench and clean gloves. We'll start the replacement by removing the Ford Focus headlights. It is secured with two screws with a universal slot. We unscrew them, freeing the headlight unit.
Now we shake the lantern and remove it from its regular place.
You can go directly to the question of how to replace light bulbs.
Low beam
On the back of the flashlight we see two round hatches covered with rubber anthers. We need the one that is closer to the side of the car. I marked it with an arrow.
We take the petal and remove the anther.
In the hatch we see a two-pin block placed on the low beam light bulb. We remove it by pulling it out and rocking it, after pressing the flat tongue of the latch (press upward, in the direction of the arrow).
Before us is a light bulb that can simply be pulled out of the socket (it was pressed with a block).
We put on gloves and install a new device in place of the burnt one. If you don’t have gloves, then hold the car lamp only by the base, without touching the glass bulb. We reinstall the power supply, making sure that its latch snaps into place, securely fixing the light bulb. All that remains is to put the rubber boot on the hatch and install the headlight in place, securing it with two screws.
Lower headlight mount for Ford Focus 3
High beam
Let's assume that the headlight has already been dismantled (see above), and we see two hatches covered with anthers. The high beam lamp is located in the one closest to the central axis of the car. I marked it with an arrow.
Remove the anther by pulling it by the petal.
Removing the boot from the Ford Focus 3 headlight
Before us is a block that is structurally similar to the one on the low beam lamp. Press the latch and remove it.
We see the high beam auto lamp, which can be freely pulled out of the socket (it was pressed against the power supply). We take out the burnt one and install a new one in its place, after putting on clean cotton gloves. We place the power supply on the base of the device, making sure that the latch snaps into place. We close the hatch with the boot and install the headlight in place, securing it with two screws.
Dimensions
In order to replace the side light bulbs in a Ford Focus 3, you need to remove the headlight (see above). Now we find a small oval-shaped hatch, closed with a rubber boot. It is located at the top of the lamp on the right for the right headlight and on the left for the left. We remove the boot.
We put two fingers into the hatch and feel for the size socket. Now we are trying to get creative and turn the cartridge counterclockwise 45 degrees so that the latches snap off. It is not easy to perform such an operation in an oval microscopic hatch; you need to be able to do it. But if it works, then the socket along with the light bulb can be removed.
We remove the burnt out device (just pull it out), and insert a new one in its place. Since the light source is non-halogen, you don’t need to use gloves - relatively clean hands are enough.
We insert the cartridge into its place and again demonstrate sleight of hand - we turn it 45 degrees, but clockwise. We put the boot on the hatch and install the headlight in place, making sure that the lower clamp on the headlight fits into the groove on the Ford Focus body (see above).
Xenon head light
As I indicated above, the Ford Focus 3 can be equipped with a lensed flashlight that uses a xenon lamp, which is responsible for both high and low beam at the same time. All that remains is to change it too.
The headlight unit of this modification has three round hatches of approximately the same size. All of them are covered with rubber anthers. The xenon high/low beam lamp is located closer to the central axis of the Ford Focus 3.
We remove the boot from it by pulling the rubber tab.
We look into the hatch and see the ignition unit mounted on the xenon base.
We remove it from the lamp base, release the lamp itself by snapping the spring clip, remove it from the socket and, putting on cotton gloves, replace it with a new one. We fix the device with a spring bracket and put the ignition block on its base. All that remains is to put the boot back in place and put the flashlight in place.
That, perhaps, is all about replacing light bulbs in the headlight unit of a Ford Focus 3. As you can see, it is not at all necessary to go to a service station, wasting time and money because of such nonsense. After all, everything can be done with your own hands.
Previous Replacing car lamps How to change the low and high beam bulbs on a Lada Priora Next Replacing car lamps What low beam lamps are needed on a Ford Focus 2 and how to change them
LED lamp for marker and brake light
In this review I will talk about LED lamps in the 1157 base, designed for side lights and brake lights.
The lamp contains 16 SMD LEDs of size 3030. Four of them are located at the end of the lamp, under a plastic lens. The remaining 12 are divided into groups of three each and located on the four sides of the lamp. The LEDs located around the perimeter of the lamp are protected from external influences by a transparent plastic insert. The plastic insert is fixed between two rings with notches. The upper ring, which also holds the lens, is screwed onto the lamp body, and the joint is coated with sealant. There are 4 reflectors installed on the side LEDs.
The question immediately arises with the heat sink. There are a lot of LEDs, heat needs to be removed, but the plastic bulb clearly prevents this. In any case, we will further analyze this issue in more detail, but for now we will consider the main parameters of the lamps.
Lamp color temperature: 6500K. Maximum luminous flux: 680Lm. Lamp size: 55.5 x 18mm. Weight: 16g.
The declared power consumption is 80W, that's what they said here. For myself, I concluded that when choosing LED lamps in sockets 1156, 1157, you can ignore this power value. It is always indicated somewhat larger than in reality, in this case, something was too overdone. Of course, I measured the power consumption over the entire voltage range and will tell you about it.
The operating voltage range is indicated as follows: 12-24V. It is very unclear whether it is meant that the lamp is designed for this voltage range, or whether it is meant that the lamp is intended to operate in 12 and 24 V on-board networks. This means that the maximum voltage will exceed 24V. In order not to leave this question unanswered, I tested the llama in the voltage range from 9 to 30V. The lamp does not shine up to 9V, so I did not include values below this level in the graph.
For greater clarity, I built a graph of the dependence of power consumption on voltage using tabular data.
This is not good when the power consumption in the parking light mode is approximately equal to the power consumption in the stop light mode. We see that at 14V the power consumption is almost 5W, which is a bit much for lamps of this type. Let's see how things are going with the heating of the lamp.
For this experiment, I placed the lamp in a small box as usual, where it remained throughout the test. The lamp was heated at a supply voltage of 14V. From the following graph and heat logs we see that the maximum LED temperature in parking light mode was 83.3 °C, and in stop light mode 104.5 °C.
The two thermal images on the left are the parking light and brake light mode, without protective glass, on the right with protective glass. In both cases, heating was carried out in protective glass, but in the pictures on the left I removed it.
For greater clarity, I will give a heating curve. We see that the lamp reaches a steady state of operation in about 15 minutes.
Thermograms with temperature scale
Side light mode: Stop light mode:
We see that the maximum operating temperature is at the limit (I’m talking about the size mode). When driving around the city, the temperature value will obviously be higher due to frequent pressing of the brake pedal.
Let's look at these lamps in action. First, I will compare this LED lamp with a standard 20W halogen lamp in low-light conditions.
And in order to numerically estimate how many times brighter an LED lamp is than a standard halogen lamp, I will use a lux meter. By placing the sensor 10cm from the lamp, I will measure the illumination created by the lamps and then compare the resulting value.
It turned out that this lamp is 4.7 times brighter than a standard halogen lamp in parking light mode, and 2.5 times in brake light mode.
Typically, such lamps can be very easily modified by removing the driver and replacing the resistor. This will allow you to achieve the desired brightness value and reduce heat generation. This is what I usually recommend doing, but in this case the driver is located in such a way that it is difficult to get it out of the base. And the presence of sealant makes this problem very difficult to solve. And when buying lamps at this price, you don’t really want to modify anything. I want to set it and forget it.
Let's also see how these lamps shine in daylight.
You can also watch the video version of this review:
That's all I have. I hope the review was useful to you.
The product was provided for writing a review by the store. The review was published in accordance with clause 18 of the Site Rules.
Instructions for replacing lamps in PTF Focus 3
Replacement can be done in two ways - the first method involves removing the lower protective apron and part of the protection. The second method is simpler - through the top and removing the headlight. The second method is simpler, since the headlight on Focus 3 can be removed quite easily.
If you change the lamp/bulbs through the bottom, you will need a T30 Torx wrench and a flat-head screwdriver.
The first method of replacing lamps in the PTF
We drive the car onto a viewing hole or overpass. Using a T30 Torx sprocket wrench, unscrew the fastenings of the lower mudguard and bend it.
Carefully climb into the formed groove with your hand and turn the lamp half a turn. Disconnect the plug from the lamp and replace it with a new one.
I’ll say right away that it will be problematic for an inexperienced person to get to the fog lamp.
The second method of replacing a lamp in the PTF
Using an asterisk or a flat-head screwdriver, unscrew the headlight mounting bolts, remove it from the grooves and disconnect the wire block.
Then you need to crawl up to the fog light with your hand and turn the burnt out lamp half a turn. Pull it to the top and carefully disconnect the plug.
Next, take a new lamp, snap the plug onto the lamp and install it back into the PTF.
If you install LED lamps, pay attention to the stabilizer units, if any. It is better to insulate them so that water does not get into them, and at the same time the contacts from the block to the lamp
Share “How to replace a PTF lamp on a Ford Focus 3”
Which lamps to choose for replacement
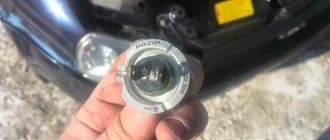
As a rule, Osram lamps are installed in the PTF from the factory. The cost of the original H11 12v/55 Osram lamp is about 500 rubles and more. This lamp has an extended service life and lasts 2-3 years. Depending on your preferences, you can install either an identical lamp or other types in the PTF:
- Long Life Lamps
- Lamps with increased brightness +100 +150% light
- Lamps with xenon effect 5000k
- LED lamps or xenon
Decide what kind of lamps you need to shine brightly, but such lamps have a shorter lifespan. So that they last a long time, but they shine worse. 5000k lamps shine with bright white light, it looks beautiful, but such lamps are not visible on wet asphalt.
LED lamps that illuminate the road well appeared relatively recently, but have already proven themselves. When you buy high-quality LED lamps, they illuminate the road better.
Lamps with increased brightness
- DiaLUCH H11-12-55 +90% PGJ19-2 Megalight Ultra PR from 850 rub.
- KOITO H11-12-55 W (100 W) Other Brand price per set from 2000 rub.
- OSRAM H11-12-55 +110% NIGHT BREAKER UNLIMITED from 1700 RUR set.
Standard lamps
- KOITO H11-12-55 0110K from 450 rub.
- GE H11-12-55 53110 from 490 rub.
- MTF H11-12-55 +30% Standard Long Life HS1211 from 300 rub.
- OSRAM H11-12-55 64211 from 470 rub.
- PHILIPS H11-12-55 +30% Vision 12362PRC1 from 450 rub.
- VALEO H11-12-55 Standart 032525 from 450 rub.
Long life lamps
- NARVA H11-12-55 LONG LIFE 48078LL from 490 rub.
- PHILIPS H11-12-55 LLECO VISION 12362LLECOC1 from 550 rub.
- OSRAM H11-12-55 +60% SILVERSTAR 2.0 (2x resource) from 1300 rub.
Change one lamp or a pair at once
Questions are often asked about whether both lamps should be replaced or just one. If factory lamps are still installed, or you previously replaced a pair of lamps at the same time, they usually have the same service life. If one lamp burns out, the second one may burn out at intervals of a week to a month.
When purchasing lamps with increased brightness, they are swapped in pairs, I think this is clear to everyone.
Disassembly and replacement of headlights
Disassembly and repair of a car headlight is required if it is necessary to clean the internal surface, replace the glass or reflector, as well as if you intend to alter the optics, for example, to install lensed elements.
Removing the headlight correctly
How to remove a Ford Focus 2 headlight was stated above. Fastening is carried out with one bolt to the cross member of the engine compartment and two plastic latches. In this it is no different from the headlights of the pre-restyling model.
No assistants are needed to dismantle the optics; all work is easy to do alone.
We disassemble the headlight
Before disassembling a dismantled headlight, you need to find an assistant in advance, since this is very difficult to do without outside help. You can damage the case or glass; this procedure will take a lot of time.
To disassemble the headlight, you will need the following tools:
- installation hair dryer with temperature control;
- scalpel or sharp knife;
- flat screwdrivers with a thin blade.
The glass is attached to the body in a U-shaped groove. The groove is completely filled with sealant. To soften the adhesive element, you need to set the temperature on a hairdryer to 250-350 degrees. An assistant should hold the heater over the joint at a distance of several centimeters. After heating the seam, use a scalpel to trim the sealant, while simultaneously moving the hair dryer to the next area. After trimming, continuing to heat, insert a screwdriver into the gap between the glass and the body and carefully push them apart.
Gluing is done using high-temperature sealant. The curing time is indicated by the material manufacturer. All this time, the glass and body must be secured against shifting.
Ford Focus headlight wiring
If the power connector or lamp sockets are damaged (broken wires, melting), they must be replaced. The blocks are available for sale either empty, without terminals, or with built-in terminals and wire sections. The procedure for installing new items varies.
In the first case, the wires from the old block are cut off. Then the terminals are attached with a special crimp and secured in the connector. In order not to get confused in the position and order of the wires, it is better to rewire one at a time, installing it from the old connector to the new one in a similar place.
To install a new block with wires instead of the old one, you need to clear the ends of the insulation and connect them by twisting. It is advisable to solder it to increase reliability. The junction is insulated with tape. It is more practical, instead of electrical tape, to use pieces of heat-shrinkable tubing, which is placed on the wires before connecting them. After heating with a hot air jet using a hair dryer, the joint will be reliably insulated.
Fuses and relays
In the Ford Focus 2, the relay and fuse box is located in the passenger compartment under the glove compartment (glove box). To remove it, you need to turn one or two retaining clips.
Replacement process, repair features
The process of replacing fog lights, although it seems at first glance to be a simple procedure, however, requires certain knowledge of both the electrical wiring of a particular car and the features of the optics. It should be taken into account that during the work the tightness of the headlight may be broken, the rated power of the lighting device may be incorrectly selected, and if the galvanic coating of the reflector is damaged, then it is no longer possible to do without a complete replacement of the headlight. The problem with PTF can be solved correctly and efficiently only by contacting a car service workshop.
The replacement and repair process consists of the following steps:
- Dismantling the elements that secure the electrical connectors, as well as the correct removal of the radiator grille and all other fasteners;
- Dismantling of rotating mechanisms and bypass frames with removal of contacts from electrical connectors;
- Removing the headlight housing and cleaning its internal surface from dust and accumulated dirt;
- Installation of new lamps and, if necessary, sealing elements;
- Installing a new headlight and reassembling the structural elements in the reverse order.
In most cases, repair and replacement of PTF on a Ford Focus 3 car should be carried out taking into account the manufacturer’s recommendations. It is in this case that their effective and long-lasting operation is guaranteed. Experienced car service electricians will help you select the necessary elements and ensure their proper installation. In this case, the choice is made taking into account the following factors:
- The strength of the headlight material and its resistance to temperature changes;
- Type and power of installed optics;
- Manufacturer;
- Compliance with a specific car model.
Important! Replacing Ford Focus 3 fog lamps requires preliminary dismantling of other elements, so it is better to entrust such work to experienced professionals.
What kind of light bulbs are on Ford Focus 3?
Before you change any light bulbs, you need to buy new ones. However, for this you need to know two main criteria: their model and power. Deviations in power can lead to problems in the vehicle's electrical network. You will find all the necessary information on light bulbs in the Ford Focus 3 in the following table:
| Lighting location | Light bulb model | Power, W |
| High beam | H1 | 60 |
| Low beam | H7 | 55 |
| Front dimensions | W7W | 5 |
| Front turn signals | РY21W | 21 |
| Fog lights | H11 | 55 |
| Side turn signals | WY5W | 5 |
| Rear turn signals | РY21W | 21 |
| Stop lights | P21W | 21 |
| Rear fog lights | P21/5W | 21/5 |
| Reverse light | W16W | 16 |
| License plate light | W5W | 5 |
Also note that the car uses halogen headlights with H7 and H1 sockets for low and high beam, respectively. If you plan to install lighting with a bi-xenon lens, then drivers will need to already buy products marked D3S (low/high beam)
With this table, you can easily buy all the lighting you need and not worry about bulb compatibility. The price of products varies from several hundred to a thousand rubles. Before purchasing, be sure to inspect the product packaging. All inscriptions must be clearly visible. Poor quality packaging may indicate that you have come across a counterfeit product. Also inspect the light bulb itself for defects and damage.
Original products are guaranteed to be compatible with your car, but their cost is often prohibitive for drivers. There is a temptation to buy cheaper analogues made in China or Korea. However, be prepared to encounter some problems:
- distortion of the light flux;
- blinding oncoming drivers;
- rapid dimming of headlights;
- short period of work.
In the end, of course, you will have to overpay due to frequent replacement of cheap and low-quality light bulbs.
Description of optics
The Ford Focus 3 low beam lamp is installed in a separate module. Depending on the version and type of equipment, a halogen or xenon part is responsible for the low beam lighting.
In basic versions, the car is equipped with halogen lamps. From the factory in Focus there are elements from the manufacturer Osram. Before purchasing an original part with the Ford inscription, you should look for a light element from an official supplier: its cost is significantly lower.
The following types of bulbs are used in Focus headlights:
- dimensions – W5W, 55 W;
- long range – H1, 60 W;
- low – H7, 55 W;
- turn signals – PY21W, 21 W.
In rich configurations with a bi-xenon lens, there are gas-discharge sources with the designation D3S for the high and low beams of light.
When purchasing, you should take into account the base, manufacturer and power of the part. When installing a more powerful lamp, the reflector may overheat and melt.
Prerequisites for replacing the rear light bulb Ford Focus 3
A malfunction of the wiring lamp manifests itself in two cases: it stops lighting or the on-board computer signals a breakdown. In the second case, the lighting fixture may continue to function, albeit incorrectly. The first situation represents the maximum danger, while the second is a warning, but also indicates improper operation of the lighting device or car electrics.
- long service life of the car;
- voltage drops due to general wear and tear of the wiring or battery;
- oxidation of contacts;
- physical damage.
Lamps may not work for other reasons: wiring interruptions, interruptions in the switching mechanism, or oxidized connections. In this case, the signals also do not work. But replacing lamps will not give the desired effect.
Another type of malfunction associated with the stop lamp is the on-board computer indicating a malfunction. When the lamps are working, this indicates an incorrect voltage or problems with the electronics of the machine. In the first case, replacing lamps, carried out in combination with cleaning the contacts, leads to a positive result.
Diagnostics and repair results
To check the performance of fog lights, modern car repair shops have specialized equipment that allows you to determine the cause of the malfunction as accurately as possible. Devices for scanning car electronics (testers) allow you to accurately find the location of damage based on the received code. In this case, depending on the data, it is necessary to check the following elements:
- Lamp;
- Fuse;
- PTF electrical circuit;
- Switch;
- PTF alignment adjustment;
- Instrument panel module.
Experienced professionals, when a breakdown is detected after diagnosis, depending on the location of the damage, will take appropriate measures to eliminate it. And if necessary, they will completely replace the anti-fog elements, in compliance with all the necessary instructions from the manufacturer.
Proper operation of the optics is the key to the safety and reliability of the vehicle, its effective operation in all weather conditions, with limited visibility and on winding roads. Therefore, you should pay special attention to the serviceability of your car’s fog lights!
Recommendations for replacing lamps on a Ford Focus 3 car
In the process of replacing any lamp, even the size, you need to follow simple rules and instructions:
Replacing the low beam bulb on Focus 3 will not be difficult for you
Bulb replacement must be carried out simultaneously on both headlights, regardless of how many bulbs have burned out; This will level out the difference in illumination on different sides of the car. Management becomes better and safer; When working with halogen lamps, do not touch the housing with unprotected hands. Otherwise, a fatty discharge will appear and be imprinted on the glass. Due to the special properties of fat, the light bulb will burn out immediately after switching on; During the dismantling process, maximum care should be taken; you can photograph each stage
It is necessary to pay attention to the axis of fixation of the light bulb in the reflector, the direction of location of the socket latches, the presence of a gap between the lamp and the body, etc.; dismantling, as well as installation, should not be carried out using great force
Everything in the car is arranged in such a way that the fasteners are quite fragile (plastic), they are easy to deform, disrupt the integrity of the threads or destroy them; Before installing the headlight assembly after the replacement process, you must first insert the bottom into special grooves that are located on the side of the car's fender. With a slight movement, the block will easily fit into the grooves from the outside. Only after inserting into the clamps do you need to tighten the screws; After completing the work of changing the lamps, you can connect the battery and check if everything worked out. If the connections are made correctly, but the light still does not come in, the reason may lie in computer failures. You'll have to reset the error.
Replacement process, repair features
The process of replacing fog lights, although it seems at first glance to be a simple procedure, however, requires certain knowledge of both the electrical wiring of a particular car and the features of the optics. It should be taken into account that during the work the tightness of the headlight may be broken, the rated power of the lighting device may be incorrectly selected, and if the galvanic coating of the reflector is damaged, then it is no longer possible to do without a complete replacement of the headlight. The problem with PTF can be solved correctly and efficiently only by contacting a car service workshop.
The replacement and repair process consists of the following steps:
- Dismantling the elements that secure the electrical connectors, as well as the correct removal of the radiator grille and all other fasteners;
- Dismantling of rotating mechanisms and bypass frames with removal of contacts from electrical connectors;
- Removing the headlight housing and cleaning its internal surface from dust and accumulated dirt;
- Installation of new lamps and, if necessary, sealing elements;
- Installing a new headlight and reassembling the structural elements in the reverse order.
In most cases, repair and replacement of PTF on a Ford Focus 3 car should be carried out taking into account the manufacturer’s recommendations. It is in this case that their effective and long-lasting operation is guaranteed. Experienced car service electricians will help you select the necessary elements and ensure their proper installation. In this case, the choice is made taking into account the following factors:
- The strength of the headlight material and its resistance to temperature changes;
- Type and power of installed optics;
- Manufacturer;
- Compliance with a specific car model.
Important! Replacing Ford Focus 3 fog lamps requires preliminary dismantling of other elements, so it is better to entrust such work to experienced professionals.
Focus 3 station wagon: lamp replacement and related work
- Condition of contacts on chips and cartridges. If there are traces of oxides, cleaning is carried out. If the contacts are damaged, the chip or cartridge is replaced.
- Presence of condensation in the internal cavity of the lamp. Often this malfunction is associated with a leak in the connection between the socket and the headlight housing. Here the condition of the sealing collar is inspected. If it is damaged, it will be replaced. The canopy glass may also be damaged. Here, the possibility of repair work depends on the nature of the damage. Often such a malfunction is fatal, and the entire headlight assembly is replaced.
- General condition of optics and reflectors. Sometimes deep cleaning and polishing of minor defects is required.
Our car service professionally services Ford Focus 3 cars. We will replace the rear light bulbs in the shortest possible time with a guarantee of the quality of the work performed.
Replacing the rear lamps of a Ford Focus 3 involves removing and installing the rear light, but this is very easy to do with your own hands. In addition, replacing the brake light bulb and preliminary removal of the flashlight is presented in another photo report, which is also on the site. This photo instruction will show you how to change the turn signal and reverse lamps.
Recommendations for carrying out work
We will look at how to replace and how to adjust the position of the lighting elements. All these activities are within the capabilities of any motorist, but they require care and strict adherence to all recommendations.
Replacing lamps
Replacing a low beam lamp on a Ford Focus 3 takes a little time, but we advise you to set aside at least an hour for this work so that the work can be done slowly. If you have everything you need, then you can start working, but first you need to make sure that it is the lamp that is not working. To do this, you still need to check a special module - GEM, located on the passenger side in the fuse box; this is done during diagnostics.
It should be noted right away that there is no low beam fuse on the Ford Focus 3; the operation of this system is controlled by the module described above. The design only has a high beam fuse.
If everything is in order with this element, then you need to replace the low beam lamp on Focus 3; you can do the process yourself, even if you have no experience at all in this area, and simple instructions will help you:
- First of all, the hood is opened and fixed, after which the terminal is removed from the battery. This is necessary in order to eliminate problems when working with the electrical part of the car, so do not forget about it.
- Each of the headlights is held on by two screws located in the upper part of the housing; they are turned off with an asterisk or hexagon, which is described above. To make it easier for you to find fixation points, we have marked them in the photo.
Next, you need to release the latches located in the lower part of the body, there are two of them, and the easiest way is to press them out using a flat-head screwdriver with a long blade - press down so that the ledge disengages and pull the headlight outward. If you don’t have a screwdriver, you can carefully pull the case towards you; the latches are very strong and should not break.
- When the unit has left the seat, you can either continue working near the car or disconnect another connector and take out the headlight in order to place it on the table, that is, replacing the low beam bulb on a Ford Focus 3 can be done in the most comfortable conditions, which eliminates damage caused by restricted access.
- Next, you need to remove the rubber plug opposite the low beam diffuser, under it you will see a socket with attached wires. To remove the assembly from the body, just press the clamp, which is clearly visible in the photo, and the element will come out very easily.
Disconnect the lamp from the socket and insert a new one in its place. The base of the low beam lamp on the Ford Focus 3 is made in such a way that it is impossible to insert it into place incorrectly.
Adjustment
Sometimes it is necessary to adjust the low beam on a Ford Focus 3, for this you need the following:
- First of all, you need to carry out preparatory measures: check the tire pressure, fill the tank and place a 75 kg weight on the driver’s seat.
- Next, the machine is placed on a flat surface in front of the wall at a distance of 3 meters from it.
- Vertical lines are drawn on the surface, coinciding with the center of the headlights, and a horizontal line along the height of the lamps; another line is drawn 35 mm below it.
- One of the headlights is closed, after which the corrector is set to the zero position and an adjustment is made using a 7 mm hexagon, the screws are located in the corner of the headlights, the element is marked in the photo with arrows. The same process is repeated with the second headlight (headlights on KIA are adjusted in the same way).
Other possible causes of the malfunction
Failure of light bulbs is the most common, but, of course, not the only malfunction of fog lights. If after replacing the lamp the headlight still does not light up, then before contacting a car service center, you should try to solve the problem yourself.
Most often, when halogen lamps burn out due to an inrush current, the fuse located in the mounting block burns out. The unit itself can be found in the cabin behind the glove box to the right of the driver, at the passenger's feet. We remove the decorative cover by turning the two latches and check the serviceability of fuse 75 (the numbering and location of the fuses are indicated on the inside of the cover). If it burns out, replace it with a serviceable rating of 15 A.
Fuse box location and diagram
So we learned how to change the bulbs in the fog lights of a Ford Focus 3. Now choosing a suitable bulb and installing it yourself in place of the burnt one will not be any problems.
Previous
Fog lightsHow to change the bulb in the fog light of a Chevrolet Cruze
Next
Fog lights How to change the bulbs in the fog lights of a Ford Focus 2 before and after restyling?
Problems when paying with bank cards
Sometimes difficulties may arise when paying with Visa/MasterCard bank cards. The most common of them:
- There is a restriction on the card for paying for online purchases
- A plastic card is not intended for making payments online.
- The plastic card is not activated for making payments online.
- There are not enough funds on the plastic card.
In order to solve these problems, you need to call or write to the technical support of the bank where you are served. Bank specialists will help you resolve them and make payments.
That's basically it. The entire process of paying for a book in PDF format on car repair on our website takes 1-2 minutes.
If you still have any questions, you can ask them using the feedback form, or write us an email at
conclusions
If this is the first time you are replacing the light source in the headlight of your Ford Focus 3, be very careful and handle the components with care. Focus has pre-installed plastic fasteners, and careless handling can completely deform them. For this reason, use little effort when dismantling and installing a new light source.
Ford Focus 3
There are often situations when replacing the optics does not help, and the light in the headlight continues to not light up. If you have checked all connections and are confident that the installation is correct, try connecting to your computer. There you will be able to find and reset the corresponding error and thus make the light source on your Ford turn on.
Changing a light source is an easy procedure even for a car enthusiast without experience in repairing faulty components.
And, of course, regardless of the reason for the failure of the lighting source, purchase only high-quality products. It will ensure your safety and will not blind drivers in the oncoming lane.
Work order
- The car is lifted on a lift
- Unscrew the fog lamp mounts from the rear of the bumper, remove the electrical connectors
- Depending on the model, the fog light frame is additionally removed
- A new fog light is being installed
- The machine is assembled in reverse order
The work to replace the Ford Focus fog light is covered by a warranty. Fog lights of original and non-original production are available. Impeccable quality of work, competitive prices and prompt replacement.
To make an appointment at our Moscow service station, simply dial the numbers listed on this page.