Decoding the functions of the Lada Largus FL on-board computer
Lada Largus FL (facelift from 2022) received a number of exterior and interior updates. For example, the car received a new instrument cluster with an on-board computer (OB) function. The capabilities of the BC are presented in the Lada Largus FL operating manual.
When you briefly press the “Up” or “Down” buttons on the right steering column switch, the following information is displayed sequentially on the on-board computer display:
A – “Total mileage counter”; B – “Trip mileage counter No. 1” (from the moment the readings are reset); C – “Total fuel consumption” (from the moment of group zeroing of readings); D – “Average fuel consumption” (from the moment of group zeroing of readings); E – “Current (instantaneous) fuel consumption”; F – “Calculated (approximate) range on remaining fuel”; G – “Trip mileage counter No. 2” (from the moment of group zeroing of the readings); H – “Average speed” (from the moment of group zeroing of readings); I – “Setting tire pressure” (in a variant); J – “Set value of the speed limiter or cruise control when the speed limiter or cruise control function is turned on” (in a variant); K – “Indication of outside air temperature”; L – “Indication of the current time” (optional).
Examples of data displayed on the on-board computer display:
* In conditions of insufficient airflow to the ambient temperature sensor (in a parking lot, when driving in a traffic jam, etc.), the readings may not correspond to the actual temperature. When the ambient temperature readings are from –3 to +3 °C, the “°C” symbol starts flashing, warning the driver about the possibility of ice. Recommendations for driving in icy conditions.
Fuel filter Lada Largus 16 valves article number
Since the Lada Largus fuel filter is designed for its entire service life, the manufacturer does not imply its replacement. Accordingly, there are no original fuel purification filters for Largus on sale.
Even if you go to the catalog, you will not find a fuel filter separately on the diagram. Only the electric fuel pump module assembly. It can be ordered using article number: 172024388R.
This module costs from 6.5 to 10 thousand rubles approximately. However, not everyone is willing to spend so much money on fuel system maintenance. Therefore, many manufacturers have launched the production of separate fuel filters for Lada Largus. Further in the table you will find the article numbers of fuel filters for 16 cl and 8 valve Lada Largus engines.
| Brand | Name | vendor code | Price |
| LynxAUTO | Submersible fuel filter | LF-249M | 1200rub |
| MASUMA | Fuel filter | MFFN225 | 1100r |
| Sat | Fuel filter | ST-172024388R-SF | 1300rub |
These filters can be found in almost any region, since the brands are well-known and known everywhere.
As for the mesh (coarse filter), it can be ordered by article number:
MPU025N MASUMA fuel filter (mesh) HS110138 PATRON fuel pump mesh
I found only 2 options, but I'm sure there are others. Anyone who has installed any proven grids, please write in the comments. I'll add options to the article.
If you plan to replace the pumping station assembly, then you can buy analogues of the entire fuel module. Here are some of them:
| Brand | Name | vendor code | Price |
| Ween | Fuel pump module | 192-0001 | 4500rub |
| Startvolt | Fuel pump module | SFM 0901 | 2900rub |
| Achr | Electric fuel pump assembly | EFM1160301 | 2900rub |
| Dynamatrix | Fuel pump | DFM1160301 | 3200rub |
| Amd | Electric fuel pump | AMD.FP167 | 3550rub |
| Henko | Fuel pump assembly | MV-PFA18 | 3500rub |
| Krauf | Module assembled with fuel pump | KR0820M | 3560rub |
| Miles | Fuel pump assembly renault logan i 1.4/1.6 04- / sandero i/ 3 bar ap44002 | AP44002 | 3570rub |
| Stellox | Fuel pump | 10-02035-SX | 3540r |
| Sat | Fuel pump assembly nissan almera g15ra/renault logan2/sandero2 13-/duster 13 | ST-17042-00Q0G | 3640rub |
Resetting trip mileage counters and other parameters to zero
To reset the trip mileage counter No. 1, use the “Up” and “Down” buttons on the right steering column lever to select mode B “Trip mileage counter No. 1” in the on-board computer menu and press any of the “Up” or “Down” scrolling buttons ", hold it for a while. The selected value will first flash and then reset to zero.
Resetting the trip mileage counter No. 2 is possible only together with resetting a group of other on-board computer readings: – C “Total fuel consumption”; – D “Average fuel consumption”; – G “Trip mileage counter No. 2”; – H “Average speed”.
That is, when one of these readings is reset, the entire group is reset to zero. To reset a group of these readings, use the “Up” and “Down” buttons on the right steering column lever to select any of the modes C, D, G, H in the on-board computer menu and, by pressing any of the “Up” or “Down” scrolling buttons, hold it for a while. The selected value will first begin to flash, and then all four readings in the group will be reset to zero.
In addition, if the maximum value of the trip counters is exceeded, the parameters are reset automatically.
eco mode
Stop panicking!
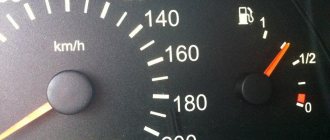
As you can see, in order to find the answer to the question of how long and how far you can drive “with a light bulb,” I studied the operating instructions for the most popular cars in Russia. The data was compiled into a table. Conclusion: the minimum fuel supply that car manufacturers provide us is 5 liters, in most cases it is about 7 liters. This should be enough for at least 90 kilometers when driving on a country road in a B-class car. So there is no need to panic when you see a low fuel light or a written warning that the tank is almost empty - unless, of course, you are in the tundra or desert. You'll make it to the gas station.
To find out where the nearest one is, look at the navigator map by turning on POI and filtering by gas station. No navigator - stop to use your smartphone or tablet. A short stop won't hurt. Of course, it is better to find a network gas station with high-quality gasoline, but if there is no guarantee that one is nearby, it is better not to risk it and refuel at the first one - minimally. When you reach a decent level, fill the tank full and dilute fuel of dubious quality. And wait a couple of seconds after turning on the ignition before starting the engine: let the pump fill with normal gasoline.
Explanation of some data after zeroing the readings
The greater the distance traveled since the last zeroing operation, the more stable and reliable the readings of average speed, average fuel consumption and range of fuel remaining in the tank will be.
During the first few kilometers of driving after resetting the calculated values, you may notice that the range of the fuel available in the tank increases while driving. This is due to the fact that the average fuel consumption since the last time the readings were reset is taken into account.
Average fuel consumption may decrease in the following cases: • the vehicle has finished accelerating; • the engine temperature has reached normal (and the calculated values were reset when the engine was cold); • You have left a busy city onto an open country road.
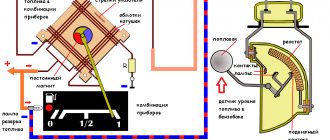
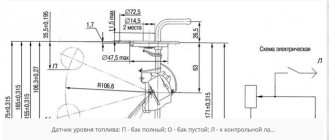
Fuel pressure regulator in the Lada Largus without pump
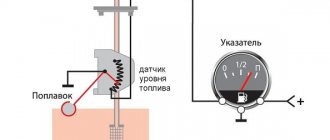
The fuel pressure regulator, structurally combined with the fuel module storage cup, maintains constant fuel pressure in the engine power system in all engine operating modes. The electric fuel pump delivers more than is required to maintain system functionality. Therefore, when the engine is running, part of the fuel is constantly drained into the fuel tank thanks to the pressure regulator.
It is noteworthy that timely replacement of the fuel filter can increase the engine life by up to 30%.
Setting the clock on the BC display
Setting the clock on the BC display (optional).
By briefly pressing any of the “Up” and “Down” buttons on the right steering column lever, go to mode L for displaying the current time on the on-board computer display.
When you press and hold any of the “Up” or “Down” buttons for more than 3 seconds, the clock goes into time correction mode, and the hour digits begin to blink (the minute digits do not blink). A single and short press on the “Up” or “Down” button will change the readings by one hour. By pressing and holding the Up or Down button for a long time, the hour values rapidly change to the desired current reading.
If, after adjusting the clock, you do not press the buttons for 5 seconds, the clock will automatically switch to the minute correction mode, and the minute digits will begin to blink (the hour digits will not blink). A single and short press on the “Up” or “Down” button will change the readings by one minute. When you press and hold the Up or Down button for a long time, the minute values quickly change to the desired current reading.
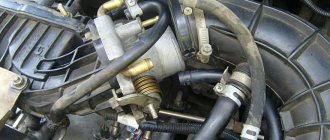
Replacing the fuel filter Lada Largus
First of all, I would like to say that even an amateur auto mechanic can perform such work. To do this, you only need tools, a place where the work will be done and a little free time.
1. Remove the rear seat cushion.
2. Open the inspection hatch cover.
3. Disconnect the wire connector and move the wire harness to the side so that it is not in the way.
4. By pressing the latches, disconnect the fuel pipe and move it to the side. If you have not relieved the pressure from the system, then at this moment fuel may leak from it.
5. Using a mounting tool or a wide screwdriver, unscrew the fixing ring.
6. Take out the glass completely and move it to a place convenient for work, for example, on a workbench. Next we will analyze the glass.
8. To replace the fine fuel filter, disassemble the module, as shown in the photo:
After assembly, do not try to start the engine immediately. Turn the key several times to give the pump time to circulate fuel throughout the system.
Removing the fuel pump module for Lada Largus video
Informing about the need for maintenance
The service interval for your vehicle is 15,000 km or one calendar year, whichever comes first. When the response threshold is reached at 1,500 km or one month (whichever comes first) before the need for service, when the ignition is turned on, the indicator on the on-board computer screen turns on for 3 seconds
. From now on you can find the same icon in the menu.
When the response threshold is reached at 0 km or 0 days (whichever comes first) before the need to carry out service, when the ignition is turned on, the indicator on the on-board computer screen turns on for 3 seconds and the multifunction indicator in the instrument cluster constantly lights up in red
. After the service has been completed and the counters have been reset, these indicators and warning lights will go out.
Source
Lada Largus fuel filter replacement interval
According to the official regulations, the Lada Largus fuel filter has a resource equal to the entire service life of the car. In other words, AvtoVAZ says that the fuel filter does not require replacement and is designed for the entire service life of the car. And this is at least 160 thousand kilometers.
The optimal replacement option is considered to be 30 thousand or 24 months. Believe me, with our quality of fuel this will be the most correct option. It’s both good for the car and easy on the pocket. When replacing the fuel filter, it is not necessary to drain gasoline from the Largus tank.
The fuel filter on the Lada Largus, like on any other car, requires replacement. I don’t understand why AvtoVAZ engineers suddenly decided to make it maintenance-free. What changed? Has the quality of the fuel improved or have some innovative materials been used for filtration? I have been working in various services for over 30 years and have seen a lot in my time. And a common cause of car breakdowns is untimely car maintenance. Do it correctly and on time and you will be happy.
Victor, 56 years old, Vladivostok.
Prerequisites for replacing the fuel filter Lada Largus
If you notice at least one of these signs, then the first thing you should think about is replacing the Lada Largus fuel filter.
Comment from the forum:
I have always considered replacing the fuel filter in gasoline cars to be a very subtle perversion. Paraffin is deposited in diesel engines. And there is nothing to be deposited in gasoline. Mechanical impurities will not create criminal obstruction in the filter.
vishnu, DROM forum user for over 15 years on the forum.
Trip computer multitronics C590
Prehistory
In 2014 I learned what multitronics is. Almost immediately I bought the 731 model and installed it in my Logan. At the beginning of 2015, model 590 was released - the one that replaces the air duct. I hung my 731 from the glass onto the ceiling trim and started dreaming about a new product. So I drove until the last car was sold. During this time, I have accumulated a lot of positive experience from using this device. And I removed 731 and put it on a shelf in the country.
After 3 months, I carried out troubleshooting, during which I found out that the additional cable braid needed to be changed and there were glue smudges on the body that I could not remove. I put everything in its original box and put it away until “better times.”
Six months later, I started looking for the scythe in earnest. Found it for 900 rubles including delivery. Due to natural laziness, I couldn’t get to the savings account for another 3 whole months.
And after 9 months of using only a regular bookmaker, I threw away 731 on Avito “as is” for a modest 2200 rubles. My hard worker left on the same day. The new owner was not at all embarrassed that he would not have Air overboard, physically. ignition, analogue FLS and dimensions/gas input. I referred this to the price tag of 30 percent of the price of new. But he still didn’t fit the bill for me. Putting a 750togo body on a panel is ugly. Vestaplafon does not allow it to be placed on the ceiling.
Purchase
The moment of fulfillment has come. After 4 years, I finally bought 590. I was looking for version “C” - with voice. It was almost impossible to find these in the city, CLs are voiceless everywhere, but I found the one I needed.
Installation
First of all, I studied a lot of records on d2 and realized that the air duct definitely needs to be plugged. I couldn’t find parolon at home, so I went to the nearest chain hypermarket, where I bought a sponge for washing the car. I returned to the box and scattered the radio, beard and air duct. I started to bundle the cable. I pulled the connector out of the glove compartment. I attached a cable to it and hid the whole thing under the carpet at the passenger’s feet.
I laid a cable over the glove compartment
I took care of the air duct - pushed in a sponge, rolled up the mating surface with a piece of vibration insulation
I crimped the cable to size (for some reason it goes to the BC itself, and not to the obd as before).
Inserted all cables
Then I started wiring an additional cable and a temperature sensor. With the wires everything is as usual - 10,11 and 24 pins of the tidy. I inserted the sensor into the engine compartment and then realized that it was not long enough. Fortunately, the sensor is resistive and is not afraid of cable extension. I found 50 cm of 0.2mm2 spiral cable. The wire was spliced, soldered and everything was insulated. I wound electrical tape on top along the entire length.
The sensor was attached to the “gill” of the PTF cover. There it is blown and does not catch the heat from the engine/headlight. Moreover, the BC measures readings only at speeds above 20 km/h
The last step was to click the BC into place and assemble the interior
I made a brief adjustment - I chose the “M86” protocol, the ignition “physical”, the dimensions “physical”, the tank “FLS” “Tareed 7”. I was surprised by the abundance of additional parameters. There are flags for all lamps, and all misfires, all errors, and even the percentage of catalyst aging. I was very pleased with the opportunity to turn on the radiator fan at 1/2 speed at any coolant temperature (according to the firmware, I have 96g - 1st speed, 100g - 2nd speed) and, of course, the ability to forcefully turn on fan speed 2, before turning off the ignition. This will be very useful for cooling the radiator of the air conditioner in the summer, in the heat.
UPD
At the request of Svarog-RUS, I added a video on setting up corrections as in the dashboard. I don’t want to set it up according to the instructions; there you need to fill the tank up to the neck, roll out 25 liters or more, fill it full again and indicate the amount of fuel on the receipt. For Largus this is difficult, because everything depends on the tilt of the car, and you will have to drain about 20 liters
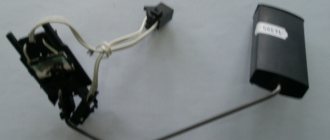
Operations to repair the fuel module (fuel pump) Lada Largus
1. Disconnect the wire from the negative terminal of the battery. 2. Remove the fuel module (see “Removing and installing the Lada Largus fuel pump”).
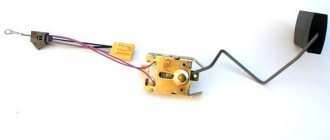
3. Disconnect the fuel level sensor wire block from the cover.
4. Remove the fuel level sensor wires from the holder on the fuel filter housing.
5. Press out the sensor fastening clamp..
6. . slide the sensor housing in the direction of the arrow in the photo.
7. . and remove the sensor
8. Disconnect the pump wire block from the cover.
9. Press out the three plastic holders.
10. . and remove the fuel pump assembly from the storage cup.
11. Remove the fuel pressure regulator O-ring
When assembling the module, replace the fuel pressure regulator O-ring with a new one.
12. Overcoming the force of the clamps, remove the strainer from the fuel inlet
Wash or replace the strainer if it is very dirty.
13. Use a screwdriver to press out the latch.
14. . Move the cover away from the pump and remove the spacer spring.
15. Disconnect the wire ends from the pump.
16. Remove the pump from the filter housing.
17. Disconnect the fuel hose from the pump. Fuel hoses are secured to the fittings of the pump and filter housing using a heat-shrink method.
After removing the hoses from the fittings, it may be necessary to replace the hoses to ensure a good seal.
18. Assemble the fuel module in the reverse order of disassembly. 19. Install the parts in the reverse order of removal.