Car audio is an art and you can’t argue with that. To achieve clear and powerful sound inside the car, owners resort to various tricks.
The acoustic trunk of the VAZ 2114 is one of the ways that will help you get real and strong sound inside the car. You can build an acoustic trunk for a VAZ 2114 yourself, fortunately there is nothing complicated about it. Music, thirty years ago, at least in our country, was a rarity in a car. More precisely, it was there, but the sound evoked, to put it mildly, strange sensations.
Today, car audio is a whole culture, a special sphere where beauty, art and high technology are combined in the most amazing way.
Acoustic trunk in VAZ 2114
On the other hand, all this can become lyrical for a certain number of drivers who are not going to spend crazy money to get real acoustic comfort. Yes, music, let it sound, but not necessarily at the highest level; average quality is enough for us.
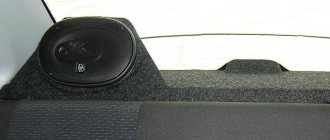
Acoustic shelves and podiums in the trunk
Especially in order to provide the car interior with average-level acoustics, very inexpensive, often homemade, acoustic shelves and podiums were invented. The shelves, in particular, very successfully replace the standard ones, and due to this alone the sound quality characteristics are significantly improved. And even the simplest-looking acoustic shelf can give an average sound to a music lover.
What can acoustic shelves and podiums provide?
So:
- The overall level of sound quality inside the car will improve.
- Extraneous sounds will disappear when playing music, especially clearly audible at high volume levels.
- It will become possible to install dynamic heads of various sizes that simply do not fit into the standard places prepared by the automaker.
Note. The presence of acoustic shelves and podiums will allow you to install large and heavy speakers in your car, the sound power of which is not comparable to small speakers.
- Installing acoustic components will make it possible to correctly mount speakers for a car radio and build entire acoustic scenes.
- The aesthetic component of the car is significantly improved.
An acoustic trunk shelf is not just an effective way to transform a car into a modern vehicle with all the amenities, but also a clear improvement in comfort, noticeable when traveling long distances. Listening to music on the road is pleasant, and listening to good music is doubly pleasant.
Note : The trunk of a VAZ 2114 car can not only be used to install an acoustic shelf, but itself act as an entire acoustic center. The speakers can be embedded into the trunk floor, in the corners and even on top, creating a real ensemble.
Like any acoustic system, the trunk of a car after modernization must meet the following requirements.
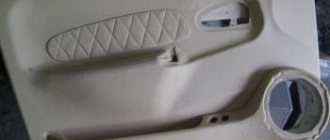
Speakers embedded in the sides of the trunk
- Have sufficient rigidity of the panels, thereby eliminating resonance phenomena that negatively affect the purity and strength of sound. Large speakers have considerable weight and, when playing at full power, must have reliable support underneath them.
Note. The design must be made in such a way that it minimizes almost all resonance phenomena, including rattling and so on. This is achieved by using a panel of sufficient thickness, the presence of stiffeners and the absence of flat areas with a large area.
- A tightness must be created, which will eliminate the occurrence of an acoustic short circuit, reduction in sound quality, etc.
Taking into account these above factors, a competent acoustic environment is created in the trunk of the VAZ 2114. Basically, typical acoustic trunk shelves should be made of wood or chipboard, but samples made of carbon fiber and carbon fiber are also known, which are no less effective. In addition to rigidity, sufficient thickness and good fastening, the acoustic shelf and podiums must be combined with the appearance of the interior. Because of this, they are covered with the same skin as the interior itself. Carpet most often plays the role of cladding. The shelves themselves in the trunk can have different types of designs, but today only two options are common:
- Single shelves in the trunk, which are more often used in sedans and are popular in VAZ cars. It is a simple panel with special holes for speakers.
- A prefabricated acoustic shelf, which already consists of three parts, and most often, this design is applicable in hatchbacks and station wagons, but is also suitable for the VAZ 2114. The main part of such a shelf is the central part, which folds down or is removed when loading luggage. As an addition, there are two fixed shelves on the side, into which the speakers are built.
Store shelves already have special holes for speakers, but an ardent music lover who expects strong sound and pure acoustic effect will not be satisfied with this option. Often shelves are made by hand, using multi-level acoustic podiums.
Choosing the right speakers for your car based on different criteria
The first rule of high-quality sound is the number of speakers in the car. But this does not mean that you need to place three dozen sound sources in the car - everything should be in moderation
It is important to respect the presence of different frequencies. For example, you can use one or two subwoofers, two tweeters and seven or nine midrange elements
The number of sound sources in the car should not exceed reasonable limits. For example, an 11.2 sound system (eleven regular speakers and two subwoofers) is considered the most functional for an ordinary car. Often one subwoofer is enough, and high power is not necessary. You should also comply with the following criteria for purchasing speakers for your car:
- absence of incomprehensible discrepancies in frequencies, a large number of high-frequency devices;
- correctness of the kit - it is better to buy ready-made audio systems than to create them yourself;
- the presence of either two powerful speakers with low frequencies or a subwoofer;
- the ability to connect the entire system to a small car amplifier;
- reasonable power consumption so as not to drain the battery from one track;
- the presence of built-in fuses in each sound source or correct connection.
It often turns out that the speaker buyer is not very knowledgeable about electronics, but undertakes to install the purchased devices himself
In this case, you need to pay special attention to the type of connection. Each speaker or entire sound system must be fused
This will help avoid unpleasant overloads.
Therefore, it is better to immediately take advantage of the offer of ready-made audio systems with fuses in each sound source. Such a purchase will allow you to simply connect new sound sources and get high-quality sound. With the help of ready-made systems, you can change the sound quality in your car within a few minutes.
DIY acoustic trunk
Trunk with acoustic effect
As mentioned above, making an acoustic trunk yourself is not so difficult. It is enough to know the basic information and technology, and then act based on the scenarios of your own imagination. The process begins, of course, with preparing the trunk floor:
- A thick piece of cardboard is taken, from which a pattern is made for the future floor.
- The sketch is transferred to plywood, preferably not too thin, and outlined.
- Then the shape is cut out.
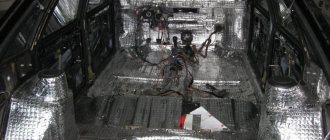
Preparing the floor for the acoustic trunk
- We take the foam rubber and shoot it at the ends of the plywood. This is done so that the plywood does not creak and sits softer.
- We cover the workpiece with carpet and install it in place.
Now the most difficult thing is to make the boxes so that they do not make noise on bumps, and everything looks perfectly beautiful. Of course, all this is done not only from an aesthetic point of view, but also in order to significantly increase acoustic comfort.
- Again, we cut out blanks for the boxes from plywood.
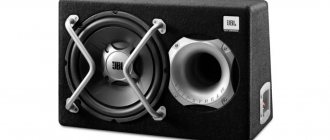
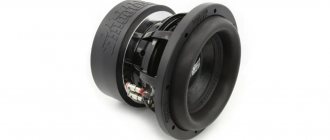
Subwoofer boxes
- The pieces of the workpiece are held together with glue and self-tapping screws.
- The right and left homemade boxes are installed in the trunk and, like the floor itself, are covered with carpet.
- We install high-quality speakers and radio.
- Enjoy great sound.
Connection diagram
After the cables have been laid and labeled (if necessary), you should proceed to connecting the acoustics to the head unit. To connect the speakers to the car radio, make sure that there is no short circuit to the body. To do this, check the wiring using a multimeter.
The next step is to check the impedance of the speakers themselves. The norm is 4 ohms. If there are no discrepancies with these parameters, you can begin connecting the cable. Each receiver should include a circuit diagram, so installation will not take much time.
The easiest way to connect the speakers to the radio in your car is using ISO connectors. If they are not provided in the standard radio, you can purchase a separate ISO adapter. With its help, you can quickly replace devices in the future.
Front
If the wires have multi-colored insulation, connecting them will be easy. The front speakers have light-colored cables:
If there are no markings, you can check the speakers as follows. A finger battery (AA or AAA) is connected to each wire for a short time. The speaker connected to this wire will begin to make a squeaking sound. This will allow you to connect the front speakers correctly.
When the diffuser moves upward, positive polarity can be determined.
Rear
When connecting the speakers to the radio, you need to remember: the rear speaker cables have dark insulation:
- purple (for the right device);
- green (for the left).
If markings are not provided, you can, as in the case of the front pair, check by connecting to a AA battery. Each wire must be correctly connected from the speakers to the head unit into the connector provided for this purpose. After this, the connection of the rear speakers to the radio can be considered complete.
Home speakers
Some car owners are wondering how to install pop or household speakers from a music center. Theoretically, such a connection of speakers is possible, but there are a number of nuances.
- The quality of the sound produced will be lower than with car speakers. This is explained by the fact that household speakers are designed for use in open spaces.
- The voltage on these devices is different from the voltage on car devices, so a conversion will be required.
With an active system on the power supply board, it is necessary to find the points at which voltage is supplied to the amplifier. In these places the device is powered by a battery. As for the connection diagram to the head unit, it can be different:
- directly from the radio;
- through a power amplifier.
Amplifier
Connecting an amplifier will increase the volume and sound quality. A cable from the head unit and a power wire (it comes from the battery) are connected to the amplifier. The next step is connecting the speakers. When using a bridge circuit, one channel is connected to “-”, the other to the load terminal “+”.
How to connect 6 speakers
Experts emphasize the fact that the sound quality in a car largely depends on the power and capabilities of the speakers in the car, and not on their quantity. Meanwhile, many car enthusiasts are wondering whether it is possible to connect 3 or 4 pairs of speakers to the radio.
To solve this problem you will need to purchase an amplifier with 4 outputs.
Portable speaker
Instead of a radio, you can use a portable speaker that connects to a smartphone or any other gadget via Bluetooth. This device is widely used among car owners. The list of its advantages includes a relatively low cost, no need to connect to the car system, and the ability to use it not only in the car, but also in any other place.
The only drawback of a portable speaker is that the sound quality often does not reach the level of specialized speaker systems consisting of an amplifier, speakers and subwoofers.
So, the time has come to replace the speakers in the car. How to do this, and what do you need to know for this? You definitely need to understand the number of speakers you are replacing, their size, the power that the tape recorder or amplifier will provide (when installed), and the desired power rating of the speakers. It would also be good to understand where to connect which ones.
How to connect?
Acoustic shelf in the trunk
Option for an acoustic shelf in the trunk
As mentioned above, a shelf is also installed in the trunk. It may be a folding version, and on the sides there will be fixed shelves with speakers.
Basic moments
So:
- Installation of the shelf is carried out using self-tapping screws and corners.
- The process of installing the shelf is simple, especially on the VAZ 2112.
- The side panels can be left in the form of boxes, or you can remove the trim and make new ones (for example, like this).
Acoustic side shelf
- When installing fixed side shelves, you should ensure their rigidity and reliable fixation to the maximum extent possible.
- There are two ways to install speakers in side shelves: open installation, where the speakers are installed after installing the shelf, and hidden installation, where the speakers are installed in place beforehand.
Note : Regardless of how the speakers are installed, the wires are routed out in advance.
- When installing an acoustic shelf in the trunk, the damping effect should be taken into account. In this case, the trunk and shelves will need to be provided with a good sound-absorbing effect. If initially the walls and floor of the trunk of the VAZ 2114 were lined with thin and low-quality material, then everything can be changed. An expensive fleecy carpet laid on foam rubber or other vibration- and sound-absorbing material will solve this problem.
Noise and vibration insulation for acoustics
On this passage, full of optimism, we end our article. More detailed instructions for making acoustic shelves with your own hands can be downloaded from the Internet.
Correct installation of ovals
How to properly install such speakers? We must remember that they should be installed only in sedans, since in such a car the trunk is separated from the trunk. In hatchbacks, station wagons and other single-volume bodies, it is very difficult to achieve good sound from “ovals”, and it simply does not make sense to do this.
The installation site must be as rigid and durable as possible, without rattling or vibrating. If there were no holes in the shelf, you need to cut them to fit the mounting size of the speakers, if possible, between the metal stiffeners.
The metal of the shelf must be properly glued with vibration and noise insulation. To do this, you can use vibration-damping materials with a thickness of 3 or even 4 mm as the first layer and noise-insulating material as the second layer. Sound insulation must be selected according to thickness so that plastic cladding can be installed on top, if any.
The interior must be completely separated from the trunk, without cracks or gaps. You can also use plywood, which is cut to the size of the shelf and firmly installed on it. The plywood itself, for a more aesthetic appearance, can be covered with carpet, leatherette or painted.
The speakers should be installed by screwing them through plywood to metal. It is better to use bolts and nuts rather than self-tapping screws. If you don’t want to mess with plywood, you can use spacer rings made of the same plywood or MDF. The speakers must be fixed firmly, rigidly and without distortion.
After installation, you need to configure the sound correctly. When oval speakers are the only ones in the system, you can only slightly change the equalizer settings. If you also have front speakers, then it is advisable to shift the balance a little forward, thereby dragging the “scene” there.
It’s even better to make a “cut” on the radio, if it allows it, by forcing the oval speakers to play only low frequencies. In this case, this will allow you to achieve the effect of a subwoofer. If the head unit does not have an LPF, you can simply remove the midrange component and tweeter from the pancake, achieving the same result.
Do-it-yourself acoustic shelf for VAZ 2114
Acoustic shelf for VAZ 2114
An acoustic shelf for a VAZ 2114, made of plywood and covered with carpet, will improve not only the interior of the car. On the VAZ 2114, the acoustic shelf is a component that solves several problems at once: sound output improves, squeaks in the trunk disappear, speakers can be installed in any size, even the largest ones.
What you need
To make a shelf you need:
- Sheets of plywood (2 pcs., at least 0.5 cm thick);
- Sheet of cardboard;
- Self-tapping screws;
- Furniture curtains (2-3 pcs);
- Jigsaw;
- Sandpaper;
- Fabric for covering the shelf (corpet or other);
- Glue;
- Measuring instruments;
- Marker;
The self-made structure will consist of two parts - a base with seats for speakers and a folding part that will provide access to the trunk.
An acoustic shelf is essential
VAZ 2114 acoustic shelf
You can buy a shelf in a store (the choice today is very rich) or make it yourself from available materials. Let's focus on the second option, which appeals to the majority of Russians who are not accustomed to spending extra money (why, if all you need to do is put in a little effort).
According to most drivers who have little or good knowledge of car audio, installing 4 speakers according to the scheme: 2 at the front and 2 at the rear will be the ideal solution. There will be no problems with the front acoustics in terms of reproduction, since in front of the VAZ 2114 there are standard places for installing 13-inch speakers.
Note : Note that such speakers play well, there is enough power, but still, if this is not enough, then podiums are placed in the doors, where larger speakers are installed - 16 inches.
Acoustic shelf for VAZ 2114
Let's leave the front speakers alone and move on to the rear. There are more problems here. The standard places for speakers in the rear, not only on the VAZ 2114, but on all other cars, are no good, as they are too small.
You can’t install large speakers here, and small ones can’t cope with reproducing more or less noticeable bass. In addition, the standard shelf on the VAZ 2114 is too “flimsy” and is also unable to support the 6x9 oval speakers intended for it.
The factors listed above simply force a motorist who is partial to good and high-quality music to act.
Coaxial or component
Choosing the right speakers is not that easy. There are currently two types of car speakers in use: coaxial and component. Coaxial speakers include several speakers at once, the so-called strips. There are two-, three- and even four-way speakers. Component speakers are designed to reproduce only a certain segment of frequencies: low, high or medium.
Let’s make a reservation right away, the price tag between coaxial and component speakers differs very, very much; component speakers belong to HI-FI and HI-END equipment and are expensive, and also require a professional amplifier (possibly more than one) and competent installation
Moreover, the installation location of such speakers in the car is of no small importance for the overall sound quality
Manufacturing
Acoustic shelves for VAZ 2114
In principle, there is nothing difficult to make. You will need to arm yourself with a little patience (and Moscow was not built right away), follow the instructions clearly, and have the necessary tools and materials at hand.
What do you need
Acoustic shelves for VAZ 2114
To successfully carry out the operation, you must prepare the following:
- Plywood – a sheet 18 mm thick is suitable;
- A piece of material for reupholstery - carpet is ideal, but if the interior is upholstered in leather or leatherette, then for a harmonious perception we replace the carpet with a piece of the corresponding material.
Note : Carpet is good because it is very convenient to work with. This material has amazing obedience if you know how to handle it.
- Glue for carpet - the best option is aerosol or Nairit;
- Stain;
- Special staples for an 8 mm stapler (for wood) and the furniture stapler itself;
- Painting tape;
- Several self-tapping screws.
As for tools, you should have a good jigsaw, a plane and a drill or, better yet, a screwdriver on hand.
Installing an acoustic shelf on a VAZ 2114
Algorithm of actions
The first task is to dismantle the standard elements, leaving only the metal base.
Attaching the acoustic shelf
After that:
- A drawing is drawn, markings are made on plywood or chipboard. The dimensions of the new surface are practically no different from the dimensions of the standard one. Chipboard sheet is thicker than plywood. If you were able to buy plywood or had it on hand, you can fold it in two or even three layers and glue it with wood glue. A shelf made of one layer of plywood may not be able to withstand the weight of the speakers and will crack. It turns out that the efforts were in vain, a mistake was made.
- The new part is cut out using a jigsaw. Its length may not correspond to the length of the one that was dismantled. You need to check this - try placing it on an iron base in the cabin. The original shelf is usually slightly larger in size due to the specific fixation. The new one should be one centimeter shorter in length. In order not to break the symmetry, shorten the board on both sides by 0.5 mm.
- Cut out holes for the speakers. Markings are applied, taking into account their future location. Don't rush to cut out the parts - if you make a mistake, you'll have to take new sheets of plywood or chipboard and start the whole job all over again.
- Holes for the speakers are cut in the metal base. Markings are made on the metal frame. They are cut using a grinder. This must be done carefully - there is a risk of sparks when the disk and surface interact. It is necessary to use personal protective equipment, such as goggles and gloves, a carpenter's coat or an apron. The car interior should be protected from accidental damage.
- Using an additional layer of plywood or chipboard, you can complicate the configuration of the acoustic shelf and achieve the effect of tilting the speakers in any direction. To do this, you need to draw a drawing of an additional part that will help create an angle. The outline should be transferred to a sheet of plywood or chipboard, cut out this element, glue it with wood glue to the inside of the main sheet, and additionally secure all parts with self-tapping screws.
- The edges are smoothed with a fine-section file and sanded. The resulting product can be coated with a wood primer and varnished so that the material does not deteriorate and lasts a long time. It can be negatively affected by high or low temperature in the car interior and air humidity.
- A cover is sewn from carpet. Carpet performs a thermal insulation function and reduces vibration. It is necessary for the salon to be beautiful and stylish. It will be difficult to guess that in fact the acoustic shelf is not purchased.
- The created structure is installed in the cabin and the speakers are connected.
Troubleshooting solutions
An excellent way out of their current situation is to install the rear shelf of the VAZ 2114 yourself. Today, on numerous websites dedicated to cars, you can find a lot of options for making the necessary design on your own. If you don’t have the skills to work or free time, then an excellent solution is to buy an acoustic platform at an auto supply store. It is possible to select several modifications that differ from each other both in design and in the materials used in manufacturing. The price of the accessory depends on its design and the specific store, on average it ranges from 1,200 to 3,000 rubles.
Benefits of replacing the rear shelf
The main thing that car enthusiasts notice after installing a new, modified element is a more confident design that does not bend under the weight of even the most impressive-sized sound speakers installed on it. In addition, the acoustic characteristics of sound transmission are noticeably improved. This happens due to the fact that wood is the best conductor of sound impulses generated by speakers. In addition, the strength of the shelf and the reliability of its fastening prevent the appearance of unnecessary deformations, looseness, annoying squeaks and extraneous noise.
Useful video
You can get interesting tips and recommendations by watching the video below:
The car has a short history so far - this model rolled off the assembly line in 2001. Outwardly, it resembled the previous model, but the VAZ 2114 received a slightly modified body. The main distinguishing feature of the car is the smoothed angularity of the front end and hood due to new wings and hood and narrowed headlights.
The decor of the car has also changed slightly, a new design for the dashboard, the interior trim has also undergone changes and made the car more attractive.
But the fact that all these changes did not affect the chassis at all provided a huge springboard for creativity and improving the model with your own hands. That is why the VAZ 2114 is still undergoing all kinds of improvements along with tuning classics, for example, tuning the VAZ 2106. But this is not only the installation of a new bumper, radiator grille, headlights and taillights, etc. This is also the use of scientific knowledge. Interesting design solutions for external tuning can be seen in the video:
A few words about car audio systems
To create good acoustics you need a high-quality audio system and its correct placement. There are two main types of acoustics: component and coaxial. In terms of price, the component system loses to the coaxial system: it is much more expensive. The second option involves three-way (low, mid, high frequencies) or two-way speakers. The components of such a system “produce” narrowly targeted sound.
The component system creates surround sound by using speakers with different frequencies installed at different points in the car. The mid-frequency speaker is installed in acoustic podiums on the VAZ 2114 in the front doors. Using special spacer rings, you can turn the speaker towards the driver. The doors will need soundproofing to prevent rattling.
There are several options for installing high-frequency speakers, the most preferable is mounting on the front pillars. With this arrangement, the tweeters, in combination with mid-frequency speakers and a subwoofer, create a deep, “surround” sound. The last component, responsible for transmitting low frequencies, exists in two main versions:
- active (with its own sound amplifier);
- passive (an external amplifier is used).
Subwoofers are divided according to the presence or absence of a housing into open and closed. Subwoofer enclosures come in different types: classic (box), barrel, hidden enclosure (often in the free volume of the trunk). Open (“free-air”) bass acoustic components are mounted in doors and armrests between seats. The most common “object” for installation is the VAZ 2114 acoustic shelf.
To create high-quality acoustics, all subwoofer options are installed towards the top or towards the trunk. If a VAZ acoustic shelf is chosen for placement, good sound insulation and a strong position of the dynamic head are required. In this case, the rear factory shelf needs to be modified, that is, pasted with soundproofing materials or weighted with plywood.
Front strut
Installing a front strut will help to correct the balancing in some way. It is a piece of pipe that can be easily installed with your own hands.
Again, you will first need to choose a spacer option. Today there is an abundance of front struts on the market, with front struts available in a wide range from various manufacturers.
Owners of used V8s are advised to choose an adjustable strut. The fact is that over time, on an old car, the strut cups get closer together. If the spacer is not adjustable, it will become difficult to install it (you will have to lift the car, use a mounting tool, etc.).
Here's how to install the front brace.
- A nut is unscrewed from each support (use a 13mm wrench);
- The distance between the support plates is adjustable (if an adjustable spacer is installed);
- The spacer is placed and the nuts are screwed into place.
As you know, the front strut for cars was invented by athletes. Even on cross-country V8s, it was widely used to strengthen the body when driving off-road. These amplifiers are also used in circuit racing. Here they offered a chance to increase steering sensitivity. In a word, the beginning of the use of spacers was associated with the beginning of the operation of the car in extreme conditions, when there were prohibitive loads on the body.
The body of the G8 is quite rigid and under normal operating conditions there is no particular reason to strengthen it. But today few people drive on good, ideal roads. Reinforcement in this case will not only help improve driving comfort, but will also significantly extend the life of the car body.
What to do?
There are three ways to solve this problem. The choice in favor of one option or another directly depends on your requirements, wishes and sometimes financial capabilities.
Solution option
Explanation
Completely dismantle the sides and shelf
Nothing will make noise in this situation, but you will deprive yourself of space to install an audio system. You can forget about high-quality sound inside the car
Purchase a ready-made podium for durable material with holes for speakers
A good option that requires certain financial costs. All you have to do is install it in place. Disadvantage - it is not always possible to find a shelf that is ideal for all parameters
Make a podium with your own hands
This option provides minimal financial costs and the opportunity to create a shelf that will meet your smallest requirements. The downside is that you have to do the work yourself, which not everyone can handle.
Having a stronger and thicker shelf not only eliminates noise, but also improves the sound quality of the audio system. The thick shelf acts as a highly efficient enclosure.
Today we will look at how you can create an acoustic podium with your own hands, which will be placed on factory sidewalls. You can also try to make an option with your own sidewalls, but it is much more complicated and extremely difficult for a beginner to cope with. Let's not make things difficult for you. The option with standard sidewalls is very good.