VAZ 2112 acoustic shelf
As you know, achieving good sound in a car interior, where there is very little free space, is quite difficult. But this can be done if you use some devices, one of which is a homemade or store-bought acoustic shelf. There are a lot of components inside a car that interfere with normal sound. It's not just the noise of the engine or the hum of a moving car. The weak stereo effect is mostly due to the rear speakers and the direction of their sound. In other words, a large number of barriers arise between the speaker and the listener, in which the sound disappears. Of course, the problem can be solved and this can be done in several ways:
Acoustic shelf VAZ 2112 with sides
- Point sound. This method involves installing the speakers (see How to choose speakers for your car radio yourself) so that they are aimed directly at the listener. In order not to deprive any of the passengers of sound, this method involves directing the speakers to the center of the cabin, thereby avoiding obstacles.
Note. In this case, the speakers are installed on the ceiling using a podium. But this method has disadvantages. In particular, there is no way to firmly fix the speaker, which will lead to rattling and other errors. In addition, this method of installing the speaker risks a complete lack of bass.
- Reflected sound. The speakers in this case are directed to the rear window. Thus, the stereo effect is enhanced, and the sound becomes much more voluminous. This method is much easier to implement than the first and the bass sound will not suffer from such a dislocation.
Note. The reflected sound method implies the presence of an acoustic shelf. Only the store shelf is made in such a way that the speakers face the ceiling, where some of the sound is dampened by soft and fleecy material. In addition, if the VAZ 2112 car has headrests on the seats, then these are additional obstacles. Therefore, it is recommended to make a shelf yourself, especially since it is not so difficult.
Rear trunk shelf of VAZ 2112 made of carbon fiber
This article will help you save money and make your own carbon fiber parts for the internal body elements of the VAZ 2112. The total cost of all materials used is approximately $150. This price includes three rolls of carbon fiber, 2 liters of resin, wax, a set of brushes and sandpaper. These are all the necessary materials to make a shelf for speakers. So, we have prepared the materials, now it’s time to get down to business.
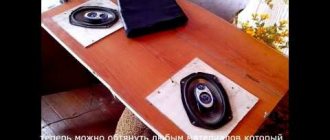
The rear shelf of the VAZ 2112 is a rather voluminous element, and besides, there are simple curved lines, so we can make this part without any problems. First of all, we roughly sand the surface so that it can adhere to the surface of the shelf as best as possible. Next, we measure the required amount of carbon material. When cutting the carbon fiber, we add three centimeters of margin on each side, and also keep in mind that we will have to fold the material at the edges so that the seam is not noticeable. When bending the fiber, you should secure all parts of the part with tape or insulating tape, so it will not slip. We try on the carbon fiber and make sure that it fits the surface and does not bulge anywhere. In several places we grab it with pieces of double-sided tape to the surface. During the application of resin, the fiber may separate from the shelf, creating a risk of bubble formation; the tape prevents this from happening.
We mix all the resin, each type has its own instructions and hardening time, before starting work it would not hurt to familiarize yourself with this information. The resin will begin to set in about 15 minutes, do not mix more than you can use in that amount of time. We strongly recommend using a respirator while working, otherwise you will get headaches. Now we begin to apply the resin to the carbon using the “peck” method on the first layer. Make sure that the carbon fiber does not slip, you need to work carefully because this happens very easily. We continue to treat the carbon with resin until it completely saturates the fabric and the air is completely released from the fabric. We wait until the first layer dries, this lasts about 2 hours. Next, take scissors and cut off the excess material. The next step is to apply another layer of resin. At least 3-4 layers of resin must be applied to the surface. Subsequent layers can be applied using normal brush movements and a thicker layer of resin. There is no need to sand between coats; this will do more harm than good. At the last stage, do not forget to add wax to the resin. Its quantity should be twice as much as the hardener. After the last layer has been applied, you need to let the part dry thoroughly, this will take about a day. The part will have a slightly cloudy appearance after drying, but do not be alarmed by this. The last crucial stage remains; it determines what the element will look like. We begin polishing the trunk shelf of a VAZ 2112, starting with sandpaper with the coarsest grit and ending with a final size of 1500.
- Author: admin
Rate this article: Share with friends! Related posts:
Rear shelf (acoustic) for Volga Gaz 3110
Trunk lighting VAZ 2112
Carbon fiber dashboard for VAZ 2101
Website about joints
I was tired of the constant rattling of the rear shelf and so I decided to get confused and made a new shelf with my own hands
and so we take two pieces of plywood like this...
and cut out something like this. In order to cut it out, we take the old shelf and lay it on top of the plywood that is above in the photo, outline it with a marker and use a jigsaw. I made two such templates, the second one is about 1 cm narrower, along a curved arc that is located on the glass side. I did this because there will be fewer adjustments in the future
this is how it turns out, two cut pieces of plywood
try it on. We make the smooth edge of the plywood flush with the reinforcing strut of the body. if it sticks out, we cut off the edge of the glass, but don’t get carried away so as not to overdo it
After making adjustments on site, we take the first measurement from below, insulation on it, and the second cut plywood on top. We mark, use a thin drill to make holes so that the self-tapping screw fits better, and tighten them tightly in a circle. This is done so that it is stiffer and does not rattle
marking the places for the speakers...
but here it’s up to everyone... I decided to paint on both sides. This is the outside side, that is, from the trunk. and one more thing, if you decide to paint, then before painting you still need to go through the screws; in the next photo you can see exactly where. We pass the edges with sandpaper and sand until there are no sharp edges
Read also: Electric chair massager
Here you can see where to go with the screws. inner side, from the salon
After the paint has dried, we attach the shelves so that they do not rattle like the factory ones and sit rigidly. unfortunately I forgot to take a photo. I made them this way: when we remove the seats, from the trunk side we see three lugs on the body amplifier, put the shelf in its place and make marks so that the bolt that will be the mount goes into this lug, this is the front mount. As for the rear, we open the trunk and climb into it)))) what do we do next, and then we see under the rear window there are two protrusions on the left and right, so, we make marks along the edge of these protrusions and go together with the shelf to make fastenings, I bent I put it on the screws from the tin, after which we put the shelf back and climb into the trunk, there are holes in the protrusions, we make marks on the tin, we make marks, the fastenings are ready. All that remains is to screw it on. I almost forgot, it is advisable to take the front bolts with a screwdriver head, insert them into place and tighten them, since then you will not secure the shelf firmly. According to the fastenings, everything seems to be all right. The writing seems scary, but in reality there is nothing complicated.
after the fastenings are ready, we take the insulation and lay it in three layers...
Photo instructions for making side shelves in the trunk of a VAZ
The resulting design can now be installed in a car. When installing, the standard self-tapping screws for attaching the sidewalls to the body must be replaced with M5 bolts. In order for the acoustic shelf to sit firmly on the sides, it is best to use Velcro (see photo below).
Now, significant weight can be placed on the resulting hard modification of the sides of the trunk without fear for its integrity, plus with this design we have completely eliminated any rattling and squeaking.
There are many other ways to combat noise in the trunk of a VAZ 2111 and VAZ 2112, but it is best to use them in combination - this increases the effectiveness of using each of them separately.
We're sorry, but the requests coming from your IP address appear to be automated. For this reason, we are forced to temporarily block access to the site.
To continue, please enter the characters from the image in the input field and click "Submit".
Cookies are disabled in your browser
. We will not be able to remember you and correctly identify you in the future. To enable cookies, follow the tips on this page.
Photo gallery
On all cars of the tenth family, including VAZ, installing the front speakers in standard places is possible without any difficulties. This is especially easy to do if you already have wiring for powering the speakers. In this case, there should be no problems with the installation at all. One important point is worth noting. So, first of all, we remove the casing, after which we find the power wires for the speakers and connect them. After that, in all 4 corners we install square brackets-clamps under the self-tapping screws, which will then be used to secure the speakers. Next, everything is assembled in the reverse order, that is, we install the casing and the procedure can be considered complete. All rights reserved.
Acoustic shelf and its production
Acoustic shelf for VAZ 2111
The reader probably wondered if it was possible to make such a product yourself without spending extra money. The answer is, of course you can. Just know that the acoustic shelf for the VAZ 2111 or 2112 should be built according to a slightly different scheme. The fact is that these car models belong to the station wagon body type, and most of the instructions for making shelves that can be downloaded from the Internet imply installation in sedans. In principle, the manufacturing process does not have any special differences, but there are a number of nuances that should not be ignored, otherwise it will affect the sound quality of the speakers and even the safety of passengers.
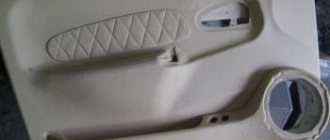
Installation of devices in rear doors
Compared to installing products in a shelf, installing 16 cm speakers directly into the rear doors is more labor-intensive. First, the owner of the LADA Granta will need to remove the door trim. The “Standard” package does not provide for cable lines throughout the cabin, so you will need to lay them yourself. The wire leads end under the front panel.
Other versions of the Lada Grant have the ability to quickly connect speakers to existing wired lines without much difficulty.
How to install step by step? The installation procedure assumes the following sequence.
- Loudspeakers are screwed to a pre-prepared plywood cover.
- The corresponding ends of the wires present in the door panel are connected to the speaker terminals in the LADA Granta car.
- The trim is fixed to the door using appropriately sized self-tapping screws.
- We cut a hole in the door trim to match the diameter of the purchased mesh.
- The mesh should be attached to the upholstery, which can later be installed on the door panel.
Acoustic shelf and its production
Acoustic shelf for VAZ 2111
The reader probably wondered if it was possible to make such a product yourself without spending extra money. The answer is, of course you can. Just know that the acoustic shelf for the VAZ 2111 or 2112 should be built according to a slightly different scheme. The fact is that these car models belong to the station wagon body type, and most of the instructions for making shelves that can be downloaded from the Internet imply installation in sedans. In principle, the manufacturing process does not have any special differences, but there are a number of nuances that should not be ignored, otherwise it will affect the sound quality of the speakers and even the safety of passengers.
VAZ 2111 station wagon
A station wagon or hatchback differs from a sedan in the size of its interior. Because of this, it is necessary to place acoustic podiums with the correct direction on the station wagon shelf. There are other nuances, including mounting options, and much more.
Finalization
Refinement of the acoustic shelf
In the VAZ 2111, the shelf does not have to be made from scratch. You can simply modify the standard one. Here are some features you need to know:
- The standard rear shelf on the VAZ 2111 does not allow the installation of speakers, since it does not have a straight surface. The point of finishing is precisely to create a flat surface;
- The material for finishing should be plywood 20 mm thick. Let its width be about 3.4 meters;
- The standard shelf consists of two layers, the material of which resembles plastic. It is easy to cut with a knife.
Taking these features into account, we do the following:
- We cut off the part of the shelf where we intend to install the speakers;
- From a piece of plywood we cut out the outline of the shelf, copied from the standard one;
- We coat the plywood with epoxy and glue it on the back side of the shelf;
- The seams and irregularities formed during the joining process are eliminated with acrylic wood putty, and then, after drying, sanded down with sandpaper;
- In the end, you will need to reupholster the shelf with a suitable material, for example, carpet.
Note. A piece of plywood can be glued not down the standard shelf, but up. There won't be any difference. But, in both cases, the standard shelf will become noticeably heavier, and the speakers will hold more confidently and reliably. By the way, if the shelf after such modification is, in your opinion, not weighted enough, there is a reason to cover it with vibration material, and only then reupholster it with carpet.
Shelf from scratch
Acoustic shelf from scratch
If you are not satisfied with the modification, but want to make everything yourself, then we do the following:
- We take two pieces of plywood. The first piece should repeat the shape and dimensions of the standard shelf, and the second piece should be 1.5-2 cm shorter;
- We connect two pieces of plywood together using foam or glue. And then we make sure to fasten it with wood screws;
- We separately manufacture the folding part of the shelf. It can also be made from plywood. Awnings work well as a tilting mechanism.
Note. The folding part of the shelf can be cut off from the standard one, and then screwed to the new one. Nothing complicated - we cut off exactly the part with the hinges and attach it to the new shelf.
- At the final stage, the shelf must be covered with carpet.
Note. You can make a shelf without a folding part, using one sheet of plywood. To give it a stylish appearance, you can decorate the shelf with an inscription, by burning, or in some other way.
Advantages and disadvantages of a shelf in a station wagon
| Improved sound quality | In a station wagon, a wooden acoustic shelf can pose a threat during a collision with a car from behind. |
| The appearance of the interior becomes more attractive | When transporting bulky cargo, you will need to periodically unhook the speaker wires and remove the shelf |
| The luggage compartment receives additional sound insulation | |
| If you are smart and add folding legs to the shelf, you will get a real tourist table |
Hyundai Accent › Logbook › Actually, something that has been standing for a long time. Acoustics in my car.
So I decided to write what was actually done regarding the sound in the car during the two years of ownership. First of all, when I bought the car (it had a cassette radio), it was decided to buy a new radio. It was decided to buy an inexpensive mafon with three outputs for amplifiers, for subsequent connection of all components through amplifiers... I arrived at a local Pioneer store and chose this from everything that was offered to me:
Before: Art Sound AS 6.2 (left over from my eight) the cost was about 4500 rubles.
Since spacers had to be placed under the front, it was decided to make the front doors noisier. The material used was vibroplast STP + splen from the same company. There is no photo of the process, there is only the final result:
I am pleased with the result of the door noise. The noise became a little less, the door closes with a slight movement of the hand, the sound when closing is dull... In general, everything is as it should be... Next in line was installing the “pancakes” back. For these speakers, I made an acoustic shelf from 20mm plywood and covered with gray carpet. There were no problems with the shelf. I did this: I took off the original shelf, put it on plywood, traced it and cut it out. Next, so as not to miss the holes for the speakers, I put the cut out shelf in place as it would stand and from the trunk side with a marker I traced along the original holes in the steel shelf... And only then, based on these marks, I tried on the speakers, how it would all be, marked it out and cut it out . I tried everything on, was glad that it worked the first time and didn’t screw up anywhere and covered it with carpet... The most difficult thing was to connect the shelf with the speakers already in place))) Because. The shelf with the speakers already screwed in would not fit through, and if I first put the shelf down and then screwed in the speakers, I couldn’t get a screwdriver under one screw... In the end, I don’t even know how, I managed to crawl up and screw the speakers onto the shelf already in the car... The shelf itself I screwed it with self-tapping screws of the required length through the holes of the steel shelf through the spacers between the steel and acoustic shelf. Overall I'm happy with everything. The bottoms on the pancakes were very pleasing... I didn’t think it would be so good. Many who rode behind me asked what kind of subwoofer I had... And this is without an amplifier.
Then, about a year later, I found out that a friend had an unnecessary Mac Audio amplifier, but he didn’t want to sell it separately, but sold it together with a Signat 12″ sub and a 2 farad capacitor for 3000 rubles.
The case was, to put it mildly, not a fountain... And having acquired the whole thing, I decided to make a new case for it. This speaker was tested on the car audio website, here is a link to the article: www.avtozvuk.com/az/2004/…/htmdoc/120-145signat. htmFrom which it became clear that the housing for this speaker must be at least 30 liters, there is no more sense. I wanted to make the housing with minimal loss of trunk volume, but with the required displacement. I measured everything in the trunk that I needed and went to look on the Internet for how to calculate the housing for a subwoofer... in the end I calculated everything on an online calculator. There you enter the dimensions of the sides that you need and he gives you the displacement that you will receive in the end. Now for some reason I can’t find this site... But I didn’t save the link...(((For the body, 20mm liquid nails, wood screws (were), soundproofing material Biplast Premium, and naturally dark gray carpet were purchased. All joints before tightened with self-tapping screws, were coated with liquid nails, and also inside and outside, all joints were again covered with the same liquid nails. When the body was almost ready, Biplast Premium was glued on the inside
Next, I closed the case with the front wall and glued it onto the same Biplast Premium. Then I covered everything with carpet. It was decided to attach the amplifier to the back wall of the subwoofer, and the capacitor to the side. I bought the wiring as a ready-made Mystery kit:
And I routed everything on the driver's side. The power wire was pulled from the engine compartment through a wiring hole with a rubber membrane. As a result, in the trunk it all looks like this:
Overall, I'm happy with the sound at the moment. Everything was set up so that the sub would simply play along with the music exactly as much as I considered necessary. The goal was not to destroy the glass on neighboring cars and houses, as well as my own ears... As a result, the amp was turned up almost to the minimum, and the bass was soft and pleasant. In general, I am very pleased with how everything turned out in the end...
Thanks to everyone who mastered so much text!))) I wrote from the heart))) If you have any questions, ask, I’ll try to answer)))
The benefits of an acoustic shelf
Acoustic shelf VAZ 2110
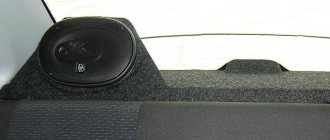
Before moving on to the immediate algorithm of actions, let's dwell on the benefits of an acoustic shelf. Let's find out what its advantages and advantages are. So, below are the known advantages of such a shelf:
2110 acoustic shelf with hidden speakers
Reviews
Delivery of goods is carried out throughout Russia and the CIS:
1. Russian Post (from 350 rubles and above)
Delivery to all regions of the Russian Federation and CIS countries
2. Transport Companies (from 350 rubles and above)
Delivery throughout Russia and the Republic of Kazakhstan
- TK Energy (nrg-tk.ru)
- TC Business Lines (dellin.ru)
- TC SDEK (www.cdek.ru)
- TK PEK (pecom.ru)
- TK KIT (tk-kit.ru)
3. Pickup
The order can be picked up at the office at Tolyatti, 40 Let Pobedy 38, TD “Malachite”, 1st floor.
The waiting time for sending an order in our online store is approximately 2-7 working days, large orders 7-14 working days. days; color of bumpers, mirrors, body parts, spoilers, etc. 7-14 work. days; sewing covers, upholstery, steering wheels, gear knobs, EVA mats, etc. 7-14 work. days.
During this period, we will send you a tracking number by email. email to track the parcel en route.
Payment can be made in the following ways:
1. Payment to a Sberbank card
You can pay using the SBERBANK-Online application and other Bank applications.
After placing an order, making payment, do not indicate comments , we ourselves will understand by the amount of the order and the name of the sender. After receiving the funds, the status of your order will be changed to paid until 17.00 of the current day, or from 9.00 of the next Moscow time.
2. By bank card
Automatic acceptance of payments using MIR Bank cards, VISA International, Mastercard.
You can also pay with credit cards with a grace period.
To select payment for goods using a bank card, on the corresponding page you must click the “Pay for order by bank card” button.
2. Payment to QIWI wallet 89272115207
3. Payment on Yandex.Money 410013993950891
5. Payment to a bank account for legal entities and individual entrepreneurs (commission 6%)
Send your organization's details to [email protected] for invoicing. After paying the bill, be sure to send a payment order.
4. Cash on delivery of Russian Post (commission from 4%)
IMPORTANT! When sending by cash on delivery, RUSSIAN POST will take a commission for providing the cash on delivery service of 150-300 rubles, and the delivery cost also increases due to the evaluation of the goods.
Cash on delivery delivery is possible only within Russia.
ATTENTION! When choosing cash on delivery, the delivery cost is paid in advance before shipment, for the product itself upon receipt.
The amount of the order by cash on delivery should not exceed 5000 rubles; also, painted parts, goods made to order, covers, upholstery, door inserts, EVA mats, steering wheels, etc. are not sent by cash on delivery. (minimum 50% prepayment).
Be sure to save the payment receipt or a screenshot of the transfer.
The best guarantee of order fulfillment and quality is the feedback from our customers.
Reviews of our work can be found in our VKontakte group https://vk.com/topic-136384247_36675422?offset=180
We guarantee product quality, integrity and timely fulfillment of all requirements for the shipment of goods.
- home
- About Us
- Catalog
- Shipping and payment
- Reviews
- News and Promotions
- Personal Area
- Site Map
- Tuning Lada Largus
- Tuning VAZ 2113, 2114, 2115
- Tuning VAZ 2110, 2111, 2112
- Tuning VAZ 2108, 2109, 21099
- Tuning VAZ 2101, 2105, 2106, 2107
- Tuning for foreign cars
Tolyatti, 40 Let Pobedy 38 (Malachite)
Adviсe
Technically, installing music yourself in Lada Vesta is not difficult. By adhering to a few simple rules, any motorist can handle the work. Consider these rules:
- All work must be done very carefully to avoid damage to the plastic upholstery;
- The car already has audio preparation; you only need to install harnesses to connect the front speakers;
- You cannot cut off standard connectors, but you need to buy and use adapters;
- Before installing audio, it is recommended to soundproof the Lada Vesta doors to obtain improved sound characteristics;
- Install the speakers on the spacers.
Audio preparation is measures carried out by the manufacturer (laying audio cables, installing speakers, etc.) that simplify the process of installing music for the car owner. Depending on the configuration of Vesta, audio preparation may be different.
Product delivery options
Note! Below are the shipping methods available specifically for this product. Payment options may vary depending on the shipping method. Detailed information can be found on the “Delivery and Payment” page.
Parcel by Russian Post
Available payment methods:
- Cash on delivery (payment upon receipt)
- Using cards Sberbank, VTB, Post Bank, Tinkoff
- Yandex money
- QIWI
- ROBOKASSA
Shipping throughout Russia. Delivery time is from 5 to 12 days.
Parcel by Russian Post 1st class
Available payment methods:
- Cash on delivery (payment upon receipt)
- Using cards Sberbank, VTB, Post Bank, Tinkoff
- Yandex money
- QIWI
- ROBOKASSA
Shipping throughout Russia. Delivery time is from 2 to 5 days. More expensive than regular delivery by Russian Post, approximately 50%. Parcel weight up to 2.5 kg
Express Parcel EMS
Available payment methods:
- Cash on delivery (payment upon receipt)
- Using cards Sberbank, VTB, Post Bank, Tinkoff
- Yandex money
- QIWI
- ROBOKASSA
Shipping throughout Russia. Delivery time is from 3 to 7 days. More expensive than regular delivery by Russian Post, approximately 100%.
Transport companies
Available payment methods:
- Using cards Sberbank, VTB, Post Bank, Tinkoff
- Yandex money
- QIWI
- ROBOKASSA
Delivery is possible to any locality where there is a representative office of the transport company. Delivery time is from 2 to 10 days. Sending large parcels is approximately 50% more profitable than by Russian Post.
Pickup from our warehouse
Available payment methods:
- Cash upon receipt
- Credit, installments
- Using cards Sberbank, VTB, Post Bank, Tinkoff
- Yandex money
- QIWI
- ROBOKASSA
Pickup times must coincide with store opening hours.
acoustics
The chief designer of AvtoVAZ did a good job; AvtoVAZ’s new products (LADA Vesta and XRAY) have an attractive appearance. The interior of these cars is made according to modern standards, just look at the steering wheel with ebbs! Do you know that it can be installed on VAZ cars of the “tenth family”?
Modern Lada cars are equipped with functional multimedia systems (MMS). A good example would be the Lada Kalina 2 radio, which is capable of not only playing radio and music from a USB-Flash, but also playing video, displaying photos and has a handsfree function. Did you know that through modifications this MMC can be combined with the VAZ of the tenth family?
Imagine a car in which the sound is organized using a simple radio (without the use of an external amplifier), ordinary speakers (13-16cm coaxials) and oval speakers (6x9) in the rear parcel shelf. From too much bass you can hear the speakers wheezing. In fact, this problem with the speakers can be solved with a simple modification.
There is no limit to perfection, which is probably why music lovers are ready to sacrifice everything for the sake of installing the best acoustics. Typically, tuning music in a car requires a lot of money, but sometimes you can improve the sound of your speakers and subwoofer cheaply and quickly.
The rear speakers in VAZ cars of the tenth family are located in the shelf, which is not entirely convenient. For example, not everyone likes it when the speakers are near their ears, or in order to remove the shelf in a VAZ 2111 or VAZ 2112 you must first disconnect the wires from the speakers, and the wires themselves under the shelf are always dangling. Why not install rear speakers in the doors, as is done on many foreign cars?
The standard speakers in the "tens" doors are 13cm in size, this is not enough if you decide to improve the acoustics in your car. The holes in the doors are not designed to accommodate larger speakers, so alternative podiums are most often installed. In this article we will figure out how to install 16 acoustics in the standard places of a VAZ 2110 without protruding podiums.
The volumetric and high-quality sound of music in a car depends on many factors, for example, the location of the speakers, car radio or sound insulation of the car
But it is worth remembering that high-quality car speakers play one of the main roles, which is why it is important to choose the right speakers.
Light music (also color music) is a dance of music and light. Fans of nightclub life will be interested in the topic of installing color music in the car
In this article we’ll talk about how difficult it is to make color music with your own hands and what ready-made solutions are available.
Choosing a radio for a car is not an easy task. If we go back a little, the decision was quite simple; the entire choice was limited to cassette players with limited capabilities. Currently, in addition to basic playback capabilities, the radio may include a wide list of additional options, which confuses most buyers.
Those who bought an amplifier for their car for the first time have difficulty setting it up. The amplifier parameters are set depending on the connection diagram and may differ significantly. For example, setting up an amplifier for a subwoofer or for a system without one are two different things, but it’s not difficult to figure it out.
An update for music lovers who don’t want to part with music even for a minute. Basic knowledge of electronics will help you add another option to your car - automatically turning off the radio when arming.
Many of us own Pioneer radios, the reasons for this choice are obvious: a high-quality product with decent characteristics at a relatively low price. Some Pioneer models do not have an AUX-in input, but there is such a function in the menu. Let's figure out how to activate AUX-in for Pioneer radios.
If you want to achieve high-quality music sound in your car, you cannot do without a subwoofer. The subwoofer provides natural transmission of low-frequency sounds that standard speaker system components are simply unable to reproduce. Which subwoofer for a car is better to buy, where it should be located and how to connect it - you will learn from this article.
Production of podiums in the doors of VAZ 2110
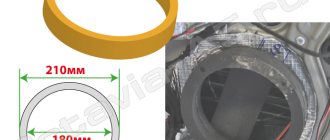
Let's consider making podiums for acoustics that will be installed in the doors. The standard dimensions for acoustics in the doors of a VAZ 2110 imply the installation of 13cm speakers, but what if you have speakers on hand that are larger than the standard ones?
Latest >>
Delivery by transport company (cash on delivery, no prepayment)
Advantages:
- the cost of delivery of heavy and large-sized orders is much cheaper than that of Russian Post;
- There are practically no restrictions on the weight and dimensions of cargo;
- There is a wooden crate service - this is an additional guarantee of the integrity of the order.
Disadvantages: unfortunately, there are branches only in cities.
The estimated cost of delivery for an order up to 30 kg is 450 rubles.
List of transport companies with which we cooperate:
- TC "PEK" (cash on delivery service available);
- TC "Business Lines";
- TC "Energia";
- TC "KASHALOT" (KIT) (cash on delivery service available);
- TC "SDEK" (cash on delivery service available);
- TC "DPD";
- TC "ZhelDorExpedition";
- TC "VOZOVOZ";
- TC "Baikal-Service".
To send your order by transport company:
- Place an order in our online store by phone or on the website (registration is not necessary);
- After we receive it, our manager will contact you by phone to clarify the cost, delivery time and your wishes. Next, we will pack your order carefully and then send it to you;
- You will receive a shipment tracking number from us via SMS or email (if available). You can monitor the status of the order coming to you using our tracking service, as well as independently, on the transport company’s website using the track number. After the order reaches your locality and the manager of the transport company contacts you, you need to receive the order at their office or order home delivery;
- Upon receipt from the transport company, you pay the cost of delivery and order.
Podiums
We have devoted a separate paragraph to these mandatory components of an acoustic shelf. As mentioned above, in the interior of a station wagon, it is recommended that the speakers be given a certain directional position. In addition, podiums add a beautiful appearance to the shelf, making them more stylish and attractive. You can make podiums for a shelf in several ways, using polyurethane foam or a solid piece of plywood. The owner decides which method to choose, but it must be borne in mind that it will be a little difficult to cut a solid piece of wood carefully and screw it so that it does not crack. We present to your attention an original manufacturing method, quite suitable for a person with basic knowledge in the field of design.
Preparation
Careful attention must be paid to preparation:
- First of all, we must have plywood, but thinner than the one from which we made the shelf. 10mm will do just fine;
- When buying fabric for upholstering a shelf, we calculate its quantity taking into account the upholstery and podiums that we will make. In this case, you don’t need much: 1x1.5 meters of carpet will be enough;
- Nylon women's stockings, can be used;
- Fiberglass putty;
- Epoxy resin;
- Stapler;
- Self-tapping screws.
Algorithm for making a podium for a car ceiling
The podium on the ceiling of the car is characterized by large dimensions, since the largest speakers are usually located in this place.
Despite this, any car owner can make a podium on the ceiling - you just need to very carefully install the structure:
- It will be necessary to dismantle the headliner so as not to damage it during operation.
- The shape and appearance of the podium are selected based on the size of the speaker.
- Usually plywood and polyurethane foam are also used.
Obviously, the procedure for manufacturing ceiling podiums is similar to the similar process in the production of door podiums.
It is noteworthy that these schemes for the manufacture and further design of podiums are suitable for any type of speakers - both round and oval. Regardless of the available speaker dimensions (13, 16, 20 and 25, as well as oval 6*9), the podium will fulfill its main purpose - to improve the sound quality of the acoustics in the cabin and securely fix the speaker in the desired position.
Photo: step-by-step production of a plywood shelf
Tools and materials
First of all, you will need to stock up on materials and tools with which you can make a shelf. This list includes:
- Sheet of plywood - 2 pieces with a thickness of at least 5 millimeters;
- Cardboard sheet;
- Set of self-tapping screws;
- 2-3 furniture curtains;
- Electric jigsaw;
- Sandpaper;
- Marker;
- Shelf covering material;
- Roulette, ruler, etc.;
- Glue.
The design involves the creation of two main elements. They are combined into a single system - a podium for the speakers and a folding part with which you get access to the luggage compartment.
Selection of speaker systems
For high-quality sound of the played soundtracks, it is recommended to purchase a 2-component system, which contains separate tweeters and mid-bass midrange/bass speakers. In this way, a high-quality sound stage can be formed.
That is why it is recommended to place them in front. The role of the subwoofer is played by cheaper coaxial speakers, which are installed in the rear of the car. To install tweeters and connect them to the radio, you need to install additional wires.
HF speakers are installed in the triangles of the Lada Vesta mirrors. If you need a budget option, then you should buy coaxial system speakers. You will not get the effect of frequency diversity to obtain a sound stage, but the musical sound of the broadcast programs will be good. No additional system configuration is required.