03/02/2022 7,270 Fuel system
Author: Victor
The fuel filter in the Nissan Almera Classic, as in any vehicle, is one of the main components of the fuel supply system. Its regular maintenance and replacement are a prerequisite for maintaining the car in good condition.
[Hide]
Where is the fuel filter located?
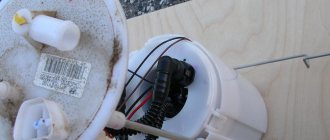
Fuel pumps on Nissan Almera Classic cars are located in a special removable module inside the fuel tank. These machines use a two-stage gasoline purification system.
It consists of two filters:
- the first one is intended for rough cleaning of fuel and is located at the inlet of the fuel intake module;
- the second - fine cleaning - is installed on the upper part of the fuel pump housing.
The location of the fuel filters and pump on the Nissan Almera H16 is absolutely identical to the location of these devices in the Nissan Almera Classic.
Layout of filters in the fuel pump module
The Almera G15 model is equipped with a simplified fuel filtration system, consisting of only one device for coarse cleaning.
Article number and approximate cost of the branded fuel filter Nissan Almera Classic and its analogues
Coarse and fine filters are included in the fuel cup. They do not have their own article numbers and are not sold separately from the module. Therefore, it is impossible to purchase branded filters on Almera Classic without purchasing a complete glass.
The original fuel module has part number 1704095F0B. Its cost varies from 12,000 to 18,000 rubles. There are also analogues of the original glass on sale. The table below shows the best alternatives to the original fuel module.
Table - Analogs of the fuel module for the Nissan Almera Classic car
| Company manufacturer | Article number | Estimated cost, ruble |
| Messmer | 770065A | 2300-2700 |
| Bosch | 986580908 | 2800-3500 |
| Blue Print | ADG06819 | 2200-2600 |
| HKT | GIP522 | 2400-3000 |
| Krauf | KR7537M | 3200-4500 |
The fuel module has a very high price, so it is irrational to completely change it if only the filters are clogged. Therefore, car owners found a way out of this situation.
Despite the fact that the original fine filter is not available for sale separately, there are identical consumables for other machines from third-party manufacturers. The table below shows brands of fuel purifiers that are suitable for the Almera Classic car.
Table - Fine fuel filters for a Nissan Almera Classic car
| Brand | vendor code | Approximate price, ruble |
| SCT | ST399 | 300-350 |
| Japan Parts | FCH22S | 400-450 |
| Nipparts | J1330507 | 300-350 |
| AMP | FF0820 | 500-600 |
| Sakura | FS2813 | 720-1000 |
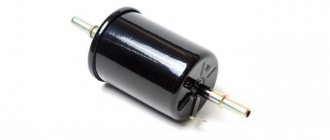
Fine fuel filter
In addition to the fine fuel filter, third-party manufacturers also produce meshes. The most suitable consumables for restoring a glass are those presented in the table below.
Table - Fuel filter screens for a VAZ 2112 car with a 1.5 liter engine
| Firm | Catalog number | Approximate price, ruble |
| WEBER | 21121139200 | 55-100 |
| Cliff | 21121139200 | 95-120 |
| FARET | 21121139200 | 90-150 |
| Zommer | KRFS2112 | 130-210 |
| StartVolt | SFF0115 | 50-110 |
Replacement frequency
The manufacturer does not indicate the service life of the filter in the service manual for the vehicle. According to official Nissan documentation, its replacement is carried out only together with the installation of a new fuel pump. But car owners, given the unstable quality of gasoline in Russia, try to change filters every 90 thousand kilometers. Some car enthusiasts perform this procedure much more often - after 12–15 thousand km.
Sometimes there is a need to urgently replace the filtration device. Its signs may include dips and jerks during engine operation, especially when accelerating over 80 km/h. Engine “tripleting” may occur in different speed ranges.
How often to change
The frequency of replacing the fuel filter on Nissan Almera N16 and Classic is not established by the manufacturer. The latter determines the timing at which it is necessary to install a new pump. As a result, the owners of the Japanese model had to empirically determine the frequency of this procedure.
According to the results obtained, in real operating conditions of the Nissan Classic, the fuel filter needs to be changed every 90 thousand kilometers. However, this parameter is not absolute. A number of motorists carry out the procedure after 12-15 thousand kilometers. This frequency is mainly due to the use of low-quality gasoline, which quickly clogs the coarse and fine filters.
This procedure should also be carried out if:
- failures in engine operation occur;
- the engine picks up speed jerkily (especially at speeds above 80 km/h);
- signs of tripping appear at different speeds.
Each of the above phenomena indicates that low-quality fuel is entering the engine.
And this may indicate problems with the filter elements.
Selecting a filter
Original fuel filters for Nissan are not available for sale separately. They can be purchased and replaced only as an assembly with a fuel pump. The part number for ordering the product is 17040–95F0B.
Analogs
As an analogue of the original filter mechanism for the fuel system of Nissan cars, they use devices from other automakers. Most often, a coarse filter from the Hyundai Accent (product code 31090–25000) or the domestic VAZ 2110–12 is used for this purpose. These parts, unlike the original, have a different shape for the installation part, which will have to be trimmed a little. From original spare parts, you will need a rubber ring to seal the module cover (17342–95F0A). Usually it has to be changed after damage due to careless dismantling of the cover.
The choice of fine filters is a little richer - this is the original part from Accent (article 31911–25000) or its SCT analogue with the number ST 399. These devices differ from the original Nissan filters in the location of the mounting point of the fuel pressure regulator. When installing them, you need to slightly trim the plastic body of the cup where the fuel pump is located. The installation of such elements has been repeatedly tested on Nissan cars produced in 2006, 2007 and 2008. For the Almera G15, the suitable filter is Francecar FCR 210141, which was successfully tested on a 2014 model.
Fuel filter for Almera Classic – which one to buy?
The manufacturer does not provide for a separate replacement of the main fuel filter (as, in principle, other components of this fuel unit). Everything should only be changed as an assembly, as a whole module. Therefore, a separate article is not provided for both the filter and the mesh.
You can also install one of the analogs of the assembled module, since they are usually 1.5 - 2 times cheaper.
| Manufacturer | vendor code | price, rub. |
| Ruei | 2457 | 3600 |
| Cross | KN17-03055 | 6000 |
| ASParts | ASP2457 | 3700 |
Since replacing the entire module assembly at once is quite expensive, and is not always justified (since only the filter may become clogged, or the pump may fail, but everything else may be in good condition), many drivers often change the design of the unit, making a tie-in, and connect any remote fine fuel filter.
The second option for upgrading the fuel module is to install a fine filter from other fuel units that require its replacement. But for this, a cutout is usually made in the module body for the pressure regulator, since on all analogues it is located in a different place from the original.
In the table below you can see which fuel filter you can buy for the Nissan Almera Classic with the specified article number and price.
| Manufacturer | vendor code | price, rub. |
| SCT | ST399 | 300 |
| Japanparts | FCH22S | 370 |
| Hyundai/Kia | 319112D000; from Hyundai Elantra III (XD) | 1400 |
SCT ST399
Japanparts FCH22S
Hyundai 319112D000
As for the mesh filter, if necessary, you can simply wash it with a carburetor cleaner - Carb Cleaner. If a replacement is needed, then you can use one of the following analogues.
| Manufacturer | vendor code | price, rub. |
| Krauf | KR1111F | 100 |
| LADA | 1118-1139200 (from VAZ 2110-12) | 30 |
| Hyundai/Kia | 3109025000 | 340 |
When to change the fuel filter on Almera Classic?
According to the Almera Classic maintenance regulations, the manufacturer does not provide for replacing the fuel filter after strictly defined mileage periods. It is replaced as a whole, as an entire module, which in turn is designed for the entire service life of the pump. On average, the fuel pump becomes unusable between 100 thousand km and 200 thousand km.
If the fuel unit is upgraded independently (remote filter, or replaceable for collapsible modules), then it can be replaced every 45 - 60 thousand km. The filter mesh can be simply washed through one maintenance.
How to change it yourself?
Sometimes car owners turn to an official dealer to replace Nissan Almera Classic fuel filters. But more often than not, many people prefer to do this work themselves.
Preparation
Before replacing the fuel filter, you need to prepare tools and auxiliary materials.
A short list of what you need:
- wrench 10;
- gas key;
- a screwdriver with a narrow flat and cross-shaped blade;
- cleaning agent (acetone, solvent or carburetor cleaner);
- an empty, stable container with a volume of 0.5–1.0 liters for draining remaining gasoline from the main line;
- rags for collecting spilled fuel.
Stages of work
After preparing the tool, you can begin work on removing and replacing parts.
Step by step sequence:
- It is necessary to relieve pressure in the fuel system. To do this, you need to find the pump fuse in the mounting block, which is located under the instrument panel in the area of the driver’s left foot. It is marked on the diagram on the block cover as “fuel pump”. You should remove it from the socket. Then you need to start the car engine. It will run for a short time and then die. It is advisable to repeat this procedure several times with an interval of about a minute between starts. While the engine is running, open the filler neck of the gas tank to equalize the pressure with atmospheric pressure.
- Fold back the rear seat cushion, under which the tank is located. It has a mounting socket in which the fuel module is installed. Before removing the cover, it is advisable to wipe off dust and dirt around the socket. Using a 10 mm wrench or a Phillips screwdriver, you need to unscrew the three bolts securing the cover. Underneath there will be a cylindrical module made of white plastic with a black ring around its circumference.
- If the fuel pressure has not been relieved using the method described above, it can be lowered with the pump power connector disconnected. The procedure for starting the engine is similar. Then you need to install a container next to the drain module. By pressing the clamping ring, you need to pull off the fuel supply hose, previously wrapped in rags, and quickly throw it into the container. It is important not to spill fuel on the interior components, since gasoline will evaporate from them for a very long time. Up to 0.2–0.3 liters of fuel can leak from the line.
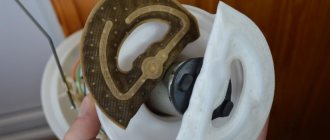
- Next, you should unscrew the module cover, which is secured with a ring nut (a black ring with protrusions around the perimeter of the module). The nut is tightened quite tightly and access to it is inconvenient. To unscrew, use the handles of a gas wrench. Now you can get the fuel pump module assembled with filters. In this case, it is important not to damage the float of the fuel level meter installed in the lower part of the device.
- You need to remove the top cover of the module by bending the three blade clamps with a flat screwdriver, and disconnect the connectors from the fuel level sensor and pump. Sometimes the wires may be held together with a nylon tie that needs to be cut off.
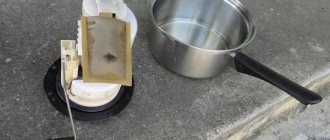
- After disconnecting the connectors, you can remove the pump with filters from the module housing. It is secured with three clamps that must be pressed while simultaneously pulling out the pump. The pressure regulator is located on the clamp and can be removed very easily. Then you need to clean the plastic cup of the module from the dirt accumulated inside.
- Next, an external inspection of the pump is carried out, as well as repair and maintenance of structural elements. The coarse filter is located on the bottom of the mechanism and can be easily removed by hand. The fine cleaning device is located at the top of the pump and is secured with two plastic clips. To bend them, use the tip of a flat screwdriver. When dismantling the filters, it is important not to forget to remove the cuffs from the pump fittings, which are installed in the new cleaning mechanisms.
- Then you can change the filtration devices and begin assembly in reverse order. In this case, you need to modify the pressure regulator valve by cutting its tube and extending it with an insert from a gas-resistant hose.
You can watch the procedure for replacing fuel filters in a video from user Azat Alikberov.
Oil filter replacement process:
- Open the hood and unscrew the oil filler plug.
- Having previously placed a container for collecting waste under the drain hole, unscrew its plug.
- After draining the old oil, you should clean the seat of the drain plug, change the gasket on the plug if necessary, and then screw it into place.
- In order to get to the oil filter, you need to remove the engine protection.
- The old filter is unscrewed using a special wrench. If there is none, you can try to tear it off with a gas gun.
- We inspect the mounting hole and the filter gasket; if there is no damage, it can be reused on a new element.
- Pour a little clean engine oil into the new filter, and then lubricate its gasket with it.
- The new element should be screwed on and tightened only by hand, without applying excessive force.
- Next, fill in the required amount of new engine oil, checking its level using a dipstick, and close the oil filler cap.
- We start the power unit for a few minutes and turn it off. This is necessary to ensure that the oil is evenly distributed throughout the power unit.
- We monitor the oil level and top it up if necessary.
As you can see, there is absolutely nothing complicated in the process of replacing consumables on a Nissan Almera car, and timely implementation of the described procedures will increase the service life of the systems in the design of which they are included.
Price issue
The cost of replacing the fuel filter on Nissan Almera Classic and N16 yourself can vary and depends on the manufacturer of spare parts. The price of the original pump complete with filters is about 10 thousand rubles.
The cost of non-original filters is much lower - for the entire set of parts you will have to pay about 1,700 rubles when using Hyundai devices, or about 800 rubles. for cheaper analogues. The most economical option is to replace the filter on a Nissan G15 - its price is around 120 rubles.
Which filter should you choose?
Original filters are not sold separately. You can only buy the part together with the pump module. There are many analogues. Some even install filters from our “ten” or VAZ-2112. However, in the latter case, you have to slightly modify the installation part. Sometimes you also need an original cuff to seal the module cover. This component is damaged if the cleaning devices are not removed carefully.
Branded trainers from Hyundai Accent can also serve as substitutes. They differ from the original. In particular, this concerns the location of the mounting points of the pressure regulator (valve). The element will fit as desired if you lengthen the valve using a hose or slightly trim the module shell.
Consequences of untimely replacement
If the fuel filters are not replaced in a timely manner, at best, the car simply will not start, since the pump will not be able to supply gasoline to the injectors in the required quantity. In this case, there is a risk of pump failure, since it is fully cooled and lubricated only when pumping fuel. In the worst case scenario, small particles of dirt will travel along the fuel lines to the injection system injectors and clog them. Sometimes this clog can be so severe that it cannot be cleared. In this case, the parts must be replaced.
When to change
The condition of the fuel pump must be checked every 15 thousand kilometers, and directly replacing the Nissan Almera fuel filter is done situationally and only together with the fuel pump, as signs of its unsuitability for use are detected.
There are no uniform statistics on the mileage, after which the car will need to be handed over to professional Tech employees. for prevention, install a new fuel pump, with which the filter is also changed.
Depending on the operating mode and the quality of the fuel being poured, the mileage can be up to two hundred km, and in some cases the fuel pump, into which the filter is integrated, will require diagnostics and repairs after a modest 20-30 thousand km.
Photo gallery
Below are photos of replacing the fuel filter in a Nissan car.
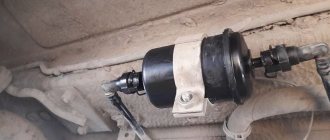
Module cover under the seat
Fuel pipe fixing clamps
Unscrewing the ring nut using a gas wrench
Coarse filter clogged with dirt
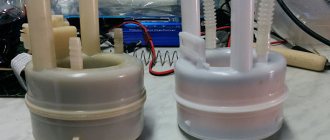
New and old fine filters - the difference in design is clearly visible
Trimming the fastening of the new coarse filter
The black oval indicates the approximate location of the valve tube cut
Modified valve assembled
Assembled module with modified valve
A cut old filter clearly shows the amount of dirt in gasoline
Filter functions
Fuel barriers have several tasks:
- Stop large particles of debris and impurities from entering the fuel
- Prevent condensation from entering the system
- The filter will protect the injector elements from damage
When an element wears out, the car shows signs that are difficult to confuse with other breakdowns - a clear loss of engine power both when driving at speed and when starting. Increased gasoline consumption will also confirm the presence of a problem with the fine filter.
When removing the fuel pump, a clear change in the color of the mesh and the presence of a large amount of debris that did not get into the fuel line are detected.
Installing a new fuel barrier (together with a fuel pump) is not an easy procedure and is complicated by the peculiarities of access to the part and the increased fire hazard of the process. Anything that concerns highly flammable substances, such as gasoline, requires special attention when working. The filter itself and the equipment do not need to change quickly if you have the appropriate skills and use professional tools.
Video “Replacing Fuel Filters”
A video from the Pro Auto32 channel shows how to replace filter devices.
Do you have any questions? Specialists and readers of the AUTODVIG website will help you ask a question
Was this article helpful?
Thank you for your opinion!
The article was useful. Please share the information with your friends.
Yes (80.00%)
No (20.00%)
X
Please write what is wrong and leave recommendations on the article
Cancel reply
Rate this article: ( 5 votes, average: 4.80 out of 5)
Discuss the article:
Removing the fuel pump
First you need to remove the rear seat element. The gasoline pressure must be relieved in the fuel line. The fuse box, which is located under the dashboard on the driver's left side, must be open. Usually on the top (cover) there is a designation with which this fuse is easy to find, because it is marked FUEL PUMP. It should be in the 2nd column (4th from the top), and also have the designation 15A. The fuse must be removed from its socket. Start the car, and after 3-5 seconds the engine will stall on its own. This action must be repeated until the engine no longer starts (usually this works after 3-5 attempts). Then wait a minute and repeat the action. If everything is done correctly, then the pressure will actually be released to the maximum, in other words, to the end.
In this case, if you do not want to look for the fuse, you should disconnect the connectors from the flange (located under the seat) of the fuel tank. There is no need to remove the hoses right away.
It is necessary to remove the filler cap and then relieve the internal pressure in the gas tank. We unscrew three dark-colored plastic bolts and remove the hole cover for inspection. Afterwards, the large plastic nut must be unscrewed by hand. We should be able to see a snow-white glass, in the place of which the gas pump is installed. This is a cylinder measuring 10 by 3 centimeters. Some models have an internal mesh, which is usually yellow with dirt.
HOW TO REPLACE THE FUEL PUMP FOR A NISSAN ALMERA CLASSIC?
Changing the fuel pump and filter on a Nissan Almera Classic
. THIS VIDEO IS NOT.
Replacing the fuel pump on Almeria
They cleaned the gas receiver and changed the pump, but did not change the filter. And the speed rose, but the start-up was not very good.
The return hose must be removed by accurately pressing the plastic latch. This hose extends from the beginning of the engine, as well as an arrow that is directed to the fuel pump. With a little pressure, approximately one small glass of gasoline will flow out of the hose. The second hose will also need to be disconnected, but nothing will leak out. The most important thing is that you need to be careful so that they are not damaged when removing them.
The connector with the harness must be removed and the fuel level meter, that is, the float located in the tank, disconnected. And then you need to remove the fuel pump itself.
Now you can start cleaning the fuel pump itself.
Replacement procedure: step-by-step instructions
Before performing operations, you need to prepare the following tools:
- set of wrenches;
- spanning tool (gas wrench);
- wire cutters, pliers;
- a set of screwdrivers with different tips;
- rust removers (solvent, carb cleaner);
- an empty 1-liter container for draining remaining gasoline from fuel lines;
- clean rag.
Work on removing elements must be carried out strictly sequentially. First you need to relieve the pressure in the car's fuel system. The fuse responsible for the operation of the pump must be removed from the mounting block under the instrument panel in the car interior. In the diagram it is marked as fuel pump.
The sequence of actions is as follows:
- Pull out the fuse.
- Then start the engine.
- Open the oil filler cap.
- Wait until the engine stops on its own.
The procedure must be repeated 2 more times with an interval of 1 minute.
Further actions are carried out inside the car. Need to:
- Raise the rear seat of the car.
- Find the hatch containing the fuel module.
- Wipe thoroughly around the nest cover so that no dirt or dust remains (otherwise, when opening it, it will get inside, and this is undesirable).
- Unscrew the cover fasteners using a screwdriver or wrench.
- Disconnect the pump by removing the power connector.
- Start the engine and wait until it stops.
- Pressing the latches, sharply pull out the gasoline supply hose.
- Wait until the remaining gasoline flows out of the line.
Popular brands: Nissan Almera
To prevent fuel from spilling and staining everything around - the smell of gasoline may not disappear from the car for a long time - you need to place an empty container near the module (a white plastic case with a lid-rim around the circumference) and lower the fuel supply hose into it.
Now we move on to the stage of removing the module. Need to:
- Unscrew the locking ring of the module using a socket tool.
- Remove the fuel module, working carefully. The fact is that at the bottom of the device there is a float for the gasoline level sensor. If you rush, it can be easily damaged.
Next, work is carried out to disassemble the module:
- Remove the top cover by bending the petal-type clamps. To do this, use a flat-tip screwdriver.
- Disconnect the connectors from the regulator (level sensor). Sometimes the wiring can be pulled together with a rigid scraper. It needs to be cut off with wire cutters or pliers.
- Press 3 clamps at once to pull up the fuel pump with both filters from the plastic housing of the module.
- Disconnect the pressure sensor - it is easy to pull out, since it is held on a clamp.
- Thoroughly clean the interior of the case using a cloth. It is recommended to soak the tip in acetone or gasoline.
The pump should be thoroughly inspected for damage. The coarse filter is located at the bottom of the device; the mesh is simply removed by hand. But the fine cleaning element is attached using plastic clips. They should be carefully pressed with a flat screwdriver so that the filter is released and comes out.
Next, reassembly into the tank is carried out. A new original Nissan fuel module is installed (approximate price - 15 thousand rubles) or a filter from a third-party manufacturer
It is important not to forget to replace the original cuffs of the fittings
Self-replacement of Nissan oil filter video
Motor oil is required to prevent friction of parts by creating a special oil film. Considering that the tachometer constantly rolls up numbers, the original properties of the car’s engine oil also deteriorate.
In addition, the Nissan Almera n16 oil filter also needs to be changed. There is nothing complicated about replacing the fluid - the procedure is standard, but it is extremely important.
This process cannot be delayed - we will tell you how to change the oil in this Japanese passenger car.
What kind of oil to fill?
One of the main questions that can be found on the forums is what oil to pour into the Nissan Almera n16 engine? Many people are also interested in which oil filter to use and how much oil is required.
We note that you cannot randomly trust unverified sources of information when choosing a lubricant. First of all, the oil must be suitable for your car and have the appropriate viscosity.
You can determine what it should be with the help of a car operating book. Alternatively, you can fill in Nissan 5W-30 oil, which can be found under catalog number KLAM2-05304 .
It is well suited in terms of viscosity, and in general the original lubricant is of the highest quality and most reliable.
It should be noted that the choice of oil should be made taking into account the operating conditions of the vehicle.
For example, if in summer the air temperature in your region rises to 30-35 degrees, instead of 5W-30 lubricant it is better to fill in 5W-40, as it retains its properties better in the heat.
The original oil with this marking can be found under the number KE90090042 . Many car owners are confused between KE90090042 and KE90090042R, and some think that they are the same thing.
For the winter, if the air temperature at this time of year drops to -30 degrees, you can fill the engine with 0W-40 semi-synthetic oil. When replacing, there is no need to buy the original NISSAN Motor Oil lubricant, but you can replace it with a product from other brands, such as:
- Castrol;
- Eneos;
- Mitasu;
- Xenum;
- Mobil and others.
Never listen to the advice of experienced motorists who recommend pouring thicker oil when the oil consumption is high. The fact is that it is more difficult for too thick motor oil to pass through narrow oil channels in the power unit, as a result of which the quality of lubrication of moving parts is significantly deteriorated.
Once you have determined which motor oil you will use, purchase the amount you need. In total you will need approximately 3 liters.
Tools
Having decided on the type of oil to be poured into the engine, proceed to subsequent work. Before you begin the replacement, review the list of tools that you should have with you when performing the procedure.
To successfully change the engine oil, you will need the following:
- rags;
- key to 14;
- new filter;
- container for draining old lubricant;
- funnel and rag;
- new oil.
Procedure
Having studied all the previous points, you can start replacing the fluid. Follow the following instructions:
So, you have successfully replaced the liquid lubricant in the engine of your Nissan Almera, and in the video you can see the whole process with your own eyes:
Video: Changing the oil in the Nissan Almera N16 engine