Print this article Font size 16
The ignition module on injection VAZ 2109 is deservedly considered one of the most complex electrical components. If the injectors have a module, then the carburetors have the simplest coil.
The actual, but incredibly important task of the module is the generation of high voltage current, which can reach 30 thousand watts. The current follows high-voltage wires to the spark plugs, which create a spark to ignite the air-fuel mixture.
The classic ignition coil is one of the components of the module, so the system works on a much more complex principle than on carburetors.
Setting the ignition timing with advance
This setup is quite easy to do.
Even a beginner can cope with this task. To do this, prepare a 13 mm wrench and a special 38 mm crankshaft wrench in advance. If your car starts, be sure to turn off the engine, as the ignition can only be turned on when the engine is off. First, the piston of the first cylinder is installed at the top dead center of the compression stroke, that is, in the ignition position. Before doing this, remove the candles and plug the hole from them with cotton wool.
It is necessary to align the mark on the crankshaft and the front engine cover. To do this, start turning the crankshaft clockwise using a wrench. During this action, the compressed air should push the cotton ball, marking the compression stroke. Continue to rotate the shaft slowly until the marks on the pulley and timing cover align.
Pay attention to the 3 marks on the cover:
- the second – by 5 º;
- the third is zero.
- The first indicates ignition advance by 10;
Since a VAZ 2107 with a carburetor engine runs on 92 or 95 gasoline, we need to set the ignition to these types of fuel. Therefore, you should select the second sign, which will indicate an ignition advance of 5.
After the required parameters match, put the spark plugs in place and remove the wires. The system is ready for use.
What needs to be done before adjustment?
Adjustment is necessary for the “nine”, which has a carburetor installed. For those who have an injector, the good news is that the car has an automatic device that regulates the ignition itself. To make the adjustment you will need 2 devices: a strobe light and a speedometer. How to properly prepare everything for setup? Thus:
- Warm up the engine to normal operating temperature, which is approximately 85°C.
- The minimum engine idle speed must be set at 750-790 rpm. Turn the fuel mixture adjustment screw on the carburetor using a wrench to change the gauges. If the RPM meets the requirements, there is no need to change it.
Next you need to reach the marks on the flywheel. The algorithm of actions is as follows:
- Disconnect the silicone hose from the fitting on the carburetor vacuum regulator. It is worth checking for vacuum.
- Then turn off the engine.
- The silicone tube can be tied in a knot or closed.
- Take a 10mm wrench and remove 3 nuts on the distributor body.
- Let's inspect the crankcase. You need to find the marked hatch. This may take some time as it is often closed with a rubber stopper.
- Once you find the device, clean the scale inside it so you can see each mark clearly.
- Take a slotted screwdriver and turn the flywheel to the alignment mark. The stripe should be located opposite the triangle on the hatch scale (triangular notch). In this position, the ignition timing is 0 °, and the pistons of the 1st and 4th cylinders of the engine should be at the TDC point. This position is the starting point for further manipulations.
- Connect the strobe pins according to the instructions to the device. They are usually connected to the battery with correct polarity.
Return to contents
Adjusting the ignition timing
For the following steps, loosen the nut securing the distributor (ignition distributor) with a 13mm wrench. Connect the harness from the light bulb (it will act as a voltmeter, that is, it will indicate the presence of voltage) to the low-voltage terminal which has a coil, and the second one on the ground.”
Now turn on the ignition. Slowly and carefully rotate the dispenser body clockwise, stopping immediately when the light goes out. The sparks that appear will indicate the moment of fire. Move the distributor counterclockwise until the contacts break and the lamp lights up again. Everything is in order, you can safely turn over the distributor, the installation is complete.
Adjusting the ignition by light bulb
There are ways to adjust without strobing. To make adjustments using a light bulb, you will need a crankshaft wrench and a standard 12-volt light bulb.
Setting the ignition timing by weakening the spark torque sensor.
The procedure for adjusting the ignition by light bulb
- Turn the crankshaft with a special wrench until the marks match. If there is no key for the crankshaft, engage 4th gear and push the car until the marks match.
- Connect a 12-volt light bulb to the wire connecting the distributor and ignition coil.
- Connect the light bulb to ground using the second wire.
- We connect the central cable to ground Lada 2109.
- Loosen the bolts on the toggle switch housing and turn on the ignition - the light should light up.
- Turn the lid to the right until the light goes out.
- After the light goes off, carefully turn the dispenser to the left.
- Stop when the light comes on.
- Tighten the housing bolts.
The lamp ignition control circuit is ideal for home surgery without the additional cost of instruments.
Setting with a light bulb
If you do not have a strobe, then the torque can be adjusted using a conventional control lamp; in particular, you will need a 12-volt lighting source.
How to set the SOP torque using a control light:
- To correctly adjust the torque of the RCD in the Nine with a carburetor engine, you will need to crank the crankshaft until the marks coincide. To turn the crankshaft you will need a special wrench. If the key is missing, you can set the lever on the gearbox to fourth speed, and then manually turn the shaft until the marks match.
- To make the adjustment, you will need to connect the test light to the wire and switchgear with the coil. The second contact from the light source is connected to ground, that is, the vehicle body.
- Next, on the switchgear housing you will need to slightly loosen the bolts that secure it. Then you will need to turn the key in the ignition. If everything is working correctly, the light should light up.
- After completing these steps, you will need to turn the housing of the distribution mechanism; it turns until the light stops burning. After this happens, the distributor housing will need to be turned in the opposite direction. The adjustment procedure stops the moment the lamp starts to light again. When this happens, the distributor no longer needs to be touched; it will be necessary to tighten the bolts that secure it (the author of the video about the implementation of this method is Nail Poroshin).
Installation of electronic ignition
Electronic ignition makes the engine smoother and softer, makes it easier to start in winter and reduces fuel consumption. If you, having a carburetor engine, decided to switch to contactless (electronic) ignition, we will tell you how to install it correctly on a VAZ 2107 car.
An electronic system for a carburetor car does not have to be too expensive or cheap. It’s better to opt for a product in the mid-price category so that you don’t have to change anything after a while.
Before work, prepare a drill and a set of wrenches.
For a general overview, first carefully read the included instructions and open the carburetor engine kit. Includes:
- 4 candles;
- connecting and high-voltage cables.
- distributor;
- switch;
- ignition coil;
The system is easy to install. First of all, remove the negative terminal from the battery and let the crankshaft run until marks 3 and 4 coincide, that is, the highest dead center.
Now you can begin the main steps. The coil must be disconnected from all wires, removed and installed a new one. The coil can now be connected to the central high voltage wire. Connect 2 brown wires to pin "K" and 2 blue wires to pin "B".
Now remove the dispenser cap. Please note that the slider must be set exactly as shown in the figure. Mark this point with a marker on the block to ensure the new dispenser is installed correctly. You can now unscrew this part and set it aside.
After opening the cover of the new distributor, install the slide perpendicular to the engine and insert it into the hole in the cylinder block. Align it with the mark on the block. Next, put the cover on and connect the wires.
Decide where the switch will be located, since there is no room for it in the VAZ 2107. It is recommended to install it next to the washer reservoir. Secure with self-tapping screws and install the connector.
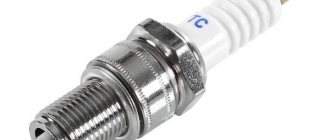
Don't forget the candles. To replace them on a VAZ 2107 car, you will need a spark plug wrench, which should be used to unscrew the old spark plugs from the cylinders and install new ones.
Their color can tell a lot about the engine's performance, so if the spark plugs have soot deposits on them, the air filter should be replaced. Normally, candles should be light brown in color.
Replacing the ignition module of a VAZ 2114
If repairing the MZ VAZ 2114 is impractical or impossible, then the problem with the operation of the device can be solved by replacing it.
The equipment needs to be changed only when the battery is disconnected. Otherwise, there is a risk of short circuits and failure of other electrical appliances.
How to remove the ignition module of a VAZ 2114?
The dismantling procedure is performed as follows:
- First, the on-board network is de-energized; to do this, loosen the negative clamp on the battery with a wrench.
- Then a search for MH is performed in the engine compartment. You can find the device by four high-voltage wires that go from the spark plugs directly to the equipment. These cables are disconnected from the MH.
- Then the connector with conductors is disconnected from the device. It is necessary to disconnect the fixing fastener located on the ignition module housing.
- The MZ itself is secured to the bracket thanks to three nuts. You need to unscrew them using a key.
- After dismantling the fasteners, the device located on three studs is removed.
Connecting a new device
The equipment installation procedure is performed in reverse order; during installation, the following nuances must be taken into account:
- After installing the ignition module, you need to look at its surface. It is marked with numbers - 1, 2, 3 and 4. These symbols indicate the numbers of the cylinders to which the MZ should be connected.
- To properly connect the device, you need to look at the ends of the high-voltage cables. They are also marked with the same numbers. This is done in order to simplify the procedure for connecting the MH to the cables.
Connection diagram
The device must be connected in accordance with the diagram given in this section.
Replacing the starter relay
Another common problem encountered on a VAZ 2107 with a carburetor is a malfunction of the starter relay. When you turn the key in the lock, the system clicks, but the retractor relay does not operate. Replacing the relay is very simple.
First, remove the starter from the relay. Unscrew the 2 screws that hold it in place. Slide it to the right and remove it by turning it backwards. Unscrew the nuts securing the starter and relay.
Unscrew the terminal.
Turn to the side.
Remove the 2 bolts securing the relay to the starter.
We remove the relay.
Install the new one upside down.
comments provided by HyperComments
Probably every motorist who owns a car of the VAZ 2108-09 family has encountered malfunctions in the ignition system. Most often, the cause of these malfunctions is a trivial reason - an incorrectly configured ignition. We are talking about how to set the ignition on the carburetor and injector of the VAZ 2109, and we will talk below.
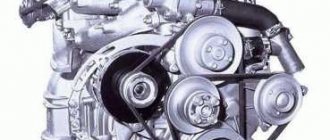
System design
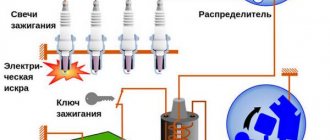
Before we begin to consider the setup process, we consider it necessary to understand the scheme and principle of operation of the system. Vehicles of the VAZ 2109 model range are equipped with a non-contact ignition system. The connection diagram for all elements is as follows:
There is nothing complicated about how the system works. For the spark to start, the crankshaft must turn. Simultaneously with the rotation, the camshaft will also turn. As a result, the sensor generates a signal that will be sent to the switch. The “K” terminal of the coil will be connected to the common wire (with “ground”), as a result of which a spark will appear on the main wire. At the moment when the working distributor slider connects the main wire with one or another high-voltage wire on the corresponding spark plug, a spark will appear and the car engine will start.
If the settings are incorrect, the spark plugs operate in the wrong timing modes. As a result, such a violation causes unstable operation of the entire power unit.
VAZ-2114 ignition module: various signs of malfunction
Experts note the main symptom of a faulty ignition coil is the absence of an igniting spark on the spark plugs. But, besides this, there are other signs by which one can judge that the module has failed:
- Lack of dynamics during engine acceleration.
- The appearance of failures in the operation of a car engine at the moment of sharply pressing the gas pedal with your foot so that the vehicle accelerates.
- A noticeable decrease in engine power (as they say, “the engine doesn’t pull”).
- “Swimming” of idle speed.
When the first signs of a malfunction of the described module appear, the owner of the VAZ-2114 should diagnose it. This can be done either independently at home or at the nearest service center for repairing cars of this model.
Preparatory activities and necessary tools
Installation of the VAZ 2109 ignition carburetor begins with preparatory activities. In particular, you need:
- Warm up the car engine;
- Set the parking brake on the vehicle and place the anti-roll bars under the rear wheels.
Remember that you cannot ignore safety rules because a car is a more dangerous vehicle and failure to follow safety rules while driving, maintaining and repairing can cost you dearly.
An important point: before starting work, you need to make sure that the carburetor is correctly configured on the car. It would be a good idea to conduct a visual inspection of all elements of the system. If we are talking about a carburetor car, then special attention should be paid to inspecting the condition of the distributor.
If you have a car with an injection engine, it is worth checking the ignition module for maintenance. The fact is that, as practice shows, it is this module that most often fails and is the reason for the inoperability of the entire system.
To complete the work we will need:
- a set of keys.
- strobe;
Video “Visual guide to replacing MH”
The STO TONN channel presented a visual aid for replacing the ignition module on a domestic VAZ 2114 car.
Due to a malfunction of the ignition module, the following malfunctions may occur in the operation of the injection engine of VAZ 2108, 2109, 21099 cars: the engine “triples”, “doubles” (works or tries to start on two cylinders), unstable idling, “dips”, “jerks” , “twitching”, etc.
— Multimeter, autotester or other device with ohmmeter and voltmeter modes
— Socket wrenches or heads for “13” and “17”
Preparatory work
— Remove the ignition module from the engine
Disconnect the ends of the high-voltage wires. Use a key set to “13” to unscrew the two upper fastening bolts, and use a key set to “17” to loosen the tightening of the bottom bolt. Remove the module along with its bracket.
— Cleaning from pollution
Wipe with a dry cloth.
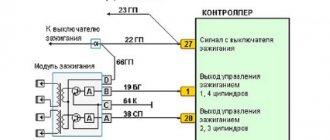
The procedure for checking the ignition module (coil) of the ignition system of VAZ 2108, 2109, 21099 cars with an injection engine
In garage conditions, you can check the secondary windings of the ignition module for an open circuit and the primary windings for a short circuit, as well as the voltage supply to the module from the ECU. This is quite enough to diagnose the problem.
— Check for short circuit
The positive probe of the multimeter in ohmmeter mode to terminal “D” of the ignition module connecting block, the negative probe to the bracket (“ground”). If there is no short circuit, the device readings tend to infinity.
— Check for “break”
Using a multimeter in ohmmeter mode, we alternately measure the resistance between terminals “1” and “4”, “2” and “3” of the ignition module.
The resistance for each measurement should be within 4 kOhm. If it is different or does not correspond to the required indicator, the module should be replaced.
— Checking the voltage supply to the ignition module
If previous checks did not reveal a malfunction, you need to check the voltage supply to the ignition module. Turn on the ignition. Using a multimeter in voltmeter mode, measure the voltage between terminals “C” and “D” of the block of the wiring harness going to the module (the terminals are marked on the block itself). The voltage must be within the vehicle's on-board voltage (12V). If it is smaller or absent, then the battery may be discharged, the wires from the computer to the ignition module are faulty, or the control unit (ECU) is faulty.
Notes and additions
— Often, one of the visual signs of failure of the ignition module can be two wet and two working spark plugs, since the module consists of two pairwise connected ignition coils that alternately produce a spark in two cylinders -1-4, 2-3. The failure of one of the coils leads to the engine running (or trying to start) on two spark plugs.
— The problems listed above in the operation of a car engine may be based not only on a malfunction of the ignition module, but also on a malfunction of the spark plugs, high-voltage wires, as well as the power and control system (ECM).
More articles on the ignition system of the injection engine of VAZ 2108, 2109, 21099 cars
Comparative test repair
The VAZ-2114 ignition module is also called a high-voltage coil, which serves to transmit current to the spark plugs. This module has its own signs of malfunction, by which it is necessary to determine when to replace the failed part. What are these signs? This will be discussed in this article.
How to regulate
Practice shows that very often problems with the ignition system are observed in older models with a carburetor-type power plant. To complete the setup you will need the following tools:
- key for 10 (suitable for both the bell and the terminal);
- tachometer (available in almost all car multimeters).
- strobe light (in principle, you can do without it, but with its help you can set the angle more accurately);
- Screwdriver Set;
On to the road. Ignition installation (VAZ 2109)
In this video, Nail Poroshin once again shows and explains exactly how to install the ignition
on the…
2109. Ignition in minus, do it as it should, and not according to the strobe
Carburetors on the map – – near you! – Purchasing from Nail...
How to test the ignition yourself
This fairly simple method of checking the operation of the ignition system can be used both for cars of the “ninth” family and for other passenger vehicles equipped with a carburetor engine. However, it should be noted right away that some experience is required here, since the test is carried out by ear.
So, first you need to accelerate the car to a speed of 50 km/h and engage fourth gear. Now press the gas pedal all the way and listen to the engine. If at this moment quiet detonation sounds appear, it means that the VAZ-2109 ignition timing is set correctly. The late timing is indicated by the absence of sounds during acceleration. In the case when the detonation sounds are too loud, one should conclude that the ignition is early. In both the first and second cases, your car’s engine requires re-adjusting the ignition timing.
The engine ignition system is responsible for igniting the mixture in the combustion chamber at the right time at the end of the compression stroke. The mixture ignites when a spark forms between the electrodes of the spark plug. Consequently, adjusting the ignition timing of a VAZ is the choice of the timing of the spark in relation to the location of the piston in relation to its top dead center (TDC).
How to correctly set the ignition on a VAZ 2109 carburetor - detailed instructions
The installation process looks like this:
1. Start the car engine and make sure that the engine speed is about 800 rpm. To set the idle speed within these limits, simply adjust the carburetor fuel mixture screw using a slotted screwdriver.
2. After setting the idle speed to the above value, turn off the vehicle engine.
3. Disconnect the rubber tube from the vacuum corrector. Gently bend the tube approximately in the center or close it with a screw of the appropriate diameter.
4. Connect the positive terminal of the strobe light to the “+” terminal of the battery;
5. Connect the negative wire of the strobe to the “-” terminal of the battery;
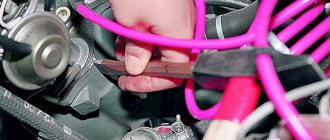
6. Disconnect the spark plug wire from the cylinder 1 socket as shown in the figure:
Disconnect the spark plug wire
7. Install the strobe sensor into the socket and connect the high-voltage cable to it;
8. Remove the cover from the clutch housing hatch:
Removing a stub
9. Turn on the ignition and start the engine. The actively changing luminous flux created by the strobe is directed into the hatch of the clutch housing:
We direct the strobe towards the clutch housing hatch
10. When the indicator flashes, the mark on the flywheel appears to have stopped. When setting the ignition correctly, the first mark should be between the technological notch and the previous mark on the scale.
Label
11. If after the described operations it turns out that the ignition adjustment of the VAZ 2109 is incorrect, we continue to work.
12. Using a wrench, slightly loosen the nuts securing the ignition distributor:
Mounting nuts
13. Having loosened the fastening nuts, turn the distributor body to the right if it is necessary to increase the firing angle, and to the left if it is necessary to decrease the angle.
14. Connect the rubber tube to the vacuum corrector and check that the ignition settings are correct. If it was not possible to achieve a normal result, we make repeated adjustments. The following describes how to check that the system is working correctly.
Setting the ignition using a strobe
Checking and subsequent adjustment of the VAZ-2109 ignition (carburetor) can be considered correct only if the engine is warmed up to its operating temperature (in the range from 80 to 90 degrees). All further actions must be performed according to the following instructions:
- Start the engine and set the crankshaft speed to 800-900 rpm.
- Remove the vacuum tube from the fitting of the vacuum ignition timing corrector and, turning off the engine, close the gap in the tube.
- Using a “10” wrench, unscrew the three nuts on which the distributor-switch is secured.
- The gearbox has an inspection window, closed with a cap, after removing which the flywheel gear ring is revealed to the eye. Rotate the flywheel until you see the alignment mark, placing it in front of the center scale graduation located on the edge of the sight glass, you will place the first and fourth pistons at top dead center. It would be a good idea to check the correct position of this mark - to do this, find the same mark on the crankshaft pulley and make sure that it is aligned with the mark on the timing cover.
Make sure the marks match
Using this method will allow you to adjust the ignition as accurately as possible with your own hands without the participation of a specialist.
- Direct the stroboscopic beam into the viewing window: the pulses of the device correspond to the moment the flywheel mark appears.
- Now you need to turn the distributor until the desired advance angle is set. According to the passport data, for A-92 gasoline this angle is 1 ± 1 degree, and for A-95 gasoline – 4 ± 1 degree. Make sure that the mark is placed opposite the desired danger, and the installation of the VAZ-2109 ignition (carburetor) can be considered complete.
- Restart the engine and re-check that the crankshaft rotates at the required minimum.
- Now you need to connect the strobe light by connecting one wire to the camshaft instead of the center high voltage wire and the other to the negative terminal of the battery.
Adjustment with strobe light
How to configure and adjust the OZ on a VAZ 2109 or 21099 using a strobe? Anyone can cope with this task, but you need to take into account that if there are malfunctions in the operation of the module, then most likely the adjustment will not solve the problem. When adjusting, engine speed should be in the region of 820-900 rpm. The method of adjusting the SOP using a strobe is considered one of the most accurate.
How to perform this procedure:
- First you need to start the power unit and set the appropriate number of revolutions for its operation. If this value on a carburetor engine is outside the limits, then you need to adjust the air-fuel ratio to form a combustible mixture.
- Next, you need to disconnect the vacuum line from the fitting. Having done this, the car engine should be turned off, after which the gap in the vacuum hose will need to be removed. If there is no clearance, you will need to unscrew the three nuts that secure the distributor or switchgear housing.
- Once these steps are completed, you will need to remove the rubberized plug from the transmission housing; directly behind it is the flywheel inspection hole. In addition, you will need to disconnect the high-voltage wire from cylinder number 1 from the distribution unit cover.
- After this, you should activate the strobe itself. This device is connected instead of the disconnected wire, as well as to the battery. After starting the power unit, the device will transmit impulses in time with the flywheel. In this case, the distributor body will rotate until the mark on it coincides with the one marked on the flywheel itself. Once the marking is complete, you will need to secure it in place. For diagnostics, make sure that the marks on the flywheel and crankshaft match; if this is the case, then the installation of the OZ was carried out correctly (the author of the video is Nail Poroshin).
Incandescent lamp instead of strobe light
Many car owners will ask a completely correct question - how to set the ignition of a VAZ 2109 in the absence of a strobe light. Of course, it is even more correct to work with a strobe, especially since in this case you can carry out the setup and adjustment work as accurately as possible. However, there is another method that will be useful for those who, for one reason or another, do not want to buy a strobe light.
To work, we need a regular incandescent lamp, designed for an operating voltage of 12 V. The entire algorithm of actions is as follows:
- Disconnect the wire going to the ignition coil from the distributor
- We connect one terminal of the incandescent lamp to the wire. Connect the second wire from the lamp to ground.”
- As in the case when the ignition of a VAZ 2109 is set using a strobe light, we loosen the nuts securing the distributor using a wrench.
- Turn on the ignition. The incandescent lamp should light up.
- Gradually turn the dispenser until the lamp stops burning. Next, turn the distributor slightly in the other direction. Once the lamp lights up again, you can tighten the mounting nuts.
Of course, the method described above cannot provide the highest possible control accuracy. However, with its help it is quite possible to achieve more or less correct and stable operation of the power unit.
Checking with a light bulb
This will make it easier when using a strobe light. Requires a 12 volt lamp. The procedure is as follows:
- start the engine and loosen the bolts on the distributor;
- then slowly turn to the left - when the light flashes, the dispenser is stable.
- a central closing wire is installed there (high voltage;
- the body must be turned to the right until the lamp goes out;
- the second is applied to the mass;
- a contact from a light bulb is connected to the wire from the coil to the distributor;
To better understand how the moment is established, we suggest you watch this video:
How to adjust the ignition on a VAZ 2109 - an alternative method
In addition to the adjustment methods described above using a strobe and a light bulb, you should remember one more method - adjustment using a standard speedometer. We emphasize that this method, like the method using a light bulb, cannot provide high tuning accuracy. In addition, it has a significant drawback - it is impossible to carry out the adjustment yourself; an assistant will be required. Like:
- Your assistant is driving the car. Turns on the ignition and monitors the standard tachometer readings on the instrument cluster.
- Loosen the distributor nuts and twist a little.
- Your assistant turns the ignition key. The speedometer needle should quickly deflect and return to zero.
- It is necessary to ensure that the distributor remains in a position in which the tachometer needle deflects.
You may notice that this method requires patience and a lot of time. As practice shows, it is not possible to adjust the ignition quickly and the first time using this method. Therefore, it is recommended to use it only as a last resort.
How to set the ignition on a VAZ 2109 injector
Above we described the process of adjusting carburetor engines. However, there are VAZ modifications equipped with injection power units. How to set the ignition on a VAZ 2109 with such an engine?
First of all, it should be noted that in the case of injection engines they do not have a distributor and a Hall sensor. In this case, the system simultaneously has two ignition coils and, accordingly, two switches. The main difference between the injection system and the classical one is that control signals are generated by a special electronic unit. The operating principle is as follows:
The principle of operation of the injection system
So there is simply no need for a distributor, because it is the electronic control unit that determines in which cylinder there should be a spark and at what moment. Signals from the control unit are sent to the inputs of the switches, and from them to the ignition coils. One switch is responsible for the spark in the first and third cylinders, the second - in the second and fourth.
As in the case of engines with a carburetor fuel system, adjustment is carried out taking into account special technological risks. The ignition marks of the VAZ 2109 injector are shown in the photo below:
Ignition marks VAZ 2109 injector
Please note that it is impossible to adjust the engine injection system yourself. The fact is that this operation involves making changes to the software of the microcontroller of the electronic control unit. Of course, each specific microcontroller has its own specific firmware. In addition, there are non-standard firmwares, for example, with settings for a sporty driving style.
Only an experienced specialist with certain knowledge can make the electronic control unit blink. Therefore, if there is a malfunction in the ignition system of an injection engine, you must seek help from a trusted car service center.
Adjusting the electronic ignition on the injector
What to do if there is no spark at the spark plugs, what is the switch connection diagram, what to do if the ignition does not turn on and what are the signs of too early OZ? We offer you to learn in more detail how to configure and how to check the module on an engine with an injector or carburetor. In the case of injection power units, the procedure for setting up the SPD is carried out by reprogramming the control unit; this requires special software. Accordingly, it is better to perform such a procedure under the supervision of specialists at a service station.
How to check the correctness of the work performed?
If you set up POP yourself, you will also need to verify that the steps are correct.
To complete the verification you need to do the following:
- We start the engine, diagnostics are carried out while driving, for this you will have to drive on a flat road.
- To obtain more accurate test results, it will be necessary to accelerate the vehicle to approximately 50 km/h.
- After selecting this speed, you will need to engage fourth gear and then sharply press the accelerator pedal. When you press the pedal, an explosion is heard from under the hood of the car, that is, a metallic knock. In this case, the sounds themselves may not last long. If so, you have successfully completed all setup steps and the distributor has been installed correctly. If the sounds are long and prolonged, this will indicate that the SPD was installed too early, and the detonation will be quite loud. If there are no sounds from under the hood, we can conclude that the OZ was installed late.
Possible reasons for failure of the ignition module
Before repairing the main part in the car’s ignition system, you need to understand the nature of the problem. To do this, the consumer must be aware of the signs of a malfunction, as well as the causes of the breakdown.
The main reasons for device failure
Causes of problems:
- The ignition system uses spark plugs that do not match the vehicle parameters. They may not have the gap specified by the manufacturer. Also, the spark plugs themselves may not be working or dirty; this can be determined by visual diagnostics. If there are traces of carbon deposits on the devices, they must be removed.
- Malfunctions in the operation of the MH can arise as a result of frequent spark checks. At the time of diagnosis, a high load is placed on the device. If it appears frequently, it will lead to equipment failure or incorrect operation.
- The ignition module in the VAZ 2114 operates with the high-voltage cables disconnected. This also leads to device failure. The products themselves may be damaged, which affects the functioning of the engine as a whole.
- The device operates under severe vibration conditions. Their impact may be due to poor quality fixation of the module in the seat. As a result of vibrations, the factory soldering inside the equipment structure is damaged. This leads to its incorrect operation.
- The contact inside the plug with the low-voltage cables is broken.
- Initial use of a defective device or module with poor build quality. This factory defect can only be eliminated by replacing the mechanism; repairing the equipment is pointless.
- Moisture getting inside the case. This problem is unlikely, but exposure of the device to liquid may cause it to short out and break.
Signs of coil malfunction
The main symptoms of a malfunction in the VAZ 2114 ignition module:
- Difficulties arise when trying to start the engine. Starting the car engine may be difficult due to the fact that there is no spark on a spark plug or several.
- When idling or parking with the internal combustion engine running, the speed of the power unit floats. Their change is not associated with pressing the gas pedal and other third-party factors. This happens randomly.
- There are dips in the power of the car's engine. This is especially felt when driving uphill or sharp acceleration. Problems can also occur when driving on a flat road.
- Several cylinders stopped working. Usually these devices operate in pairs, so elements 1-4 or 2-3 could fail. Non-working cylinders may be indicated by “triple movement” of the engine.
- A “Check Engine” warning light appeared on the dashboard.
If the ignition module malfunctions, problems will appear not only in engine operation, but also when starting it.
The “Simple Opinion” channel, using the Lada Priora car as an example, spoke in detail about the symptoms that appear in the operation of the ignition modules.