Do-it-yourself replacement of front pads on a Toyota Corolla
The pads located on the front wheels wear out faster than the rear ones, so if you hear a clear squeaking noise during braking, you should understand that this is a sign of wear.
The sequence of actions will be as follows:
- Place the Corolla on a jack and remove the front wheel;
- Unscrew the upper and lower bolts by 14, holding the pad support;
- The free end of the caliper is brought out, and it is worth paying attention to the fact that there is no tension in the hose;
- It is necessary to remove the pads on both sides. If they are strongly welded on both sides, you can use a screwdriver, but do not use excessive force.
After this, the installation process is performed in reverse order.
Installing new pads
As in the case of changing a wheel, you must first, without using a jack, loosen the wheel nut, then lift the car and slowly carefully remove the wheel. In my case, this is a double procedure, since I changed the pads on two wheels at once.
Installing new pads
When the wheel has already been completely removed, you need to use a wrench (preferably using a socket and a wrench) to unscrew the lower guide in the caliper. You don't have to touch the top guide at all. Firstly, if you unscrew it, you still won’t be able to remove the pads. Secondly, it is better not to unscrew two guides at the same time. Once the bottom guide is unscrewed, you can move the bracket up and remove the old pads.
Installing new pads
When buying new pads through the officials, I was advised to immediately buy plates on them, which prevent the appearance of unpleasant squeaks. They are on all the pads, but I didn’t want to remove the old ones and use them.
If it is not possible to buy new plates, you can leave the old ones. You just need to clean them well with a metal brush, and then put them on new pads. In general, I was lucky, they advised me to buy them along with a set of new pads. And it’s quite difficult to find them on sale now.
After installing the plates, you need to recess the brake cylinder rod. I did this with a regular pry bar, but, in principle, this can be done with any other tool that is suitable in thickness.
Installing new pads
IMPORTANT! It should be taken into account that if you recess the rods of two cylinders at once, the amount of brake fluid in the expansion tank may slightly increase. Some car owners sometimes even drain the brake fluid completely, but I didn't do that.
The places where new pads will be installed must also be thoroughly brushed to remove dirt and rust. After fixing the new pads, you need to assemble everything in the reverse order: fix the pad with brackets, tighten the lower guide, put the wheel in place.
Installing new pads
We disassemble the wheel and remove the old pads
After preparing the car for replacing the pads, loosen the nuts on the wheel.
Raise the car on a jack . To prevent the car from standing only on a jack during replacement (after all, this is not a very stable support), I advise you to place bricks under the car.
There are protruding ribs running under the bottom (something like stiffening ribs), so I put bricks under them.
Then I lower the car so that it rests on the bricks (but I don’t remove the jack completely, it will serve as additional support) and now you don’t have to worry about the car falling.
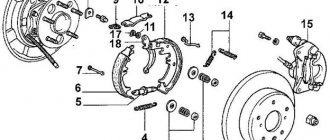
Unscrew the nuts completely and remove the wheel. Now you need to remove the drum. This is why we need a bolt. It must have an M8 thread
Screw the bolt into any of the two holes on the drum. To twist it, we need a socket wrench. I had it at 12, but it depends on what kind of bolt you have.
We screw it in until the drum noticeably moves away from the support disk (the round cup that is located behind the drum and to which all the drum brake mechanisms are attached).
Now we unscrew the bolt (otherwise the drum will not be removed due to skew), if the drum cannot be removed, then screw the bolt into the second hole. After removing the drum, the bolt (if it is still screwed in) can be unscrewed immediately; here we will no longer need it.
Now you need to remove the spacer spring. This is easier to do in the place where the spring sticks out. For the right side it is on the left (if you look at the brake mechanism), for the left side it is on the right (again, if you look at the brake mechanism). I removed the right pads.
In order to unhook the spring, we clamp it with pliers, as in the figure. Then we stretch the spring (using pliers, of course) in the direction shown by the arrow. When the spring comes out of engagement with the block (as in the figure), pull it towards you, but do not let it compress again until we pull it out of the hole.
Then we return the spring to a compressed state, without releasing it from the pliers (if you throw it, it will shoot out and can damage the piston boot). On the second side it will come off easily, because it will already dangle freely.
Now remove the pad clamps. You can remove the lock washer by hand. To begin, press with your finger (on the back of the support disk) the rod on which the spring and the lock washer are held. You can see a slot on the washer (red rectangle in the photo above).
You need to hold the rod and turn the washer 90 degrees so that the protrusions of the rod fall into the slot of the washer. If everything is done correctly, the washer and spring can be easily removed. We put them aside (we don’t throw them on the ground, because they can simply be trampled, and this is a very important detail).
Here is the rod itself. Here is the spring and washer. We remove the lock from the second block in the same way. That's it, the pads can be removed. They are connected from below by such a spring
It doesn’t interfere at all with removing the pads, but it can easily get lost, so we put it aside towards the latches.
Now one of the pads no longer holds on to anything. Let's see if the new pad has such a spring and such an expansion plate. This spring and plate together with a gear wheel on a spacer sleeve. This wheel forms a mechanism for distributing the pads.
If there is none of this (and when I bought the pads, I didn’t have any of this on them), then everything needs to be rearranged. There is nothing complicated here. Unhook the spring from the plate and pins, and remove the plate from the trunnion (the rod on which it sits).
Replacing brake fluid on a Toyota Corolla
Every car owner can say with confidence that the fluid in the brake system is one of the important elements in the safety of the car, on the correct functioning of which much depends.
The purpose of this system is to slow down or completely stop the car, and its replacement can be done along with replacing the brake pads.
Brake fluid change frequency
Most often, the frequency of changing the fluid in the braking system will depend on how fast the car travels a certain number of kilometers. You can clarify this quantity by looking at the technical documentation for the machine. If we talk about Toyota Corolla, then this should be done every 40-50 thousand kilometers traveled.
The reason for the replacement is its increased hygroscopicity, that is, the ability to absorb moisture from the air. This causes the boiling point of the liquid to decrease. For example, only 3% liquid in the composition is enough to lower the boiling point by 30 degrees.
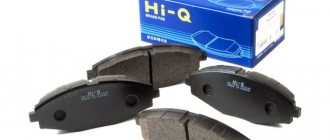
ATE 13.0460-5604.2
The pads are designed for aggressive use, adapted to significant loads, and are effective even at extreme temperatures. The products provide a smooth stop and are made of improved friction material. The linings do not generate dust, produce minimal noise, and do not contain asbestos. Excessive wear is indicated by an additional sound layer.
Pros:
- good protection against counterfeiting (the authenticity of the elements can be easily checked on the official Internet resource of the manufacturer);
- long operational period;
- reliability in case of emergency situations.
Users consider the overpriced devices to be the only drawback.
Replacing brake pads on a 2008 Toyota Corolla
One of the most important safety elements in a car is its braking system.
The life and health of people, as well as the safety of the vehicle itself, depend on the quality of its work. The system's job is to effectively reduce the speed of the car after it accelerates.
In this article we will talk about how to replace brake pads on a 2008 Toyota Corolla.
Every driver knows that it is the pads that perform direct braking. This occurs by pressing them against the brake disc of each wheel individually. Constant friction gradually destroys the working brake material of the pads and over time they become unusable, ceasing to perform their function efficiently.
Which ones to choose?
Today there are many different manufacturers. The highest quality pads are produced by Germany, France, Spain and Japan. In addition to the manufacturer, it is important to choose the right size pads for your wheel caliper.
Like any spare part, they are divided into: original and non-original. It's your choice here. The original lasts significantly longer than the non-original. The price of such pads is usually twice as high.
In general, as always, it’s up to you to decide whether to choose the quality or cost of the product.
Step-by-step instructions for replacing pads
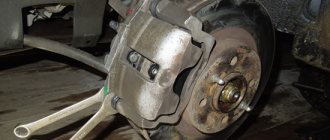
Before starting work, you need to prepare your workplace - this is necessary if you are afraid of getting dirty. We lay a blanket in front of the wheel and wash the disk. After this, you need to jack up the car on the side where we will change the block. We unscrew the wheel we need and begin direct work with the brake system.
First of all, we need to unscrew the bolt holding the caliper using a suitable wrench. The photo clearly shows the location of the bolt that needs to be tightened.
Having unscrewed the bolt holding the caliper, lift it up and, for ease of work, tie it to the body with wire. The photo shows how everything needs to be done.
After this, you need to press in the brake piston. This must be done first of all to apply heat-resistant lubricant. For this we used a clamp. In the photo below everything is visible and clear.
After the piston has been pressed in, we need to press out the brackets with a screwdriver. We perform the following actions: press the bracket - pull the block towards you.
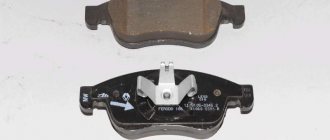
So we pulled her out. Let's pay attention to what it looks like and what components it consists of. The photographs will show the general view, as well as the disassembled block. Brackets will also be shown. The photos are signed.
Having disassembled it, let's see how worn it is. The block we pulled out could travel about another 20 thousand km. Below is a photo in which there are two of them - new and old.
- After we have compared them, we take a new one, lubricate it with heat-resistant paste - exactly as shown in the picture, and also lubricate the cylinder and brackets.
We put everything back together and put everything in its place. We assemble the caliper and install the wheel in its place. Work with one wheel is finished - you can move on to the next one.
High temperature lubricant for brake service
I spent a long time searching and reading about lubricants for brake system elements. Many people unknowingly lubricate the guides with the grease that comes with the brake pads, but it is intended for completely different purposes, and is not intended for the temperatures at which the caliper guides operate. And in the end I purchased for existential testing: Vmpauto 1502 Lubricant for calipers, universal “Ms 1600” costing 312 rubles 82 kopecks. The tube is 50 grams, although you could take 100 grams at once, the difference in price is not significant.
As he writes
We buy consumables for rear brakes
On the rear guides, as well as on the front, one guide has an elastic band. The only difference is that on the front calipers the guide with the rubber is at the top, and on the rear calipers at the bottom. I didn’t have these rubber bands on the guides; the old owner of the car took them somewhere or the service station removed them when servicing the brake system. The rubber bands are not sold separately, only in a set with guides. I bought a repair kit for the front, and the guides for the rear are in good condition.
Caliper guide bushing 47769-05020
But the rubber bands for the rear brake caliper guides are sold separately on Toyota Avensis, which I purchased: 47769-05020 Caliper guide. Two elastic bands for 157 rubles. 52 kopecks They are a millimeter longer, we cut them with a utility knife and they sit like they belong.
Signs that your e 150 needs to be replaced
You can understand that the disks need to be changed by the presence of the following signs:
- The wheels begin to beat.
- During braking, the car begins to pull away from the straight path.
- When braking, a knocking or extraneous grinding noise is heard.
The official manufacturer recommends changing brake discs after the second replacement of the pads, but as a rule, Toyota Corolla front brake discs are changed between 100-130 thousand kilometers. It is also recommended that before changing them, take a measurement, which should be:
- The front ones are at least 23 millimeters.
- The rear ones are about 8 millimeters.
After the measurements, you can decide whether to replace the TD.
Operating principle
To understand why they wear out, you need to know how the pads work. Brakes are cylinders that, when the pedal of the same name is pressed, press the pad against the wheel. The greater the pressure in the cylinder, the stronger the device is pressed.
However, during frequent sharp braking, the rubber wears off and the springs wear out. Therefore, old pads must be removed.
Replacing the rear brake pads of a Toyota Corolla can be done with your own hands without visiting a service center. To do this procedure correctly, just read and follow the following instructions.
How to change the front ones
- The front brake pads are very easy to change. The second time, the procedure will take you no more than 10 minutes per wheel. We install chocks under the wheels and put the car on the handbrake. Turn the wheel on which you will change the pads outward, this will make it easier to work with the caliper. Step 3 Step 2 Step 1
- Using a 12-mm open-end wrench or socket, loosen the top bolt and completely unscrew the bottom one. Now you can “open” the caliper upwards and gain access to the pads.
Open the caliper
- To remove the cover, push it to the side and then pull it towards you. Installing it backwards should not cause any problems; there are special clamps there.
Clamps will help with adjustment
They do not allow the overlays to be placed incorrectly.
New consumables in place
- To get the caliper into place, press out the brake cylinder using a wrench or pry bar. On some machines this can even be done by hand.
Release the brake cylinder
- All that remains is to tighten the two mounting bolts, put on the wheel, and you are good to go.
If you have any questions, watch the video.
How to replace: video guide
As you can see, disc brakes are much easier to change than drum brakes. Their braking efficiency is relatively the same, but drum brakes are prone to overheating (but their service life is 2-3 times longer).
I still couldn’t figure out how to remove the rear drum?!
if the handbrake is not tightened, it does not interfere with removing the drum
It can be seen. Because, before screwing in the bolts, you need to bring the pads together according to the method described in the book.
By the way, the Opel has the same mechanism for spreading the pads. But there were no holes in the shield - I made them in the drum. Logic helped. And then, a few years later, I saw how it was done at Toyota. )
if it is clearly tight, then it is necessary to bring the pads together before screwing in the bolts. you do this. 2.1. From behind the drum (on the casing) remove the oval rubber plug. 2.2. you try to look inside this very hole with a flashlight and a mirror. inside you should see a wheel with notches standing at its end and next to it something like a dog. You need to look so that it is clear where to poke the screwdrivers. 2.3. take two flat screwdrivers. You lift the pawl with one screwdriver, and with the second screwdriver you rotate the wheel, digging into its notches. 2.4. You can understand in which direction to rotate the wheel this way: when the pawl is not raised, the wheel can only rotate in one direction. I’ll remember which way it can rotate without a pawl and rotate it in the opposite direction, lifting the pawl.
and of my mistakes I can only remember one: when I removed the drum for the first time, I did not close the pads enough and used only one bolt, alternately screwing it into the holes with greater force. one of these holes in the drum is cracked