Description of the nuances of assembling a 12 Volt voltage stabilizer for a car, a list of necessary parts, 3 circuit options. + TEST for self-test. We will analyze the TOP 5 questions on the topic and the TOP 3 soldering irons for boards.
TEST:
To understand whether you have sufficient information about car stabilizers, you should take a short test:
- Why install a 12-volt stabilizer on your vehicle? a) The vehicle’s network produces an inconsistent voltage. This depends on the state of charge of the battery. The voltage ranges from 11.5 - 14.5 Volts. But LED bulbs only require 12 volts. To supply the required voltage, SN is installed. b) LED lamps operate at 18 Volts. In order for them to function when connected to a car, additional load has to be supplied through a stabilizer.
- Why do LED light bulbs often burn out without a stabilizer? a) The main reason is a low-quality LED manufacturer. b) Due to surge voltage on them.
- In what case will it be necessary to additionally connect an aluminum radiator to the stabilizer? a) If more than 10 LEDs are installed on the car. b) When installing LED lamps of different colors on the car.
- How are LEDs connected? a) 3 LEDs are connected in series to a resistor, and then the assembled set is connected in parallel to the next LEDs. b) 3 LEDs are connected in parallel to a resistor, and then the assembled set is connected in series to the next LEDs.
Answers:
- a) Depending on the state of charge of the battery, the LED lamps will receive a fluctuating voltage - from 11.5 to 14.5. That is why the MV is connected to the lamps - to obtain a constant voltage of 12 Volts (this indicator is needed for LEDs).
- b) LEDs are not designed for voltage surges that come from the battery, so they soon burn out without a stabilizer.
- a) If more than 10 LEDs are installed on a car, then it is advisable to equip the circuit with an aluminum radiator.
- b) First, 3 LEDs are connected in series to a resistor, and then they take a new coupler and connect them in parallel to each other.
Car owners often install LED lighting on their cars. But light bulbs quite often fail, and all the created beauty immediately fades. This is because LED bulbs do not work properly if they are simply connected to an electrical outlet. For them it is necessary to use special stabilizers. Only in this case will the lamps be protected from voltage surges, overheating, and breakdown of important components. To install a voltage stabilizer on your car, you need to understand this issue in detail and study a simple circuit that you can assemble with your own hands.
Definition: CH 12 volt for a car is a small device designed to dampen excess voltage in a car coming from the battery. As a result, the connected LED lamps receive a constant load of 12 volts.
Selection of 12 V stabilizer
The car's on-board network provides power from 13 V, but LEDs need only 12 V to operate. That is why it is necessary to install a voltage stabilizer, which will provide exactly 12 V at the output.
By installing such equipment, it will ensure normal conditions for the operation of LED lighting, which will not fail for a long time. When choosing stabilizers, motorists are faced with problems, since there are so many designs, and they all work differently.
You should select a stabilizer that:
- It will function correctly.
- Provides reliable protection and safety of lighting equipment.
Important details you need to know
You can also highlight paragraph 5, subparagraph 12, which says that the main headlights (the so-called headlights) themselves should be turned on only after the side lights have been turned on. An exception can be considered those moments when the side lights turn on briefly as signals (flashing).
Despite the fact that this does not seem particularly important at first glance, when connecting daytime running lights yourself, you will have to take into account all these nuances and delve into them.
However, there are many car enthusiasts who claim that stabilization is completely unnecessary and their DRLs work perfectly without it. They argue that installing a stabilizer will be a waste of time and there is no difference between “empty” DRLs and DRLs with a stabilization unit. And, it seems, connecting daytime running lights is just an additional expense.
As a result, you will get reduced brightness of the daytime running lights and their immediate task (the reason for which you installed them) - warning drivers from oncoming traffic - will not be performed effectively enough.
Using LED daytime running lights without an additional stabilization unit, you will need to replace them almost annually, or even more often, while their direct function will be performed worse. Is it worth being lazy and saving a couple of hundred rubles because of this?
Expert opinion
It-Technology, Electrical power and electronics specialist
Ask questions to the “Specialist for modernization of energy generation systems”
Refinement of running lights com you can find several options for control units for daytime running lights, which have a pleasant price tag and many positive reviews. Ask, I'm in touch!
A simple 12 V voltage stabilizer with your own hands
If you have even minor skills in assembling an electrical circuit, then it is not necessary to purchase a voltage stabilizer ready-made. To make a homemade device, a person will spend 50 rubles or less; a ready-made model costs slightly more. There is no point in overpaying, since the result will be a high-quality device that meets all the necessary requirements.
The simplest but most functional stabilizer can be made with your own hands without much effort. It is very difficult to assemble a pulse device, especially for a beginner, and therefore it is worth considering linear stabilizers and amateur circuits for it.
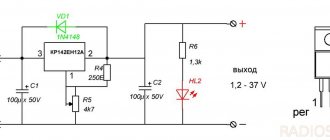
The simplest 12 volt voltage stabilizer is assembled from a (finished) circuit, as well as a resistance resistor. It is advisable to use the LM317 chip. All parts will be attached to a perforated panel or universal printed circuit board. If you assemble the device correctly and connect it to your car, you can provide good lighting - the lights will stop blinking.
LM317 circuit
Connection diagram
Manufacturing recommendations
For manufacturing, you will need electronic components for the selected circuit. You can purchase them in specialized stores or online. For a device based on an integrated linear stabilizer, a housing is not needed, but you need to take care of the radiator. You will also need a radiator when making a ruler using discrete elements. More complex devices must be assembled on boards. Those skilled in home technology will be able to design and etch the PCB themselves. For the rest, it is better to use a breadboard - cut off the required piece and mount the elements on it.
Breadboard mounting.
You also need to select or assemble the case, not forgetting about heat dissipation. Heat-shrinking the board is not the best option in this regard. You will also need a soldering iron with a set of consumables.
It is difficult to give general manufacturing instructions - it all depends on the chosen scheme and preferred technologies. But we can give some advice to those who have little experience in the manufacture of electronic devices:
- all connections must be carefully soldered (being careful not to overheat the elements and conductors in the insulation) - operating conditions will be associated with shaking and temperature changes, and poor-quality soldering will immediately make itself felt;
- the body of the structure must prevent water and dirt from getting inside - when installing the device under the hood, these substances will be sufficient;
- if the case is not used, the soldering points must be carefully isolated - for the same reasons;
- After assembly and performance testing, it would not be superfluous to coat the board on the solder side with varnish and dry it.
Only a careful approach to manufacturing can guarantee at least some long-term operation of a homemade product in harsh conditions.
12V MV Parts List
To make a voltage stabilizer with your own hands, you should find or buy the following parts:
- Board - 35 by 20 mm.
- Chip LD 1084.
- RS407 diode bridge. If this is not the case, then we select any small diode intended for reverse current.
- Power supply with a transistor and two resistances. This equipment is needed to ensure that the end is turned off when the low or high beam headlights are turned on.
Three LEDs must be connected in series with a current-limiting resistor that equalizes the electric current. This set should then be connected in parallel to the next set of light bulbs.
Connecting LEDs
LED sockets, so-called clusters are sold on sale ; they are designed for 12V . You can simply connect them to the on-board network and enjoy the beautiful lights. But there is an unpleasant feature - when the engine speed changes, the brightness of the LEDs in the clusters . Slightly, but noticeable to the eye. In addition, in fact, they normally shine at a voltage of about 12.5V, so if you have low voltage in the on-board network, the clusters will glow dimly. Structurally, the cluster consists of a chain of LEDs and a resistor . For every three LEDs there is a resistor that suppresses excess voltage. The LED strip is designed in exactly the same way, so if you need to cut a piece, look at the strip, there are places on it where you can cut it. Usually these are the same three LEDs and a resistor. You can’t cut anywhere