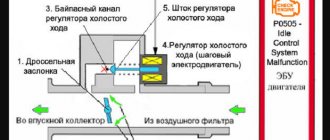
Principle of operation
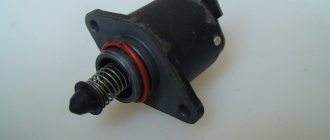
The Grant idle speed sensor with 8 valves is located at the very bottom of the throttle assembly. This part is a rod that regulates the amount of air supplied to the fuel system. The IAC works according to the following principle:
- When the engine starts, the throttle valve is in the closed position.
- Information about this is sent to the engine ECU.
- The ECU sends a signal to the IAC.
- The IAC opens, sending air bypassing the throttle valve through the outlet channel.
- The ECU, receiving signals from the temperature sensor, adjusts the clearance of the IAC rod, thereby maintaining the required idle speed.
The sensor operates until the engine warms up to 80 degrees. After reaching the required temperature, or after pressing the gas pedal, the IAC switches off. After shutdown, the throttle assembly comes into operation, opening the throttle valve. The IAC is switched on again when the car is idle with the engine running, in neutral gear.
Operating principle and location of the IAC
Briefly, everything happens as follows. When the engine is idling, a certain amount of air enters it, which allows it to function smoothly.
DPKV takes into account the number of revolutions, this data is sent to the control unit, from which a command is given to the IAC to reduce or increase the air supply. Which he does, ignoring the closed throttle.
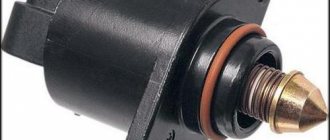
IAC device: 1) valve; 2) regulator body; 3) stator winding; 4) lead screw; 5) plug terminal of the stator winding; 6) ball bearing; 7) stator winding housing; rotor; 9) spring.
If the engine warms up to operating temperature, the controller automatically begins to maintain idle speed. If the engine has not heated up to the required degree, then the controller itself will increase the speed due to the IAC, thereby ensuring the engine warms up at higher speeds. This mode of engine operation allows the car to start moving immediately, without warming up.
Where is the idle air control valve located? Yes, in the throttle body - it is secured there with two screws. There are cars on which the heads of the mounting screws can be drilled out or the screws themselves are set on the varnish, which, of course, can significantly complicate the replacement or cleaning of the IAC air duct. In such cases, it is extremely difficult to do without dismantling the throttle body.
Currently, automakers use the following types of idle air regulators:
Let's look at each of the listed types in more detail.
The idle speed control solenoid operates using electromagnetic force. So, when voltage is applied to its coil, the core is retracted, and the damper mechanically connected to it rises, thereby opening the air channel. When the voltage is lost (that is, the solenoid is turned off), the damper returns to its place, closing the channel.
Adjustment of the operation of the solenoid IAC is carried out by changing the frequency of command signals to the actuator. In order to pass a precisely measured amount of air through itself, high-frequency signals are sent to the working element. This allows air to be supplied in small portions.
The stepper idle speed controller has a ring magnet in its design, as well as four electromagnetic windings. Voltage is applied to them alternately, thereby creating a rotating magnetic field that causes the control rotor to rotate. It is connected to an actuator, which locks or unlocks the air channel.
As for rotary idle speed controllers , they are controlled using frequency pulses. The operating algorithm is similar to the solenoid type, however, instead of a solenoid, in this case a rotor is used.
Symptoms of a problem
The IAC on Grant is called a sensor or IAC. But it is not one, because it does not provide information about calculating air pressure or speed. This part is a regulator. For this reason, the ECU does not receive a fault signal and does not send a “CHECK” signal to the instrument panel. The malfunction can be identified by the following signs:
- The engine starts with difficulty.
- It stalls after starting.
- Speed is unstable, especially in cold weather.
- Poor speed maintenance in neutral gear.
- High idle speed.
- Unstable engine operation when shifting the gearbox to speed.
All of these symptoms may be the result of a malfunction of other sensors and regulators that are part of the throttle body and fuel system. The main reason for this engine behavior is a lean fuel mixture or excessive air consumption in the system. The ECU clearly regulates the amount of air and gasoline, mixing them. Any discrepancy directly affects the stability of the engine.
Important! Checking the throttle assembly for operability must begin with the idle speed regulator.
There are several ways to check the IAC for performance. This will require dismantling the part. Without dismantling, you can only check the resistance and electrical conductivity of the IAC.
Important! It is prohibited to knock on the regulator body. This method will not improve performance. But it can render the part unusable if other components of the throttle system malfunction.
IAC malfunctions
Since the IAC, as the name suggests, operates primarily at idle, its malfunctions are noticeable in this mode. Like any electromechanical unit, the idle air regulator has a higher probability of mechanical failure. The moving parts are covered with deposits from crankcase gases, but if the engine is equipped with an EGR system (exhaust gas recirculation), then the IAC “smoke” even faster.
Since the injection ECU cannot monitor the actual change in the flow area of the idle air regulator, the slightest wedging of the damper rod or rotor will instantly give itself away. Swimming, freezing idle speed, inability to start without the gas pedal indicate that the idle speed control is sticking or not moving at all. Such IAC malfunctions do not cause any error codes to appear in the memory of the injection computer.
Problems with the electrical part are less common, and usually not in the regulator itself, but in the connector and wiring: breaks, short circuits, oxidation of contacts. An error with a standard OBD-II code will already be set here:
- P1513 – short circuit to ground.
- P1514 – open circuit.
Resistance check
To do this, you need to disconnect the terminal supplying the IAC. Next, using a tester set to resistance testing mode, remove data from terminals A-B and CD. The operating resistance should be in the range from 0.4 to 0.8 Ohm.
Electrical conductivity
If the resistance is within normal limits, it is necessary to check the electrical conductivity. To do this, you need to disconnect the connector. Next, you need to connect “+” to terminal A. Then measure the output voltage from the remaining contacts. It should be equal to 12 volts. In this case, the operating resistance should increase to 50 Ohms.
Frame
Checking the short circuit between the housing is very important. The IAC may show operating resistance within normal limits, but be closed to the housing. To check, you need to set the tester to the “dial-in” mode. Next, connect one tester probe to the body, and connect the other one in turn to the conductive contacts in the regulator socket. If one or more contacts are shorted to the housing, the part is faulty.
Repair
Diagnostics
The VAZ 2110 lambda probe has four outputs:
Pads for VAZ 21102
Checking the oxygen sensor heater comes down to a basic check of the heater circuit:
the presence of voltage at the power contact of the vehicle’s on-board network (if there is no voltage, check the entire circuit); presence of continuity of the negative contact circuit.
In the future, we are exclusively interested in the signal wire, or rather, the change in voltage passing along it from the sensor to the ECU during various engine operating modes. You can check the operation of the sensor in two ways:
- Using a voltmeter;
- Using an oscilloscope (motor tester).
Since this instruction is intended for the common man who simply cannot have professional equipment in principle, we will diagnose the sensor using a voltmeter.
Method one: reading trouble codes
In order to read the fault codes located in the controller’s memory, it is necessary to either connect special diagnostic equipment to the diagnostic block (located on the left side under the instrument panel console) (too simple - not for us), or close contact “B” to ground, which is so The same can be done by connecting contacts “A” and “B”.
Diagnostic block VAZ 2110
- “A” - contact connected to the vehicle ground;
- “B”—controller signal contact;
- “G” — control of the VAZ fuel pump;
- “M” is a contact for issuing information (serial data).
After these contacts are closed, turn the ignition key to position “III” (do not start the engine), observe the “CHECK” indicator, which should flash the number 12:
- Flash;
- 1-2 second pause;
- Flash;
- Flash;
- Long pause of 2-3 seconds;
- Double repetition of the above cycle.
Reading fault code number “12”
Attention! This code indicates that the self-diagnosis program is running, otherwise this program does not work. After this, the program displays codes of existing faults in a triple cycle (each code three times), in the absence of these, code “12” continues to be displayed constantly. After this, the program displays codes of existing faults in a triple cycle (each code three times), in the absence of these, code “12” continues to be displayed constantly
After this, the program displays codes of existing faults in a triple cycle (each code three times), in the absence of these, code “12” continues to be displayed constantly.
Attention! When the diagnosis is completed, these contacts are allowed to be opened only after the ignition is turned off, after ten seconds. Erasing fault codes from the ECU memory in order to make sure that the fault has been eliminated occurs by turning off the controller's power for at least ten seconds. The power is turned off either by disconnecting the negative terminal from the battery or by removing the controller fuse
The power is turned off either by disconnecting the negative terminal from the battery or by removing the controller fuse
Erasing fault codes from the ECU memory in order to make sure that the fault has been eliminated occurs by turning off the controller's power for at least ten seconds. The power is turned off either by disconnecting the negative terminal from the battery or by removing the controller fuse.
Dismantling check
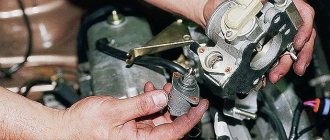
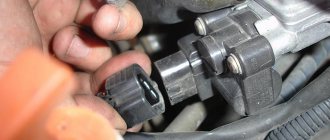
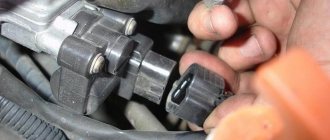
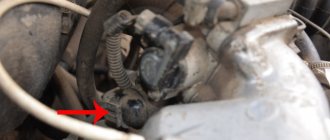
In order to dismantle the IAC, it is necessary to remove the air duct. Next, you need to unscrew the 2 mounting bolts, disconnect the power terminal, and remove the IAC from the mounting seat.
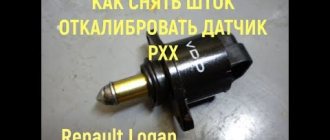
On Lada Granta with 8 valves, an electronic gas pedal can be installed. Its power connector may be located next to the IAC connector; it will also have to be disconnected. Before checking, the part must be cleaned of grease and dirt. It is not recommended to press or twist the rod. The rod is adjusted to 800–1500 rpm. Any impact may disrupt this setting. You also need to wash and clean the contact socket from oxidation. Check the integrity of contacts and wires.
1 way
You can check the functionality by simply connecting the power connector to the dismantled IAC. Next you need to start the engine. In this case, the rod should move slightly outside the housing. If this does not happen, the node is not working. There is no need to help the needle with this. Pressing or trying to influence movement is prohibited.
Method 2
This method is based on measuring the distance from the end of the needle to the IAC body. The measurement can be carried out using a ruler or caliper. For the working mechanism, the distance should be 2.3 cm. If this limit is higher, it means the rod is constantly open and the idle speed is higher than normal. If the distance is below 2.3 cm, then the end of the needle has worn out or has dried up in its saddle.
If a discrepancy with the required parameters is detected, this means that the IAC is inoperative and requires replacement.
Addresses of companies providing installation/replacement services (Moscow, St. Petersburg, Kyiv region)
| № | Name | Address |
| 1. | "Oiler" | https://oiler.ua/ Kyiv, V. Lobanovsky Ave., 119D, Goloseevsky district |
| 2. | "AUTOKLONDAYK" | https://auto-vaz.com.ua/ TO AUTOKLONDAYK, Kyrylivska street, 60P, of. 1, Kyiv, 04080 |
| 3. | "Star - D" | https://star-d.ru/ st. Savushkina, 89, not far from the Staraya Derevnya metro station, 200 meters from the St. Petersburg - Finland highway (from Primorsky Prospekt). |
| 4. | "OSA" - Society for Assistance to Motorists" | Address: 190013, St. Petersburg, st. Vvedensky Canal, 7, BC “Farvater”, office 210 |
| 5. | "Auto Mechanic" | Address: Rostokinsky pr-d, 3с61 |
| 6. | "PaAlex" | Address: st. Ozernaya, 46k2s2 |
Replacement
Replacing the idle air control valve on a Lada Granta is very simple. To do this you need to do the following:
- Stop the engine and wait for it to cool completely.
- Disconnects the negative terminal from the battery.
- Remove the air duct.
- Disconnect the electrical connector from the IAC socket.
- Using a key set to “13”, unscrew the 2 mounting bolts.
- Remove the regulator from its seat. It is also worth removing the rubber sealing ring.
- Clean the IAC seat from dirt and oil.
- Place the new O-ring into the seat.
- Reinstall the idle speed control.
Next, in reverse order, secure the IAC, install, and connect all elements of the system. After installation, you must turn on the ignition and give the computer time to recognize the new part. After 5–7 minutes, you can start the engine to check the functionality of the IAC.
Checking the serviceability of the regulator
Before starting the process of checking the idle air control, it is necessary to ensure that the vehicle is stationary, that is, tighten the handbrake and place shoes under the wheels. Let's look at the simplest and most accessible diagnostic methods.
The device is removed from the general electrical circuit and the voltage is checked using a voltmeter. When the ignition is turned on, the resulting voltage should not go beyond the standard limits, that is, 20 volts. If the voltage is much lower, there is a problem with the battery charging; if it is absent, it is worth checking the entire circuit.
You should check the resistance level. It should not exceed 53 Ohms.
If you turn on the ignition and apply the power supply to the idle speed control, the sensor needle should change its position; if not, this indicates a malfunction.
It is possible that the main malfunction is in the operation of the IAC itself. With certain skills and knowledge, you can replace a faulty idle air control yourself, without the help of car service workers.
Original IAC
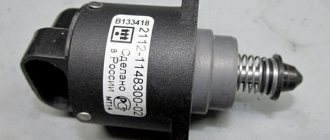
The working life of the original idle speed sensors is 90 thousand km. During this “time”, it is worth diagnosing this node. If there are any signs of malfunction, it is better to replace the IAC than to carry out independent repairs. Independent disassembly and assembly of this mechanism can lead to unbalance of the level of position and distance of needle movement. It is better to replace the IAC with original components. Russian manufacturers mark idle speed regulators with article numbers 2190 KZTA1148300-02 or KZTA 2112114830004. Non-original components of poor quality will not allow this part to operate for the required 90,000 km.
How to distinguish counterfeit pxx from the original?
You should not buy a regulator from the “first person you come across”
Buy in official VAZ showrooms, in specialized stores, where you will be offered a guarantee and a sales receipt. Pay close attention to the appearance of the product and original packaging. The absence of the latter is 100% counterfeit. Examine the body of the product; there should be no signs of “clumsiness” on it, the rivets on the surface should have heads, the original spring is always black and has fewer turns than on the fake. The body of a counterfeit product is most often 1 - 1.5 mm shorter than the original. Pay attention to the little things, and you are very likely to purchase an original and high-quality regulator.
Location of the idle speed sensor on the Lada Granta
The Lada Granta with an electronic pedal does not have an idle speed sensor! That's why they sent you from the store to remove yours. There is only one idle speed sensor, you can’t go wrong if you have one, of course.
This is what the electronic pedal looks like
Finding out which pedal you have is easy. If you have a throttle cable under the hood, then you have a regular pedal. So, if you do not have an electronic pedal, then the sensor is located on the throttle valve assembly, or rather in its lower part.
Throttle assembly without idle speed control (electronic gas pedal)
To remove it, you must:
- remove power from the battery;
- remove the power supply from the idle speed sensor;
- unscrew the two fastening bolts;
- remove the idle speed sensor.
How to check and replace the idle speed regulator of a VAZ-21114 engine
To check and remove the idle air control (IAC), you need to remove the throttle assembly completely (see “Removing the throttle assembly”) or partially. During partial dismantling, we disconnect the throttle valve drive cable, crankcase ventilation hoses and the canister purge solenoid valve from the throttle assembly. Having unscrewed the two nuts securing the throttle assembly to the receiver, remove the assembly from the studs without disconnecting the coolant hoses from it.
1. With the ignition off, release the latch and disconnect the engine control system wiring harness block from the IAC.
2. The regulator connector terminals are marked with the letters “A”, “B”, “C” and “D” on the block body.
To check the regulator supply voltage, turn on the ignition.
3. Using a tester, measure the voltage between terminal “A” of the wiring harness block and ground. We carry out the same measurements for other terminals of the wire block. In each case, when continuously measuring voltage, the tester readings should vary in the range from 0.5 V to 12.0 V.
4. To check the serviceability of the regulator itself, use a tester (in ohmmeter mode) to measure the resistance between the terminals of the regulator connector. For a working regulator, the resistance between terminals “A” and “B”, as well as “C” and “D” should be 40 - 80 Ohms.
5. To remove the idle speed regulator, use a Phillips screwdriver to unscrew the two screws securing the regulator to the throttle assembly (for clarity, shown on the removed throttle assembly).
6. Remove the idle speed control
The connection between the regulator and the throttle assembly is sealed with a rubber ring.
| rice. 7 |
8. Install the idle speed control in the reverse order. Before installing a new regulator, use a caliper to check the distance between the end of the valve needle and the supporting surface of the regulator flange.
The distance should be no more than 23 mm. This is necessary in order not to damage the regulator during installation. The regulator needle should not rest against the throttle assembly seat. If the distance is more than 23 mm, then you need to use a special regulator tester to pull the shut-off needle inside the regulator. Before installing the regulator, clean the valve seat, air channel and the surface under the regulator's sealing ring in the throttle assembly.
Apply engine oil to the regulator sealing ring. The tightening torque of the regulator mounting screws is 3 – 4 Nm.
What is the difference between a fuel injection engine and a carburetor engine from a user's point of view? There is no need to pull the choke or play with the gas pedal when starting the engine. The car itself raises the speed for reliable operation of a cold engine, lowers it to normal and does not react in any way to turning on the headlights or air conditioning, despite the increase in load. Before the transition to electronic throttles, these functions were performed by a separate unit - the idle air regulator (IAC). What is RXX? This is an electronically controlled valve that allows the injection system to increase or decrease the amount of air entering the engine, regardless of throttle position. As soon as the injection systems “learned” to control the throttle directly, the need for a separate IAC disappeared.
The often used term “idle speed sensor” is completely incorrect. The sensor is a unit that transmits some information to the injection ECU, the XX regulator is an actuator mechanism with which the ECU influences the operation of the engine. They stand at different ends of the injection system operation algorithm, and cannot have anything in common. The appearance of the term “idle chord sensor” is associated with low technical literacy: any incomprehensible node connected to the “brains” can be considered a sensor. The idle speed sensor actually existed on primitive injection systems - it was a simple limit switch that closed when the gas pedal was released. And so he informed the ECU that the car had gone to idle. Later, this was determined by the throttle position sensor, and a separate “idle speed sensor” was not needed.
Speed floats on grant 8 valves
After the owners try to start the engine in the morning, sometimes a problem arises: the idle speed of the Lada Granta fluctuates. This is considered one of the most significant shortcomings that arise in VAZ cars. If, after lengthy checks, it is discovered that the cause lies precisely in the throttle assembly, it is necessary to pay special attention to how air leaks through the connections of the intake receiver and the remote control.
General information
Any car owner sooner or later faces a problem when the idle speed of the car fluctuates. If the car has been in use for several years, then you will inevitably have to face this problem. In order to determine the reason for this breakdown, you need to carefully understand the design of the car.
THIS IS INTERESTING: VAZ 2112 will not start
If, when starting the engine of a Lada Granta, it is observed that as it warms up, instead of smoothly decreasing, the speed simply disappears for a few seconds, and then operates spasmodically, then the reason is 60% precisely because the idle speed fluctuates .
However, the problems disappear after the engine continues to function. All visible symptoms suddenly disappear and the engine continues to operate normally. However, the problem will repeat itself every time it is started and will not go away.
With each subsequent use of the car, this problem will only get worse. Therefore, you should not postpone its solution indefinitely, as in the future this will lead to very expensive repairs.
First causes of malfunction
Most often, cars that have an electronic fuel injection system suffer from this problem. The root cause of this situation is that there is a constant suction of excess air, the volume of which continues to constantly increase, which, in turn, leads to breakdown.
The electronic unit, or electronic sensor, is responsible for fuel injection and at the same time calculates the entire volume of air entering the cylinders. In addition, based on the indicators provided by other sensors, the electronic unit opens the injection solenoid valves for a certain time.
The problem may lie in the incorrect operation of the crankcase ventilation valve.
Consequently, when excess air enters them, the sensor responsible for the throttle position shows the motorist that this task is impossible.
At the same time, the temperature sensor indicates that the engine should have already left the warm-up system, therefore, it needs much less fuel. It is during this period that the idle speed of the car fluctuates.
We can conclude that this happens due to the fact that the electronic unit simply does not know where to supply excess air.
The second reason why idle speed fluctuates is constant jamming. It occurs directly in the crankcase ventilation valve. If the malfunction depends on this, the frequency with which the automatic power control sensor operates is disrupted. As a result, the sensor shows instability of engine speed. When in a faulty state, they range from 1,200 to 800 rpm.
If the car is equipped with a carburetor-type engine, then a similar problem may arise due to a violation of the servomotor adjustment. It is not difficult to carry out work to eliminate such a malfunction; it is enough to unscrew the adjusting bolts in the area of the loose servomotor, where the sensor points to the drive, which is dangling along with floating speed. Once you complete this procedure, the fault will disappear, unlike a normal engine.
Absolute pressure and air temperature sensors Lada Granta
These sensors are combined into one housing and installed on the receivers of the intake module; the most modern AvtoVAZ engines are equipped with them.
DBP on Grant differs in the output signal voltage within the range of 0.15..4.6 V, this voltage depends on the pressure level inside the intake pipe. The information it sends helps the ECU calculate the amount of air received by the intake pipe during one cycle.
A breakdown of the device circuit leads to an error code being entered into the system memory, and then the alarm turns on. After this, the control system calculates the air received based on the crankshaft speed, as well as based on the throttle valve opening angle.
The sensitive component of the DTV is the inlet pipe thermistor. The output signal voltage of the device connected to the computer will be approximately 0.3..4.9 V, it depends on the temperature of the air passing through the specified element. When a DTV failure is detected, the control system performs actions similar to its actions in the event of a DBP failure on a Lada Granta, replacing the readings of the described device with fixed temperature values.
Conclusion
Replacing the idle speed control is not a panacea in the fight against floating speed or a throbbing engine. Most automotive electricians have a tester in their arsenal to check the operation of the regulator. To do this, remove yours and give it for inspection. The regulator glitch may be intermittent, but the tester will show the correct picture.
Sometimes I have the same problem, the speed jumps, but the engine does not stall. Now I understand, most likely it is the idle speed sensor. I watched the video, in principle, now I can change it myself.
If the revolutions on 16 valves “float”, then the first thing you should check is the idle speed sensor. The only thing is that not all novice car enthusiasts know where it is and how to change it. It’s good that there are videos with which you can easily figure out what’s what.
A meaningful article that will be useful to every Lada Grant owner who does not want to spend their money on a hundred.
Comments from the same laymen as the author of the article... Do you even understand what you are writing about?
The idle speed sensor in the injection system of the Lada Kalina model is a special electronic device. Such a component can be found in any other car that runs on gasoline and has distributed injection. The design of the sensor is represented by an electric motor, paired with a conical needle by the manufacturer. Note that the device is controlled by an ECU.
The idle speed sensor rarely experiences malfunctions, but if such a fact occurs, it causes a malfunction in the idle speed of the engine. They begin to “float”, and the engine, in turn, ceases to function normally. As a result, achieving a timely return to operating temperature after a cold start becomes problematic.
How to set up a carburetor
Before you start adjusting the penny carburetor, you need to make sure that all components that affect the normal functioning of the internal combustion engine are in good condition. Check the spark plugs, the gap between the electrodes, the distributor, the coil, and the high-voltage wires. You can adjust the carburetor on a VAZ 2101 car only at engine operating temperature (85..90 degrees).
But before you start making adjustments, be sure to purchase a repair kit for the VAZ 2101
Moreover, pay attention to the fact that this repair kit matches your carburetor. If Solex is installed, then you do not need to buy a repair kit for DAAZ. Of course, the price of this set is not very high, but if you buy the wrong one, you will have to run around a little, exchanging for the right one
Disconnect the cable that connects the accelerator pedal to the throttle valve drive. The pipe connecting the air filter housing to the breather must also be disconnected.
Of course, the price of this set is not very high, but if you buy the wrong one, you will have to run around a little, exchanging for the right one. Disconnect the cable that connects the accelerator pedal to the throttle valve drive. The pipe connecting the air filter housing to the breather must also be disconnected.
Make sure that there is no vacuum in the hose connecting the carburetor to the advance angle adjuster on the distributor. Now you need to adjust the quality of the mixture. Screw in the screws one at a time until the engine begins to shake slightly. Now we need to achieve normal and most stable operation. To do this, unscrew the quality screws one by one. Do not make more than one turn. This adjustment is purely by ear, but it is quite possible to normally adjust the carburetor of a penny in this way.
To determine how well the adjustment has been made, open the throttle sharply and then close it immediately. If the speed increases sharply, there are no delays, then the carburetor is adjusted correctly. But the further operation of the VAZ 2101 will show more accurately. Carefully monitor how much gasoline is consumed per hundred kilometers. From time to time, check the condition of the spark plugs; if there is carbon deposits on them, adjust the air supply to the carburetor of the VAZ 2101.
Welcome! Idle speed - Over time, a person who uses a car with a broken idle speed decides to adjust it, because as we all know, if the idle speed is too low, the engine will stall from time to time, and if it is too high, then the fuel consumption of this engine increases and here you have to look for, as they say, a golden mean.
But in order to find this middle ground, you must first learn how to adjust the idle speed of a car, and not all people know how to adjust the idle speed. Therefore, today we will look at the issue regarding idle speed adjustment on cars of the “Classic” family.
Note! To make adjustments, you only need one single screwdriver!
- Adjusting the idle speed using a gas analyzer
- Adjusting the idle speed without a gas analyzer
Tips for adjusting idle speed: Firstly, adjustment must be performed at engine operating temperature (90-95 ° C), and also when adjusting, the air filter must be installed on the car.
Secondly, when adjusting the idle speed, the fuel level in the carburetor float chamber must be adjusted.
Thirdly, the valve clearances must also be adjusted and the car’s ignition timing must be adjusted.
Fourthly, when adjusting the idle speed, the air damper must be completely open; you can check this by removing the roof from the air filter housing and then looking at the damper.
Fifthly, adjusting the idle speed of a car is not always easy for a beginner, because adjusting the crankshaft rotation and adjusting the carbon monoxide (CO) content must be done together.
Note! To more accurately adjust the idle speed, you need to use a “Gas Analyzer”, which most owners do not have at all. But the adjustment can also be made without this device, but it will be more complicated! (How to make adjustments without this device, see the section: “Adjusting the idle speed without a Gas Analyzer”)
Malfunctions of the electronic gas pedal
Moving contacts and conductive paths are subject to wear, which makes their signals incorrect. As a result, the engine will operate unstably, “dips” will appear, and at idle the speed will “float”. If a malfunction occurs in the operation of E-gas, the Check Engine warning lamp on the instrument panel will light up, and the ECU will switch the system to a reserve mode of operation, in which the speed will increase slowly, even when the gas pedal is pressed sharply. Fuel consumption may also increase.
If both sensors fail, the ECU will switch the engine management system to emergency operation mode, the engine will only operate at speeds slightly above idle (1500 min-1). In this case, it is recommended to contact a service station to replace the failed parts under warranty.
Causes of malfunctions
Reasons why repair or replacement of the TPS may be required:
- The contact elements have become acidic. This problem can hardly be called a breakdown, but it refers to malfunctions that can be eliminated. During prolonged use, the sensor contacts may oxidize. This is due to the operation of the TPS under conditions of temperature changes and exposure to moisture. To eliminate the problem, you need to dismantle the controller and clean the contact elements with cotton wool treated with WD-40.
- Erasing the coating based on the initial segment of the slider movement. If the resistive base is removed, the controller will not operate correctly. As the slider moves, the voltage supplied to the control module will increase. But as a result of erasing, this does not happen, since there is no resistance. This leads to problems, and sometimes the control module malfunctions.
- Damage to the tips on the device. If this happens, burrs will form on the lining, which will ultimately lead to failure of the remaining elements. In some cases, the contacts will continue to function, but this will not last long, especially since the wear on the substrate will increase. With such problems, the slider and the resistive layer will refuse to contact, which will lead to the inoperability of the machine’s motor.
- Slider failure. This component of the device wears out over long-term use. As a result, it may deviate from the required trajectory, which will lead to problems.
Functional features
The main purpose of the sensor discussed here in Lada Kalina is to measure the main parameters in the intake system and adjust the speed. This is done by sending pulses to the engine control module, which, based on the data received, adjusts the volume of injected fuel.
Due to the fact that the specified idle speed regulator acts as an actuator, determining its failure is a very difficult task. This is due to the lack of a useful self-diagnosis function in the Lada Kalina.
The device is designed to control the volumes of air that are directed through the intake tract into the combustion chambers of the engine. Here, the air mass (also measured by the mass air flow sensor) enters through a special channel, bypassing the throttle valve, which is closed in idle speed mode.
This idle speed regulator is involved in warming up the 8-valve engine, ensuring that the unit reaches its operating temperature in a timely manner.
When the ignition is turned on, a rod “crawls out” from the regulator and reaches a specially designed hole. This is called the initial position of the sensor.
Next, we outline the primary functions of this device:
- adjusting the optimal air mass;
- participation in warming up the engine 8 valves;
- determination and adjustment of the number of revolutions.
Features of the Lada Granta throttle assembly
The throttle valve is turned by an electric motor through a gearbox. Both are built into the throttle body.
When starting and warming up the engine, as well as during idling, the flow of air into the cylinders is regulated by opening the throttle valve.
The throttle position is controlled by two sensors built into the throttle body.
The throttle valve opening angle is set by the electronic control unit (ECU) depending on the estimated amount of air that should enter the engine cylinders. This takes into account the operating mode of the engine (starting, warming up, idling, and so on), the temperature of the ambient air and the engine, and the position of the gas pedal.
Control commands are sent to the throttle assembly to the electric motor. At the same time, the ECU monitors the opening angle of the damper and, if necessary, sends appropriate commands to adjust its position. As a result of the fact that the ECU simultaneously regulates the amount of injected fuel and incoming air, the optimal composition of the combustible mixture is maintained in any engine operating mode.
The electric throttle body is sensitive to deposits that may accumulate on its inner surface. The resulting layer of deposits can interfere with the smooth movement of the throttle valve, jamming it (especially at low opening angles). As a result, the engine will operate unstably and even stall at idle, start poorly, and failures may also appear during transient conditions. To avoid this, as a preventive measure, deposits should be removed with special detergent compounds during regular vehicle maintenance. A large layer of deposits can completely block the movement of the damper. If flushing fails to restore the throttle assembly to operability, it must be replaced.
A malfunction or incorrect operation of the throttle assembly may be caused by a broken contact in its electrical circuit (oxidized terminals in the wiring harness connection block). In this case, it will be possible to restore operation by treating the terminals with a special compound for cleaning and protecting electrical contacts. There are other possible causes of the malfunction:
— no supply voltage is supplied to the throttle assembly;
— signals are not received from both throttle position sensors;
— The computer cannot recognize signals from the throttle position sensors.
In these cases, the engine control system goes into emergency mode. At the same time, the car retains the ability to independently move a short distance at a slow speed, which, in extreme cases, will allow it to be moved to a safe place (pull to the side of the road, leave an intersection, etc.).
The fact that the throttle assembly is operating in emergency mode may be indicated by a burning indicator lamp for a malfunction of the engine management system and an increased speed of the crankshaft at idle (about 1500 min-1, despite the fact that the engine is warmed up to operating temperature). it will not respond to pressing the gas pedal.
Each of the throttle position sensors is a potentiometer. During operation, gradual wear of conductive paths and moving contacts occurs. Over time, wear can reach such an extent that the sensor cannot function correctly. The presence of two sensors increases the reliability of the entire unit.
If only one sensor fails, the warning lamp will light up, but the engine management system will switch to backup mode. In this case, the engine will respond adequately to pressing the gas pedal, but with worse performance parameters
The reserve mode allows you to drive your car to the repair site under your own power.
We determine the malfunction ourselves
The regulator is designed to maintain idle speed in a given range and ensure correct and timely warming up of the engine.
Although malfunctions in the functioning of the engine in this mode rarely occur on the Lada Kalina, practice has made it possible to establish a certain set of signs indicating a malfunction of the regulator.
- difficulties starting the unit;
- when the gearbox is in the neutral position, “floating” engine speeds are observed;
- when switching transmission stages on the move, the engine stops without authorization;
- Once the unit begins to warm up at low outside temperatures, the speed is not able to overcome the 1500 per minute mark, which “delays” the time it takes to reach operating temperature.
Observant owners of Lada Kalina testify to a decrease in speed after turning on the air conditioning compressor. This often leads to the engine stopping, and the lubricant pressure symbol in the unit lights up on the instrument panel.
The most common breakdown is instability of speed. For mileages exceeding the 50,000 mile mark, and if such symptoms appear, we first recommend cleaning the cavity of the throttle assembly. Only after this can the regulator be replaced. This device cannot be repaired, so this action becomes a non-alternative measure.
IAC cleaning
Do-it-yourself troubleshooting of the idle air regulator consists of simply washing it to remove carbon deposits. To do this you need to follow the instructions:
- disconnect the wire plug from the sensor;
- Unscrew the two fastening screws with a small shaped screwdriver and remove the sensor from the mounting socket;
- Clean the needle cone using WD-40 or carburetor cleaner.
Read more: KAMAZ rear axle gearbox weight
The same means can be used to wipe the regulator contacts and the entire throttle assembly.
After cleaning, the IAC is installed back. In this case, you need to measure the distance from the end of the needle to the body - it should be approximately 2.3 cm.
Self-diagnosis of the regulator
Signs of a malfunctioning idle air control regulator are a reason to carry out at least a basic check. Remove the regulator and check the condition: heavy carbon deposits will be a direct reason to clean it to eliminate their effect on the IAC.
In this regard, valves with PWM control are more convenient: you can fill them with carburetor cleaner and leave the idle speed control to “soak”, while stepper IACs are washed under pressure from jets from a cylinder, and the consumption of the product is higher.
When the IAC is removed, immediately check its seal (gasket or rubber ring) if the IAC is installed on a pipe or throttle body on the vehicle. External IACs are connected to the intake manifold by rubber pipes - carefully inspect them for cracks or breaks. A defective gasket or pipe will need to be replaced.
It is much easier to check the IAC if you have at least the simplest diagnostic equipment, for example, the ELM327 adapter with the appropriate software. Let's look at checking the idle air control using the example of the OpenDiag program (which is available in both free and paid versions, including for smartphones).
How to check IAC with a running engine? Run the program and pay attention to two lines: the desired and current position of the regulator. The numbers change synchronously with the change in speed (decrease as it warms up). When you turn on the headlights or air conditioning, you will see a change in the degree of opening of the IAC, but the engine speed should not drop. Moreover, the first line that changes is the “desired position” (this parameter is calculated by the injection ECU every cycle), followed by the “current position” (for stepper IACs - after each series of pulses is transmitted to the regulator, the displacement will be one step, until the “current” and "desired") If the data changes, but the speed does not, then we either have a serious air leak, which closing the IAC cannot compensate for, or the regulator itself does not move.
You can check the IAC even faster. Let's go to the actuator control menu, called up from the upper left corner. Here we are interested in the parameters “Desired position of the XX regulator” and “Desired XX speed”: by pressing the “right-left” buttons while the engine is running, you can either change the current position of the IAC valve, or set the speed at will, controlling the valve in the same way. Any intervention should immediately affect the operation of the engine. If in some part of the stroke the command to change it does not cause a reaction, then it becomes clear that in this place the idle speed regulator is jammed.
Replacing the idle speed sensor
The sensor replacement begins, we dismantle the device.
- We remove the engine screen from the LADA Kalina and disconnect the cable connectors from the corresponding blocks on the throttle unit and the idle speed controller.
- To disconnect the heating pipes, you will need to partially drain the antifreeze. We carry out the indicated manipulations.
- To dismantle the device itself, we need a regular screwdriver with a cross-shaped profile.
- We remove the pipe leading from the crankcase ventilation system. We do this by loosening the clamps and moving them. We are temporarily putting this hose aside.
- We repeat such manipulations with the refrigerant supply pipes (if they have not been previously removed) and the purging of the absorber circuit.
- Using the key set to “13” (the head is more convenient), we remove the throttle block. It is attached to the inlet receiver with nuts.
- Let's look at the gasket. If damage is found, we must replace it, otherwise the intake system will receive unwanted air leaks.
- Installation of the regulator in the LADA Kalina car is also simple and is carried out with an eye to the reverse sequence of manipulations during disassembly.
- It is important to pre-measure the needle here. The optimal position will confirm the exit from the regulator body to a length of at least 23 mm. For measuring action we use a caliper. If the required value is not achieved, then you will need to “recess” the valve itself into the regulator body. Here we connect the positive contact of the device to the corresponding terminal of the battery (you will need a temporary cable).
We apply the bare edge of the element to the negative contact. The needle moves slowly, and therefore quite a lot of such touches will be required.
Lada Granta 8 valve idle speed floats
» Articles » Lada Granta 8 valve idle speed floats
After the owners try to start the engine in the morning, sometimes a problem arises: the idle speed of the Lada Granta fluctuates. This is considered one of the most significant shortcomings that arise in VAZ cars. If, after lengthy checks, it is discovered that the cause lies precisely in the throttle assembly, it is necessary to pay special attention to how air leaks through the connections of the intake receiver and the remote control.
Source