- December 19, 2020
- Equipment
- Elena Volkova
Vehicle safety is the most important element that you should always pay attention to first.
The CV joint is a special part that is installed on all-wheel drive SUVs. Therefore, if the CV joint is faulty, this can cause quite serious damage to the car.
To prevent this from happening, it is always important for the car owner to know what the very first signs of a breakdown of this element are.
Basic malfunctions of the Chevy drive grenade
There are 4 main signs that the constant velocity joint needs to be replaced or repaired:
- A crunching sound when driving slowly when turning, which intensifies as the wheel angle increases.
- Knocks or crunching sounds during a sharp (or not so sharp) start.
- Play in the hinge. It can be determined by shaking the axle shaft with your hands.
- Jerks when accelerating the car.
Malfunctions of CV joints occur as a result of manufacturing defects, incorrect installation of a part, lack of lubrication, driving at high speed over potholes, or natural wear of rubbing parts.
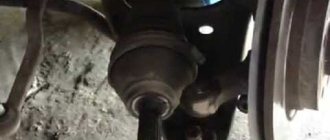
Important! Internal and external constant velocity joints wear out especially quickly when the boot is damaged. In this case, lubricant leaks from the CV joint, and instead the bearings are filled with abrasive particles of sand and dirt.
Checking the hinges is carried out in three stages:
- Turn the steering wheel completely and try to move away slowly. If a crunching sound is heard, it is necessary to change the “grenade”. In this case, the sound comes from the side where there is a problem.
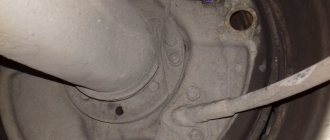
- Raise the car on a lift or hang out the wheel from which you can hear a crunching sound. Visually check the integrity of the boot and make sure there is no play by shaking the axle shaft with force by hand.
- Raise both wheels of the front axle and engage reverse gear. A crunch indicates the need to replace the grenades.
If a breakdown is detected, the parts must be replaced with new ones.
We replace the outer and inner ones on a VAZ 2123 with our own hands
Hinges tend to wear evenly.
Useful! Therefore, it is better to change the left and right CV joints at the same time.
Before starting work, you need to prepare the appropriate tool:
- wheel wrench;
- screwdriver;
- jack;
- hammer;
- extension;
- vice;
- support under the bottom of the car;
- keys for 13, 17, 27.
First you need to dismantle the drive, and then change the internal and external hinges. Work order:
- unscrew the fastening nuts and disconnect the cardan from the front axle;
- lift the car, hang it up and remove the front wheels;
- unscrew the lower shock absorber mounts from the levers;
- unscrew the nuts holding the bearing housings of the internal constant velocity joints;
- Unscrew the gearbox fastening to the cross member. Raise the knot and secure it by tying or placing a support.
Further actions are performed sequentially for the left and right drives.
- remove the cap protecting the wheel bearing;
- unscrew the nut;
- remove the bushing;
- raise the lower arm by compressing the suspension spring;
- unscrew the fastenings of the lower ball joint;
- move the steering knuckle to the side, releasing the splines of the outer CV joint;
- unscrew the exhaust pipe from the exhaust manifold and move it to the side (this operation is only needed to replace the right-hand drive CV joints);
- move the gearbox back a little;
- pull out the drive.
Next, you need to replace the hinges with new ones. To do this you will have to disconnect them from the drives. This is done like this:
- clamp the axle in a vice;.
- dismantle the old boot;
- using an extension, knock the CV joint off the axle splines;
- clean teeth from dirt;
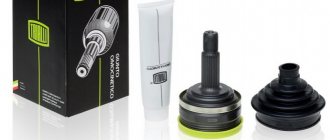
- put on a new hinge;
- lubricate the part;
- put on a new boot and secure it with a clamp.
Then all that remains is to assemble the drive. Parts are installed in the reverse order of removal. Related articles:
However, the problem is that in order to timely detect a defect in the boot, it is necessary to conduct a thorough inspection of it every day. This is difficult to do under normal conditions.
Repair: disassembly and lubrication
You can do without replacement if damage to the boot was detected in time. In this case, the “grenade” bearings may not have time to collapse due to the ingress of water and sand.
Important! The repair consists of disassembling the CV joint and thoroughly washing it in kerosene. After this, you need to put new grease into the bearings and put on a new cover.
However, the problem is that in order to timely detect a defect in the boot, it is necessary to conduct a thorough inspection of it every day. This is difficult to do under normal conditions.
Useful video
Watch a visual video below on how you can replace the CV joint on a Chevrolet Niva with your own hands:
When changing the angle of rotation of the drive drive on the Chevrolet Niva, the transmission of rotating torque from the engine to the wheels is carried out with the participation of a special unit - a constant velocity joint (in the future, possibly a CV joint). What is a part, what types exist for this car brand, what are the operating rules? The answers to these and other questions are contained in the material presented. Also here you will find a description of the instructions for replacing the internal CV joint on a Chevrolet Niva yourself.
Causes of failure
Reasons why you need to replace the CV joint on a Chevrolet Niva
, not so much. A breakdown can occur due to extremely careless driving, which of course never leads to anything good. Also, the cause may be the boot, which has already become old and cracked, which is why dirt gets into the CV joint, which under no circumstances should be there.
It is worth noting that the situation with a cracked boot may mean that you just need to install a new one, and the hinges may be fine, but this happens extremely rarely and most often the whole problem lies in the breakdown and wear of the CV joint.
What is a node
The name CV joint itself is an abbreviation for the phrase constant velocity joint.
The node faces the following tasks:
- Make the transmission of rotating torque from the engine to the wheels of the drive drive uniform and without loss of power.
- Reduce the load on expensive parts that rotate to move the car: shaft, gear, etc.
- Reducing the level of vibration when moving vehicles.
Modern front-wheel drive cars and some all-wheel drive “horses” are equipped with such homokinetic joints. The manufacturer guarantees the same duration of operation of the unit and the vehicle itself, provided that the CV joint is serviced and driven carefully. That is, if you drive carefully and periodically properly care for the part, it will last for the entire life of the vehicle.
The fulfillment of the first point depends only on the personality of the owner, his desire to monitor the technical and sanitary condition of the car. But the implementation of the second point on most domestic roads is sometimes simply impossible. And sooner or later the grenade (another name for the unit, which arose due to its external resemblance to a military projectile) fails. It is necessary to replace the internal or external CV joint on a Chevrolet Niva or on another car with a front-wheel drive and all-wheel drive design solution.
Varieties
SR as a suspension part began to be used on cars from the mid-20th century. Thanks to the unit, it became possible to simultaneously rotate and control the rotation of the wheels at an angle of up to 70 degrees. In the automotive industry, four technical solutions for components are used:
- cam;
- tripoid;
- ball;
- twin cardan shafts.
All these types are united by the basic design, which is a rigidly connected body and holder. The car's joints are also divided into:
- internal, rotating up to 20 degrees;
- external, more mobile and transmitting without power losses.
The part works according to the following principle.
- There are grooves on the surface of the inner race. Their number is the same as the number of bearings inside it.
- The cage is held in place by bearings that separate the housing and the cam.
- The bearings move along the path of the smaller diameter of the fist and the larger diameter of the housing.
- This creates a rotational impulse that transmits torque to the driven shaft.
If you change the angles connecting the axle shafts, the bearings begin to move inside the grooves. This is how torque is transmitted.
Reasons why a hinge joint fails
The internal CV joint on a Chevrolet Niva is a high-quality and reliable part of the automobile chassis system. Listed below are the main reasons that provoke early wear and failure of the unit.
- Incorrect, illiterate, extreme (rapid start with inversion of the drive drive and slipping) driving.
- Lack of care for a part that needs periodic cleaning and lubrication.
- Unfair production of the hinge assembly using low-quality materials and violation of technological rules.
Several signs listed below indicate that there may be a problem with the grenade and the internal CV joint on the Chevrolet Niva needs to be replaced.
- The appearance of a crunching sound when making turns. This phenomenon occurs if the SR requires lubrication of the connections, or a mechanical inclusion, for example, dirt, gets into it.
- Interruptions in the movement of the car at the start, when the speed increases or, conversely, when it decreases.
- Increased vibration when turning, accelerating, or driving at high speeds.
To make a final diagnosis, auto mechanics have created several simple techniques.
The very first signs of a CV joint failure
Replacing the internal CV joint on a Niva-Chevrolet is required when some problems begin to arise. These include the following:
- When turning right/left, strange sounds appear, namely crunching sounds. If this occurs, the first thing to do is lubricate the connections.
- When making any turns, during acceleration, and also while driving at high speeds, vibration increases.
- Interruption of the vehicle's movement - this can happen both at the start and when the speed decreases or increases.
Diagnostics
Experienced mechanics advise car owners to pay attention to the condition of the boots approximately every 5-7 thousand kilometers. Detection of any defects: cracks, failure of the clamp, indicates that the CV joint may be damaged. How can I check this?
- The car is placed on a lifting mechanism and engaged in first gear. A worn-out assembly will produce a sound resembling a characteristic crunching sound.
- An increase in play of one and a half tens of mm is a characteristic sign of failure. They check it by pumping the internal CV joint of the Chevrolet Niva at the output of the external drive.
You need to check the performance of the part periodically, every 4-5 months of driving on good roads. And every time after driving over rough terrain, dirt roads, potholes, etc.
Replacing the internal CV joint of a Niva Chevrolet
All parts of the unit are in constant motion during operation, as a result of which they wear out and fail. Therefore, most car owners are faced with the need to replace a faulty internal CV joint of a Chevrolet Niva with a serviceable one. Below is material for the step-by-step implementation of this work.
- The front of the car must be in an upright position. To ensure safety, it is necessary to place protective devices under it to ensure the immobility of the mechanism.
- At the very beginning you need to remove the wheel and the lower ball joint.
- Next, disconnect the shock absorber and the lower arm on the suspension, from which the spring is removed.
- The fist and hub are not removed, it is slightly hung to the side. To do this, you can adapt a generator belt or something similar.
- Then the cap and bearing nut are removed from the hub.
- The bolt that secures the right suspension bracket is unscrewed.
- At the assembly itself, you need to unscrew the nut and remove the grower, freeing up access to a larger threaded length. Using keys and a hammer, the SR is dismantled, removing it from the hub.
The hinge assembly on a Chevrolet is mounted in the reverse order.
A grenade on a car is a constant velocity joint. The knot received this name because it looks like a military knot. It can also be called CV joint. With its help, torque is transmitted from the engine to the wheel in a car at different angles of rotation of the drive wheel.
Removal and installation of front wheel drives Niva Chevrolet
You will need: keys “13”, “17”, “27”, a wrench for the wheel nuts.
1. Disconnect the front driveshaft from the front axle gearbox (see “Removing and installing the driveshaft”).
2. Raise the car and remove the front wheels.
3. Disconnect the shock absorbers from the lower front suspension arms.
The hub nut is tightened to a large torque. Therefore, we recommend using a head with a strong knob.
16. Remove the left drive in the same way.
You can watch the video: Removing the drive
17. Install the drives and all removed parts in the reverse order of removal.
When tightening the wheel hub nuts, adjust the play in the bearings (see “Checking and adjusting the play in the front wheel hub bearings”).
CV joint on Niva Chevrolet
With its help, torque is transmitted from the engine to the drive wheels. It's mostly front-wheel drive. Due to the CV joint, torque is transmitted uniformly, taking into account the fact that the wheel is at a different angle relative to the car.
On a Chevrolet, a grenade can be:
- Internal.
- Outdoor.
Outer CV joint Inner CV joint
Like all other parts in the car, this unit has its own specific service life. Therefore, every Niva owner sooner or later is faced with the need to replace the CV joint.
Reasons for grenade failure
One of the reasons for the failure of the CV joint is a breakthrough of the boot and the ingress of dirt.
The CV joint can fail for the following reasons:
- Long service life of the mechanism . This is the most common cause of breakdown. Usually the part has to be replaced after 10,000 kilometers (on average), but it may happen that repairs are required even earlier.
- Sloppy driving . This could be sharp turns, driving on an uneven road at high speed, or turning the steering wheel when the car suddenly starts. In all these cases, the maximum load is placed on the CV joint.
- Water, dust or dirt gets into the device . For this reason, the hinge may also fail prematurely. Water gets inside due to damage to the rubber boot. The protection can crack due to any factors during operation, so it is recommended to periodically check its condition.
Grenade replacement
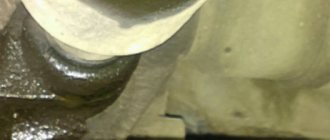
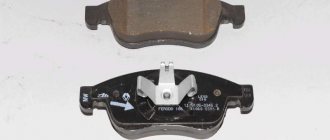
Right inner CV joint close up, you can see the article number and markings
This unit consists of parts that are constantly in motion. As a result, they may burst or wear out , requiring replacement.
The device can only be repaired if the owner of the car has identified damage to the boot in time, and therefore foreign substances have not yet managed to get inside the mechanism.
But this happens quite rarely, since it is almost impossible to detect damage to the boot in time. It should also be said that the cost of the CV joint is not high, and therefore it can be purchased if necessary.
Video about restoring the Niva Chevrolet CV joint
Troubleshooting
You can determine the malfunction of the grenade yourself . To do this, while the car is moving, turn the steering wheel in any direction until it stops. In this case, the driver will hear a crunching sound in the area of the front wheel. In this case, you need to replace the hinge.
During the repair process, it is important to determine whether it is necessary to change both hinges or one, because such work is recommended to be carried out only in a comprehensive manner.
Video on how to determine if a grenade is faulty
Changing a grenade on a Niva Chevrolet with your own hands
To replace a grenade, you must first remove the old one. In the process, you will have to dismantle the axle shaft along with the CV joint (you can find a disassembly video on the Internet). Then the car owner must perform the following actions:
- Clamp the removed assembly in a vice.
- Remove the old boot.
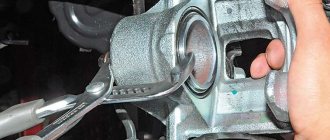
Removing the boot - Knock the CV joint off the axle using a hammer and a socket.
We knock down the CV joint - Clean all teeth on the axle gear.
- Install the new joint on the axle.
Installing a new hinge - Place the boot and secure it with clamps.
Installing the boot - Install the axle with CV joint on the car.
Install the axle with CV joint on the car in the reverse order
Video about replacing a grenade on a Niva Chevrolet using a reverse hammer
Disassembling the axle shaft
To access the inner CV joint, it is necessary to carry out the following disassembly operations:
- Remove the grenade boot clamps and remove the inner CV joint boot .
- Knock the CV joint off the drive shaft.
- To remove the inside of the hinge, you need to remove the retaining ring of its cage.
If, when removing the inner CV joint , chips were found in the boot, and there is any damage on the hinge, then replacing the inner grenade is simply necessary.
Before putting the boot on the new inner
CV joint, it is necessary to fill it with special CV joint grease -4 (quantity 150 cm). Replacing the outer and inner CV joints on a VAZ 2110, VAZ. To ensure that there is enough lubricant in the grenade, it is recommended to stuff lubricants under the boot.
Conclusion
Knowing the features of the CV joint and how you can identify its malfunction or replace it, you can cope with such work on your own , having little experience in this work.
Replacing the outer CV joint on a Chevrolet Niva is an important undertaking, because if the breakdown is not repaired in time, the consequences can be very sad; the wire may simply jam while driving. One of the first symptoms of this problem is a slight cracking sound when the steering wheel is in the turned position at the beginning of the journey.
Part Features
Constant velocity joints - these elements were created specifically for front-wheel drive vehicles; previously, torque was transmitted to the wheels using a simple cardan. Due to the large load on the hinge, the service life of the part was very short. To avoid such a situation, this node was created.
An outer CV joint is needed to transmit torque evenly when the wheel is at different angles. CV joints can be both external and internal.
There are certain parts in the assembly that are constantly moving, so often the parts burst or completely wear out, and this requires their urgent replacement. Repair of the device is carried out when damage to the boot is detected in time, when dirt, dust and other substances do not have time to penetrate inside the grenade.
To identify a breakdown on a Niva, turn the steering wheel all the way in any direction while driving. If there is a problem, then you will hear a characteristic creaking sound in the area of the front wheel. During the repair work, you should determine how many hinges need to be changed - one or two at once. Professionals advise implementing the procedure comprehensively.
Repair stages
- Clamp the shaft in a vice
- At the inner CV joint, it is necessary to remove the outer and inner clamp
- Slide the cover protecting against dirt and turn it inside out
- Using a drift and applying maximum effort to the joint cage, knock out the inner CV joint
We do the same with the outer hinge.
- Remove both the inner and outer clamp from the outer hinge
- We slide the dirt cover and turn it inside out
- Using only a drift, we direct maximum force onto the holder and knock down the CV joint
Work on replacing the outer CV joint
To carry out the procedure, you must first remove the old grenade, which is removed along with the axle shaft. To do this, you need to raise the body using a jack and install a strong stand under the car to avoid health problems. Before raising the Niva body, it is best to lower the hub nut; for this, a head is used, as well as an extension for the key. After this, the wheel is removed and the lower wheel of the front shock absorber is unscrewed, the nut on the hub is removed, and the grenade is thus pulled out.
After this, replacing the CV joint on a Chevrolet Niva is carried out according to the following steps:
- It is necessary to clamp the assembly that you removed in a vice.
- Removing the damaged boot.
- Knocking down the outer CV joint using a hammer.
- All teeth on the axle gear should be thoroughly cleaned.
- A new hinge is being installed.
- The boot is inserted, which should be clamped using clamps.
- All parts are mounted in place.
To carry out independent repairs, use two heads, an extension, a hammer, a jack, a wheel wrench, a wrench, a ratchet, and a flat-head screwdriver.
Replacement procedure: step-by-step algorithm
There is no point in repairing a worn-out unit, so the outer CV joint of a Niva Chevrolet is always replaced. Replacing a damaged “grenade” is a labor-intensive operation. You will need a set of wrenches, pullers, and experience in performing plumbing work.
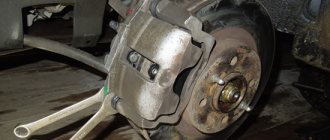
Outer CV joint
The damaged unit is replaced using an axle shaft with grenades removed from the vehicle. The body is raised with a car jack, a reliable stand under the car and wheel chocks are installed. This helps protect the repairman from possible injuries. Before lifting the car body, loosen the hub nut. You will need a head and an extension for the key. Next, you need to remove the wheel and unscrew the lower mount of the front shock absorber. Take it to the side and secure it with improvised means. Also unscrew the bolts on the ball joint.
Then they completely remove the nut on the hub and, pulling it towards themselves, take out the “grenade”.
The outer joint can be replaced without removing the axle shaft.
Release the boot mounting clamp and move it as far as possible on the axle shaft. A hammer with an extension is used to hit the body of the “grenade” until it is removed from the axle shaft. Before installing a new part, be sure to change the retaining ring on the axle shaft, since it is disposable. Installing the hinge is done in the reverse order.
Inner CV joint
This faulty unit on a Chevrolet Niva can only be replaced after the axle shaft with constant velocity joints has been completely removed. The “ear” and skis are released, which will allow you to rotate the bridge when removing the axle shaft. For ease of operation, the dismantled axle shaft with “grenades” should be clamped in a vice. Replacing the internal CV joint of a Niva Chevrolet occurs as follows:
- Remove the clamps securing the protective boots and move them as far as possible.
- Use a hammer and extension to remove the damaged “grenade”. A few blows are enough to dismantle the faulty part.
- Before installing a new hinge, carefully clean the splines and install a new retaining ring, since it is disposable.
- A new CV joint is installed on the axle, the protective cover is additionally filled with lubricant, and the boot is clamped with a clamp.
The axle shaft with new grenades is assembled and mounted in the reverse order. The process is fully presented in the video:
It will be possible to extend the service life of constant velocity joints if you monitor the condition of the protective covers on the grenades, avoid bad roads and use only high-quality spare parts.
Source