Why the heater fan does not work on a Niva Chevrolet: reasons and repairs
The standard stove on a Chevrolet Niva, in principle, rarely requires repairs and heats properly, but over time the quality of conveyor components began to decline. Therefore, the heater began to exhibit childhood illnesses, which, one way or another, lead to failure of operation. An electric heater motor with peripheral equipment can create a number of surprises, and we will talk about them today.
How does the Niva Chevrolet heater fan work?
Like any automobile electric motor, the heater fan on the Chevrolet Niva is a DC commutator motor with the ability to stepwise adjust the speed. A motor with catalog number 2123-8118020 with a removable impeller on bushings is installed on the conveyor ; however, there is an alternative to it on floating bearings from the Luzar company with catalog number lFh-01211 ; there is a similar bearing motor from the Boutler company.
The stock engine can reach a peak of 3000 rpm , while the analogs spin up to a maximum of 2750 rpm . The maximum current consumption for the Luzarov motor is 25 A , for the native one - about 18 A.
Heater motor luzar lfh-01211 12V/14A.
The difference is significant, since the heater motor circuit is protected by fuse F18 rated 25 A.
Additional resistor
The operation of the electric motor in four modes is ensured by an additional resistor , which often causes various malfunctions. Its catalog number is 2111.8101012 or 2123-8118022-01 .
Additional resistor 2123-8118022-01.
At the first speed, the engine should consume no more than 5.1A , at the second and third 9 and 14A, respectively. At the maximum, fourth rotation speed , the voltage is supplied bypassing the resistor. Actually, all possible culprits for the malfunction of the air supply to the cabin are indicated; it’s time to name the symptoms of the malfunction.
Symptoms of a problem
The simplest situation is when the electric motor does not spin at all. In this case, there may be several reasons :
- Failure of fuse No. 18 rated 25 A. It only protects the heater motor circuit.
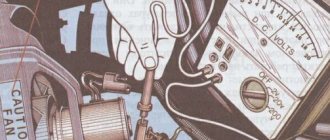
Check fuse F18.
In these situations, everything is simple - change the fuse, clean the contacts and check the wiring. In the case of damaged or worn brushes, you will have to completely remove the stove fan.
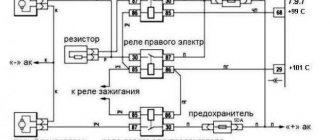
Connection diagram for the electric motor of the heater fan and the rear window heating element: 1 – ignition switch; 2 – mounting block; 3 – heater motor switch; 4 – additional resistor; 5 – heater electric motor; 6 – rear window heating element; 7 – switch for heated rear window with control lamp; A – to power supplies; K6 – additional relay; K7 – relay for turning on the heated rear window.
Stove fan repair
It is more difficult when the engine spins, but does not develop sufficient speed . This is dangerous because when the rotation of the electric motor shaft is difficult, it consumes much more current, so the fuse may burn out and the winding may fail. Diagnosing a fault in this case requires some experience and the breakdown may not be immediately detected, but a blown fuse will make it clear that there are problems with the motor.
The engine armature may not gain speed due to a dirty, oxidized or worn commutator or worn brushes.
In addition, insufficient motor speed can be caused by an interturn short circuit in the armature winding or wear or clogging of bushings or bearings . It is also possible that the cabin filter is clogged. In the case of bearings or bushings, the engine will make noise during operation, and the noise will increase over time. This can be treated either by replacing the motor, or by lubricating or replacing bushings or bearings.
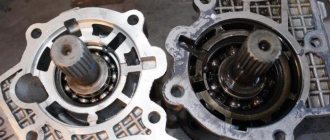
The cause of increased noise from the stove may be clogged bearings and bushings that need to be lubricated.
The bushings or bearings are lubricated only with a regular spindle and machine oil. Engine oil or grease is not used in this case. A new engine costs about 600 rubles, depending on the manufacturer .
Symptoms of a malfunctioning stove fan
The main signs of a stove fan failure are as follows:
- the electric motor does not work;
- the rotation speed of the electric motor decreases;
- The fan starts to creak.
Depending on the symptoms that appear, the procedure for eliminating the problem is determined.
The electric motor does not work
If the electric motor stops working, the noise in the cabin disappears when the heater is turned on.
Often the reason for this is the failure of fuse F18 with a rating of 25A in the corresponding block, through which voltage is supplied to the stove motor.
Another reason may be damage to the fan motor winding - if the wire insulation is damaged, an interturn short circuit may occur. In this case, the electric motor must be replaced.
When there is an interturn short circuit, the electric motor stops working.
The rotation speed of the electric motor decreases
When the rotation speed of the motor shaft decreases, it is somewhat more difficult to determine the source of the problem. The noise level becomes noticeably lower as the motor power decreases. This may be due to severe wear on the armature or brushes. In addition, the fan begins to consume much more current, and this can lead to the failure of fuse F18.
If the armature is heavily worn, the electric motor will rotate much more slowly.
If only fourth speed works
In cases where the motor refuses to work at the first, second and third speeds, but turns perfectly at the fourth, the same resistor with three isolated windings is to blame. If you can’t buy it, you can try to restore it yourself. True, only in the case when the thermal fuse has blown, naturally, no one will rewind the windings, the game is not worth the candle.
Fan resistor
You can remove and check the resistor without dismantling the engine. It's done like this :
- Use a Phillips screwdriver with a short blade to unscrew the rightmost screws securing the glove compartment.
Unscrew the rightmost screws securing the glove compartment.
Move the glove compartment aside to get to the resistor.
We remove the contact block.
Unscrew the screw securing the resistor.
Built-in fuse
To replace the built-in thermal fuse, any type KSD-160 or RY01-165 is suitable . They work up to a temperature of 150-165 degrees . To solder a new resistor, be sure to use low-melting solder so as not to overheat the part, and during soldering, hold it with thick pliers for better heat dissipation. Good luck to everyone and a comfortable temperature in the cabin!
The device of the stove of the Niva Chevrolet car
The Chevrolet Niva is equipped with a liquid-type heater. It supplies warm air to the cabin and cools the engine, overheating of which can lead to disastrous consequences and costly repairs.
Without air conditioning
The Chevrolet Niva heating system consists of the following elements:
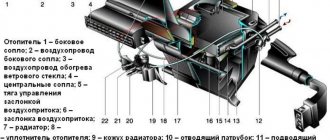
- ventilation duct;
- windshield heating duct;
- intermediate body;
- air intake filter;
- fan;
- interior heating duct;
- foot heating duct;
- heater radiator.
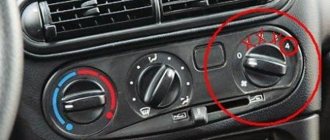
The intensity of the hot air supply is regulated using dampers. The air duct system distributes the heat flow to various areas of the cabin: windshield, side windows, legs, doors, etc. In addition, there is a four-speed air supply switch.
Heating system for the interior of a Chevrolet Niva car, where 1 is the side deflector air duct; 2 — windshield air duct; 3 - intermediate body; 4 - intermediate air duct; 5 — outside air filter housing; 6 — fan housing of the heating and ventilation system; 7 — central deflector; 8 — air duct for blowing the front passenger’s feet; 9 — facing of control units; 10 — front air duct for blowing the legs of rear seat passengers; 11 — rear air duct for blowing the legs of rear seat passengers; 12 — heater assembly; 13 — air duct for blowing the driver’s feet; 14 - side deflector
With air conditioning
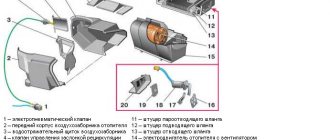
The air conditioning system allows you to regulate the temperature and humidity in the cabin. Before turning on the air conditioner, the heater fan is turned on, and the temperature control knob is set to minimum. Almost the entire air conditioning system is located in the engine compartment. Only the evaporator is brought into the cabin between the heater and the electric motor, providing heat exchange between the incoming air and the refrigerant.
Heater and air conditioner diagram, where 1 - heater housing; 2 — inlet pipe of the heater radiator; 3 — heater radiator outlet pipe; 4 — air conditioner evaporator housing; 5 — evaporator outlet pipe; 6 — evaporator inlet pipe; 7 — fan housing; 8 — control cable for the external air supply damper
As the refrigerant moves through the evaporator tubes, it absorbs heat and turns into a gaseous state. The evaporator fins are cooled, and the fan directs cold air into the cabin and reduces the temperature. Gaseous refrigerant from the compressor under pressure enters the condenser, cools and turns into a liquid state. After this, the liquid is supplied to the receiver, and from it to the evaporator reducer, where it again turns into a gaseous state. A new cycle begins.
Video How to Remove the Heater Control Unit Niva Chevrolet
- air flow direction control knobs;
- switch for high-speed fan operation.
After all three switches are removed, arm yourself with a screwdriver and, by prying it a little, remove the air circulation control lever. Now nothing will hinder you; you can easily remove the control unit lining itself. Also, carefully pry it in several places with a screwdriver and remove it. Under the facing panel you will find two screws, which will be easy to unscrew using a Phillips screwdriver. After these steps, you can carefully remove the control unit itself. On the reverse side you will see that a block of wires connected to the speed mode switch is attached to the block; be sure to pull it out too. In the same way, find the block of wires connected to the backlight lamps, and disconnect them too. If your car has an air conditioner, then you will need to additionally disconnect the hoses from the vacuum switch.
A little lower you will find a bracket holding the shell of the damper drive rod. You need to carefully pry it off with a screwdriver. Do the same with the other rods, ensuring that the control unit is completely disconnected.
As you can clearly see, there are no particular difficulties when dismantling the control unit. But you realize that you should not, of course, do such manipulations for the sake of enthusiasm and practical experience. It is often necessary to remove the unit if the backlight bulbs have burned out. Changing them is simple, just spin the socket in the opposite direction, pull it out, change the lamp, and then do all the steps in reverse order.
You also have to disassemble the control unit when you discover that the heater of your Chevrolet Niva does not work or works with serious problems.
Very often the electronic control unit for the stove installed on your Niva fails. In this case, you will still have to turn to qualified electricians for help, since you can remove the unit, but you cannot identify the cause of the problem. To carry out such work, it is very important to have various tools, instruments, testers and devices, and it is also important to have good knowledge of electrical engineering.
So, if you are unhappy with the way the stove works on your Chevrolet Niva, you don’t like the fact that the car’s interior warms up slowly, then act boldly, look for the reasons, solve problems, armed with tips and necessary instructions, and enjoy the good performance of your car.
Main stove malfunctions
Stove malfunctions can be very different. The most common reason for its failure is:
- heater valve malfunction;
- damage to radiator pipes;
- failure of the additional resistor;
- radiator damage;
- control unit problems.
As a result of any of the above situations, the stove stops working normally.
Warm air does not enter the lower part of the cabin
Before repairing the stove, you should check the temperature of the coolant (coolant). Perhaps the problem is not in the interior heater, but in the cooling system. If the engine warms up to operating temperature (90˚C), then the cause of the malfunction should be sought in the stove.
With the help of damper position regulators, warm air is directed to different parts of the cabin
The dampers should be adjusted first. To supply hot air to your feet, follow these steps:
- The engine warms up until the warm air can be felt with your hand.
- The heater fan speed switch is set to position 4.
- The airflow direction knob turns to the 12 o'clock position and immediately returns to 10 o'clock. Air should begin to flow into the lower part of the cabin.
- If the result is not achieved, the procedure is repeated.
This sequence of actions is due to assembly errors. Due to gaps and backlashes, interference is created with air distribution and installation of the damper in the desired position the first time. If after these steps the heat still does not reach your feet, the heating system needs to be modified.
Antifreeze leak from the stove
In used cars, coolant often begins to leak from the stove. The reason for this is usually wear and tear on the pipes or a malfunction of the heater tap. Since antifreeze circulates under pressure, all connections must be tight. However, during prolonged use, hoses and gaskets lose their elasticity and burst. After inspecting the heating system and identifying the leak, the worn part is replaced with a new one. When making repairs, you should not use clamps made in China due to their poor quality.
Heater diagram
The most common reason for its failure is: Warm air does not enter the lower part of the cabin Before starting repairs of the stove, you should check the temperature of the coolant. Perhaps the problem is not in the interior heater, but in the cooling system.
With the help of damper position regulators, warm air is directed to different parts of the cabin. First, the dampers should be adjusted. To supply hot air to your feet, follow these steps: The engine warms up until the warm air can be felt with your hand. Consequently, it is almost impossible to open the tap without breaking it.
stove Niva Chevrolet
https://youtube.com/watch?v=UNMCm8ypDbI
To get to it, you need to dismantle the dashboard in the cabin on the passenger side. The stove tap is mounted in a special niche in the engine compartment. If the tap has been replaced, then it is better to install new pipes along with it, because during operation they have probably lost their elasticity.
Collective farm tuning of the Niva Chevrolet stove: In some cases, the correct switching method does not work and then you have to modify the heater in order to achieve its full functionality. The main problem with dampers and ducts is leakage.
We will improve the cracks and eliminate leaks in the stove. Remove the heater control unit by disconnecting all wires and cables from it. If there is a radio, remove that too. Disconnect the transmission tunnel lining.
You don’t have to remove it completely, but only lift it by unscrewing two screws on the driver’s and passenger’s sides. Remove the steering wheel, steering column trim and unscrew the screws securing the front panel. When removing the dashboard, mark all the wires to make it easier to reattach them in their places in the future.
Without removing the entire front panel, when dismantling the heater unit, some elements of the air conditioner and the stove itself can be damaged. Remove the front panel frame attached to the body with screws. The heater housing cannot be removed without dismantling the front panel frame. Behind the frame you will find the heater unit casing, connected to the intermediate housing of the heater or to the evaporator section on a car with air conditioning.
Chevrolet Niva 2012, 80 l. With. — self-repair
Installation of a new unit is carried out in reverse order. The most common purpose of such tuning is to improve the air supply to the driver's and front passenger's footwells. To do this, install additional air ducts and adjust the shape of the damper drive strip
For such modification you will need: You must work with the plastic of the heater housing very carefully, as it is quite fragile
The steps are performed in the following order: Select tubes suitable for the role of additional air ducts. You can use plumbing pipes as additional air ducts. Remove the side trims on the center console on both sides.
Air flows in the cabin are distributed by air ducts, which are located under the instrument panel and under the floor tunnel lining, and under the floor upholstery to supply air to the feet of the rear passengers.
To control the distribution of air flows, use the distribution regulator handle on the center console of the instrument panel, as well as the regulators and guides of the central and side deflectors on the instrument panel.
To heat the interior, move the temperature control knob to the hot red zone. In this case, the outside air is directed using a damper through the heater radiator, which is integrated with the engine cooling system.
Remove the screws of the tie rod brackets. Disconnect the rods from the heater damper levers. Unscrew the screw of the bracket securing the recirculation flap drive rod and remove the lever bracket and disconnect the wiring harness block from the heater electric fan switch.
Heater diagram First of all, we want to orient you that the Niva already has a liquid-type heater installed, which allows you not only to supply warm air into the car interior, but also to cool the running engine, preventing it from overheating. It's no secret that overheating the engine entails extremely undesirable consequences.
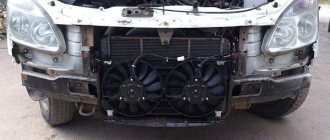
An electromagnetic clutch is built into the compressor pulley, which engages and disengages the compressor shaft from the pulley according to signals from the engine control system controller. Refrigerant vapor from the compressor under high pressure enters the condenser located in front of the radiator of the engine cooling system. Passing through the honeycombs of the condenser, the refrigerant is cooled by the counter flow of air and with the help of fans of the cooling system.
Interior heater repair
The stove in the Chevrolet Niva is considered one of the most reliable components of the car. However, it can sometimes fail.
Replacing the heater cable
Sometimes it is not possible to change the position of the heater damper. The reason for this is a broken cable. To replace it, you will need a standard set of tools and a headlamp. Replacing the cable is carried out as follows.
- The driver's seat moves back.
- The handles are removed from the damper control panel and the screws are unscrewed.
- The panel is dismantled on the left side at the location of the driver's feet.
To access the cable you will need to remove the heater control mechanism - The cable fastening latches are removed.
- The recirculation damper mechanism is dismantled and the cable is removed.
- A new cable is installed. Each end must be twisted into a ring and securely fixed.
Using a cable, the position of the air supply flap is changed - Assembly is carried out in reverse order.
- The functionality of the mechanism is checked.
Replacing the interior heating control unit
A faulty control unit can also cause the interior heating system to not operate correctly. Its dismantling, necessary for repair or replacement, requires the following procedure.
- The negative terminal is disconnected from the battery.
- All handles are removed from the heater control mechanism. To do this, you need to carefully pull them towards you. All handles are removed from the heater control mechanism
- Use a flat-head screwdriver to remove the air circulation lever. Use a flat screwdriver to remove the air circulation lever
- Use a screwdriver to pry up and then remove the block lining. Use a screwdriver to pry up and then remove the block lining
- Under the cladding, use a Phillips screwdriver to unscrew two self-tapping screws. Two self-tapping screws are unscrewed under the cladding
- The control unit is removed.
- Remove the connector with the wires going to the speed switch.
- The block of wires that provide illumination of the unit is disconnected. The connector with wires is removed from the control unit
- If there is an air conditioner, all hoses coming from the vacuum switch are disconnected.
- Use a screwdriver to remove the bracket holding the damper cable braid and other similar elements.
- All rods are disconnected from the control unit.
- A new or repaired device is installed in the reverse order.
After dismantling, the control unit is repaired or replaced with a new one.
Replacing stove pipes
If a coolant leak is detected, the pipes along with the clamps should be replaced. The work is performed in the following sequence:
- The coolant is drained from the system.
- The screws securing the glove compartment are unscrewed and it is removed.
- Use a Phillips screwdriver to unscrew the clamp of the lower pipe. The hose is removed carefully - the antifreeze should not get on exposed skin. If difficulties arise, the pipe should be rotated around its axis.
- The second pipe is removed in the same way.
- New hoses are installed and tightened with clamps.
If antifreeze leaks, the stove pipes are replaced with new ones.
Video: dismantling the stove pipes on a Chevrolet Niva
Replacing the stove fan
If the fan does not turn on or if strange noises appear when it is turned on, then the electric motor is most likely faulty.
Malfunctions of the stove of the Niva Chevrolet SUV and their elimination
With the onset of cold weather, it is important that the car interior is heated, creating comfortable conditions for the driver and passengers. The article discusses cases when the stove of a Niva Chevrolet car does not work, the main malfunctions, and describes how to repair the unit.
Car heating system
The Chevrolet Niva SUV has a heating system that not only heats the interior in winter, but also cools it in summer.
Its design includes:
- Control block;
- radiator;
- coolant pump;
- pipes;
- evaporator;
- tap;
- compressor.
In addition, the design has a resistor and a fuse that are responsible for functionality.
Heating system diagram
Possible faults
Various problems with the Chevrolet Niva are possible: the heater blows cold air, the fan may not work, etc.
The cause of the problem may be the following:
- The stove tap does not work;
- radiator pipes are damaged;
- the additional resistor does not function;
- radiator is faulty;
- The control unit does not work.
To restore the functionality of the system, you need to know how to troubleshoot problems and repair faulty elements or replace them.
How to fix a resistor?
Before repairing a resistor, you need to make sure that it is inoperative. To do this, you need to turn on the ignition and check its operation - how the air will blow. This device is responsible for the operation of the fan, or more precisely, its rotation frequency. If the fan does not work in the first three speed positions, then the device is faulty.
Checking the device for serviceability
To change the resistor, you need to pull the glove compartment forward without removing it. Disconnect the wiring harness. Next, remove the device and install a new part. After the process is completed, you should check the operation of the fan at different speeds (author - Andre Vladimirovich).
How to change the tap and pipes?
Over time, due to wear and tear, the pipes become unusable and the heater valve leaks. The stove pipe is replaced if it is leaking. If the faucet is faulty, it should be replaced. It is better to replace it with a ceramic product; they last longer than the standard ones. It is recommended to change the pipes along with the tap: over time, they lose elasticity and may leak.
Control block
The control unit contains switches for heating system modes. If it doesn't work, it needs to be replaced. To do this, you need to dismantle the device and replace it with a new one. You can carry out repairs, but in this case you need to understand electrics or entrust the repair to a professional.
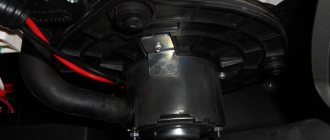
Fan
If the fan is not working, check the functionality of the electric motor. Using this device, air is pumped into the interior of the car. To repair the fan, it must be removed. The removed device is checked using the battery. If the motor is not working, it must be replaced. You can completely replace the entire device by purchasing a new device in advance.
Replacing the heater (radiator)
Replacement is carried out if antifreeze begins to leak. The radiator is located behind the glove box, in a niche on the left side of the front passenger's feet.
New replacement product
The procedure includes the following steps:
- First, turn off the on-board network by disconnecting the negative terminal from the battery.
- Then you need to remove the glove compartment and side panel.
- Drain the antifreeze from the block.
- Next, unscrew the air duct blowing on the legs so that it does not interfere with removing the parts.
- Then remove the cabin air filter.
- Having unscrewed the snail, we move the damper body to the side. Then you should disconnect the wires, and take out the volute and motor.
- Next, unscrew the evaporator screws and disconnect the hose. Moving the evaporator to the side and gently pressing it to the floor, remove the device.
- Then disconnect the pipes. If there are new pipes, the old ones can be cut off.
- After unscrewing the two fastening screws, remove the heater radiator from the niche.
- We install a new device. Assembly is carried out in reverse order.
- Add coolant.
After replacing the radiator, you need to check the functionality of the stove.
Video “How to change the heater on a Chevrolet Niva”
This video shows how to replace a heater core (the author of the video is Auto Fix Info).
Dismantling the stove
The stove is dismantled as follows.
- The negative terminal is removed from the battery.
- Remove the dashboard, performing the same steps as when replacing the control unit.
- The screws securing the heater to the cross member of the instrument panel are unscrewed.
- The stove is pulled out from its installation location.
Removing the stove from a Niva Chevrolet car is quite simple
Refinement of the heating system of the Chevrolet Niva
When the intensity of supply of air heated by the heater into the cabin decreases, it becomes necessary to modify the heating system. This is due to errors in the assembly of the system. The main problem is the lack of tightness in the air ducts and dampers. This leads to incorrect distribution of warm air throughout the cabin. The modification is carried out as follows.
- The steering column casing and driver's side console are removed.
- On the heater side, a plate is removed that sets the direction of air supply.
The die located on the heater side needs improvement - The slot at the top of the die is made straight while maintaining the starting and ending points. To give the desired trajectory of movement of the damper, you can glue a plastic card to the die.
To give the desired trajectory of movement of the damper, you can glue a plastic card to the die - The lower flap, which is responsible for supplying air to the legs, is rigidly attached. To do this, a homemade bracket is cut out.
The last stage of modification of the stove is the rigid fixation of the lower damper
As a result, warm air will be distributed throughout the cabin strictly in accordance with the position of the flow direction regulator.
Thus, even an inexperienced car enthusiast can ensure a comfortable microclimate in the interior of a Chevrolet Niva car. To do this, you just need to strictly follow the instructions and recommendations of professionals.
Source
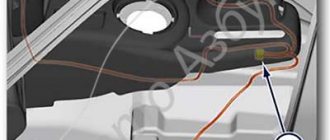
Improvement No. 3. Installing the grille on the air intake
When disassembling the heater, a large number of tree leaves and insect remains were found in the air intake casing and in the honeycombs of the heater radiator grille, which also reduced the efficiency of the heater. Therefore, after cleaning and flushing the heater core, I took measures to prevent the radiator from clogging.
To do this, I bent a wire frame to the size of the air intake inlet, covered it with a nylon mesh with a 1x1 mm cell, and installed it at the bottom of the rubber seal of the air intake inlet. It was perfectly fixed there in the fold, like an accordion, without additional fastening.