How to check the speedometer shaft?
Usually, to check the functionality of the shaft, it is enough to drive a couple of tens of meters. Start the engine and drive 20–30 meters and observe the behavior of the end of the shaft. If the tip is motionless, you need to lift the hood cover, unscrew the nut that secures the shaft. If only the shell of the part gives in, then this will indicate only one thing - a shaft break has occurred. In this case, you will have to remove the remaining tip from the drive. For this job you will need pliers.
Another development of events is also possible if both the shaft and the shell fail, and this will indicate that there are simply no edges at the tip of the shaft. Regardless of the reason for the shaft failure, it will have to be replaced.
Often the need to change the drive arises due to wear of paired gears. In order to solve this problem, you do not have to remove the gearbox. To solve the problem, it is enough to have an inspection hole or overpass.
The first step is to unscrew the bolt that secures the drive housing to the gearbox. After this, the housing is removed, then the gears. The latter must be replaced. In order to choose the gears that are suitable for your car, just compare the new ones with the old ones, the number of teeth should be the same.
If there is oil on the housing, it would be a good idea to check the O-ring and replace it if necessary. The drive elements are washed using clean kerosene.
The order of assembling the unit is reverse.
Causes and breakdowns
In reality, the resource of the CV joint turns out to be significantly less, which is caused by operating conditions, poor quality of roads, driving habits and other factors.
The CV joint is popularly called a “grenade,” which is due to the external similarity of the element to this explosive device.
Here's what you should know about grenade malfunctions:
- Practice shows that the most common cause of CV joint failure is dirt, dust, and sand that enter the mechanism through a damaged boot;
- Sometimes the problem of a non-functioning grenade can be solved by replacing the boot. This is possible if the CV joint itself has not yet worn out due to exposure to contamination;
- If the damaged boot is not detected in time, the grenade will be completely worn out within literally 200 kilometers;
- If the CV joint fails, a strong crunching sound appears when cornering and accelerating. Such a symptom indicates the need to urgently replace the CV joint;
- The cost of new grenades is quite affordable; they are available at any auto parts store. But you should purchase those that meet the technical requirements of the VAZ 2109;
- If you have at least a little experience in repairing cars yourself, it is quite possible to replace a grenade with your own hands.
Old and new element
How to recognize a faulty speedometer?
- The speed is displayed incorrectly;
- The numbers stop crooked;
- The sensor has burned out.
The main condition for success is the correct dismantling of the front panel. Let's consider the sequence of work. A pair of screws are unscrewed, which serve to fix the bottom panel, and the “beard” is removed. The top panel is released from the clamps, and the emergency lights are turned off. This applies to side lights, low beam, and cigarette lighter. Next comes dismantling the pads and removing the panel itself. There is now free access to the screws securing the speedometer.
Thank you for your attention, I hope the article was useful for you, see you again at VAZ Repair.
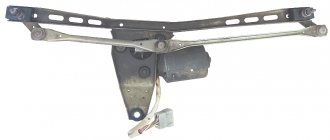
Replacing the speedometer drive gear of a VAZ 2109
Removing and installing the speedometer drive
1. Support the rear wheels with wheel chocks, then jack up the front of the car and place it on stands. drive is located at the rear of the transmission, near the differential entry point of the right drive shaft. Depending on the model configuration, the drive may have a mechanical (cable) design or be an electronic sensor.
2. On models with a cable-driven speedometer, remove the fastening pin and disconnect the cable from the drive gear. On other models, disconnect the associated electrical wiring.
Repair tool
To independently remove CV joints on a nine or any other car, you need to have the following tool on hand:
- A socket wrench for “30” or a socket with a strong wrench.
- Hammer and chisel.
- Balloon wrench.
- Set of spanners and sockets.
- Penetrating lubricant such as WD-40.
- Capacity of at least 5 liters.
- Marker or metal scriber.
- Jack, support and wheel chocks.
Replacing Speedometer Gear VAZ 2109
Replacing the speedometer gear of a VAZ 2109
Removing and installing the speedometer drive
1. Support the rear wheels with wheel chocks, then jack up the front of the car and place it on stands. The speedometer drive is located at the rear of the box, near the entry point into the differential of the right drive shaft. Depending on the model configuration, the drive may have a mechanical (cable) design, or be an electrical sensor.
2. On models with a cable-driven speedometer, remove the fastening pin and disconnect the cable from the drive gear. On other models, disconnect the appropriate wiring.
3. Unscrew the fastening bolt and remove it together with the heat shield (if provided).
4. Remove the drive assembly with the driven gear from the manual transmission housing and remove it together with the sealing ring.
5. If necessary, the gear can be removed from the gearbox housing (do not forget to remove the oil seal); check the condition of the gear; if mechanical defects are detected, replace it. Replace the O-ring as soon as possible.
Replacing the VAZ 2109/14 speedometer drive and their modifications
Hello everyone, in this video I’ll talk about replacing the speedometer drive with injection modifications at the front.
Speedometer doesn't work
The speedometer did not work. Why the speedometer does not work. The main reasons for the breakdown of the VAZ 2108 speedometer.
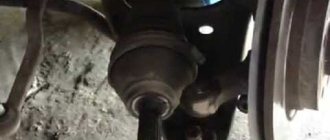
Signs of CV joint malfunctions
Most often, the outer CV joint of the VAZ-2109 is replaced, since its resource is approximately three times less than that of the internal one. But the repair algorithm is generally similar.
Even to install new boots, you will need to completely dismantle the drive - it’s much more convenient to work this way. To determine if grenades are damaged, you need to do the following:
- Turn the steering wheel to the left all the way.
- Drive away and listen for any extraneous sounds.
- Turn the steering wheel to the right all the way, then drive off again and listen to the sounds.
If a characteristic crunch appears, you need to change the grenade. It is useless to repair it - these elements cannot be restored. If both CV joints are faulty - internal and external, then it will be easier to install a new drive assembly. At least there won't be any problems knocking down old grenades.
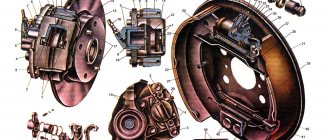
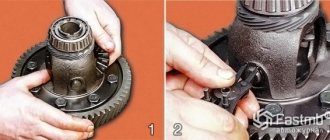
repair of gearbox differential on VAZ 2108, VAZ 2109, VAZ 21099 cars
1. Remove the differential (Fig. 5.12) from the gearbox (see “Disassembling the gearbox and troubleshooting its parts”).
2. Turning 90° around the pinion axis, remove the side gears from the differential housing.
3. Remove the retaining ring from the pinion shaft.
4. Remove the pinion axle and two pinions from the differential housing.
5. Remove the bolts securing the driven gear to the differential housing.
6. Press the driven gear off the differential housing. 7. Inspect the working surfaces of the satellites, the axes of the satellites, side gears and the spherical surfaces of the differential housing in contact with them. Remove small irregularities with fine-grained sandpaper. Replace parts with significant defects.
8. Check the condition of the transmission driven gear. If there are chips, chipping or significant tooth wear, replace the driven gear. On VAZ 2108, VAZ 2109, VAZ 21099 cars, final drive gears with different gear ratios are installed. The number of teeth of drive gear 1 and the number of teeth of driven gear 2 are stamped on the driven gear.
WARNING The final drive gears are selected in pairs at the factory based on noise and contact patch. Therefore, when replacing the driven gear, also replace the drive gear: the driven and drive gears are sold as a pair. To check, count the number of teeth on the drive gear.
9. Inspect the bearing seats on the differential housing. If these areas are significantly worn out, replace the differential housing. If there is pitting (sinks) on the raceways and rolling elements, traces of indentation of the rolling elements on the raceways, or damage to the cages, the bearings must be replaced.
10. To replace the differential bearings, use a puller to press the bearings off the differential. In this case, the bearings are destroyed. Then…
11.... press out the outer rings from the gearbox and clutch housings with a special puller. If there is no puller, press out the axle seals first. Please note that in this case the seals are damaged and the seals must be replaced (for more details, see “Replacing gearbox seals”). Press out the bearing rings from the outside of the crankcases with a punch.
12. Please note: there may be an adjusting ring under the ring installed in the gearbox housing, which must be re-selected before pressing in new rings (see “Selecting the differential bearing adjusting ring”).
Development of pickup truck production
The country's first traveling passenger car with a carrying capacity of up to 0.5 tons based on a serial one was produced in 1972. It became a utility vehicle under the designation IZH-2717. The small truck immediately gained great popularity and was produced for almost 30 years, and in total about 2.5 million copies were manufactured. Due to its body shape, the car received the popular nickname “Heel”, which then passed on to other models of similar cars.
In the late nineties, with the growth of small and medium-sized businesses, the demand for small pickup trucks based on passenger cars increased sharply. This allowed VIS to increase the number of vehicles produced, as well as the number of modifications. also tried to return to the market of heeled cars, but the VAZ-1706 (“Lada Shuttle”) model, produced on the basis of the 2108 model, lasted on the assembly line for only three years.
Replacing the Drive Gear of the Speedometer Drive VAZ 2109
Replacing the drive gear of the VAZ 2109 speedometer drive
Removing and installing the speedometer drive
1. Support the rear wheels with wheel chocks, then jack up the front of the car and place it on stands. The speedometer drive is located at the rear of the box, near the entry point into the differential of the right drive shaft. Depending on the model configuration, the drive may have a mechanical (cable) design, or be an electrical sensor.
2. On models with a cable-driven speedometer, remove the fastening pin and disconnect the cable from the drive gear. On other models, disconnect the appropriate wiring.
3. Unscrew the fastening bolt and remove it together with the heat shield (if provided).
4. Remove the drive assembly with the driven gear from the manual transmission housing and remove it together with the sealing ring.
5. If necessary, the gear can be removed from the gearbox housing (do not forget to remove the oil seal); check the condition of the gear; if mechanical defects are detected, replace it. Replace the O-ring as soon as possible.
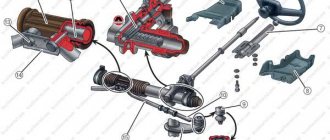
Transmission speedometer drive
Front axle
The front axle has an independent telescopic suspension, which uses both hydraulic shock absorbers and coil springs. The wishbone is the lower one with braces. The chassis is equipped with a stabilizer bar. The suspension device of the VAZ 2109 is almost identical to that of the VAZ models 2108, 21099.
Components and parts of the front axle chassis
The front axle of the VAZ 2109 is perhaps the most complex element of the chassis, this is due to the fact that the car’s transmission is front-wheel drive, but the number of main components in its structure is not so large. This:
- Rack with shock absorbers;
- Rounded fist;
- Cross arm;
- Stretch marks;
- Mounting units for the chassis to the body and transmission;
Description of the front suspension design
The chassis of the front axle of the VAZ 2109 contains quite a lot of elements, but everything is typical for cars of this class and its design has something in common with many cars of the same type. The main part is a telescopic stand with a hydraulic shock absorber. A coil spring with a stroke buffer is installed on top of the hydraulic cylinder. The upper support is also made of polyurethane and ensures the rack swings and vibration damping. The device for fastening the rack to the body (with three bolts) allows you to dampen vibrations. There is also a ball bearing inside the support, which ensures that the stand rotates together with the wheel. At the bottom of the steering knuckle there is a ball joint for connection with the lower suspension arm.
To compensate for the forces, there are stretchers with rubber-metal hinges. To install the wheel hub, a double-row thrust bearing is mounted in the steering knuckle. The hub is secured with one bolt. The suspension device also includes a stabilizer; it is connected to the lower suspension arms through struts with rubber hinges.
The design of the rear axle chassis of the VAZ 2109 is much simpler, this is explained by the fact that, unlike a classic rear-wheel drive car, it does not have transmission-related parts. And the load taken by the chassis is much less than that of a truck.
Rear axle chassis parts
Due to the milder operating mode (compared to the rear-wheel drive of previous models), the designers had the opportunity to simplify the design and design of this unit of the VAZ 2109. Thus, in the rear suspension of the chassis there are no stretch marks and parts for transmitting rotational force to the wheels, stabilizers (since their role is played by the beam), this slightly worsened the dynamic parameters of the car, but significantly increased reliability. The diagram of this chassis unit includes:
- Trailing arms;
- Central beam;
- Brackets for fastening the vehicle axle to the side member;
- Hydraulic shock absorbers;
- Springs (pair);
- Flanges for mounting wheels.
Rear axle design
The main element of the rear axle of the chassis of the VAZ 2109 is a beam, which in turn consists of three parts - two trailing arms and a connector. These three units are connected by welding with reinforcing linings. Brackets for installing car shock absorbers and flanges for installing wheel axles are welded onto the arms.
In the front part, hinges are installed with a lever; bolts pass through them to secure the chassis to the hinges mounted on the body side members. The shock absorbers of the rear axle of the VAZ 2109 are hydraulic with added coil springs. In their upper part, through rubber-metal bushings, they are fixed in the parts of the car body.
Rear-wheel drive and all-wheel drive on 2108-2112 Thoughts on this matter! very interested! Rating: 1 Votes
#1 Guest_Kolin_*
#2 MAG
- Active Member
- Group: Users
- Posts: 196
- Registration: 05 October 09
- Gender: Man
- City: Nizhny Tagil
- Interests: VAZ tuning, AUTO sound
#3 BadBoy
- Off topic
- Group: Users
- Posts: 3
- Registration: 12 December 09
- Gender: Man
- Samara city
Attached images
#4 BadBoy
- Off topic
- Group: Users
- Posts: 3
- Registration: 12 December 09
- Gender: Man
- Samara city
Attached images
#5 GLS
- The Evil Mega-Moderator
- Group: Moderators
- Posts: 9768
- Registration: 18 March 10
- Gender: Man
- City: Crimea, Yalta
- Interests: Tuning vases. KING TONY instruments. Suspension.
VAZ 21083 GLS , German, October 22, 1987. She's been through a lot. In the family since 1997, mine since 2007. Volume 1.8 liters, compression ratio 10.8. Block 11193 196.6 mm milled, crankshaft 84 mm STI (neck 41.5), connecting rods 1119 129 mm polished, journals 20 mm, end pistons 118.01. TurboTema oil pan with flap. 8cl Sport cylinder head, milled, combustion chamber volume 28 cubic meters, puddle for large valves. Valves custom 34/39 ports inlet min. diameter 33.5 mm, window 36, outlet 30, window 32. ProSport springs, titanium alloy plates, solid pushers, STI 3 11.7 288/282 shaft, gasket 21116. Custom M-Pover receiver (modified, 36 mm channels) , 54 mm throttle, cold start ProSport, Federal Tax Service in a standard box. Injectors from AGU 1.8T, RTD 380 kPa, pump MASUMA MPU-103 (Toyota Supra). MG-Race edition, 60 mm, Honda Legend 3.5 can. GM ignition, NGK armored wires, NGK IR spark plugs (iridium). Sensors: DPKV, DKK, DPDZ, IAC, DMRV, DD, control unit January 5.1-61 sewn online by Vova from Sevastopol. Oil only Castrol EDGE 10W60 Engine on Createch mounts; Front suspension: Autoproduct crab extension, Autoproduct arm extension, Triangular arms, IQ Racing 22 mm stabilizer, strut with additional support TM Supports CC20 Master, Phobos springs -50 2110- 2 turns, Plaza Sport50 shock absorbers; Rear suspension: Acomi supports, Plaza SP70 2170 shock absorbers, Phobos -25 springs - 3 turns, Tehnomaster rear stabilizer, AvtoProdukt welded cup strut, TM body reinforcement. Brakes: front TORNADO FS 15 Pro.Sport Gold discs, EBC GreenStuff pads, stock rear. Brake booster TORGMASH. Equal-length drive VSMPO Vega 15 wheels , front spacers SS20 20mm, Yokohama PARADA spec-2 tires, camber, rear 2 degrees with Stinger spacers; before 0.35 minutes, caster 3.5 degrees. Interior, short-throw tuning-car slide, with PRO.SPORT handle, PRO.SPORT Rally leather steering wheel, black, custom vw golf mk3 seats, Torg-mash pedal covers. Lots of all sorts of creaks and rattles. Externally, the color is white xeral , front bumper Lukoil, rear bumper 2113 stock, sills and moldings 2113, bad fight, mirrors F1 style xenon bi-lenses G5, ignition units Infolight, infolight lamps 5000 K 50 Watt.
#6 Kulibin
- Tuner
- Group: Users
- Posts: 761
- Registration: 08 December 07
- Gender: Man
- City: Moscow region, Kolomna
- Interests: Car tuning
BadBoy (12.12.2009, 21:12) wrote:
#7 GLS
- The Evil Mega-Moderator
- Group: Moderators
- Posts: 9768
- Registration: 18 March 10
- Gender: Man
- City: Crimea, Yalta
- Interests: Tuning vases. KING TONY instruments. Suspension.
giv (26.3.2010, 18:09) wrote:
Yesterday a friend told me that there are 12 all-wheel drive. And around the plant