Did you feel vibration when braking? One of the reasons may be uneven wear of the brake discs, which are best replaced in pairs. Discs are also changed when their thickness becomes less than 17.8 mm. Replacing brake discs on all modern Lada cars (XRAY, Vesta, Largus, Granta, Kalina, Priora and Niva 4x4) is performed in the same way without significant differences.
Required:
- new brake discs (Granta, Priora, Kalina): catalog number: 2110-3501070 (13 inches) and 2112-3501070 (14 inches)
- new brake discs (XRAY, Vesta, Largus): 7701206339 (without ABS) and 7701207795 (with ABS).
- set of tools.
Raise the car on a jack and remove the wheel. Unscrew the brake fluid reservoir cap and spread the brake pads, checking the brake fluid level (pump out if necessary). Then:
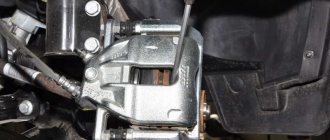
- remove the brake hose (No. 4) from the strut bracket (No. 5).
- Unscrew the 2 bolts (No. 2) securing the caliper.
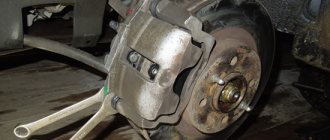
Hang the front brake by the suspension spring, preventing the brake hoses from twisting. To remove the brake disc, you will need to unscrew the 2 mounting bolts on the wheel hub, holding the brake disc with your hand from turning. If the brake disc cannot be removed, tap the disc with a hammer on the contact plane of the wheel (hitting the working surface (No. 1) of the disc with a hammer is unacceptable).
Installation of the brake disc is carried out in the reverse order, after first cleaning the adjacent surfaces from dirt. After installation, you must press the brake pedal 2-3 times and check the brake fluid level. The whole process is also shown in the video:
Let us remind you that to prevent squeaking brakes, it is important to choose the right brake pads.
It is important to monitor the condition of the brake discs on the Lada Priora. The front ones are installed in all trim levels. At the same time, the rear ones are usually installed by the owners themselves. It is important to replace in a timely manner. If the disk is worn down by at least 2-3 mm, it is necessary to install new parts. The thickness should be checked using a caliper.
Snapshot
Through the caliper window we estimate the thickness of the brake pads.
Through the caliper window we estimate the thickness of the brake pads.
Through the caliper window we estimate the thickness of the brake pads.
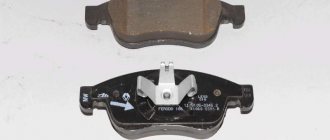
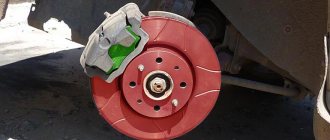
We replace the brake pads of both front wheels if the thickness of the friction lining has reached the maximum permissible value - 1.5 mm. Rotating the brake disc, inspect its working surfaces on both sides. There should be no cracks or deep grooves on the working surfaces of the disc.
Some useful tips:
- Whenever you replace pads or brake discs on a Priora, take the time to inspect the entire brake system, check the protective rubber covers of the guide pin, and the movement of the caliper relative to the brake pad guide. If the movement is tight, it is necessary to apply special grease to the guide pins.
- Replace protective covers if cracks or damage are found on their surface. It is recommended to use special lubricant - UNIOL-1, but if you don’t have one at hand, you can replace it with high-temperature lubricant.
- After replacing the brake pads, it is not recommended to actively use new parts or check the effectiveness of the brakes. The fact is that grinding in new pads to brake discs is not a matter of minutes; it takes time for everything to get in properly; it is impossible to say more precisely, because it all depends on the intensity of braking, the quality of the pads and the frequency of operation of the car. At first, you need to take into account the fact that the brakes do not work effectively enough, so constantly brake with a “reserve”.
- To speed up the process of grinding brake pads to discs, select a flat section of the road, preferably with a minimum number of road users, and perform several cycles: acceleration - smooth braking. Be careful and do not lose your vigilance, because it is very easy for new brake pads to overheat or “burn” (when the top layer of the linings becomes “mirror-like” and braking efficiency is reduced by 10-15%).
Snapshot1
Using a caliper or micrometer, we measure the thickness of the disk, which should not be less than 17.8 mm.
Otherwise, both disks must be replaced. Using a caliper or micrometer, we measure the thickness of the disk, which should not be less than 17.8 mm. Otherwise, both disks must be replaced.
Using a caliper or micrometer, we measure the thickness of the disk, which should not be less than 17.8 mm. Otherwise, both disks must be replaced.
Why do rear pads wear out rapidly?
Several factors influence the wear rate of the rear pads. In the first place here is the driver’s illiterate work with the brake system. Considering the fact that the Priora is equipped with a fairly powerful engine, most drivers prefer aggressive driving with rapid acceleration and sharp braking. With this type of driving, the operation of the car’s braking system leads to the fact that the rear pads wear out very intensively. Many inexperienced car owners, due to ignorance, practically do not use engine braking.
The second factor is the replacement of the rear pads on the Priora with low-quality spare parts. Questionable manufacturers of cheap elements may use low-quality and sometimes simply unsuitable materials to produce the friction layer of linings. This can not only reduce the manufacturer's recommended replacement schedule, but also render the brake drums unusable. Let's look at the main signs that require urgent replacement of the rear brake pads on a Priora.
Snapshot2
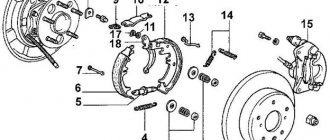
Brake mechanism of the left front wheel: 1 - screw securing the cylinder body to the caliper;
2 — brake hose; 3 — wheel cylinder; 4 — hydraulic brake bleeder fitting; 5 — caliper; 6 — brake pads; 7 - guide pin; 8 — guide pin cover; 9 — pad guide; 10 — brake disc; 11 — brake mechanism shield; 12 — ring gear for ABS sensor; 13 — locking plate; 14 - bolt securing the cylinder to the guide pin. Brake mechanism of the left front wheel: 1 - screw securing the cylinder body to the caliper; 2 — brake hose; 3 — wheel cylinder; 4 — hydraulic brake bleeder fitting; 5 — caliper; 6 — brake pads; 7 - guide pin; 8 — guide pin cover; 9 — pad guide; 10 — brake disc; 11 — brake mechanism shield; 12 — ring gear for ABS sensor; 13 — locking plate; 14 - bolt securing the cylinder to the guide pin.
Brake mechanism of the left front wheel: 1 - screw securing the cylinder body to the caliper; 2 — brake hose; 3 — wheel cylinder; 4 — hydraulic brake bleeder fitting; 5 — caliper; 6 — brake pads; 7 - guide pin; 8 — guide pin cover; 9 — pad guide; 10 — brake disc; 11 — brake mechanism shield; 12 — ring gear for ABS sensor; 13 — locking plate; 14 - bolt securing the cylinder to the guide pin.
Attention! The brake pads of the front wheels must be replaced as a set - all four pads. Replacing the pads of only one brake mechanism can lead to the car pulling to the side when braking.
If the fluid level in the brake hydraulic reservoir is at the MAX mark, then before installing new pads, use a syringe or a rubber bulb to pump out some of the liquid from the reservoir so that when the piston is recessed into the wheel cylinder of the brake mechanism, liquid does not flow out from under the reservoir cap.
After removing the front wheel, we securely fix the car on a factory-made support stand.
Manufacturers and prices of analogues - which brake discs are better to install on Priora
The owners want to improve their Priora, including in terms of safety. Therefore, when choosing spare parts for a car, you can pay attention to several manufacturers who create analogues. As you know, the best brands are those whose products have been tested by other drivers. These include:
- Brembo R14 ventilated (set) price – 5700-5800 rubles;
- “Avtosporttekhnika” R14 (set) – 3,500 rubles;
- ATE R14 ventilated (set) – 6,200 rubles;
- ATS R14 ventilated (set) – 4,040 rubles;
- AvtoVAZ Lada Sport R14 (set) price - 2,800 rubles;
- Tornado R14 (set) – 5,300 rubles;
- Allied Nippon R14 ventilated (set) – 2,800 rubles;
- BM - BD V 220 (set) price - 2,100 rubles.
All models presented in the list come without ABS support. An exception is the BM - BD V 220 kit, which can work with ABS. Of all the above, the version for the sports Priora is especially praised, with components from the manufacturer Brembo in second place. As for the rear drums on the Priora, they differ from the front ones in that they have a technological window - it is necessary so that the ABS sensor can be connected.
Snapshot7
We remove the brake pads from their guide.
We remove the brake pads from their guide.
We remove the brake pads from their guide.
Attention! Once the caliper has been rotated relative to the shoe guide, do not press the brake pedal as the piston may come out completely from the cylinder.
We clean the pad seats in the caliper and the pad guide from dirt and corrosion.
Before installing new pads, it is necessary to move the piston as much as possible inside the cylinder. This operation can be performed in different ways.
Replacement: removal and installation of brake discs of a Priora car
Replacing front discs on a Lada Priora car is relatively simple. Despite the fact that the front part of the chassis has a greater number of functions - from turning to starting to move, there are also more complex operations. It is much more difficult to change the drums to caliper ones.
To replace brake discs on a Priora, prepare:
- wheel wrench;
- jack, two supports;
- head "14";
- wire or cord;
- spanner "10"
By the way, it’s worth installing good – no, but high-quality front brake discs on the Priora, for example Brembo, as in the video. To be fair, it should be noted that those who install spare parts from Lada Sport usually do not stop there. To modernize the front part of the chassis, they acquire other elements for the sports version and make a real tailor-made for the sports version.
How to remove and change brake discs on a Priora - watch this Video
To remove a brake disc on a Priora car, use the following instructions:
- Drive the car onto a flat surface and place wheel chocks under the rear wheels.
- Jack up the front end and support it.
- Remove the wheels: use a wheel wrench to turn the bolts, moving from one to the other, and then pull the wheel towards you. The bolts should be folded separately.
- Work first on one side, then on the other. Turn the steering wheel in the direction from which you are removing the rotor.
- Using a socket, unscrew the screws securing the caliper and remove it together with the bracket.
- Remove the pads.
- Tie the caliper by the bracket with a wire to the shock absorber spring - this way the brake hose will definitely not be damaged.
- Using a "7" wrench, remove the pins holding the brakes in place.
- We remove the disk.
- Before installing new parts, take a closer look at the caliper and pads, and check the hose for leaks. All of them must be intact to ensure a safe trip.
- Install a new spare part. Check that it is on the same plane as the hub - it should be held by the caliper. The distance to the pads should not be too small or large.
Snapshot9
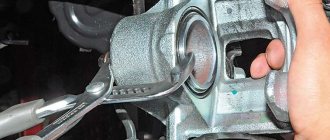
We insert a screwdriver with a wide blade or a mounting spade through the caliper window and, resting it on the brake disc, move the bracket, recessing the piston into the cylinder.
We insert a screwdriver with a wide blade or a mounting spade through the caliper window and, resting it on the brake disc, move the bracket, recessing the piston into the cylinder.
We insert a screwdriver with a wide blade or a mounting spade through the caliper window and, resting it on the brake disc, move the bracket, recessing the piston into the cylinder.
After replacing the pads, press the brake pedal several times to set the gaps between the pads and discs. We check the fluid level in the tank and, if necessary, bring it up to normal.
During operation, the surface of the brake disc becomes uneven, as a result of which the contact area of the new, not yet worn-in pads with the disc decreases. Therefore, during the first 100 km after replacing the pads, until the new pads have broken in, be careful, as the car’s braking distance may increase. In this case, the pads may become hotter than usual, up to the appearance of slight smoke and odor, especially in hot weather.
Lada Priora: checking and replacing the brake pads of the front wheels
How much do standard brake discs cost on Priora - article number and price
The front braking system of the Lada Priora car consists of several parts - very close to the discs there are several more parts that are also important for proper braking, and the other part of the suspension is responsible for a smooth ride and minimizing jumps when passing obstacles. Before buying brakes for a Priora, inspect all the parts so that they do not wear out - if they are worn out, new rotors may not save you.
The standard part for the VAZ-2170 “migrated” from the tenth family, and therefore you can often find it in stores with the inscription “for the VAZ-2112”. Its catalog number is 2112-3501070-02, the price is from 1100 to 1500 rubles.
Change the disk or solve the problem differently
After the “diagnosis” has been made, the next dilemma should be resolved - try to restore the product or remove the old one and install a new one? Do not forget that grinding the product is possible only if a certain residual thickness of the working edge is preserved (at least 22 mm). The possibility of sharpening is especially important for ventilated products. It should be noted that most craftsmen still recommend removing the old structure and completely replacing it with a new one, rather than trying to restore the damaged one.
Of course, if it is not financially possible to remove the old one and replace the disk with a new one, provided that the old one still has some thickness left, you can try to restore it. Small scratches/chips and other minor flaws can be easily dealt with by turning the product using special equipment.
Theoretically, you can even make a groove with a file, but this method is not reliable and is not recommended for use. In general, manipulation involves removing a thin layer of coating from each side of the product, thereby creating a perfectly smooth surface. But do not forget that the more layers that need to be removed during the grinding process, the more the remaining service life of the restored part will be reduced. Usually 2 surface layers are removed, but in rare cases it may be necessary to remove 3.
It is not recommended to buy and use used or reconditioned brake discs, since in this case it is not possible to find out where and how they were used. However, using the above methods for checking the level of depreciation of this part, you can calculate its wear and understand whether its further operation is permissible or not.
We recommend
“The handbrake light is on: how to solve the problem” Read more
Before carrying out manipulations to restore the part, you should find and eliminate the cause that led to deformation/damage to the mechanism. If this is not done, then there is no point in “saving” the part - it can again be damaged in the same way. The most common cause of uneven wear on this product is incorrectly installed or simply poor-quality brake pads.