Suspensions are affected by driving style and the condition of the roads on which the car travels. It is better to skip the story about the state of affairs in the CIS countries. Racks are the most vulnerable elements of the chassis. To find out what condition these parts are in, the car should be taken to a service center. The replacement can be done independently, but the driver must know exactly what to change. There are main signs by which you can determine that the chassis elements have become unusable:
- While driving the VAZ 2114, the driver hears knocking and noise even when driving on a flat road. The shock absorbers are worn out - this diagnosis is usually made by car specialists.
- Difficulty maintaining a smooth driving pattern. In 95% of cases, the cause of such a malfunction is the spring.
- Regular suspension breakdowns. The culprit could be the rear undercarriage components or the entire rack stopping normal operation due to a malfunction.
Elements of the front suspension of the VAZ 2114 are less likely to fail, but the process of replacing springs and shock absorbers is no different from working with the rear suspension. Usually the driver feels where the breakdown has occurred. Repairs should begin only after receiving a “diagnosis” from the workshop.
Replacing springs and struts should be done in pairs on one suspension. When changing only one shock absorber, at first most of the load will fall on the old parts, and this will significantly shorten their life.
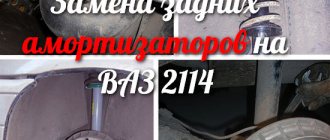
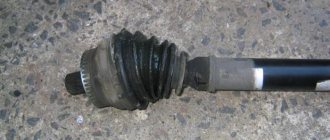
Replacing the rear shock absorber and spring of a VAZ 2114
Repairing the rear suspension of a front-wheel drive VAZ car is not a difficult job and can be done alone, but it will be easier with an assistant. Determine what you are going to change! If the trunk of a car swings for a long time after driving over a bump, then the reason is faulty shock absorbers. If you transported cement and wall blocks in your car and overloaded it, change the springs. If you don’t know what the problem is, but you hear noises or knocking noises from the rear suspension, then either change everything, or leave it alone and go to a suspension specialist.
Note: on rear-wheel drive vehicles, the driveshaft sometimes knocks, and the knock is often heard from the rear suspension - their owners come here for repair of driveshafts.
When choosing springs, pay attention to the color marking - it indicates stiffness. The stiffness of the front and rear springs should be the same. In addition to the shock absorber and spring, it is advisable to buy rubber and plastic parts (shock absorber pads, spring gasket, shock absorber housing, and compression stroke damper), as well as fasteners. But you don’t have to buy everything at once, but only what you need, after disassembly and inspection.
Raise one side with a jack and place a support under the car. Do not work on a car that is on a jack, much less climb under it. Unscrewing the nuts will require force, and the jack is not a stable support.
Remove the wheel. Clean the shock absorber mounting bolt and nut from dirt. Lubricate the threaded joint with wd40 or another penetrating lubricant. While the nut is soaking, unscrew the top nut.
To do this, remove the rear parcel shelf and fold down the rear seat. We find and remove the plug. In front of us is the end of the piston rod with flats for a 6mm wrench. The rod is secured with an M10 nut. Despite the fact that the nut is protected from dust, before unscrewing it you can spray it with wd40 lubricant - it certainly won’t make things worse. The VAZ 2114 repair manual recommends holding the rod with a special key. Most likely you don't have one. Use a carob. To loosen the nut, use a union nut (with a large reach, for working in a niche). If you don’t have such a key, don’t even try, don’t waste the edges of the nut.
You can buy a special key at a car store and it’s inexpensive.
Let's move on to the lower shock absorber eye. Use two 19mm wrenches. Hold the bolt (or nut) with one. Give others a spin. The key can be taken with a socket or a head. To increase torque, use a pipe. After unscrewing the nut, remove the bolt, and then the shock absorber and spring. There was a stuck spring gasket high in the body niche. Tear it off. Remove and inspect. If the gasket is deformed, it is better to replace it.
Carefully inspect the shock absorber housing. There should be no cracks, worn holes or other damage. If any are found, but you did not buy the casing, you will have to go to the store again. You should not install a casing with holes, but you can leave the steel casing cover. Also inspect the remaining parts that were not intended to be changed. Deformed and dented ones will have to be replaced.
Before installation, check whether the nut screws easily onto the rod of the new shock absorber. Is it possible to insert the bolt by hand and screw the nut onto it by hand? If necessary, replace the nuts and additionally calibrate the shock absorber bushing using a reamer. There should not be a large gap, but if the bolt has to be driven in with a hammer immediately during installation, then the next time it is replaced it can only be knocked out.
Pull the rod out to the full length of the new shock absorber. Place the compression stroke buffer on the rod. Connect the shock absorber housing to the cover and also place it on the shock absorber. Then one pillow and a spacer bushing. Check that the rod is extended as far as possible.
Place a new gasket on the top edge of the spring, orient it and secure it with tape or thin wire. Place the spring on the shock absorber and now orient it on the shock absorber cup.
To put the shock absorber in place with an uncompressed spring, bend the cross member arm as low as possible using a crowbar. And now the upper edge of the spring rests against the body (through the gasket), and a bolt is inserted into the lower shock absorber bushing. Screw the nut, but do not rush to tighten it. Now you need to use the weight of the car to compress the spring and release the shock absorber rod through the hole in the body.
To do this, you can use two methods: screw the wheel and put the car on the ground or raise the cross beam lever with a jack without removing the car from the support. Choose for yourself what is more convenient for you.
When raising the lever (or lowering the car), take your time. Command an assistant and guide the rod, but do not allow it to compress. Use a piece of hose or metal tube to guide the rod. Try also the key straw. When the rod has come out into the hole in the body, put on the top cushion, support washer and tighten the nut (by hand is enough). And only after lowering the car onto the wheels do we tighten the nuts properly. Both top and bottom. Similarly, change the spring and shock absorber on the other side of the car.
After driving 50.100 kilometers, inspect and stretch the suspension.
Replacing front struts, springs and supports on a VAZ 2114-2115
The front struts on VAZ 2114-2115 cars wear out much faster than the rear ones, and this is due to the fact that the front part of the car bears a large load, since the main units are located there. If the shock absorbers are leaking, or are starting to leak heavily in potholes, then it would be best to completely replace them. Many people are used to dealing with such problems at a service station, although if you try a little, you can do it all on your own. The main thing is to have all the necessary tools and equipment at hand. Below is a detailed list of everything:
- spring ties
- ball joint or steering wheel remover
- pliers
- hammer
- keys for 13 and 19 as well as similar heads
- crank and ratchet handle
- breakdown
I recommend that you first familiarize yourself with the video, which will be presented below, and then read my photo report on the work done.
How to adjust the hood latch
The first faults that the driver notices can be eliminated by a simple inspection and tightening or replacing some parts. Adjustment of the hood latch on all VAZ cars is carried out in two main stages: horizontal and vertical.
Vertical adjustment
Vertical adjustment is a check of the optimal length of the lock latch. This must be done if the hood cannot be securely locked in the closed position. When driving, a rattling noise is heard, even with the engine turned on, when the car is standing still, there is a slight bouncing of the cover.
To adjust, use a 19 mm spanner and a flat head screwdriver. Stages of vertical adjustment.
- Loosen the locknut on the latch. To prevent the latch itself from turning, hold it with a screwdriver.
- If the hood lid does not close well or does not close at all, it is necessary to adjust the length of the latch. You just need to unscrew it (enlarge it) with a screwdriver.
- If the cover rattles and vibrates when driving, shorten the length of the latch by screwing the latch several turns.
- Verifying the correct latch length setting can only be done through experimentation.
- There are no dimensions, calculations or measurements with a centimeter tape, even in production.
- After the mechanism is adjusted, the locknut should be tightened with a wrench while holding the lock latch.
Horizontal adjustment
It is necessary to carry out horizontal adjustment on a VAZ 2115 if the lock jams when opening or a metallic grinding noise is heard when driving.
Horizontal adjustment of the latch is carried out in several stages:
- The locknut is loosened.
- The latch lock moves in a horizontal plane so that when closing the cylinder coincides with the standard hole in the frame.
- Checking the fit and tightening the locknut.
- Adjustment helps to get rid of the problem with minor shifts of the working mechanism during constant driving loads.
Guide to self-replacement of front suspension struts on VAZ 2114 - 2115
The first step is to put the car on the handbrake, remove the front wheel bolts and jack up the car. Then finally remove the wheel and you can begin this repair of the chassis on the VAZ 2114-2115.
First, you need to release the rack from the mount with the steering tip. Read about this in more detail in the article on Replacing tie rod ends. After we have completed this task, unscrew the two nuts securing the strut to the lever from below, as is clearly shown in the photo below:
And we try to pull out the bolts from the back side with our hands. If this cannot be done due to rusted connections, then you can use a punch or a wooden block to knock out the bolts with a hammer:
When the bolts pop out, the stand can be moved to the side, thereby disconnecting it from the lever:
Now open the hood and unscrew the three nuts securing the front support to the body glass of the VAZ 2114-2115. This is clearly shown in the picture below:
When you unscrew the last nut, hold the stand from below so that it does not fall. Then you can remove it without any problems:
So the entire front suspension module has been removed. To disassemble it, we will need spring ties and a special wrench to unscrew the central nut on top of the support. The first step is to loosen the top nut, holding the rod from turning:
Never let go completely, otherwise you might get a spring on your forehead or something else. Tighten the springs using special tools
And only then unscrew the nut completely and remove the upper support cup:
Then you can start removing the support itself:
And then the springs:
Now all that remains is to remove the rubber boot and compression buffers and you can begin replacing all the necessary parts of the front suspension: support bearings, supports, struts or springs. The entire assembly process is carried out in strictly reverse order and does not take much time. When installing the module on a car, it is possible that you will have to tinker a little so that the holes in the strut body itself and the lever line up at the bottom. But if you have a mount, you can do it yourself!
The prices of components are approximately the following (for example, I will name from the manufacturer SS20):
- The supports are sold at a price of 2,000 rubles per pair
- Front struts can be purchased for around 4500 for two pieces
- Springs can be purchased at a price of 2000 rubles
As for the remaining parts, such as compression buffers and anthers, in total you will spend about 1 thousand more rubles. Of course, the effect after installing a non-factory suspension is simply pleasing. In general, I’ll write about this in future articles.
We change the rear and front struts, springs and shock absorbers on a VAZ 2114
Suspensions are affected by driving style and the condition of the roads on which the car travels. It is better to skip the story about the state of affairs in the CIS countries. Racks are the most vulnerable elements of the chassis. To find out what condition these parts are in, the car should be taken to a service center. The replacement can be done independently, but the driver must know exactly what to change. There are main signs by which you can determine that the chassis elements have become unusable:
- While driving the VAZ 2114, the driver hears knocking and noise even when driving on a flat road. The shock absorbers are worn out - this diagnosis is usually made by car specialists.
- Difficulty maintaining a smooth driving pattern. In 95% of cases, the cause of such a malfunction is the spring.
- Regular suspension breakdowns. The culprit could be the rear undercarriage components or the entire rack stopping normal operation due to a malfunction.
Elements of the front suspension of the VAZ 2114 are less likely to fail, but the process of replacing springs and shock absorbers is no different from working with the rear suspension. Usually the driver feels where the breakdown has occurred. Repairs should begin only after receiving a “diagnosis” from the workshop.
Replacing springs and struts should be done in pairs on one suspension. When changing only one shock absorber, at first most of the load will fall on the old parts, and this will significantly shorten their life.
Hood lock functions
The purpose of any locking mechanism, be it the hood lock of a VAZ 2109 or a BMW, is to tightly hold the engine compartment lid, preventing street dirt and water from entering the engine compartment. The engine compartment is provided with optimal ventilation, but air penetration should not occur through the cover.
The “disease” of 90% of VAZ cars is that six months after use, the hood lock begins to deteriorate: the cylinder wears out, the springs lose their rigidity, the cable (traction mechanism) frays, and cracks can form on it. Therefore, the lock should be adjusted twice a year, replacing, if necessary, faulty parts. Otherwise, a sudden opening of the hood on the highway is guaranteed.
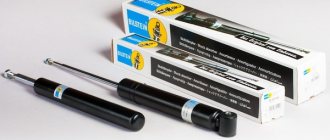
Installing new springs and shock absorbers
Replacing springs and struts for a VAZ 2114 is carried out according to the same principle, regardless of whether the rear or front suspension is being repaired. For repair you will need:
- Jack;
- Hammer;
- Heads and keys with sizes 13′ and 19′;
- Breakdown;
- Spring ties;
- Puller for ball joints;
- Ratchet handle and knob for it;
- Pliers;
- New details.
Warning: when installing new struts (shock absorbers) or springs, the owner of the VAZ 2114 must raise the rear or front part of the car. To avoid injury, you need to put chocks under the front wheels. During operation, first gear must be engaged. You shouldn’t rely only on a jack; it’s better to play it safe and add strong supports. The chassis must be in an unloaded state, so the supports should not overlap the beam.
- You need to lift the front or rear of the car with a jack, depending on which suspension will be serviced.
- The wheels must be removed.
- To get to the rack, you need to remove the steering tip. It is held in place by a bolt and a cotter pin.
- When the strut is freed from the steering tip, it is necessary to unscrew the nuts securing the strut to the lever. This is done as follows:
You can evaluate the result of shock absorber repair as follows: the car is placed on a flat surface, and the driver pumps it several times. If the car is firmly on its wheels, then the process was completed correctly. After 100-200 km, you will need to re-tighten the nuts. This is done to consolidate the new elements that have already been “adjusted”. Regular inspection and lubrication will help keep your undercarriage in good condition.
Detailed video on replacing rear struts:
Replacement of shock absorbers and springs of the front suspension of VAZ 2114, VAZ 2115, VAZ 2113, Lada Samara 2
Springs (and shock absorbers on Lada 2115) should only be replaced in pairs (on the front and/or rear axle).
We carry out the work on an inspection ditch or overpass, but it is also possible on a flat horizontal platform.
To replace the springs and shock absorbers of the front suspension, remove and disassemble the guide spring strut.
There are two options for removing the guide spring strut of the VAZ 2113. In the first option, it can be dismantled as an assembly with the steering knuckle and brake disc without loosening the nuts of the lower and upper (adjusting) bolts securing the strut to the steering knuckle. This option is convenient if, after completing the work, you do not plan to adjust the angles of the front wheels.
But since after replacing shock absorbers and springs it is necessary to adjust the wheel alignment angles, we will consider the second option.
We hang and remove the wheel from the side of the rack being removed. Turn the steering wheel in the opposite direction until it stops.
...and using a 19mm spanner we unscrew the nut securing the tie rod end pin to the strut arm.
Use a puller to press the finger out of the lever.
If there is no puller, unscrew the nut not completely, insert the mounting blade into the spacer between the steering rod and the strut arm and hit the end of the strut arm with a hammer.
Remove the front brake hose coupling from the strut holder.
To unscrew the shock absorber rod nut, we use a special wrench that allows you to keep the rod from turning.
Remove the plastic plug from the upper support of the guide post.
We loosen the tightening of the shock absorber rod nut of the VAZ 2114.
Before unscrewing the upper bolt securing the strut to the steering knuckle...
...paint the installation marks on the bolt and strut bracket.
ATTENTION
When subsequently installing the spring strut guide, aligning the marks does not guarantee accurate setting of the specified wheel camber angle, but allows for a slight deviation from the original value.
Using a 19mm socket, unscrew the nut of the upper bolt, holding the bolt from turning with a wrench of the same size.
Having removed the washer from the bolt to adjust the camber angle of the wheel, use a soft metal drift to knock out the bolt.
Bolt and washer for adjusting the wheel camber angle.
Similarly, unscrew the nut of the lower bolt securing the strut to the steering knuckle and knock out the bolt.
We move the steering knuckle away from the strut without pulling on the brake hose.
Using a 13mm wrench, unscrew the three nuts securing the upper support of the spring strut guide to the body...
...and remove the stand.
We install two spring ties diametrically opposite each other so that they capture five turns of the spring.
By alternately rotating the tie screws, we compress the spring.
After the spring pressure on the support cups weakens, unscrew the rod nut.
We remove from the rack the upper support of the VAZ 2115, the upper support cup, the spring with ties, the compression stroke buffer and the protective cover.
Use a chisel to knock down the compression buffer support...
...unscrew the nut of the strut housing.
If you don’t have a special wrench, you can unscrew the nut with a chisel without fear of damaging it, since the shock absorber installation kit includes a new nut.
We remove the rod with the working cylinder from the strut body and drain the shock absorber fluid into a container.
We wash the cavity of the rack housing with white spirit.
We install the cartridge (cartridge) into the rack housing.
As a rule, shock absorber kits from well-known manufacturers include a special wrench for tightening the strut housing nut.
Rotating a special wrench with a torque wrench, tighten the nut to the torque specified by the manufacturer of the fret 2113 shock absorber.
We put a protective cover on the rod.
We install the ties on the new spring.
We compress the spring by alternately rotating the tie screws.
Install the spring with ties on the lower support cup of the strut.
We install the upper support cup of the spring, the upper support, attach and tighten the rod nut with a special wrench. Remove the spring clamps.
We install the guide spring strut of fret 2114 on the car in the reverse order.
Similarly, we replace the shock absorber and spring of the other suspension strut.
We recommend that you perform adjustment of the steering wheel angles at a service station.
VAZ 2114: replacing the front pillar with your own hands
On a VAZ 2114 car, the front strut is replaced if it fails. The resource of the suspension element is quite long, but do not forget that the fourteenth has been produced since 2001, and the youngest car is currently three years old. And the service life of a shock absorber depends on many factors, including the conditions in which the car is operated. And, unfortunately, they are not always ideal - the quality of the roads leaves much to be desired. Let's look at the entire process of replacing the front pillar on a VAZ 2114.
Primary problems with the hood latch
The first malfunctions in the locking mechanism are noticeable immediately
If you pay due attention to them, a simple adjustment will help you repair the lock. The hood lock cylinder on the VAZ 2109, for example, is made of industrial steel and for it to break completely, you need to ignore the first malfunction signals for more than one month
- Each time you close the hood, you need to slam the lid harder and even put pressure on the frame.
- The lid clangs and rattles on rough roads. Moreover, this can be clearly heard in the cabin.
- The lock does not close the first time.
- When the cable is loosened, you need to pull the handle several times for the lock to open.
- After pressing the hood handle in the cabin, the lid does not lift, forming a gap, but remains in place. The gap between the frame and the cover can only be seen if you lift the cover yourself.
Tools for work and materials
When replacing the front strut on a VAZ 2114, it is necessary to have all the following tools at hand:
- Jack (ideally, of course, a hydraulic or pneumatic one would be suitable, since they are convenient to work with).
- A set of keys.
- Pliers, duckbills, forceps.
- Hammer and chisel (just in case).
- Puller for the ball joint of the steering tip.
- Spring tensioner.
- Steel wire.
- Lubricant like WD-40.
Replacing the front struts of a VAZ 2114 with your own hands is impossible without a new set of spare parts. What is better - to take all the elements separately or together? Depends on how “killed” the shock absorbers installed on the car are. If all the elements of the rack have become unusable, then you can purchase it assembled, then the repair procedure becomes much easier - it will be enough to unscrew a few bolts and install all the suspension components.
But this is true for cases when you purchase branded spare parts, for example, Kayaba (KYB, Kayaba). But if the renovation is “budget”, then you can collect all the elements separately:
- Shock absorber strut VAZ 2114. Standard SS20.10P/L.00.000-01 will cost you about 5,000 rubles, but you can find it cheaper. The price directly depends on the manufacturer. But we must not forget that quality can also be judged by price. On the VAZ 2114, the front strut is not replaced so often, so you need to be responsible when choosing components.
- Support bearing number 348702 (or included 8115). Bearing dimensions 14.5x52x1475x100x19 (according to specification).
- Chipper (silicone is preferable, but rubber is also possible). The ideal copy is number SS74101 - a complete analogue of the stock one.
- Anther. The cheapest option is plastic, with the number 2108-2902814, but it deteriorates quite quickly and is not worth buying. The similar 2110-2905681-R, from the front pillars of a VAZ 2110, performs much better in operation.
- Bolts securing the hub to the shock absorber.
- A spring is needed if the old one has sagged too much.
- “Little things” such as washers and metal spacers for springs can be borrowed from an old rack.
But we must not forget that the replacement must be carried out simultaneously on both sides! Therefore, all of the above spare parts will have to be purchased in double quantities.
Choice depending on manufacturer
Often, when parts break down, drivers try to buy original factory parts as replacements, not wanting to experiment. However, there is a decent choice from other manufacturers, whose products are sometimes no worse than the original ones.
Sirius
There is a large assortment for different brands of cars, and parts are also manufactured in any configuration according to customer drawings.
Phobos
The quality is satisfactory, but, according to some car enthusiasts, after 2 years they begin to sag, losing rigidity. In total, about 500 types of springs are manufactured under this brand for any brand of car; there are standard, reinforced and lowered springs. Clearance kits with increased ground clearance are also available.
Technospring
Good quality for little money. They lose rigidity over time, but do not sag. Quite good as a budget option.
Very durable, no sagging. They have a stiffness adjustment directly on the car, done with a special thumb under the hood.
Eibach
High-quality, very durable, practically do not “age” - do not sag, do not lose rigidity. There is no roll when turning. But they cost one and a half times more than Koni.
Products of the SS20 brand undergo mandatory testing at test benches, after which they are selected in pairs with similar characteristics. This check ensures, according to the manufacturer, 100 percent product quality. A large assortment allows you to choose the right characteristics depending on your driving style and operating conditions. There are 3 options available:
- hot coiling of standard height with linear compression characteristic;
- cold coiling of standard height with linear and progressive compression characteristics;
- cold coils are lowered, with a progressive compression characteristic.
Kilen
Alternative original springs from Kilen are of the highest quality. The service life, as the manufacturers claim, is twice as long as the original VAZ products.
Asomi
Excellent springs made from special alloys, coated with epoxy coating to increase service life.
Replacing the front struts of a VAZ 2114
And now more about how to replace the front strut supports of a VAZ 2114 with your own hands. First, you should prepare the car for work - disconnect the battery, install stops under the rear wheels so that the car cannot be moved. And we begin:
- Raise the side to be repaired using a jack.
- We remove the wheel. Need I say that you need to loosen the bolts in advance?
- Place the brake pipe to the side so as not to damage it.
- Using keys “17” and “19”, unscrew the bolts securing the strut to the hub. These bolts and nuts can be thrown away immediately - reuse is unacceptable. Firstly, there is a plastic lock on the thread, and it is designed for a small number of tightenings. Secondly, metal fatigue affects and the bolt can become deformed when tightened.
- On a VAZ 2114, the front strut can be replaced without removing the spring. But you still have to unscrew the nut and remove the tie rod end.
- Using a key set to “13” you need to unscrew all three nuts that secure the support bearing housing to the car body.
After this, the entire rack assembly can be removed and a new one installed in its place. As you can see, replacing the front struts of a VAZ 2114 is not that difficult. But if you install an old spring, you will have to tinker with disassembling the old unit - this can be problematic, since long-term use takes its toll on it. Rust appears, the metal “sticks”, sometimes even penetrating lubricant cannot help.
The repair procedure is the same on both sides. Installation of a new rack is carried out in the reverse order. It is important to observe the tightening torque of threaded connections, since your safety depends on it. Use a torque wrench for convenience. At this point, the replacement of the front struts of the VAZ 2114 is completed, you can continue to use the car.
- lifeSport
- buy a children's tracksuit for a girl
- janome skyline s7
- engine oil
Repair
To repair the lock and replace parts, you will need the following tools:
- open-end wrench for 17 and 19;
- liquid oil for lubrication;
- Screwdriver Set;
- pliers or pliers.
Repairing a lock yourself requires some skill and slowness, so you need to count on at least 2 hours. First you need to determine which mechanism in the lock has failed; most often it requires repair:
- springs (zam, hook, latch);
- replacement of traction.
Replacing the lock spring
The lock spring is located on the car frame. Wear of the metal part, deformation and cracks cause the hood to not close tightly. Using the VAZ 2114 as an example, you can install the lock spring in several stages:
- Disconnection from the spring of the traction mechanism. A screwdriver is used.
- Removing the spring.
- Installing a new lock spring.
Replacing the latch spring
If you need to change the latch lock spring, for example, on a VAZ 2114, you will need a flat-head screwdriver and a 19mm wrench. You can change the spring in three stages:
- Kickback (loosening) of the locknut.
- Unscrewing the pin.
- When the locking mechanism is removed, the spring is replaced with a new one and a similar assembly is performed in the reverse order.
Replacing the hook spring
Unlike the previous two spring replacements, replacing the lock spring will require either pliers or fine tweezers. Repair is more painstaking and requires a certain skill. The work is carried out according to the following principle:
- Use a screwdriver to pry off the lock washer that holds the hook axis.
- The washer is removed from the grooves with tweezers (or pliers).
- The hook axis is removed.
- The spring is removed.
Replacing traction
It is necessary to change the lock drive when the locks are in working condition, and when the hood is opened using the handle from the passenger compartment, the lid does not open.
Replacement of traction is carried out according to the following principle:
- The cable is released from the hook (the hook itself does not need to be removed).
- A 13 key is used to secure the handle axis.
- The handle is removable.
- Use pliers to straighten the bent part of the cable.
- The locking sleeve extends and the end of the cable is released.
- The loop is removed from the draft lever.
- The rod is pulled out from the motor side.
- The shell is released from the holders and the part is replaced.