A constant velocity joint (CV joint, “grenade”) is a device that transmits torque from the car engine to the wheels. It was invented in the 20s of the XX century. Before the advent of the CV joint, cars with front-wheel drive, which were distinguished by high cross-country ability and maneuverability, lost power when cornering, vibration occurred, and torque was distributed unevenly.
Created for a special purpose, CV joints have high strength. There is an opinion that the CV joint mechanism - with proper care and proper handling, of course - can even outlive the car itself. Unfortunately, problems can arise with the grenade. Read on to learn about the characteristic signs of problems and how to replace a CV joint with your own hands.
When to change CV joint
There may be several signs of problems with the operation of such devices. Usually, drivers determine by the sounds from the car's suspension that the CV joint needs to be replaced. This is indicated by a crackling noise when the car turns sharply. To make sure that you urgently need to replace the CV joint, you should stop and turn the wheels to their extreme position. A crunch that appears after starting means that the damaged front CV joint needs to be replaced.
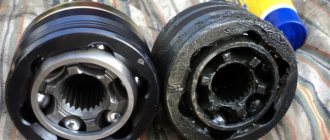
The appearance of the same sounds when the wheels are turned in the opposite direction means that the mechanism on the other side of the wheel has come to an end. In such a situation, the condition of the protective covers should be assessed. It is better to put the car on a lift and inspect them carefully. If fresh signs of grease are visible near them, the bellows need to be replaced. If its rupture is clearly visible and there is no lubrication, you will need to immediately replace the CV joint.
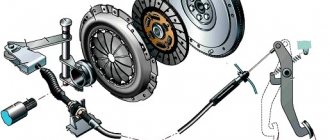
What is needed to install a new CV joint
If the car owner lacks locksmith skills, it is better to immediately go to a decent car service center. They will replace the mechanism at a reasonable price. Experienced car mechanics do this work quickly. If you want to do it yourself, you need to prepare:
- lift;
- set of spanners;
- pliers;
- screwdriver;
- metal pipe as a lever;
- bench vice.
You will need a new CV joint with a protective cover included, fixing clamps and lubricant. To make it more convenient to change the CV joint, part of the transmission oil is drained from the gearbox. To dismantle the drive, the front wheel is removed from its side. Then the hub nut is unscrewed with force, the brake disc with caliper, ball joint and steering wheel tip are dismantled.
To ensure greater torque when unscrewing and screwing the hub nut, it is better to stock up on a pipe that is put on the wrench. The splined drive shaft of the device is removed from the gearbox using a pry bar, which is used as a lever. Then, carefully knock out the outer joint from the wheel hub with a hammer and a wooden block.
Types of CV joints, their design and operating principle
CV joint device: 1. Right front wheel drive; 2. Gearbox; 3. Left front wheel drive; 4. External joint housing; 5. Retaining ring of the hinge cage; 6. 18. Hinge cage; 7. 19. Hinge separator; 8. 17. Hinge ball; 9. Outer clamp of the cover; 10. 15. Protective cover for the hinge; 11. Thrust ring; 12. 14. Left wheel drive shaft; 13. Inner clamp of the cover; 14. Internal hinge lock; 15. 20. Retaining ring of the inner joint cage; 16. 21. Shaft buffer; 17. 22. Internal hinge housing; 18. 23. Axle gear retaining ring.
There are several types of CV joints, but only two are widespread in passenger cars:
- Ball.
- Tripoid.
The design of a ball CV joint includes two cages - an internal one, in the form of a spherical fist (fitted onto the shaft), and an external one (made integral with the shaft end, which is inserted into the hub or gearbox). Between them there are balls placed in special grooves, which are kept from falling out of the hinge by a separator. It is the balls and the grooves along which they move that are the main working elements of the CV joint, since they transmit rotation and allow you to change the angle of one race relative to the other.
To prevent the inner race from coming off the shaft, it is secured with a retaining spring ring located in a special groove on the shaft. The locking ring is also used on the shaft ends of the outer race of the internal joint.
The tripoid joint does not have an internal race; instead, a three-pin fork mounted on the shaft is used. Each cleat on this fork has spherical rollers on needle bearings. Thanks to these rollers, rotation is transmitted, the shaft with the fork can change the angle relative to the cage, and also move longitudinally relative to the outer cage (enter into it), which makes it possible to change the length of the drive.
The connection between the fork and the shaft is splined, but at the same time it fits onto the shaft quite tightly. Additionally, the fork is secured with a retaining ring to prevent it from jumping off.
It is noteworthy that tripoidal CV joints are used only on the gearbox side, but they are not used on the hub side.
Ball joints can be located on both sides. That is, you can find drive shafts on cars with two ball joints, internal tripoid joints and external ball joints, but never with two tripoid CV joints. This is due to the peculiarities of the operation of each of these types of hinges.
It is interesting that some cars (for example, Volkswagen Golf 2) use an internal ball joint of an interesting design - the outer race with the shaft end is not made at the same time, but they are connected to each other by bolts. We'll touch on them a little later.
Replacing the outer CV joint
- We tear off the mounting bolts from the wheel and the hub nut, and place wheel chocks under the rear wheels. (To make it easier to tear off the nuts, it is better to use an extension for the wrench).
- We jack up the car and put it on a stand (under no circumstances do we work on a jack) and hang the wheel.
- We remove the wheel.
- We unscrew the 2 bolts that secure the ball joint to the steering knuckle.
- If it doesn’t work, use a wrench extension and WD-40.
- We turn the steering wheel to the side and slightly pull back the steering knuckle with the stand and remove the outer part of the hub along with the CV joint (For convenience, you can make several gentle blows with a hammer).
The installed hinge, together with the outer CV joint boot, is fixed in the hub. All that remains is to add the oil drained before dismantling into the gearbox. Such a replacement of the outer CV joint does not present any great difficulties, and can easily be done independently. The partially disassembled front suspension is restored after installing a new outer joint.
Types of clamps on the CV joint boot
Now it’s time to talk about what kinds of clamps there are, how to deal with them, and which clamps for the CV joint boot are better?
First type
Let's start with the most popular. This is the so-called “Ford” clamp. Recently, it can increasingly be found in kits from various manufacturers of grenades for the VAZ 2110 and other domestic cars. Among its advantages, of course, is the full connector, that is, if you accidentally forget to put it on in advance, you can do it at any time. Besides, you can’t “pull him over.”
Among the disadvantages, of course, is its disposability; you can use it a maximum of 2 times. Many may think that there is always a new one in the kit, but they would be extremely mistaken. It also happens that he is not there. Anything can happen.
To install it, you will need pliers or regular bokoser-nippers. We just tighten it as much as we can with our hands, then squeeze it.
Second type
These are purebred Chinese clamps. As soon as you see them, you will immediately understand why there is such an opinion about them. These clamps are simply made almost from foil. That is why they are tightened in two turns. To install, simply place a screwdriver into the plastic to avoid turning, then tighten, bend, bend the antennae, and cut off the excess.
The advantages include ease of installation; absolutely no tools are needed except a screwdriver. Well, the downside, as with the previous option, is that it is disposable, since after installation you will have to cut off the extra tail of the clamp with scissors.
Third type
The third type can only be found on grenades for domestic cars. On the one hand, they are the most convenient, since they are made of thick metal, which, by the way, is quite soft; installation takes about five seconds. It can be installed at least 10 times, it all depends on accuracy. Of course, there is one drawback - the need for a special clamp, the cost of which is several times higher than the cost of replacement at a service station. Of course, if you plan to buy only the same grenades, then you can buy the necessary thing.
Replacing the inner CV joint
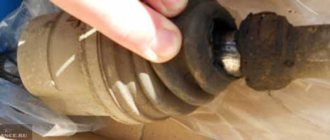
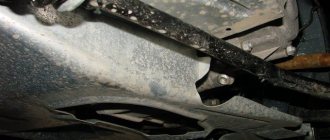
Replacing the internal CV joint, which transmits torque from the gearbox to the shaft, is easier than replacing the external one. To decide how to remove the CV joint connected to the gearbox, just look at it on the lift from below. It can be fixed to the box in various ways. After releasing it from the fastenings, it is enough to turn the wheels all the way so that the inner CV joint is removed as if it is not being held in place by anything. Before removing the inner CV joint, remove the boot, housing, three rollers and the retaining ring securing the three-beam fork to the shaft. She is also filming.
The inner CV joint can be removed either separately or on the drive together with the outer one. Using this method, replacing the inner CV joint is not too difficult. If you have a tripod CV joint, then when installing it back, minor difficulties are possible. The three-spoke plug may not fit into place. The rollers located on it may not fit into their guide grooves inside the housing. It is enough to turn the drive shaft a couple of times, and they will be where they need to be.
What is a CV joint and how does it work?
Experienced car owners often call these parts “grenades.” And such an alternative name is telling - the presence of such a “grenade” in a car can sooner or later cause serious trouble, in other words, an explosion.
Of course, this is a joke in which there is a certain amount of truth. The abbreviation CV joint stands for the following: constant velocity joint. The function of these units on almost all front-wheel drive and some all-wheel drive vehicles with independent suspension is to transmit torque from the power unit to the drive wheels. Front CV joints, which are very modest in size and weight, make the car's wheels rotate and also provide control of them.
Torque is transmitted from one axle shaft to another at a constantly changing angle. Car enthusiasts call front CV joints “grenades” not only because they have some external similarity, but also because if this unit breaks down (which usually happens suddenly), the car will not be able to continue moving (in the absence of a cross-axle differential lock).
The principle of operation of the hinges is similar to the principle of operation of the cardan. But the node itself is more advanced and complex. During the rotation of the cardan shaft, torque is not transmitted synchronously (one shaft rotates evenly, the other does not), and the shafts can hardly intersect at a large angle. At the same time, for hinges with significant resources, rotations relative to the axis at an angle reaching 70° are not difficult.
The active position of front CV joints in the market is due to the widespread demand for front-wheel drive cars and the spread of independent suspension. Moreover, the first developments of hinge elements were carried out by engineers 100 years ago.
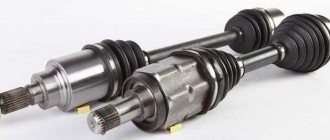
Front CV joints have different features; different car factories produce constant velocity joints of different designs. Despite this, they all work the same. The drive shaft is connected on one side to the wheel bearing and on the other to the differential. Thus, torque is transmitted from the internal combustion engine to the drive wheels.
We recommend
“Ball of the rear upper arm: purpose and malfunctions” More details
The design of the front outer assembly includes a housing and a cage with grooves for moving the balls, with the help of which the component elements are rigidly connected to each other. The task of external components is to transmit torque regardless of rotation angles.
The mobility of the inner front CV joint is much less, its rotation angle does not exceed 20°. Structurally, it consists of rollers on bearings moving inside grooves in the glass. The purpose of this joint is to compensate for the suspension travel and ensure the continuity of the shaft.
During vehicle operation, the front CV joints are subject to serious loads, therefore, in order to increase their service life, the part must be lubricated and protected from the external environment. The hinges are placed inside sealed boots (plastic or rubber), filled with lubricant and attached to the shafts using clamps. The quality and integrity of this protective shell ensures the functioning of components whose location is such that they are constantly exposed to precipitation and road dirt.
Is it possible to do without replacement?
It is known that CV joints usually last a long time. However, contamination can quickly disable them. Therefore, sometimes discussions arise about the advisability of their restoration. There is no need to do this. In order for the machine to work reliably, a broken CV joint must be replaced with a new one. People who know the structure of the car and have the necessary plumbing skills do this work independently.
It is best to inspect the closing covers regularly. Tears, cracks and other damage may occur there. Using this method, you can detect defects in a timely manner and promptly replace the boots on the inner and outer CV joints. It also makes sense to install screw clamps when replacing the hinge and cover. They more reliably isolate from dust and dirt.
There are recommendations to replace CV joints as damage is detected. It’s better not to wait for the next case to become unusable. Ideally, when the drive is completely removed, it is advisable to install a new cover at the same time. It does not require a lot of money and time to replace the CV joint along with it.
Hello, dear car enthusiasts! Front drive wheels provide car owners with many bonuses in the form of: more responsive steering, increased maneuverability, stability on slippery roads and other delights.
In return, the machine, namely its chassis coupled with the drive, will require additional attention. The front wheels are able to pull the car only thanks to the presence of a shaft connecting the hub to the variable gearbox.
However, that's not all. It would be impossible to transmit rotation from the transmission to the wheels without special devices installed at the ends of the shaft - CV joints.
A constant velocity joint is, today, the only way to transmit rotational motion between axle shafts located at an angle to each other.
In this regard, any self-respecting car enthusiast should know how to remove and disassemble the CV joint, diagnose, maintain and repair it.
How to remove a CV joint yourself without the help of a car service
Despite the apparent complexity of the front-wheel drive design of a car, regardless of its make and model, the design of this unit is quite simple and similar in all cars.
In order to remove and replace the CV joint, it is enough to have a garage with an inspection hole or an overpass to facilitate access to the lower part of the car, as well as a set of standard tools.
As a rule, experienced car enthusiasts manage their work without any special devices, but if there is a desire to speed up repair work, you can purchase a CV joint puller.
Considering that each drive wheel has two hinges, repair work can be carried out depending on the following types of failure:
- removal of the internal CV joint and its repair;
- removing the outer CV joint;
- Removal and repair includes a shaft and two joints.
How to remove the inner CV joint in the garage
Repairing an internal CV joint is an event that is quite rare, but you must have the skills to handle this mechanism, because for its long life it is necessary to carry out preventive measures, replacing the boot and lubricant.
Before describing the technology that includes removing the internal CV joint, it should be noted that in this case, an inspection hole will be simply necessary, because the joint cage is bolted (6-8 pieces) directly to the differential gears, and this is the lowest point of the transmission.
What is the risk of CV joint failure?
CV joints cannot always be repaired even if only one of the boots is damaged. In most cases, their repair is not provided by the manufacturer; in case of wear or damage, the front inner CV joint is replaced with a new one.
However, on some cars, severe wear or breakage of the front hinge can lead to more serious problems. The fact is that the needles that fall off the roller bearings penetrate into the gearbox housing, and then, rising with the lubricant, are ground by gears. The consequences in this case are simply catastrophic.
If the front inner CV joint is not replaced in time, it may jam, causing the axle shaft to break and making it impossible for the vehicle to continue moving. The danger of such a situation is clear without further ado.
In order not to lead to trouble, it is worth inspecting the anthers of the front internal and external hinges every 5 thousand kilometers traveled. If there is a suspicion that the components are leaking, the best option would be to replace the boots with new ones and update the lubricants at the same time. If a crunching noise occurs while driving, you need to contact service as soon as possible or replace it yourself.
Fault diagnosis
How can a novice car enthusiast who has never encountered a similar problem check the CV joint on his own? It is not at all difficult to determine the malfunction and replace the CV joint with your own hands, but you will first need to determine which part is faulty.
With significant wear of the inner race, significant play in the CV joint is formed, which makes itself felt with various sound effects. The CV joint most often crunches when turning. This defect, with significant wear, can also be manifested by small jolts on the steering wheel. This effect is especially noticeable on cars not equipped with hydraulic or electric power steering.
Significant wear of the CV joint can also be determined by shocks when starting the car, as well as by a sudden change in engine operating mode, especially at low speed. This technical problem can also be caused by other transmission malfunctions, which, under certain conditions, can produce similar sounds, so before passing a final verdict on the old CV joint, you need to make sure that the diagnosis is correct. To determine the radial clearance, you will need to hang the front suspension of the car one by one and, having fixed the main drive shaft, turn the wheel in different directions; if the free rolling of the wheel is significant, and a knock is observed, the CV joint can be considered faulty, and it must be replaced immediately. In some cases, the cause of this phenomenon may be a weakening of the CV joint to the vehicle shaft. This problem is solved by tightening the bolts holding the CV joint. In this case, the conditions for tightening this part with the necessary force must be met. If the tightening torque is less than that set by the manufacturer, then this malfunction will make itself felt again after a short period of time.
If the cause of a CV joint failure is excessive wear on the race, the CV joint must be replaced using original spare parts.
CV joint replacement
Replacing a CV joint depends on which part needs to be replaced, internal or external. Replacing the outer joint or the inner one, in any case, will require removing the axle shaft from the car. Disassembling this part will not take much time, and is usually carried out in the following sequence:
- The front wheel of the car is removed from the side where the repair work will be carried out;
- The wheel hub nut is unscrewed;
- The bolts that secure the outer CV joint to the main drive shaft are unscrewed;
- The axle shaft, together with the inner and outer CV joints, is removed from the car.
KINDS
The CV joint was invented quite a long time ago; according to the most common version, it was invented back in the twenties of the last century by Alfred Rzepp. Therefore, it is not surprising that since then many varieties of this part have appeared:
- cracker - installed exclusively on trucks;
- tripod - usually used as an internal CV joint;
- twin hinge – used quite rarely due to its complex design;
- ball, or CV joint, is the most common type, which is most often used on the axles of passenger cars.
It was this invention that became revolutionary for the design of passenger cars with front-wheel drive.
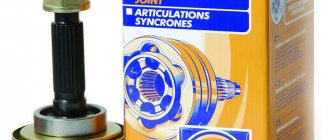
CV joint device
Here you can see a photo of a ball CV joint, thanks to which it will become clearer what this part is like in the assembled state. If we talk about its components, then, in fact, there are not so many of them:
- Housing with outer ring.
- Separator.
- Inner ring.
- 6 balls.
- Shaft.
- Stop ring.
- The anthers are external and internal, they are held in place by clamps.
If you put these elements together, they actually look like some kind of grenade.
All these parts are assembled into an external CV joint and an internal CV joint. The internal one transmits rotational movements to the external mechanism, which results in a change in the angle of the axle shaft relative to the axis.
Malfunction prevention
In order for this part to last as long as possible, it is necessary to completely eliminate the possibility of dirt and water getting under the rubber cuffs of the CV joint. If there is the slightest damage, this part must be replaced with a new one.
For this purpose, it is better to use original spare parts that are made from high-quality rubber. If you purchase counterfeit cuffs, the procedure for replacing this part will have to be carried out too often.
Another reason why the CV joint often fails is its insufficient fastening to the main gear shaft. If the bolts are not tightened well enough, then over time they begin to unscrew randomly. In this case, the outer CV joint moves significantly away from the shaft, and with a significant gap, knocking noises will be observed in the transmission. If this malfunction is not detected in time and the fastening bolts are not tightened, then in a short time the CV joint will be completely “broken.”
How to change the CV joint and how to determine the malfunction of this part is described in detail in the article. The operation of replacing the CV joint will not take much time, but if you do not want to fix this problem yourself, you can always turn to a car repair shop for help.