An engine knock sensor is necessary to detect improper combustion of the air-fuel mixture (FA). In the event of a malfunction, the ECM (Engine Control Module) puts the engine into emergency mode, limiting the power and speed of response to the gas pedal. Let's look at the signs of a sensor malfunction, its design and diagnostic methods.
Checking the functionality of the sensor
Do not rush to throw away the old sensor - first you should check its functionality.
Often the problem lies in faulty wiring, in which case replacing the sensor will not help. To test the knock sensor, you should connect it to a multimeter, setting the latter to test DC current. When hitting the sensor, the multimeter should show a voltage of about 15–30 mV. The more intensely you hit it, the more voltage it should generate. If the multimeter shows nothing when hitting the sensor, then it definitely needs to be replaced.
If you notice even a slight manifestation of a sensor malfunction, it is necessary to diagnose the vehicle. But often, when a single error occurs, the malfunction icon on the dashboard is constantly lit, although there are no other signs of a sensor malfunction - in this case, it is enough to reset the computer errors.
We will answer your questions for FREE regarding deprivation of rights, road accidents, insurance compensation, driving into the oncoming lane, etc. Daily from 9.00 to 21.00
Moscow and Moscow region
St. Petersburg and Leningrad region
Free call within Russia 8-800-350-23-69 ext.418
Features of V-shaped internal combustion engines
In the event of an error on one of the knock sensors, their connectors must be swapped. If the sensors are difficult to access, study the electrical diagram. It is likely that the wires from the sensors come to a common connector. By disconnecting the connector, you can fool the engine ECU by installing appropriate jumpers between male and female.
Clear errors from the ECM memory, start and warm up the engine. Perform a test drive to see if the DTC returns (the Check Engine light will illuminate on the dashboard).
If the error from Bank 1 changes to Bank 2 and vice versa, it means that there are no problems with the wiring from the meter to the control unit, but the fault is in the sensor itself. If the error persists for the same cylinder head, you should check the wiring for a break. To do this, use a multimeter in ohmmeter mode. Connect one of the probes to the connector wire on the sensor side, and the second to its counterpart coming to the ECU. Check to see if the signal wire is shorted to ground. To test, connect one of the probes to the signal terminal of the sensor connector, and touch the battery ground terminal with the other. The resistance of the open wire must be greater than 20 mOhm.
Knock sensor malfunction during operation
Where is the VAZ 2110 speedometer sensor located? Where is the speedometer sensor located?
To identify faults in the knock sensor, you need to know where it is located in the power compartment of the car. Its location is not far from the oil dipstick at the top of the cylinder block.
Sometimes the defect can be eliminated by simply tightening or loosening the fastening of the product to the motor; the tightening force should be within 20 Nm. It is better to control the tightening force of this type with a special torque wrench. If the adjustment does not have a positive effect, it is necessary to check the VAZ 2110 knock sensor and then replace it with a new product.
The search for faults in the knock sensor must be carried out on a special stand, which is equipped at service stations or repair plants. At home, you can try to repair the VAZ 2110 knock sensor if you have basic concepts in electrical engineering and the car enthusiast can use a tester or similar device with millivoltmeter and megohmmeter scales.
The procedure for determining a malfunction of the knock sensor is as follows:
- Before checking the knock sensor, it must be removed from the power unit. To do this, you need to press the latch and disconnect it from the contact block.
- Unscrew the fastening nut and dismantle the product by removing it from the stud.
- To diagnose a removed device, you need to power it to the terminals of the multivoltmeter, setting the minimum measurement limit.
Important: you should know that for a knock sensor with one contact, the black wire, which is associated with the negative contact, is connected to the mounting bolt socket, and the positive red wire must be connected to the signal contact in the shoe connector
Determining the malfunction
There are two ways to determine a possible breakdown. The easiest way is to use the services of a car service. Experienced specialists, using certain devices, will quickly identify the presence and cause of a malfunction. The maximum diagnostic period is 1 hour. If you want to save money, you can check the condition of the DD yourself.
It is quite simple to independently determine the malfunction of the knock sensor. To do this, you do not need to have any deep knowledge, only your attentiveness. You should think about organizing diagnostics of the device when the knock sensor shows the following signs of malfunction:
- you notice a significant loss of power from the internal combustion engine;
- acceleration of your car has become “sluggish” and difficult;
- there is an unreasonable increase in fuel consumption;
- the exhaust became smoky;
- the presence of a detonation process;
- The “Check Engine” light on the control panel is on.
The self-check procedure looks like this:
- We remove protection in the garage. You have to work with the engine itself.
- We exclude a break in the shielding braid or signal wire.
- If the problem is not a break, then you need to focus on the outlet itself. It may need replacing.
- Checking DD contacts.
- We carry out diagnostics using a standard multimeter.
You can determine whether the device is faulty using a digital multimeter. Measure the resistance level of the DD contacts. Any deviation from the norm will be a reason to replace the device with a new one. Before you begin, you should find out the resistance standard for your car brand. As practice shows, this indicator can vary greatly for different brands of cars. To avoid wasting time and money, you need to arm yourself with the necessary information.
You can check the functionality of the sensor by measuring the voltage of the contacts. Carefully unscrew the sensor from the cylinder block. Apply voltage to one contact and connect ground to the negative drive. Hold the DD itself with your hand and hit it on any surface. If the device is working properly, then after contact between shocks a voltage of 30-40 millivolts should appear; if it is absent, then it requires replacement.
How to change a knock sensor
Insufficient coolant level sensor in the expansion tank - check and replacement
The knock sensor for VAZ 2110, 2112 and 21214 with a fuel injection system is located in the front of the engine. If the engine has 8 valves, then the sensor is installed in the area of cylinder 4, if there are 16 valves, then between cylinders 2 and 3. On Grant, Priora and Kalina cars it is also located on the engine block between the cylinders.
Replacing it will take no more than 10-15 minutes:
- Unscrew the bolt holding it to the engine block.
- Disconnect the sensor from the terminal block. Remove the sensor and replace it with a working one.
- When installing a new sensor, carefully tighten the mounting bolt - unstable contact with the engine body will lead to errors in the operation of the motor.
On which cars is this problem most common?
The problem with code P0326 can occur on different machines, but there are always statistics on which brands this error is more common. Here is a list of some of them:
- Chevrolet (Chevrolet Cobalt, Malibu, Tahoe, Trailblazer)
- Citroen (Citroen C5)
- Ford
- Honda
- Hyundai (Hyundai Accent, Santa Fe, Solaris, Elantra)
- Kia (Kia Rio, Sid, Sorento, Soul, Sportage, Cerato)
- Mercedes (Mercedes w212)
- Opel
- Peugeot (Peugeot 307, 407)
- Volkswagen
- VAZ 2112, 2113, 2114, 2115
- Lada Kalina, Priora
- TagAZ Accent
With fault code P0326, you can sometimes encounter other errors. The most common ones are: P0011, P0133, P0332, P0420, P0722, P0743, P1529.
Consequences of a malfunction
How to check the crankshaft sensor of a VAZ 2115 injector 8 valves
If you notice the Check Engine icon on the dashboard, you should immediately visit the nearest service station for diagnostics. Often, the car’s on-board computer reports error p0325, which means a malfunction of the knock sensor circuit 1. The cause of its occurrence can be either an open circuit or possible errors in the knock sensor. In the first case, it is enough to check the sensor connector - if it was not completely latched during the previous replacement, then over time it may open.
Failure to take corrective action on a faulty knock sensor may result in more serious damage:
- strong vibrations and shocks will eventually lead to the destruction of the piston;
- the engine will begin to get very hot, which is fraught with boiling of the coolant with all the ensuing consequences. At best, you will have to spend money on a major overhaul of the engine, but often the block is destroyed by a broken connecting rod;
- increased fuel consumption. An additional symptom of this is the appearance of strong smoke from the exhaust pipe with a distinct smell of gasoline;
- reduction in engine power. A significant deterioration in dynamics can lead to an emergency on the road.
If such a breakdown occurs, repairs should be started without delay. If there is a malfunction, it is better to replace the knock sensor in a timely manner than to pay for repairs in the future, the cost of which may increase by an order of magnitude.
Symptoms of sensor malfunction
You can determine whether the sensor is broken without a dashboard. But this will require experience and a special approach to your car. You need to know him very well. We list the signs by which you can understand that the device is broken, from here it will be immediately clear what the knock sensor affects:
- Fuel efficiency will drop. This may not be noticeable right away, but over time the driver will definitely notice it.
- Also, as the throttle increases, the engine detonates longer than usual. The knock sensor affects the acceleration of the car.
If you determine the breakdown yourself, then it’s not far to independently diagnose the sensor, as well as replace it yourself. In principle, this is not difficult, but it requires some understanding of the process.
- there is more useful information here.
Replacing the Priora Knock Sensor 16 Valves AUTOINTERLINE.RU
The main symptoms of a faulty knock sensor on a VAZ-2112 16 valves
The knock sensor on the 16-valve VAZ-2112 has the same malfunction conditions as some GAZ, Toyota, Gazelle, Priora and Kalina cars. We change the knock sensor ourselves. Detailed article about replacing the temperature sensor, replacing the VAZ-2112 sensor 16 valves. 2. Replacing the knock sensor. 16:23. New. Naturally, not every motorist will be able to find out that this is exactly the sensor, but you can discern the direct and indirect reasons for the malfunction.
The video provides an overview of the main faults and diagnostics of the wide-band knock sensor on the VAZ-2112:
Signs of a malfunctioning knock sensor
Resistance that should be in the sensor in good condition
Before considering the causes, it is necessary to look at the symptoms of the malfunction. So, let’s look at what can still serve as a warning sign that the knock sensor has failed:
- The engine loses power.
- Overclocking potential drops.
- Fuel consumption has increased.
- The CHECK light came on on the instrument panel.
- Smoky exhaust.
- Presence of detonation.
- The engine started to stall.
Of course, an important reason for the failure of the knock sensor is the fuel mixture, namely the quality of gasoline itself. The lower the octane number, the lower the resistance to detonation
phase sensor 2110, 2111, 2112 16kl. Where is the phase sensor located? Error p0340. Replacing the camshaft position sensor on a 16 valve engine. If the fuel detonates, it will not completely burn through the engine and you will hear the muffler firing.
Replacing the knock sensor on a Lada Priora.
Replacing the KNOCK sensor. Error P0325.
Happy everyday life of an AvtoVAZ owner: driving and repairing, driving and repairing. Replacing the knock sensor on a VAZ-2112 16 valves: photos and. Signs of a malfunction of the knock sensor VAZ-2112 16 valves. We change the knock sensor.
Knock sensor diagnostics
The sensor is checked with a multimeter. Replacing valves on a Priora 16 valves. In this case, the sensor is “knocked” with a screwdriver
To diagnose the knock sensor, it is removed from the engine and a voltmeter with a measurement limit of up to 200 mV is connected to it.
Next, they “knock” the sensor on a hard surface and look at the voltmeter readings. When tapping, the readings should change. If they do not change, this means that the sensor is not working. If they change, then the sensor readings change, but whether they are correct is in question!
ECU signal about malfunction
Failure of the sensor will be immediately obvious by a characteristic knocking sound. Many motorists simply reset the “minus terminal” to reset the readings of the electronic control unit, but it is worth understanding the very reasons for the effect and eliminating them. Replacing the timing belt. Priora 16 valves. Let's look at the ECU error codes that signal a failure of the knock sensor:
code-0325 hints at network problems. Replacing the phase sensor for a VAZ 2112 16 valves. Replacing the timing belt: Priora 16 valves. For example, a break in the wiring or acidification of the plug contacts. In this case, we call the electrical circuit connecting the sensor, clean the electrical contacts;
Error 0325 on the BC STATE screen (Open circuit of the knock sensor)
Type of knock sensor
conclusions
It is quite easy to determine the malfunction of the VAZ-2112 16 valve knock sensor. The first sign will be the presence of errors in the electronic engine control unit and the “Check Engine” light on the instrument panel. Next, a simple check with a multimeter will show whether this particular product has actually failed or not. If the sensor is faulty, it must be replaced.
Source
Causes of sensor malfunction and ways to check it
The knock sensor on cars rarely fails, including the Priora. However, VAZ-2170 owners can often detect a DD malfunction error. And the reasons for its occurrence may be the following factors:
- Damage to the wiring that connects the sensor to the ECU.
During operation of the car, damage to the insulation may occur, which will ultimately affect the signal level. A normally operating sensor produces a signal from 0.6 to 1.2V. - Oxidation of contacts.
The device is located on the cylinder block and is exposed not only to moisture, but also to aggressive substances in the form of engine oil. Although the sensor contact is sealed, a connection failure cannot be ruled out, which leads to oxidation of the contacts in the sensor or chip. If the wire on the DD is in good condition, then you need to make sure that the contacts in the chip and on the sensor connector are intact. - Violation of the integrity of the body. It should not have cracks or other defects.
- Damage to internal elements.
This happens extremely rarely, and you can verify the suitability of the device by testing. The piezoceramic element or resistor may fail. To do this, you will need to perform a sensor test. - The connection between the sensor and the cylinder head is not reliable enough.
It is recommended to pay attention to this point to all owners of Priora cars whose BC displays error P0326 . The device is fixed with a bolt that has a shortened thread. This thread does not rest against the block with its end part, therefore vibrations from the block with a normally operating motor are not enough to generate the minimum permissible signal of 0.6V. As a rule, a sensor fixed with such a bolt produces a low voltage of 0.3-0.5V, which is why error P0326 occurs. The problem can be corrected by replacing the bolt with a stud of the appropriate size.
Having considered the main symptoms of a malfunction of the knock sensor on a Priora, you should resort to checking its serviceability. To do this, you need to arm yourself with a multimeter. The method for checking the device is quite simple, and it is much more difficult to remove the sensor from the car than to check its suitability. The check is performed as follows:
- Vehicle-mounted sensor. You can check the device without removing it, which is especially important for Priora cars with 16-valve engines, where access to the device is limited. To check the sensor, you must perform the following steps: get close to the sensor in order to be able to strike on or near it. We ask the assistant to start the engine, after which we strike the sensor with a metal object. As a result, the sound of the engine should change, which indicates that the ECU has set the ignition later. If such changes can be traced, it means that the device is working properly and is suitable for use. This also indicates that the sensor circuit is working properly.
- Checking the voltage on the sensor removed from the car. Connect the multimeter probes to its terminals and switch the device to the 200 mV voltage measurement mode. This is necessary in order to fix the voltage on the device. Next, lightly hit the metal part of the sensor with a steel object (or press the metal part with your fingers), and observe the readings. Their changes indicate the suitability of the device.
- Checking resistance. A working DD on Priora and other VAZ models has a resistance that is equal to infinity, which is quite normal, since when not working the piezoelements are not connected to the contact washers. We connect the device to the DD terminals, setting the measurement mode to MOhm, and take measurements. In the non-working position, the value will tend to infinity (on device 1), and if you start to influence the sensor, squeezing it or hitting it with a metal key, the resistance will change and amount to 1-6 MOhm. It is important to understand that sensors for other cars have different resistance values.
- Check the condition of the wires and contacts of the chip. It is checked visually, and if damage to the insulation is detected, the chip must be replaced.
- Checking the integrity of the circuit. To do this, you need to arm yourself with a multimeter with a continuity mode, and test the wires from the chip to the terminals on the ECU. The pinout diagram for the knock sensor on the Priora will help with this.
Knock sensor pinout diagram
The above presented pinout diagram for the Priora knock sensor is appropriate for January and Bosch brand controllers. If the wires are not damaged, and error P0325 is displayed on the BC, then this indicates a failure of the resistor. Some craftsmen eliminate such a breakdown by soldering a resistor of the appropriate size between the wires in front of the chip. However, this is not recommended, and it is much easier and more reliable to buy a new sensor and replace it. Moreover, the cost of the product is 250-800 rubles (depending on the manufacturer).
This is interesting! If checking the sensor and wires shows that there are no defects, but the error message on the BC about a device malfunction continues to light up, then you should resort to replacing the fastening element, that is, replace the bolt with a stud with an extended thread. How to do this correctly, read in the next section.
How to check
If a component breaks down, the car will continue to function as before. There may not be any obvious symptoms of a malfunction. If a breakdown occurs, it will be considered electronic, since the device is part of the car’s electronics.
Device failure can occur for a variety of reasons - for example, due to a malfunction of the device itself, a short circuit in the system, or a break in the signal wire. To conduct self-diagnosis, you need to determine where the sensor is located. The car's owner's manual has information about this.
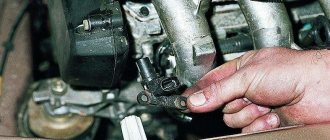
Next we begin to remove the mount. Unscrew the nut on the stud. Disconnect the electrical connector and put it aside. The body of the device is removed from the pin. The knock sensor is checked using two wires - signal and ground. Remember that there is a fragile piezoelectric crystal inside the device. Of course, the system provides certain protection in the form of compensators, but it will not save you from strong mechanical impact. It is not worth disassembling the sensor, since the seal of the housing must not be violated.
It's better to check with a multimeter. There should be no twists on its wires. It is better to use a device with short wires. The minus probe is connected to the sensor hole located in the center, and the positive probe is connected to the control connector. If the device is working properly, the multimeter indicator will show a jump in electricity of 40-150 mV.
If the device is faulty, there will be no activity. You can check with several devices - then there will be no doubt that the procedure was carried out correctly. After diagnosis, the defective sensor is replaced.
If the sensor does not work, it must be replaced - there are no other options here. The device is inexpensive and can be found in any specialized store. Of course, the price depends on the make and model of the car, but in general it is low. You can replace the device yourself, but if you lack the skills and experience, it is better to turn to a specialist. They will charge 2-3 thousand rubles for the work.
Before replacing, you need to let the engine cool down and turn off the power to the car by disconnecting the negative terminal of the battery. On some cars, the device is located in such a way that it can be removed without effort.
To dismantle the device, you will need a 12mm wrench - you use it to unscrew the mounting bolt. Then the device is turned off and removed. A new sensor is installed in its place. Assembly occurs in reverse order.
When buying a new sensor, make sure that its catalog number matches the number of the old component. Then the ECU will work completely correctly. Do not buy devices from Chinese manufacturers - they are, of course, cheaper, but the savings will certainly come at a cost.
The knock sensor is a very important and at the same time simple device that can be replaced without much effort
It is important to identify the malfunction in time so as not to damage the car by driving with a faulty sensor.
Testing with a Multimeter
A highly sensitive voltmeter is taken in the mode up to 200 MV; in the new sample, both connectors are connected to the meter.
In the old model, the first contact is attached to the probe of the device, the other is connected to the body. A massive object, a key or pliers is tapped without force on the body, changing the power, the voltmeter needle should react sensitively and deviate in proportion to the force of the impact. If this does not happen, the device has worn out and needs to be replaced. Move the multimeter controller to the resistance scale. The load in a working sensor will be from 1 to 10 MOhm. A broken controller will show an infinite value, and a broken one will show too small, less than 1, about a few tenths of an ohm.
Another diagnostic method is recommended to check for the presence of voltage on the DD. The multimeter is switched to the millivolt scale, the “+” probe is connected to the connector that supplies the signal, the negative probe is thrown to the ground of the sensor (the hole from the motor mounting bolt). DD, hold in your hand and tap on some hard metal surface, numbers from 30 to 40 mV should appear on the scale. If the display is empty (potential difference), this indicates a sensor malfunction.
Methods for self-diagnosis of DD in old and new samples are almost the same. The method of checking an existing sensor is also suitable when checking a new instance. It is better to do this directly at the time of purchase.
If, after replacing the sensor, the ECU still detects that it is faulty, then detonation occurs for indirect reasons: it depends on the quality of gasoline, there are problems with compression, the spark plugs are either burnt out or flooded.
Lada Priora engine knock sensor
Removing and installing the knock sensor.
Attached to the top of the cylinder block, it detects abnormal vibrations (detonation shocks) in the VAZ 2170 engine.
The sensitive element of the sensor is a piezocrystal plate. When detonation occurs, voltage pulses are generated at the sensor output, which increase with increasing intensity of detonation impacts. The ECU, based on the sensor signal, regulates the ignition timing to eliminate detonation flashes of the VAZ 2171 fuel.
To replace the sensor you will need a 13 key.
1. Disconnect the wire from the negative terminal of the battery.
2. Press the metal clamp of the wiring harness block...
3. ...and disconnect the block from the Lada Priora knock sensor. For clarity, the crankcase ventilation hose has been removed.
4. Use a wrench to loosen the bolt securing the knock sensor VAZ 2172...
5. ...and, having unscrewed the bolt by hand, remove it together with the Lada Priora knock sensor.
Pay attention to the sensor markings so that you can purchase a similar knock sensor for replacement. 6
Install the sensor in the reverse order by screwing in its mounting bolt and tightening it to a torque of 10.4–24.2 Nm
6. Install the sensor in the reverse order, screwing in the bolt securing it and tightening it to a torque of 10.4–24.2 Nm.
How to Troubleshoot or Reset Trouble Code P0326
Some suggested steps to troubleshoot and fix error code P0326:
- Visually inspect the electrical wires and connectors leading to the sensor.
- Check the continuity of the wiring from the PCM to the knock sensor wiring connector.
- Measure the resistance of the knock sensor and compare with factory specifications.
- If necessary, replace the knock sensor.
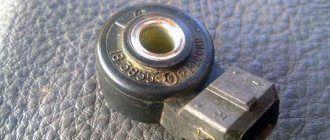
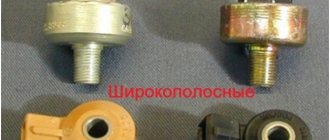
Please note that there are two types of knock sensors, resonant in the form of a barrel and broadband in the form of a ring-washer.
How does a knock sensor work?
The operating principle of the unit is based on the piezoelectric effect. The DC signal is supplied to it from the controller. Inside the sensor there is a special resistor designed to reduce the voltage. After the voltage is reduced by 2 times, it is supplied to the controller again. The electric current at this time already has a variable value. The return signal is transmitted through a circuit that reproduces the reference voltage. This becomes possible due to the fact that the impulse comes in the form of a direct electric current and returns in the form of an alternating current.
The signal is reproduced in the engine during the detonation flash. Its amplitude depends on the detonation power. If the motor operates in normal mode, a 2.5V return signal is sent to the controller. In this case, the controller does not change the operating mode of the motor. If the signal value is different, the ignition timing will change. This is done to partially dampen detonation. At this moment, the motor switches to safe mode - thanks to the same sensor.
Precautionary measures
The signal from the sensor is sent to the ECM. Detonation in the engine is the reason for a sharp rollback of the ignition timing towards the retard. During subsequent cycles of engine operation, the angle decreases stepwise until detonation combustion is detected again. Often, when an engine detonates, not only does the ignition timing rollback (ignition timing), but also the air-fuel mixture becomes richer. In this way, it is possible to adapt to changing operating parameters, keeping the engine in the zone of greatest efficiency.
Causes of detonation
Unstable engine operation is a consequence of many malfunctions:
- low quality fuel. Gasoline with a low octane number or a large amount of impurities also negatively affects engine performance;
- malfunction of the gas distribution mechanism. “Hanging” valves prevent the free exit of exhaust gases, resulting in detonation;
- ignition system malfunction. There may be several options, ranging from a stretched timing belt to low-quality spark plugs;
- problems that have arisen in the piston group. A large amount of carbon deposits accumulating on the pistons and valves of the combustion chamber also leads to a significant decrease in engine power and its unstable operation;
- clogged air filter. Obstruction of air movement leads to the formation of a mixture supersaturated with gasoline, which also leads to increased fuel consumption.
High signal level - warning codes
Many motorists have encountered the problem of various knock regulator warning signals. One of them may be P0328 - high signal level of the knock sensor . It can cause not only a malfunction of the device itself, but also, for example, too noisy operation of the engine. The best solution to the problem is to contact a service station so that they can diagnose the car, in particular, the element itself.
In addition, there is another signal that the driver can receive from the system - 0327, this code means a low level of the detonation signal. As a rule, it occurs in several cases - either after a long descent with the gear engaged, or in a situation when replacing the sensor is already necessary. In any case, you will either have to check its serviceability on your own; for this it is better to dismantle it and connect it to special equipment, or do this with the help of specialists.
We check and change the knock sensor on the Priora ourselves
Knock sensor on Priora - all the details of operation and replacement
Purpose and location of the knock sensor
A knock sensor (DS) is a device that is installed on the outside of the cylinder block wall to monitor the occurrence of abnormal vibrations caused by detonation in the engine. that is, explosive self-ignition in the combustion chamber of the working mixture. The DD produces an alternating current signal, the voltage amplitude and frequency of which depend on the vibration parameters of the cylinder block.
Each level of intensity and frequency of oscillations of the engine walls corresponds to its own signal. The engine control controller constantly analyzes the data received from the engine. When detonation occurs in the cylinders, the amplitude of vibrations of the corresponding frequency increases, and the DD generates a signal, after processing which the controller adjusts the ignition timing, making it later, which leads to the suppression of detonation of the working mixture.
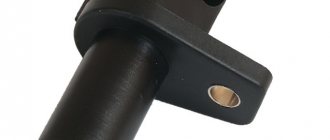
The Priora DD consists of a washer-shaped plastic body, which has a hole in the center for a bolt with a 13-head head, and on the side there is a two-pin connector for connecting wires from the controller. The main part of the DD is located inside the case - a sensitive piezoceramic disk element, which, in fact, generates voltage (signal) when exposed to vibration.
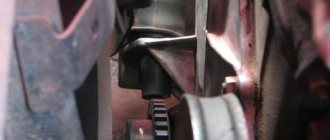
The DD Priora is installed on the cylinder block, namely: on its front wall under the intake module, next to and slightly above the dipstick socket for monitoring the oil level in the engine. It is not visible from the top of the hood. It can only be seen from below, for example, from a pit, when the lower engine protection is removed.
When is the DD changed on Priora?
The DD is removed for inspection or replacement if signs of its malfunction appear or if it is diagnosed at an engine operation test bench. The sensor cannot be repaired, and if it breaks, it must be replaced. When the DD or the electrical circuit from it to the controller fails, the latter (control unit) signals this to the driver by turning on a warning lamp on the instrument panel.
At the same time, the controller switches to another engine control mode, called reserve, in which the ignition timing is constantly at a late angle. This mode is characterized by increased fuel consumption and lower engine power.
The error code indicating a breakdown of the Priora DD is 0327.
The appearance of this error is the main reason why the sensor is changed. However, in some cases, the DD may be only partially faulty, that is, it will work, but incorrectly. In this case, the warning lamp will not light up, no error will be displayed, but the engine will begin to detonate in certain modes. However, there can be many reasons for such motor operation, and if a malfunction of the motor is suspected, it is removed for inspection.
Operating principle of the knock sensor, advantages and disadvantages
When the sensor operates, voltage is created at the input and output in the circuit. Engine vibrations are transmitted to the piezoelectric element, and a voltage potential difference occurs at the ends of the sensor. When such a voltage difference occurs, the sensor sends a signal to the computer, and the electronics corrects engine operation by changing the quality of the combustible mixture and its supply to the working body.
A broken sensor does not necessarily cause an indicator light on the dashboard, so you need to know where the knock sensor is located and how to check its functionality.
The knock sensor is a mandatory part of the control system of vehicles with an electronic ignition system.
Depending on the vehicle brand, the knock sensor may be located on different parts of the engine body. But the seat is always located directly next to the ignition zone.
Pros of resonant sensors
- The device shows high quality indicators when operating at high revolutions and high speeds, and does not lose sensitivity at low speeds. The devices are insensitive to vibrations when driving on roads with poor or no surface, so they are more reliable.
- Vehicle brands with resonant sensors: Toyota, Mitsubishi, Mazda.
- Advantages of wideband sensors. They have great sensitivity to any types of vibrations and vibrations in a wide range of frequencies.
The disadvantages of broadband sensors are that if they are poorly mounted, they do not provide reliable information.
Vehicle brands with wideband sensors: Nissan, Hyundai-KIA, Mercedes, Volkswagen, Audi.
How to deal with this?
One of the simplest methods of getting rid of detonation is to change the ignition angle. After all, this parameter significantly affects the operation of the power unit. With late ignition, the fuel does not have time to burn completely, which affects power, throttle response, and fuel consumption. And with an early ignition angle, detonation combustion occurs - the fuel burns ahead of time, which leads to the appearance of shock loads on the piston group and the crank mechanism.
In carburetor cars, detonation was eliminated by turning the distributor, ensuring later ignition.
In modern injection cars, it is impossible to manually change the advance angle, since this parameter is adjusted by the electronic engine control system. Essentially, the car itself regulates the ignition to provide maximum power output with the lowest possible fuel consumption. Moreover, this is achieved at a slightly early ignition, when the angle is set so that detonation combustion does not occur. But as already mentioned, the occurrence of this effect depends on many factors.
Why does detonation occur in engine cylinders?
Experts identify several main reasons why fuel detonates in the engine.
First of all, it is worth immediately highlighting the use of low-octane gasoline in units with a high compression ratio. Simply put, the octane number of gasoline (AI-92, 95 or 98) actually indicates its resistance to detonation, and not its quality, as many people mistakenly believe.
The use of fuel with an inappropriate octane number for a particular engine naturally leads to the fact that the fuel-air charge detonates under strong compression. Let us also add that simple engines that do not have an ECM and a knock sensor are at greater risk.
Engine coking
It is important to understand that modern engines not only in foreign cars, but also in domestic cars are very different from their analogues from the times of the USSR. In a nutshell, if the engines on the Moskvich 2141 model had a compression ratio of about 7 units and worked normally on any fuel, today the units have from 9 to 11 or more units
In this case, a decrease in the physical volume of the combustion chamber as a result of the formation of a carbon layer will lead to the fact that the fuel charge in the cylinder will be compressed more strongly, and detonation will appear. If we add to this the low quality of fuel at domestic gas stations, then the risks increase even more.
Violation of the mixture formation process. In this case, a too “rich” mixture, in which there is a lot of fuel in relation to the amount of air, may begin to detonate.
Note that such detonation can be short-term and often goes unnoticed by the driver, however, it is impossible to say that there is no harm to the engine.
Ignition timing (IDA). In simple words, the ignition angle determines at what point the spark will be supplied to the combustion chamber. If we consider that normally fuel does not explode, but burns, then it becomes clear that the combustion process also takes some time.
In this case, it is important to ensure that the maximum gas pressure on the piston, which is formed as a result of the combustion of a portion of fuel, occurs precisely at the moment of the working stroke of the piston. This is the only way to effectively transfer the energy of expanding gases to the crankshaft through the piston.
To do this, the spark can be applied a little earlier than the moment the piston reaches top dead center (TDC). During this time, the fuel will have time to ignite, and the expansion of gases and an increase in pressure on the piston will occur just at the moment when the piston has already reached TDC and then goes down.
Currently reading
At the same time, you need to understand that incorrect adjustment of the ignition moment (shift of the ignition moment closer to TDC), when the mixture ignites almost when the piston has already risen to the top dead center, often becomes the cause of detonation. Again, we traditionally add to this the low quality of fuel.
Design features of the combustion chamber. It happens that some engines are initially prone to detonation. In some cases, the reason is the design of the combustion chamber itself, the implementation of its cooling, etc.
Another culprit may be pistons that have an unsatisfactory thermal balance (for example, the piston bottom is thickened closer to the center, which noticeably worsens the quality of excess heat removal). One way or another, the risk of detonation on such engines is much higher.
Engine overheating
If you pay attention to the previous point, it becomes clear that an increase in temperature in the combustion chamber is the cause of detonation. It is quite obvious that a decrease in the efficiency of the cooling system can lead to the engine overheating
Under such conditions, detonation is quite likely to occur, and detonation itself also additionally leads to local and general overheating. For this reason, engine detonation as a result of a faulty cooling system is especially dangerous, since the power unit can not only be severely damaged, but also cannot be repaired in the future.
Voltage measurement
The most effective way to check the engine knock sensor is with a multimeter (another name is an electrical tester; it can be either electronic or mechanical). This check can be performed by removing the sensor from its seat or checking it directly on site, but dismantling it will be more convenient to work with. So, to check, you need to set the multimeter to measure direct voltage (DC) in the range of approximately 200 mV (or less). After this, connect the probes of the device to the electrical terminals of the sensor. Try to make good contact, since the quality of the test will depend on this, because some insensitive (cheap) multimeters may not recognize a slight change in voltage!
Next, you need to take a screwdriver (or other strong cylindrical object) and insert it into the central hole of the sensor, then apply it to the fracture so that force is generated in the inner metal ring (do not overdo it, the sensor body is plastic and can crack!)
In this case, you need to pay attention to the readings of the multimeter. Without mechanical impact on the knock sensor, the voltage value from it will be zero
And as the force applied to it increases, the output voltage will also increase. It may vary for different sensors, but usually the value is from zero to 20 ... 30 mV with low or medium physical effort.
A similar procedure can be performed without removing the sensor from its mounting location. To do this, you need to disconnect its contacts (chip) and similarly connect the multimeter probes to them (also ensuring high-quality contact). Next, use some object to press on it or knock with a metal object not far from the place where it is installed. In this case, the voltage value on the multimeter should increase as the applied force increases. If, during such a test, the value of the output voltage does not change, most likely the sensor has failed and must be replaced (these components cannot be repaired). However, it makes sense to perform additional checks on it.
Also, the value of the output voltage from the knock sensor can be checked by placing it on some metal surface (or another, but so that it conducts sound waves well, that is, detonates) and hitting it with another metal object in close proximity to the sensor (observe when Be careful not to damage the device!). A working sensor should respond to this by changing the output voltage, which will be directly displayed on the multimeter screen
You can similarly check the resonant (“old”) knock sensor. In general, the procedure is similar; you need to connect one probe to the output contact, and the second to its body (“ground”). After this, you need to hit the sensor body with a wrench or other heavy object. If the device is working properly, the output voltage value on the multimeter screen will change briefly. Otherwise, most likely the sensor has failed. However, it makes sense to additionally check its resistance, since the voltage drop can be very small, and some multimeters may simply not pick it up.
There are sensors that have output contacts (output chips). Checking them is carried out in the same way; to do this, you need to measure the value of the output voltage between its two contacts. Depending on the design of a particular engine, the sensor must be dismantled for this or can be checked directly on site.
Please note that after the shock, the increased output voltage must necessarily return to its original value. Some faulty knock sensors do increase the output voltage when they are triggered (struck on or near them), but the problem is that the voltage remains high after being touched.
The danger in this situation is that the ECU does not diagnose that the sensor is faulty and does not activate the Check Engine light. But in fact, in accordance with the information coming from the sensor, the control unit changes the ignition angle and the engine may operate in a mode that is not optimal for the car, that is, with late ignition. This can manifest itself in increased fuel consumption, loss of dynamic characteristics, problems when starting the engine (especially in cold weather) and other minor troubles. Such breakdowns can be caused by various reasons, and sometimes it is very difficult to understand that they are caused precisely by incorrect operation of the knock sensor.
Checking the sensor operation
There are two ways to check the functionality of the sensor. First you need to find where it is, in some cases you will need to remove the protection. For example, on 16-valve engines it is often placed under the exhaust manifold. To check you need:
- Start the engine and hold it steadily at 2000 rpm. The installed sensor is subjected to gentle impacts, simulating fuel detonation; if it is in normal condition, the ECU will change the ignition angle, and the speed will noticeably decrease. After the tapping stops, the speed will return to its previous value.
- Remove the sensor by unscrewing it from the engine block. Set the multimeter to measure resistance in the range of 2 kOhm. Connect the positive electrode to the contact, and the negative electrode to the metal ring in contact with the body. After this, we begin to tap the sensor with a metal object, and the resistance should increase abruptly and immediately return to its original value. If the resistance does not decrease, the sensor is faulty.
If testing shows that the sensor is in normal condition, but problems are observed during engine operation, then you need to check the supply wires and contacts, which may simply oxidize.