To drive the gas distribution mechanism, a timing chain or belt is used. On gasoline internal combustion engines, which are installed on the Hyundai Solaris, the drive is carried out using a chain.
During operation, the chain stretches, which is compensated by the hydraulic tensioner and does not require additional tightening during the entire shift interval.
Fault diagnosis
It should be noted that the Hyundai Solaris is extremely lucky in that the developers thought of equipping the timing chain with a timing chain rather than a belt.
Cars of equivalent class and power with a belt require replacement of this element at least 60,000 (km). The chain is much stronger than the belt; the manufacturer Hyundai Solaris does not regulate the recommended mileage for changing the chain. Experts note that in Solaris, timing belt replacement (meaning chains) is most often carried out at around 85,000 - 100,000 (km). The prerequisites for inspecting the technical condition of the chain and replacing it (if necessary) are the following:
- Car won't start after stalling
- A distinct knocking sound is heard from the engine
Experienced drivers can immediately identify a broken chain by tapping in the hood. Related material: How to replace spark plugs on a Grant with an 8 and 16 cl engine
How long does a chain last?
It's amazing how many different myths and tales you can learn about the chain:
- The chain is not reliable and stretches to 100,000. (In reality, the original chain does not stretch, but counterfeit and duplicates do).
- On a Solaris this is a weak point; you need to constantly check the chain tension. (This is wrong).
- Easily torn. (Only if, on a car before 2013, when accelerating, you accidentally put a lower gear into the cutoff. And that’s not a fact).
- Jumps over easily. (Isolated cases).
- The chain loves to rattle. (No, he doesn’t).
In practice, since 2012 there has not been a SINGLE broken chain, and only a few cars that have slipped.
By modern standards, the chain is eternal. I can't remember other cars with a similar resource. Today there are already many Solaris with huge mileage and still with the original chain. If in numbers, before 300 thousand km you shouldn’t even think about it. By about 450 thousand km. You can now check the circuit. We focus on these numbers only if you are confident in the mileage. If the car was bought used, you should not rely on the odometer numbers. Today there are a lot of cars with twisted mileage. Such a service on the market costs only 500 rubles. They usually twist half the distance. This is why you need to check the condition of the circuit.
Engine on Solaris
Many car enthusiasts are interested in whether the valves on the Hyundai Solaris 1.6 and/or 1.4 are bent. It is impossible to answer this question unambiguously. The listed problems associated with the engine accompany the car throughout its operation. In addition to this, the engine on the Solaris is “disposable”, and if the valve is bent and/or the piston is jammed in the cylinder head, then restoration will require replacing the entire block, since there is no boring for the repair size.
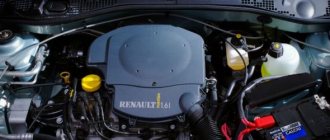
Hyundai of this model is equipped with engines that are equipped with chain gas distribution mechanisms. The volume of power units is 1.4 and 1.6 liters.
Hyundai Solaris 1.6 engine design
Both engines for Solaris 1.6 are assembled at the Chinese Beijing Hyundai Motor plant, from there the units are brought to Russia to the assembly line of the St. Petersburg Hyundai plant. First, let's talk about the general structure of the engines, and then about the differences between the old and new versions.
The 1st and 2nd generation Hyundai Solaris naturally aspirated gasoline engine is an in-line 4-cylinder 16-valve unit with an aluminum cylinder block and a timing chain drive.
The old version of the engine boasted a variable valve timing system on the intake camshaft. The new Hyundai Solaris 1.6 Gamma D-CVVT engine now has a double phase change system on both shafts (intake and exhaust). Moreover, the intake manifold now has a variable length function. The variable length is designed to change the speed of the incoming flow into the working cylinder, thereby achieving optimal power with minimal flow.
What will be needed for repairs?
If the Solaris chain is replaced not at a service center, but independently, then we immediately prepare:
- New chain
- New crankshaft oil seal
- Tube of heat-resistant sealant
- A set of wrenches (both open-end and freewheels) a set of screwdrivers
- Engine stand
- Container for draining engine oil; container for draining coolant
- Special device for fixing the pulley on the crankshaft
Material on the topic: Stove radiator - copper or aluminum? Expert opinion
Required spare parts
The kit for replacing the timing chain on a Hyundai Solaris consists of:
- Timing chain - article 243212B200 at a price of 2980 rubles. RF;
- timing gear drive guide - article number 244312B200 at a price of 750 rubles. RF;
- tensioner shoe - article 244202B200 at a price of 920 rubles. RF;
- tensioner - article number 2441025001 at a price of 2350 rubles. RF.
When replacing the chain, it is recommended to change the crankshaft oil seal - article number 214212B020, priced at 170 rubles. RF.
It is recommended to purchase coolant and engine oil that the car enthusiast constantly uses.
Difference between drives
What is better on Solaris - a chain or a belt? This question plays an important role for almost every car enthusiast. Moreover, some even rely on this fact when it comes to choosing a vehicle. The difference lies in the following points:
- Unlike a belt drive, the chain on the Hyundai Solaris is protected from a variety of external factors.
- A chain drive works almost four times more than a belt drive. Among other things, the belt stretches over time.
- When the oil pressure in the system decreases, the hydraulic tensioner cannot operate at its maximum capacity.
- The belt is much quieter and more elastic. It does not require lubricating fluid. Replacing it can be done without completely disassembling the power unit.
Modern cars are equipped with different gas distribution drives. Which to choose? The driver makes this decision independently. In recent years, not only on Hyundai, but also on other cars, belts have become more reliable, and therefore chains are gradually fading into the background.
History of creation and production
It is very symbolic that the official announcement of the start of production of the new model and the presentation of its prototype took place at the 2010 Moscow International Motor Show. On September 21 of the same year it became known that the new model would be called Solaris. Another six months - and mass production and sale of the car began. The bosses of Hyndai acted very far-sightedly, removing the “baby” Getz and the i20 hatchback from the Russian market in order to promote the new model.
- 1st generation (2010-2017).
Step-by-step instruction
This replacement process requires certain knowledge and experience. If you are faced with the need to change a chain for the first time, then it is better not to do it yourself, but to have your car repaired at a service station. For those car owners who want to replace the element on their own, we suggest using this material.
Loading …
What to cook?
You will need:
- key heads;
- spanners;
- flat and Phillips screwdrivers;
- pliers.
Set of socket wrenches Wrenches Flat and Phillips screwdrivers Pliers
Instructions
- First, disconnect the battery and remove the cylinder head cover. You will also need to dismantle the internal combustion engine protection, and then set the piston of the first cylinder to the TDC position.
- Drain the engine fluid from the internal combustion engine.
- Place a reliable support under the motor, then unscrew the screws that secure the right support of the unit. Then you need to unscrew the corresponding screws to remove the right motor mount mount.
- Using a key, you should turn the tensioner roller to loosen the belt. Then remove the accessory drive belt from the shafts.
- After this, it is necessary to dismantle the fastening screw of the power steering pump, move the device to the side and unscrew the fastening screw of the tensioner. This is done by turning the pin clockwise as it has a reverse thread. Remove the tension device.
- Next, you should unscrew the fastening screws of the lower bracket of the right support and remove it. After this, remove the screw securing the belt roller and remove the roller itself.
- Then you need to drain all the antifreeze that is in the system. The draining procedure may take more than 20 minutes. Next, holding the antifreeze pump pulley, remove the four screws securing it. Remove the pump shaft, and then unscrew and remove the screws securing it to the motor cylinder head. The pump along with the rubber seal can be removed.
- Unscrew the screw securing the crank pulley and remove the pulley itself. Then you need to disconnect the block with wires from the generator. Unscrew the nut, and then remove the generator itself.
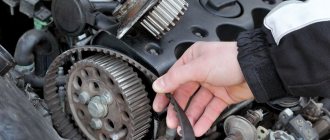
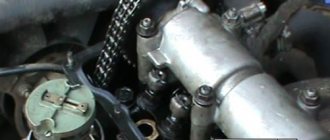
- Now you should unscrew all the screws of the timing device. Remove the cover, and then remove the tension pins and the tensioner of the mechanism chain itself. Turn the timing pulley clockwise.
- After this, the chain itself can be removed. Install the chain following the reverse order of work. When installing, make sure that the installation bolt on the crank pulley is located at the top. All contacting elements of the tensioner must be cleaned of old sealant residues. These components should then be coated with new sealant.
- Install the timing chain tensioner. Make sure that the marks on the camshaft gears and on the chain match. Carry out all further steps in reverse order. You can find out more about changing the component in the video.
1. Turn the tensioner roller 2. Remove the drive belt from the shaft 3. Remove the drive belt 4. Remove the tension mechanism 5. Remove the timing chain protective cover 6. Remove the timing chain Replacement
intervals for Hyundai Solaris are not regulated by the manufacturer.
The main malfunction of the chain is its stretching, which leads to a shift in valve timing and noise. Eliminated by replacing with a new one. Replacement work is quite labor-intensive.
It is necessary to carefully make a diagnosis; a diagnostician who has an oscilloscope in his arsenal can help you with this; he will take an oscillogram from your engine and compare it with the reference one. It will show exactly the valve timing angles. After this, he will give you recommendations for replacing the timing chain.
24410-25001 article no. Chain tensioner.
Required tools and accessories:
- Oil container
- Set of heads
- Set of open-end wrenches
- Rags
- Hammer
- Screwdrivers
- Passatizhi
- Jack
It is recommended to carry out work when the engine has cooled down. They can be combined with checking and adjusting the thermal clearances of the valves. Open the hood and remove the negative terminal from the battery. We unscrew the protection and drain the oil from the engine.
Drain the antifreeze from the cooling system into a container. Unscrew the Hyundai Solaris valve cover and remove it.
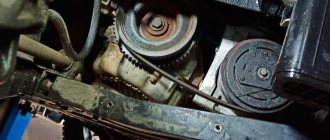
We support the Hyundai Solaris engine under a jack through a plank. We unscrew the engine mount bracket from the timing side and dismantle it. Remove the generator drive belt by using a key to release the tensioner.
It is necessary to move the power steering pump to the side by unscrewing the pump mounts.
Unscrew the belt tensioner (bolt with reverse thread). We remove it from the block. Using a socket wrench, unscrew the 4 bolts of the right engine mount bracket and remove it.
Using a wrench, unscrew the support roller bolt and remove it.
The liquid pump pulley is held on by four bolts; to keep it from turning, you need to unscrew them and remove the pulley. Unscrew the bolts securing the water pump to the engine block (5 pieces). Remove it by prying it off with a slotted screwdriver.
Using a socket wrench, unscrew the belt pulley bolt (if you have a manual transmission, ask your partner to engage fifth gear and press the brake pedal; if you have an automatic transmission, use a special holding tool). We remove the pulley from the end of the crankshaft by prying it with a mounting tool from different sides.
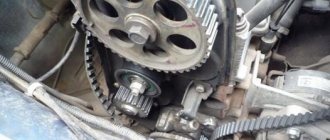
Remove the bracket from the motor by unscrewing the two bolts. The timing cover is held on the block by fourteen bolts, which must be unscrewed, after which we remove the timing cover.
It is necessary to set the top dead center of the piston of the first cylinder, guided by the marks on the shafts.
Fix the shoe tensioner with a pin, pressing the shoe with a screwdriver. Unscrew the two tensioner bolts and remove it. We remove the timing chain from the camshafts and the crankshaft sprocket. We take it out of the engine compartment.
We inspect for damage and wear on the teeth of the camshaft sprocket and crankshaft.
We clean all adjacent surfaces on the cover and block. We clean the surface of the tension device and its seat on the block. It is recommended to replace the crankshaft oil seal in the timing cover with a new one.
We install the timing chain on the sprockets, aligning them according to the marks (on the new chain, for convenience, the marks are marked with paint). We install the tensioner by applying sealant to the back.
We tighten 2 bolts. We remove the locking pin - the chain will tighten. We check the timing marks of the Hyundai Solaris. The locating pin must be in the up position.
Apply sealant to the joint surfaces of the lid and the block with a small roller. Let's join them.
We tighten the bolts. Subsequent assembly is carried out in reverse order.
As you can see, this procedure is not difficult. You can tighten the new chain by strictly following the instructions. Every car enthusiast should know that it is imperative to store the tensioner in the trunk, since such a breakdown can leave him and the Hyundai Solaris far from home, and the prospect of spending the night in the middle of the highway does not make anyone happy.
It is also worth understanding that timely replacement of this unit is the key to ensuring that it does not break. However, the manufacturer assures that this can only happen after 250 thousand kilometers. Therefore, replacing such a part will not threaten the car owner for a long time.
The performance of a car directly depends on the balanced operation of the engine. And the gas distribution system plays a huge role in the engine. Both a belt and a chain can be used as a drive.
It all depends on the make of the car. The Hyundai Solaris uses a chain drive. A chain differs favorably from a belt in that it breaks extremely rarely.
Much more often it stretches, but this does not bode well. A stretched chain can fly off the sprockets, and this situation will not be much different from a broken belt. In this case, the valves will meet the pistons.
It will bring nothing good to either one or the other. After this, the car will have to be overhauled.
How to check the condition of the circuit
There is a folk method, very tempting and simple, but not working! The owners themselves periodically tell me about it. The point is to reach the chain with your fingers and touch it for sagging. The chain will almost always be slack between the intake and exhaust gears. Unfortunately, it cannot be verified that easily.
The popular way to check the condition of the circuit
The condition can be assessed by the position of the chain tensioner, counting the number of teeth by which it has come out of the housing.
7th tooth – you need to prepare, 8th tooth – it’s time to change
The problem is that getting to the tensioner is not as easy as on other cars. Many engines have a special viewing window; Solaris does not have such a window. Apparently the factory is confident in the chain. To get to the tensioner you will have to remove the valve cover.
You can see how to remove the cover yourself in our video.
After the valve cover is removed, many suggest checking the condition of the chain by checking its slack. But this method is not indicative.
Ignore the chain slack here.
Let's see how far the tensioner has extended.
You need to find a position where you can see the chain tensioner. It is located on the left side of the engine closer to the engine shield.
We count the number of teeth that the tensioner reaches
Broken chain drive: consequences
The timing chain on a Hyundai Solaris rarely breaks, but it is impossible to completely eliminate this kind of problem. If a break occurs while the engine is running, the consequences will be dire. The valve bushings will fail, the valves themselves will be bent, and damage will affect most elements of the cylinder-piston group. In other words, you will have to do a major overhaul of the engine.
Replacing the timing belt will not cause problems. You will have to allocate only an hour of free time for her. As for replacing the timing chain, this procedure is quite complicated. It is done this way:
- Dismantle the battery.
- Remove the cylinder head, as well as the engine protection.
- Move the piston in the first cylinder to the upper extreme position.
- Pour the oil out of the engine.
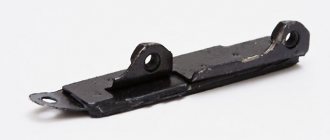
- Place the support under the pallet, then unscrew the nuts of the right support bracket. Next, remove the nut of the stud holding the right motor mount. Remove the bracket.
- Move the hydraulic power steering pump.
- Remove the tensioner bracket holding the right engine support.
- Remove the belt roller.
- Drain the antifreeze.
- Dismantle the cooling system pump pulley, and therefore the pump.
- Unscrew the crankshaft pulley bolt, and then move the pulley to the side.
- Disconnect all wires from the generator.
- Remove the generator and timing cover.
- Remove the tensioners and then the chain.
That's all! There should be no problems with assembly; it is done in the reverse order.
Was it useful to you?
This article:
What do car enthusiasts think about replacing the timing chain on a Huyndai Solaris?
1. Don't touch what works.
“The first commandment of the Red Army soldiers is not to interfere with the vehicle while it is moving, and this way the vehicle will not let you down for a long time. Until it rattles and knocks openly. If there are no extraneous sounds, then the rollers and chain are moving properly under the hood. You shouldn't go there. Enjoy the car, don't worry ahead of time. This is the case when you are very lucky that your Hyundai Solaris does not have a belt. There’s no need to worry about replacing it frequently.”
2. It’s easy to determine the malfunction
“How do you know when the timing chain is on its way?”
- The machine itself will inform you with a lighted “check” that the chain is too stretched and the tensioner cannot cope with the large backlash. Using a scanner, you can read the error code and make sure that this is the problem. And this is a signal from the tensioner sensor.
- The computer checks the correct timing of the ignition angles with a stretched chain (even with the Check not lit). In this case, their value deviates from the required one or may be close to critical figures.
- Usually, an experienced mechanic will be able to determine drive stretching by a specific sound coming from the motor (although this is not always the exact cause). If the “verdict” is correct, the corresponding noise will be heard in the engine. The diagnosis for Hyundai Solaris in this case is more obvious.
In general, one of three options can happen, or all points at once, but the angle will shift - this is 100%.”
We recommend
3. The angle is difficult to determine
“The Hyundai Solaris is equipped with a system for changing the advance angle for each cylinder individually, and during operation the values are constantly adjusted.
My opinion is that it is impossible to determine the angle in real life; if the drive is still stretched, a CHECK indication will appear with error code POO11 (0012) - similar to, for example, on Captive, replacement is needed.”
4. Changed it at 60 thousand km
“During this run of the Hyundai Solaris, I began to hear unnatural engine noise. Although it is not very loud, with the climate and on lousy roads it is not audible. Appears when you start up for the first few seconds, and at about 2000 rpm when you let off the gas. The Kulibins from the garage said that the timing chain needs to be replaced. I made a replacement and the knocking went away.”
When is it time to change?
To prevent this from happening, it is necessary to monitor the chain in order to detect defects in time. But what symptoms will indicate that it’s time to inquire about the condition of the circuit:
- the car does not want to start;
- when the engine is running, extraneous noise is heard;
- fuel began to be consumed somewhat more actively.
If you find something like this, it means it’s time to pay attention to the condition of the chain drive. The manufacturer does not regulate the frequency of checking the chain, but it is better to do this after 25,000 km. But the service interval of the chain drive is regulated, and it is 140-150,000 km.
Of course, the chain can wear out even earlier. The reason for this may be extreme driving, poor operating conditions of the car, etc.
The chain can be replaced at a service center, or you can do it yourself. The good thing about replacing the chain yourself is that you can save money. Also in this case, the car enthusiast gets the experience he needs so much.
But, it must be said that this work is quite labor-intensive, and perhaps you should entrust it to professionals. Here's what tools you need to prepare to carry out your own repairs:
- set of necessary heads;
- keys;
- jack;
- pliers;
- a set of screwdrivers with different tips;
Hyundai Solaris cars are equipped with two types of engines: G4FA and G4FC. The volume of the first is 1.4 liters, the second - 1.6 liters. They are designed the same, do not have any design differences and belong to the “Gamma” class.
Hyundai Solaris engine
Unlike other types of engines, on the Gamma the gas distribution mechanism is equipped with a chain rather than a belt. For Solaris owners, this is a significant advantage, since the drive belt must be replaced every 60 thousand kilometers. Replacing the chain, in turn, is not regulated by the Solaris manufacturer. As a rule, it changes in the event of a major engine overhaul or in the event of a break.
Replacement Regulations
Hyundai Solaris cars were equipped with 1.4 liter petrol engines. and 1.6 l. Both motors belong to the Gamma model range and have no significant design differences. The timing mechanism is driven by a chain, which is recommended to be changed after 120 thousand km. mileage, during major repairs or if there are indications for replacement:
- strong stretching, which is not compensated by the hydraulic tensioner;
- presence of visible damage to links.
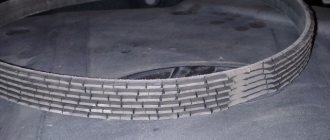
Untimely replacement of the chain or elements of the gas distribution mechanism drive can lead to a break, which will lead to damage to the internal elements of the connecting rod and piston group, the cylinder head.
The use of a timing chain has an advantage over a belt, which must be changed every 60 thousand km; in addition, the chance of a belt breaking is higher than that of a chain.
Work order
When all the spare parts have been collected and the necessary tools have been prepared, you can begin the replacement process:
- Place the car on a lift or inspection pit.
- To avoid damage to electrical appliances, it is necessary to disconnect the positive terminal of the battery before starting work.
Unscrew the cylinder head cover, remove the gasket and remaining sealant. Before installation, it is recommended to replace the gasket and apply new sealant to the mating surfaces.
- Remove the engine protection, if present.
- Rotate the crankshaft pulley clockwise using the head and knob to set the TDC of the first cylinder.
- Drain the coolant; the procedure takes about 15 minutes.
- Drain the engine oil.
- Support the engine from below with a hydraulic jack.
- Unscrew the fastening of the right engine mount to the cylinder block.
- Jack up the engine to remove the right mount.
- Place a reliable stop under the internal combustion engine and secure the wheels to prevent the vehicle from rolling away.
Using a spanner, it is necessary to loosen the poly V-belt tensioner, secure it with a thin rod, and remove the belt from the auxiliary pulleys.
- Unscrew the power steering pump mount and move it to the side.
- Unscrew the tensioner mounting screw.
Important! The tensioner fastener has a left-hand thread; it must be unscrewed clockwise.
- Remove the poly V-belt tensioner.
- Unscrew all the fixing screws of the engine support bracket on the right side.
- After dismantling the bracket, you need to remove the bolt securing the idler roller of the poly V-belt and dismantle it.
- Remove the four bolts securing the coolant pump pulley.
- Unscrew the screws securing the coolant pump to the cylinder block.
- Remove the coolant circulation pump.
- Remove the coolant pump gasket and clean the surface of any traces of old sealant. Before applying a new one, the surface must be degreased.
- Unscrew the bolts securing the crankshaft pulley and remove it.
- Disconnect the generator wiring harness.
- Unscrew the fixing nut and remove the generator.
- Unscrew all the fixing screws of the timing cover and remove the cover.
- Place marks on the chain that coincide with the marks on the crankshaft and camshaft gears.
- Unscrew the drive tensioner and remove other mechanisms.
- Remove the chain.
- Transfer the marks to the new spare part.
- Install a new chain, checking that all marks match.
- Remove traces of old sealant and apply new one.
- Install a new drive chain tensioner.
- Screw on the shoe.
- Pull out the hydraulic tensioner clamp.
- Check the tension and alignment of the marks on all gears.
- Screw on all parts of the gas distribution mechanism and damper.
- Close the timing drive cover.
- Tighten the bolts securing the cover.
- Assemble the remaining parts of the internal combustion engine, following the reverse procedure.
After assembling the engine, it is necessary to fill in engine oil, replace the filter and add antifreeze. Place the positive terminal on the battery and start the engine. If all work is carried out correctly, there will be no problems starting the internal combustion engine.
As for consumables, in addition to the chain itself, you will have to buy new tensioners, dampers and seals. Do not forget that work can only be done when the engine has cooled down. So let's begin.
1. Open the hood. Disconnect the left terminal from the battery.
We remove the engine protection. We set the piston of the first cylinder to the dead center position. 2.
3. Unscrew the left support of the unit. We place a stop under the engine, then unscrew and dismantle the right support of the propulsion system. Remove the cover from the timing system.
4. Using a wrench, loosen the tensioning device and remove the generator drive. 5. Now move the power steering hydraulic pump to the side. To do this, you will first have to unscrew the fasteners. 6. Unscrew the bolt that secures the power steering pump. We remove the pump, and then the tensioner.. 7.
Unscrew the fastening of the right engine mount bracket. Remove the bracket. 8. After this, all liquid contained there must be drained from the system. This cannot be done quickly, and this action will take at least 15 minutes. Now we dismantle the antifreeze pump pulley. Then remove the pump itself along with the seal. 9. Dismantle the crankshaft pulley, having previously unscrewed all the necessary bolts. 10. Remove the generator by first unscrewing the block.
11. Remove the timing chain tension pins, and then the chain tensioner. 12. Turn the camshaft pulley clockwise and remove the chain.
13. When installing a new chain, follow the reverse procedure. The set screw located on the crankshaft should be at the top.
14. All elements of the tensioner should be cleaned of dirt and traces of old sealant. When installing the timing cover, also remember to remove the old sealant.
Having coated the seat with sealant, you can put the cover back in place only after a few minutes. 15. When installing the tensioner, make sure that the marks on the camshaft sprockets and the chain match.
16. We check the operation of the engine after repair. If extraneous noise is detected, the work will have to be repeated.
conclusions
Instead of a conclusion, it is worth noting that each car has its own positive features and annoying shortcomings. The example of this model shows that the Korean auto industry is worthy competition for famous brands and is still popular on Russian roads. Take care of your car and good luck on your journey!
Car : Hyundai Solaris. Asks : Smirnov Kirill. The essence of the question : What type of timing drive is installed on the Hyundai Solaris?
Good afternoon, I want to buy myself a Hyundai Solaris. Tell me what drive is installed there. I want there to be a chain, but I can’t find out the exact answer! And tell me, is it better or worse than the timing belt?