The minimum permissible thickness of a non-ventilated disk is A = 10.8 mm, ventilated - 17.8 mm. If the disk thickness is less, it must be replaced. The axial runout of the brake disc surface should not exceed 0.15 mm.
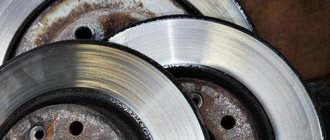
If there are burrs, deep scratches, etc. on the working surface of the disc that increase pad wear and reduce braking efficiency, replace the disc. In specialized workshops such a disc can be sharpened and ground. But at the same time, the thickness of the disk must be no less than the minimum permissible. The groove is made on both sides of the disk to the same depth.
The brake disc of a car, working in intensively stressful conditions and in unfavorable external conditions, ensures the safety of our movement. This axiom. But, while performing complex and responsible work, the disc itself, seemingly made of strong material, remains very vulnerable to damage by a part of the brake system.
Brake disc diagnostics
Disc brakes, having burst into our lives in the middle of the last century, confidently won a leading position in car design. Today, almost 90% of passenger cars leave production lines with disc brakes already installed. The reason is simple - disc brakes are more efficient and simpler in design. Which means it’s cheaper for mass production.
A not entirely good feature of disc brakes is the small contact area between the pad and the brake disc. This, in turn, requires more pressure in the brake system, and increased wear on both the brake pads and the brake disc.
What should be the minimum thickness of a brake disc to allow operation of a car? We will not give you a single figure, which varies significantly between manufacturers of both cars and brake discs. And although there are average mileage figures, it's all relative.
On forums, many novice motorists ask the question where they can find out numbers about the thickness of the brake disc. Let’s answer this: right on the disk it’s possible. The fact is that the manufacturer took care of our comfort when repairing brake discs and indicated two numbers on the end of the brake disc: the original thickness and the minimum thickness of the brake disc. After this figure, operating the car is strictly not recommended.
Numbers are numbers, but too many factors influence accelerated wear of brake discs. Among the first is your aggressive driving style within the city.
The braking system is an important component of the car.
Replacing the front brake discs of a VAZ 2110
The car is considered one of the most dangerous inventions that man has invented. To make the travel of a vehicle driver safe, developers had to create many inventions. One of them is brakes (see Repairing brakes at home). Every vehicle has a braking system. To avoid any troubles on the roadway, before leaving, you should take care of the brake system. It must be constantly maintained in working order. In most cases, repairs to brake discs and pads should be left to professionals. But if you take on repairs yourself, you should learn a few basic rules.
Note: Brake discs must be replaced on both sides at the same time. Each individual replacement of equipment requires the implementation of clear established rules. If new disks were damaged during installation due to the negligence of the installer, sellers will not provide warranty service or replace the product.
This is interesting: How to check ball joints on a Lada
How to determine brake disc wear: acceptable standards and features
The brake disc is no less important in the braking system of a car than the pads. And if the latter are replaced when worn out, then almost no attention is paid to the former. But the efficiency of the system also depends on them. Let's find out how to determine the wear of brake discs so that they can be replaced on time.
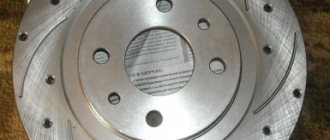
Most of the discs that lie on the shelves of car dealerships are made of cast iron. The popularity of such products lies in their low cost and good friction characteristics. But the problem is that in the process of reducing the speed, the cast iron alloy product heats up. This leads to deformation, warping, and uneven abrasion. To reduce wear and tear from heat, manufacturers began to produce products with ventilation. Grooves are also cut on the surface of the disk. This allows you to increase the life of the disk.
Withdrawal procedure
1. Remove the desired wheel and brake pads.
2. Unscrew the 2 bolts securing the shoe guide to the steering knuckle and remove the brake mechanism assembly. At the same time, we do not disconnect it from the wheel cylinder.
3. We hang the removed brake mechanism to the front suspension spring. Do not twist or strain the brake hose.
4. Clean the disk from dirt and apply WD-40 to the connections between the disk and the hub and to the guide pins.
5. Unscrew the 2 guide pins and remove the brake disc. You can knock it down with a rubber mallet.
6. Install the brake disc in the reverse order. If you are replacing an old disk, you need to use a file to remove the beads that have formed during wear.
This is interesting: What should be the compression in the VAZ 2107 engine
How to understand that the thickness of the brake disc is approaching a critical level
First of all, monitor the behavior of the car during braking, especially emergency braking. If there is a beating in the steering column, then it’s time to take a closer look at the brake discs. A visual inspection to determine the thickness of the brake disc should be carried out with the wheel removed.
The first thing to do is take a caliper and measure the thickness of the brake disc in several places. Why in different places? Because there is such a thing as uneven brake disc wear. It happens for various reasons.
When measuring brake discs, do not forget to pay attention to collars, deep scratches and other mechanical damage to the working surface of the brake disc. If they are, then it's time to think about brake disc repair.
Checking the new brake system
Note: You should immediately break in the new brake system. To do this, you need to travel 500 kilometers. The braking process should be done smoothly, without any sudden movements. If you ignore this rule, brake disc defects may occur. They arise during the process of overheating.
VAZ 2110 front brake discs
It should be noted that most modern motorists do not even think about the moment of changing brake discs. They cannot independently determine the right moment. Therefore, you should know several basic indicators that will indicate the proximity of this repair:
- You should pay attention to the thickness of the ventilated disc. Its normal condition and indicators should be 17 millimeters.
- A non-ventilated disk has its own indicator, which should not exceed 10 millimeters.
- Constantly pay attention to the runout indicator, which should not exceed 0.15 millimeters.
- Entrust the measurement of indicators to specialists. Self-measurement may not provide accurate results.
- Pay attention to the surface of the disc. If there is any damage to it, the brake system should be replaced immediately.
Motorists should pay attention to the choice of new brake discs. Purchasing from retail outlets that do not have permission to provide services to the public is strictly prohibited. The product may be counterfeit or not meet safety standards. The best option is a ventilated brake disc. Unlike a non-ventilated disc, such parts have an increased shelf life. Thanks to the constant air flow, the period of their use can be extended by 2 times.
What do we do with brake discs?
There aren't many answers. If the minimum thickness of the brake disc corresponds to the figure specified by the manufacturer, then do not tempt fate, just replace the brake discs. They must be changed in pairs on the same axis.
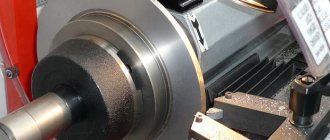
If the thickness of the brake disc corresponds to the norm, but there is some mechanical damage on it, then you need to re-groove the brake discs. Grooving the discs will allow you to bring the brake system back to normal and extend the service life of the brake disc for a certain time. You shouldn’t get carried away with grooving – it’s not a panacea.
Advantages of a disk system
If, nevertheless, the advantages of disc brakes prevail over common sense, then we will try to install a kit for replacing drums with discs. But you should select only certified parts, no amateur activities. Disc brakes will give your car the following:
- The braking distance may be reduced.
- More uniform distribution of braking force, subject to modification of the pressure distributor.
- The mass of disc brakes is less, as a result, the unsprung masses become smaller.
- Disc brakes are easier to maintain.
- Better thermoregulation.
- The pads do not stick or freeze.
Absolutely do not do this!
Some home-grown “Kulibins”, trying to save money on buying new brake discs, perform sometimes mind-boggling procedures in order to compensate for the minimum thickness of the brake discs.
For example, two brake pads are installed. To prevent the brake cylinder pistons from falling out. This ultimately leads to the fact that at speed the brake pads simply fly off to... nowhere. At the same time, the path of the car is known - into a ditch, and it’s good if there are no casualties.
Replacing worn brake discs at the wrong time can also lead to failure of the pistons of the working brake cylinders, CV joints, ball joints, etc. That is, by trying to save money and procrastinate, you can then lose more money. Remember the stingy...
Monitor the condition and thickness of the brake discs, and take measures to eliminate any defects noticed - there is too much at stake to neglect this.
Good luck determining the thickness of your brake rotors and replacing them.
Disadvantages of drum mechanisms
Drum brakes
Despite the fact that drum brakes are correctly designed, mounted and adjusted at the factory, which is why intervention is not required, they have certain disadvantages:
- This is an outdated solution that is practically never found on new cars from leading European manufacturers;
- When compared with disk mechanisms, drums are significantly inferior in efficiency;
- There is no cooling or ventilation on the drums, which leads to overheating under heavy loads on the car;
- The drums have a closed space, so it is not possible to remove dirt and wear products in the form of black dust, leaks of fuel oil and trapped moisture naturally. This is done by cleaning.
Replacing brake discs
Even with intensive use of your car, brake discs can last quite a long time. For example, judging by my personal experience, using the VAZ 2110 as an example, I can say that with a mileage of 180,000 km, it still had factory wheels.
Although, judging by one car is completely wrong. You can destroy the surfaces of a brake disc in a matter of hours if you do not promptly replace the pads that have worn down to the metal base. Also, poor-quality pads can cause grooves and uneven wear on the disc surface.
Minimum permissible residual thickness of the brake disc
- 10.8 mm for standard rims
- 17.8 mm for ventilated ones, which can be installed on later versions of VAZ 2110, 2111 and 2112 with 16-valve engines
To complete the work of replacing these parts, we will need the following tool:
- Jack and wheel wrench (to remove the wheel)
- 7 mm wrench or 7 mm socket (preferably deep)
- 17 mm head
- Ratchet and crank
- Hammer
To begin the repair, first of all, read the material on removing the front wheel caliper on a VAZ 2110. Since you will first need to take care of removing this structure.
Articles (original)
The VAZ-2110 offers a fairly wide selection of brake discs.
- The original catalog number of the disk is 2110-3501070 (ventilated) or 2110-3501090 (non-ventilated).
- The average cost of a set of two products is 5,000 rubles.
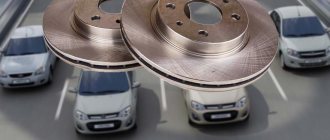
New brake disc on the car.
Analogs
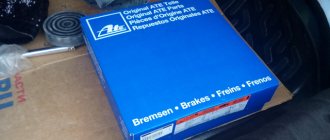
And this is what it looks like in the package (Trialli)
No less popular Trialli brake disc.
In addition to the original parts, the automotive market offers a fairly wide range of analogues, which in terms of quality and cost can cover the needs of any motorist.
Let's look at the table of manufacturers, catalog numbers and average prices for VAZ-2110 brake discs:
| Manufacturer | vendor code | Price in rubles for 1 piece |
| Profit | 5010-1142 | 1000 |
| Denckermann | B130406 | 1000 |
| Ferodo | DDF1142 | 1200 |
| LPR | L1053V | 1200 |
| Brembo | 09.8894.14 | 2000 |
| ABS | 17339 | 1500 |
| Metelli | 23-0553 | 1500 |
| Bosch | 0 986 479 082 | 1500 |
| Cifam | 800-553 | 1600 |
| Trialli | DF 135 | 1750 |
| Pilenga | 4221 SPORT | 1750 |
| Pilenga | V221 | 1200 |
| QML | BD1003 | 1300 |
| Valeo | 297781 | 1500 |
| TRW | DF4108 | 2000 |
| Allied Nippon | ADC1710V | 2000 |
| Hola | HD904 | 2000 |
| Textar | 92109200 | 3000 |
As you can see, the automotive spare parts market is quite wide, and if original wheels are expensive, then there is always the opportunity to buy an analogue.
Captain-Smollett › Blog › VAZ front drive brakes
This article will help answer all the questions about switching from one brake to another. It will also help you figure out what kind of brakes you currently have. To do this, consider the stock front brakes for front-wheel drive VAZ: 2108-21099, 2110-2112, 2113-2115, Kalina, Priora, Granta
R13 not ventilated
They were installed on the SAMAR and SAMAR-2 families, as well as on the 10th family (only with an 8-liter carburetor engine). Explosion diagram Caliper
Visually, they can be distinguished by the lack of ventilation on the brake discs, in addition to the characteristic 2108 boot.
R13 ventilated
They were placed on families 10, Kalin, Grant exclusively with 8kl. engine. Explosion diagram Caliper
Visually, it is easy to distinguish from 08 by its wider ventilated disk. Brakes from R14 can be visually distinguished by the brake disc boot ratio.
R14 ventilated
They were installed on families 10, Prior (even with 8kl. ICE), Kalin, Grant with 16kl. engine. Explosion diagram Caliper
Visually it is easily determined by the ratio of the brake disc boot. The disc will completely cover the boot. There is another option, remove the fixed bracket and 2112 should be stamped on it. In addition, it is simply impossible to install wheels of 13 radius.
R15 ventilated
They were placed on the Kalin and Grant families from 16kl. engine in the sport version. Explosion diagram
Standard R13″ ventilated calipers are used (movable caliper 2110, fixed caliper 2110 which is machined to fit a wider brake disc).
And to extend the guide to a larger radius, the plant uses “bone” adapters
When installing them, you need to file the ears on the fist
There is another option that is almost factory-made. Install the Volga calipers using a special spacer. They have their own brake pad, which, in addition to everything, has an even larger area compared to the VAZ one.
RESULT:
1) When moving from R13 non-ventilated to R13 ventilated, you will need: - Caliper bracket 2110 movable 2110-3501017 - Caliper bracket 2110 fixed 2110-3501155 - Brake disc housing right VAZ-2110 (14 inches) 2112-3501146 - Brake disc housing left VA Z -2110 (14 inches) 2112-3501147 — Brake disc VAZ 2110 (13 inches) 2110-3501070 As you can see, we will need brackets, boots and the brake discs themselves. You can leave the old calipers.
2) When moving from R13 non-ventilated to R14 ventilated, you will need: - Caliper bracket 2110 movable 2110-3501017 - Caliper bracket 2112 fixed 2112-3501155 - Brake disc housing right VAZ-2110 (14 inches) 2112-3501146 - Brake disc housing left VA Z -2110 (14 inches) 2112-3501147 — Brake disc VAZ 2112 (14 inches) 2112-3501070 As you can see, we will need brackets, boots and the brake discs themselves. You can leave the old calipers.
3) When switching from R13 ventilated to R14 ventilated, you will need: - Caliper bracket 2112 fixed 2112-3501155 - Brake disc VAZ 2112 (14 inches) 2112-3501070 As you can see, we only need a movable bracket and the brake discs themselves. The calipers can be left as old, the boots were originally designed for R14 brakes, the movable caliper remains the same.
4) When switching to R15 ventilated ones, you will need: - Movable caliper bracket 2110 2110-3501017 (but it needs to be sharpened) - Fixed caliper bracket 2112 2112-3501155 (only if you have R13 not ventilated) - Spacer for the fixed bracket - Disc 15 inch brake
How long does it last
Typically, the first replacement of discs coincides with a similar procedure for brake pads. The wear of a disc is judged by its thickness, and how quickly the discs become unusable depends on your driving style. As a rule, this takes not even months, but years. There is also a dependence on which manufacturer the pads are installed. Some of them wear out discs faster.
The permissible wear of the brake disc on the “ten”, according to the manufacturer, is 17.8 millimeters for ventilated ones and at least 10.8 for regular ones. Disc wear can be determined visually by the presence of abrasions or by hearing (suspicious noise begins in the wheels). Experts recommend immediate replacement of discs if scratches or cracks appear on their surfaces, and the thickness of the discs becomes less than acceptable. The main thing is that brake discs are replaced only in pairs, since they wear out approximately equally on both sides. Failure to comply with this rule is fraught with loss of vehicle controllability (the car will noticeably drift to the side).
On the VAZ-2110, wear on the front axle discs occurs faster than on the rear ones, since this car is front-wheel drive, and most of the energy during braking is transferred to the front wheels. In addition, as standard, the rear brakes on the “ten” are not disc, but long-outdated drum ones. They are outdated, since most automakers in other countries install brake discs on all wheels. It is worth noting that there is no specific wear and tear time frame for them, so their condition must be monitored by the owner of the car himself. They are supposed to be inspected during scheduled technical inspections. There is nothing difficult about this, since, unlike brake drums, it is easier to inspect the disc on the rear axle; you just need to remove the wheel. It makes no sense to change disks early, and not changing them when the need arises is dangerous.
Video instructions for replacing brake discs VAZ 2110-2112
The guide below was prepared by me personally for this article in particular.
Installation is carried out in reverse order and it is strongly recommended to apply copper grease to the mating parts of the brake disc and hub. The video shows this perfectly. In this case, even after a long mileage and long-term operation, there should be no problems with dismantling.
As for the price, new brake discs for the VAZ 2110-2112 can be bought from 500 to 1000 rubles apiece. The difference in price depends on the manufacturer, type (ventilated or not) and the diameter of the wheels installed (13 or 14 inches).
If you have any questions, ask in the comments and discuss together.
What does it look like
There are two main types of brake discs. The first type is ventilated, consisting of two rotating parts with special blades that allow excess heat to be removed from the wheel. The second option is with gas outlets. There are also perforated wheel rims, equipped with holes to allow water and dirt to escape from the wheel, as well as collapsible rims.
New brake disc VAZ 2110
The manufacturer installs ventilated structures on the front axle of the “tens”, since the front wheels of this car are driven and therefore receive a higher load. The ventilated disc cools faster, resulting in more efficient braking.
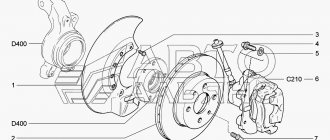
The disc is fixed to the hub, and the wheel is screwed on top of it. During its operation, it heats up and is simultaneously cooled by the incoming air flow. The design of the disc brake system is shown in the diagram.
Diagram of the VAZ 2110 disc brake system
Replacement steps
The entire replacement process can be divided into several stages:
- Removing wheels;
- Removing the old brake pad;
- Frame disassembly;
- Cleaning the hub and checking it;
- Removing coating from new disks;
- Runout check;
- Installation of new brake system elements.
Now let's talk about this in more detail.
Removing the wheel
In fact, dismantling the wheel for subsequent replacement of the brake elements is not difficult.
But a certain sequence of actions will have to be followed.
- Place a jack under the car.
- Lift it up so that it doesn't tip over, but still allows you to easily remove the wheels.
- Unscrew the wheel fasteners.
- Remove the hubcaps and the wheels themselves.
As you can see, the procedure is really simple, but it requires attention and accuracy.
Removing the pads
- Try to move the piston as far as possible from the brake mechanism. But do not exceed the distance beyond that which will allow you to comfortably remove the brake pads.
- Take out the block.
- To make the job easier, you can disassemble the brake frame. To do this, unscrew the two bolts securing the block and disconnect the device.
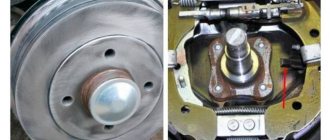
Hub
It must be cleaned, since all accumulated debris, dirt, and rust will negatively affect the effectiveness of the new brakes.
Dirty
For cleaning, alcohol-based solvents and metal brushes are used. If cleaning is not performed, the operation of the brakes will be accompanied by beating - this should absolutely not be allowed.
Be sure to check the hub for runout. Normally it does not exceed 0.1 mm. There is a special tool for checking. If the indicator is within normal limits, then a full assembly is performed.
Working with new disks
Many owners of the “Ten” are interested in which brake discs are best to choose for the VAZ 2110. The question is quite logical.
Choose certified replacements from reputable manufacturers such as Bosch, or stay true to factory parts. These are the two best options in terms of quality and compliance with the car itself.
New
Some take similar discs that partially fit the “ten”, sharpen them, and adjust the design. This is a dubious undertaking, since it requires serious skills in such a matter, additional time and financial costs. At the same time, it is far from a fact that such brakes will work better than those offered by the AvtoVAZ plant.
You've already figured out how to remove the brake element, so it's time to work on a new one. It’s not enough to just buy another brake disc and put it in place. First, it is prepared and a runout check is performed. Let's talk about this in more detail.
- The coating must be removed from a new disc.
- This coating serves as a kind of preservative.
- The layer is removed using any solvent.
- Clean thoroughly and wipe the part dry after finishing work.
- Now you can put the disk in a new place and check the runout.
- The permissible runout is no more than 0.15 millimeters.
- If the value is exceeded, this can lead to an increase in the sensitivity of the brake pedal, as well as the formation of vibrations during braking.
Installation Quality Check
Ventilated
When you complete the assembly process, be sure to check how sealed the installation was on each of the wheels.
- Press the brake pedal. If you did everything correctly, pressing will be accompanied by tightness and effort;
- You or your assistant press the pedal again, while the second person begins to turn the new disc brakes;
- If you couldn’t move anything, it means the assembly was done efficiently and reliably.
Ready kit for installation, or installation in parts
Now let's look at the sets that are offered for sale. Firstly, this is a fairly well-known kit of Darbis rear disc brakes. This set costs about 15 thousand, but it is sold without discs, and the kit includes:
- figure-of-eight bracket and caliper;
- a five-millimeter faceplate as an adapter for the hub;
- set of dirt-proof covers;
- four brake pads from the first generation Ford Focus;
- set of brake hoses from 2110;
- brake hose and handbrake cable bracket.
The kit allows you to install a brake disc of any diameter, the seller issues a copy of the certificate of compliance with technical conditions and a warranty for 30,000 km. 13-inch brake discs will cost another 6-8 thousand per pair, depending on their design and manufacturer. The manufacturer also indicates that the parking brake will now be non-adjustable, that is, adjustment will be made automatically, and manual adjustment will only be required if the cable is replaced. The entire set is installed on standard seats and connected to the brake system without any modifications.