The effectiveness of the brakes is the most important criterion for safe driving. In this case, the brake mechanisms have a consumable part - pads, which are directly involved in the process of stopping the vehicle.
The braking distance of the car, as well as the comfort of deceleration, depend on their condition and degree of wear.
How to determine the period for replacing the rear and front pads on VAZ cars of the “tenth” family and directly carry out the replacement work on your own?
When do you need to replace the pads and how to determine the degree of their wear?
The service life of the pads on VAZ-2110 cars and its derivative modifications is, on average, 15–20 thousand kilometers for the front ones, and 40–50 thousand for the rear ones. However, their wear directly depends on a number of factors. Thus, during city driving, the degree of wear is higher, as well as when operating on dusty roads, when there is a high risk of mechanical particles getting on the working surfaces.
The main sign of a malfunction is the appearance of a characteristic whistle during braking. This is due to the fact that the pad design contains signal indicator strips, and when the working surface of the pad wears down to a critical minimum, the strips are exposed and create this sound.
Along with this, problems can be expressed in the form of a metallic grinding sound in the event of destruction of the friction layer and exposure of the metal structure of the pad. In this case, during the braking stage, vibrations and knocks may appear, as well as a characteristic creaking sound in the area of the front wheel (or the rear wheel if the rear pads become unusable). In other words, the pads whistle, rattle or knock, indicating a malfunction.
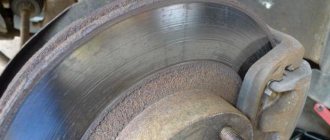
Difference in thickness of old and new pads
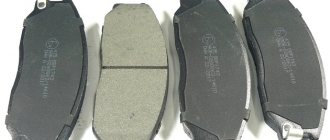
Choosing the right pads!
The standard brake pad for the front ten brakes has the following parameters:
- length 104.3 mm;
- height 62.1 mm;
- thickness 17.5 mm.
Dimensions of a standard VAZ-2110 disc pad.
When choosing pads, you should consider not so much their price as the material of the friction lining . And this material, in turn, depends on the driving style and preferences of the driver.
Selecting the material and category of pads
Briefly, each of the materials has the following characteristics:
- Semi-metallic clutches. The most inexpensive, they are made from a friction mixture, which includes graphite, inorganic fillers and 60–65% chips of non-ferrous and ferrous metals. Such pads dissipate heat well, do not overheat, but wear out the brake disc a lot. Noisy and very dusty. They do not work well in low temperatures.
- Low metal pads. Same story, but the percentage of metal content is reduced to 30–35% . Mainly composed of organic fillers. Softer and less noisy pads.
- Organic pads. Consist of glass material, carbon fiber, Kevlar. The metal content does not exceed 12–15% . The pads are very soft and low noise, but they wear out intensively. But organics are gentle on the brake disc and have good friction properties at the initial stage of braking. Not recommended for fans of an aggressive driving style, but a calm, balanced driver will comfortably drive them for at least 40–50 thousand.
- Ceramic friction linings. The best option for conditions where intensive and frequent braking and high speeds are required. The basis of the lining is ceramic fiber; rubber and soft non-ferrous metals are included in different proportions. Ceramic pads are equally effective at both low and high temperatures, do not wear out the brake disc much, and last quite a long time.
In addition to material, pads are distinguished by categories, roughly speaking, by quality of workmanship. There are three of them - a conveyor, an aftermarket and a spare parts market for third countries:
- original conveyor pads are supplied directly to the factory, they meet all possible standards, although judging by the original VAZ-2110 pads, this is not always the case;
- aftermarket is a complete copy of the original pads, they cost half as much, but the quality can sometimes be better than that of the original ones;
- Pads for third-party markets look no different from aftermarket spare parts, but the quality of the materials is an order of magnitude worse and they cost a third less.
But no matter what category the pad is, it must indicate basic parameters - operating temperature, coefficient of friction and catalog number.
We select brands and look at prices
The native tenth pads are not spoken of very flatteringly. They are only enough for a break-in, after which the braking efficiency drops noticeably and they begin to creak and vibrate. These are pads from the domestic TIIR plant with catalog number 2108 35010 80 . Their only advantage is that they are given free of charge (along with a new car), so you don’t mind throwing them away.
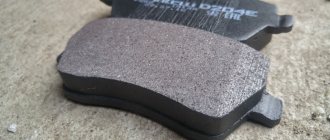
Standard TIIR pads.
Budget pads include Ferodo with number TAR527B at a price of about 400 rubles. Despite the price, they performed well both in tests and in real life. With godless use, they can withstand up to 40 thousand mileage, unless you run into a fake, of which there are quite a few. In the same price category there are Remsa , Dafmi , and there is inexpensive Nippon .
Budget brake pads FERODO TAR527B.
Lucas/TRW can hardly be called budget, they cost about 800 rubles. Catalog number GDB1446. They practically do not wear out the brake disc and last quite a long time. The best option for urban conditions. Good ATE pads and German Girling pads will cost about the same amount; they are supplied to Bavarian conveyors.
Lucas pads.
For 1,500 rubles you can buy Ferodo Premier series pads. Excellent quality, premium series of famous pads. In all indicators and characteristics they are ahead of the first two groups. Durable, low noise with a high coefficient of friction, which is not lost at temperatures of about 500 degrees.
Ferodo Premier premium pads.
The premium category includes Bosch , Textar and Delphi Hankook Frixa premium series pads and, of course, Brembo .
There is a choice, the most important thing is to determine in what conditions and how intensively the car is used . Then the pads will not disappoint with their quality and will not upset you with the high price. Strong brakes and smooth roads to everyone!
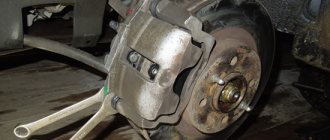
The process of replacing front brake pads on VAZ 2110, 2111, 2112
Replacing the front pads on cars of the “tenth” family is quite simple. To do this you need:
- Jack up the car and remove the front wheel.
- Bend the locking plate to gain access to the bolt and unscrew it, installing the keys “17” inside and “13” on top.
Bend the locking plate
Unscrew the lower mounting bolt
Removing the bolt and plate
Pry the caliper with a screwdriver to open it
Removing worn out brake pads
The work process takes about 30 minutes for one wheel and can be completed with minimal knowledge in the field of auto repair.
How to change the front ones with your own hands: video
Installation
Now we take a set of new friction linings out of the box and put them in place. We will need to install the cotter pin and drive arm pin support washer. The upper ends of the pads must fit exactly into the grooves of the piston. The slightest distortions are excluded. To bring the pads together, you need to move the piston to the center of the cylinder. To do this, you can use a mount. To finally bring the pads to the drum, press the brake pedal two or three times. Further assembly is carried out in reverse order. If the pads are difficult to get in, your handbrake cable may be too tight. It needs to be loosened and then adjusted. How to do it? We will talk about this below.
How to replace the rear ones
Replacing rear pads on VAZ-2110 series cars and their derivatives is somewhat more difficult, since they are of the drum type. Replacement work is carried out as follows:
- The rear of the car is jacked up, after which the wheel is removed.
- The guide pins located on the drum are unscrewed (if the pins become soured, it is possible to remove the drum along with the hub after unscrewing it).
The work is carried out with a 12 key
It is better to tap through a wooden spacer
Or using a mounting blade
Video: How to remove and install rear brake pads on a ten
Troubleshooting possible replacement problems
There are relatively few difficulties when replacing brake pads. As a rule, they are associated with souring of bolts due to rust. The drum elements most susceptible to corrosion are the mounting pins. In case of possible difficulties, the drum is removed along with the rear wheel hub, and when unscrewing the studs, it is allowed to use a penetrating lubricant such as WD-40. However, when working with brake mechanisms, lubricants should be used extremely carefully, avoiding their contact with the working surface of the pads or disc (in the case of the front wheels). Otherwise, the efficiency of the brakes can be significantly reduced, up to severe slipping between the working surfaces of the pad and the drum linings or the disc.
Dismantling
Before installing disc brakes, you need to dismantle the old rear brake mechanisms of the VAZ 2110.
This is done like this:
- Remove the wheel;
- Remove the brake drum;
- Remove the pads;
- Remove the hub from the wheel, having first unscrewed the brake pipe.
You should prepare for the fact that dismantling will not be easy. Not only do the brakes have the unpleasant tendency to stick during operation, but the bolts are also “welded” by corrosion. Therefore, it is advisable to treat the nuts and bolts themselves with a special agent (for example WD 40) so as not to tear off their edges.
It is important to plug the removed pipe with something so that brake fluid does not leak out and air is not sucked into the system. After that - knock down the hub
This works best if you attach a board or lath to the back of the support disk and hit it with a hammer, moving the blows: one from below, the other from above. This will prevent you from causing serious damage to the disk.
Front
Before starting work on replacing the front brake pads on a VAZ 2110, be sure to arm yourself with a set of tools, which includes:
- Hammer with short handle;
- A small sharp chisel;
- Two wrenches - socket and socket 13;
- Open-end wrench 17;
- Pliers;
- Small crowbar;
- Jack;
- Balloon wrench;
- New pads.
When everything is ready to go, you can begin the replacement process.
- Park the car in such a way that it cannot roll away. It is best to put some kind of stoppers under the wheels. It is advisable to use special devices rather than simple bricks.
- Loosen the bolts on the front wheels and lift the car to one side using a jack.
- Completely remove the wheel mounting bolts, remove it and place it under a raised part of the machine. This is a simple safety measure in case the jack accidentally comes off.
- Now we determine the location of the front brake pads on the VAZ 2110. The calipers are located in front of the brake disc, so to easily replace the left pad, turn the steering wheel all the way to the left, and vice versa.
- To make it easier for you to access the part, arm yourself with a thin chisel and a hammer. These tools will unlock the top bolt.
- Unscrew it with a 13 socket wrench, holding it on the other side of the caliper with a 17 socket wrench.
- There is no need to remove the pad yet, since the caliper is now in its extreme position. That is, the new part will not fit into place.
- Do not completely unscrew the bolt; use a crowbar and insert it between the body and the pad, pressing the caliper all the way.
- Once this is done, unscrew the top bolt all the way. This will move part of the caliper to the side, thereby providing access to the pad itself.
- Remove the old pads and put new ones in their place.
- During assembly, simply follow the reverse order of dismantling. Just remember the importance of bolt countering. The washer must be bent onto the edge of the fastener. At this point the replacement can be considered complete.
Device
Before disassembling, you need to know the structure of the braking system. The VAZ 2110 has hydraulic brakes with distributed circuits. One circuit is the front right and rear left mechanisms, the second circuit is diagonal.
The hydraulic drive includes a (also dual-circuit) pressure regulator. It helps regulate the brake fluid pressure on the rear brake systems. It is through the regulator that the fluid flows to both rear mechanisms.
Hydraulic brake circuit diagram
Adjustment is carried out through four chambers. Their design is as follows: two are connected to the main cylinder, and two, respectively, to both cylinders of the rear brakes.
For high-quality braking, it is necessary that the entire system works smoothly, there is correct adjustment and reliable mechanisms.
Parsing order
It is better to carry out the repair operation on an overpass (you can use an inspection hole), or just a flat area with a hard surface, because you will have to remove the rear wheels, naturally, first jacking up the car.
So:
- Remove the wheel and disk;
- We unscrew the guide bolts, of which there are 2, and remove the drum;
- A common problem is the drum sticking, so sometimes it is not so easy to remove it. The problem has long been solved by tapping a drum with a hammer (through a board);
- Using pliers, remove the tension spring;
- After this, a fixing guide spring holding the block;
- We remove the block from the support bar that is not connected to the handbrake rod. To do this, pull its free edge to the side and along the shield;
- Loosen the upper spring. To do this, you need to turn the block to the side until you can disconnect the spring;
- We do the same with the spring of the second pad;
- Remove the spacer bar;
- Disconnect the handbrake rod from the cable;
- We note to ourselves or sketch how the connection to the rod is made;
- Unhook the spring, remove the cotter pin, and disconnect the brake pad.
Using a "12" wrench, unscrew the two guide pins. Scroll the drum evenly, apply light blows to its end with a hammer or the edge of a mounting blade. Use a screwdriver to disconnect the end of the upper tension spring from the block. Remove the spring. Use a screwdriver to remove the guide spring from engagement with the block. Disconnect the lower tension spring, remove the front block. Remove the lower tension spring Remove the expansion bar Having disconnected the guide spring from the rear brake shoe, remove the manual shoe drive lever from the cable tip. To replace the shoe guide spring, remove it from the hole in the brake mechanism shield.
Thus, the disassembly process is completed.
Replacement
In principle, assembly occurs in the reverse order, although there are some peculiarities:
- To achieve normal brake fluid pressure, in the future, it is necessary to drive the piston of the brake cylinder inside;
- Connect the handbrake rod and the block, be sure to insert the cotter pin;
- Connect the guide spring to the brake pad;
- Connect the cable to the handbrake rod;
- Connect the upper spring to the installed new block;
- You need to rest the second shoe on the heel of the brake cylinder and pull its lower edge. The spring is tensioned, the bar can be inserted;
- All that remains is to insert the second block and place it in the slot of the bar;
- Using pliers, engage the spring with the second block;
- After making sure that the cable does not get affected by the movement of the parts that make up the brake mechanism, it is necessary to install the brake drum in place;
- All that remains is to tighten the guide bolts, then install the wheel.
We do the same with the other wheel.
Adjusting the pressure
First, you need to adjust the parking brake. This device always requires adjustment after repair work.
Secondly, the rear brakes are adjusted so that the system locks the rear wheels a little later than the front ones.
Knowing the structure of the brakes, loosen the bolt securing the pressure regulator, using a screwdriver, move the bracket of the regulator drive lever to create a gap of about 2 mm between the lever and its spring.
We carry out a test - we accelerate the car to 40 kilometers, then sharply brake. Someone observing the process from the outside notes whether the wheels are locked correctly. If the front wheels lock later than the rear ones, then the adjuster must be moved in the direction of decreasing the gap. Then test again until correct wheel locking is achieved.
- Benjamin
Rear
For clarity, we recommend watching a video about replacing the rear brake pads on a VAZ 2110. This will make it easier to complete the task and have a visual representation of each stage of repairing the brake system.
It will be good if you once installed disc elements . The beauty of them is that the process of replacing the rear pads will be similar to the front ones.
Required spare parts
Just 10 years ago, old pads were not replaced; they were glued on, linings were changed, or they were riveted. Today on the market you can easily purchase the entire mechanism. To replace, you need to prepare new pads. Experts believe that it is better to install replacement factory parts, article number 2110-3501080-60 (TIIR-260), 21100350180082 or 2110-3501080. There are other opinions. Some motorists believe that pads from well-known brands provide the best braking parameters on the VAZ 2110, 2111, 2112. These are parts from brands such as Brembo, ABS, Ferodo, TRW, Bosch, Optimal or Delphi.
Front
Before starting work on replacing the front brake pads on a VAZ 2110, be sure to arm yourself with a set of tools, which includes:
- Hammer with short handle;
- A small sharp chisel;
- Two wrenches - socket and socket 13;
- Open-end wrench 17;
- Pliers;
- Small crowbar;
- Jack;
- Balloon wrench;
- New pads.
When everything is ready to go, you can begin the replacement process.
- Park the car in such a way that it cannot roll away. It is best to put some kind of stoppers under the wheels. It is advisable to use special devices rather than simple bricks.
- Loosen the bolts on the front wheels and lift the car to one side using a jack.
- Completely remove the wheel mounting bolts, remove it and place it under a raised part of the machine. This is a simple safety measure in case the jack accidentally comes off.
- Now we determine the location of the front brake pads on the VAZ 2110. The calipers are located in front of the brake disc, so to easily replace the left pad, turn the steering wheel all the way to the left, and vice versa.
- To make it easier for you to access the part, arm yourself with a thin chisel and a hammer. These tools will unlock the top bolt.
- Unscrew it with a 13 socket wrench, holding it on the other side of the caliper with a 17 socket wrench.
- There is no need to remove the pad yet, since the caliper is now in its extreme position. That is, the new part will not fit into place.
- Do not completely unscrew the bolt; use a crowbar and insert it between the body and the pad, pressing the caliper all the way.
- Once this is done, unscrew the top bolt all the way. This will move part of the caliper to the side, thereby providing access to the pad itself.
- Remove the old pads and put new ones in their place.
- During assembly, simply follow the reverse order of dismantling. Just remember the importance of bolt countering. The washer must be bent onto the edge of the fastener. At this point the replacement can be considered complete.
Preparatory work
To speed up the replacement of brake pads on a VAZ 2110, it is necessary to prepare tools for work in advance.
So, you will need:
- New pads;
- Balloon wrench;
- Jack;
- Open-end wrenches “13 to 17”.
In addition, prepare the car itself for repair. First, fix the rear wheels (you can place special stops, bars or bricks).
After this, “tear off” the mounting bolts on the wheel, jack up the car and remove the wheels.
In this case, replacing the brake pads of the VAZ 2110 must be done one at a time, each time placing a wooden block under the beam (this will relieve the jack).
Rear
For clarity, we recommend watching a video about replacing the rear brake pads on a VAZ 2110. This will make it easier to complete the task and have a visual representation of each stage of repairing the brake system.
It will be good if you once installed disc elements . The beauty of them is that the process of replacing the rear pads will be similar to the front ones.
The situation is completely different for those who use factory drum braking systems. The work will have to be done delicately, but completely achievable on your own.
To get started, arm yourself with a set of tools, which includes:
- Balloon wrench;
- Jack;
- Pliers;
- Screwdriver;
- Hammer;
- Sharp chisel;
- Open-end, socket and ring wrench sizes 12, 13 and 17 - 3 sizes of each type of wrench.
Now we proceed directly to replacing the rear brake pads.
- Place chocks under the front wheels and remove the rear wheel.
- Unscrew the guides using a 12mm wrench.
- Guides are required for fixing to the axle shafts of the drums.
- It may be quite difficult to remove the drum from its place. This is where you will need a hammer and a wooden stand. Tap the inside of the drum. It is strongly not recommended to hit the drum directly with a metal hammer, as the mechanism may be damaged.
- If the drum cannot be removed even after hammering, treat the contact areas with the hub with WD40 or other penetrating lubricants.
- Then, arm yourself with pliers and remove the springs from the bottom and top of the pads.
- Remove the guide spring located in front.
- This will allow you to completely remove the block.
- When the bar is removed, you can begin to remove the spring from the rear pad.
- Well, now remove both parts of the block. When removing the back one, remember the hook. It comes from the handbrake cable.
- After removing the old block, put a new one in its place. Assembly is carried out in reverse order.
- But there is one caveat - the bushing must be removed from the drive arm, which will greatly facilitate the reassembly process. The upper part of the pads is inserted into the grooves located on the cylinder rod.
- Be prepared for the fact that certain difficulties may arise when installing a new element. The reason is the large output that remains as a result of the operation of old brake elements.
- Take two pry bars and squeeze the two blocks together to bring them as close as possible. At this point the replacement can be considered completed.
- At the last stage, mandatory bleeding of the brake system is carried out. Without it, not a single intervention in the design of car brakes can be done.
Order of Operations
Compared to repairing the front pair on the above VAZ models, working with the rear elements is more difficult, since they have a drum structure. To ensure ease of operation, you need to place the machine on a level floor and jack up the rear part.
- First the wheel is removed. Behind it there is access to the dirty drum. It is necessary to completely loosen the handbrake cable, otherwise there will be problems with dismantling.
- The studs on the brake drum are loosening. If they are heavily oxidized, you can remove the part together with the hub; to do this, you also need to unscrew it.
- First you need to try to remove the drum. If that doesn’t work, you can coat the acidified areas with a brake or aerosol compound. This will increase the repair time, but will make the work easier. Then tap the part with a hammer through a mounting blade or wooden block.
Attention! At this stage, you need to assess the safety of the brake drum, that is, understand whether it needs to be replaced or can continue to be used. If there are deep scratches, chips, cracks, or grooves on the body, then the old part must be replaced.
- After removal, you can assess the condition of the entire mechanism. If there are leaks, the cylinder will need to be repaired. It is necessary to remove dirt and check the integrity of the anthers. If everything is normal, you can continue replacing the pads.
- Use pliers to remove the cotter pin, remove the tip and disconnect the spring. It is important to save the puck. You will have to tinker with the spring; you may need a long screwdriver or a strong awl. The spacer bar is then removed and the parts are removed from the body.
- You need to clean the shield from dirt. The condition of the linings should be assessed. Manufacturers recommend replacing them with a thickness of one and a half millimeters, but practice shows that it is advisable to use new ones even with a thickness of 3 millimeters.
- The new part is now being installed. But first you need to completely clamp the cylinder piston, otherwise the drum simply will not install.
- New pads are mounted, the rod is pinned, the spring is installed with a screwdriver.
Care must be taken to ensure that the cable housing does not come into contact with moving parts. Important! When making repairs, you should act carefully; liquids and lubricants should not come into contact with the surfaces. Otherwise, the performance of the brakes will be reduced.
See the order of events in this video: