3-door 4-seater hatchback of a particularly small class with a transverse engine and front-wheel drive. Production of the Oka began in 1989 at the Volzhsky Automobile Plant. The engine is a two-cylinder with a displacement of 650 cc, in 1997 it was increased to 750 cc. volume. Currently, the production of Oka cars has been transferred to the Kama Automobile Plant, as well as the Serpukhov Automobile Plant. In addition to the basic models KamAZ-11113 and SeAZ-11113, manual control options are available for disabled people. Due to its very low price it is of interest for export.
This small car was developed at the Volga Automobile Plant at three factories - VAZ, KamAZ and SeAZ (in a disabled version). It has been produced at Volzhsky Automobile since 1990.
Distinctive features are modest overall dimensions, front-wheel drive, a two-cylinder engine with a displacement of 650 cubic centimeters (“half” of the “eight” engine), a universal three-door body with a folding rear seat.
Later, modification 11113 appeared with a more powerful 0.75 liter engine. In addition, an electric car has been developed on the basis of the Oka, which is assembled individually at the Pilot Industrial Production.
Several years ago, the Volga car was discontinued; now it is produced only by KamAZ and SeAZ, although power units (only 0.75 liters) are still produced only by VAZ.
Copyright © 2007-2020 All rights reserved. All trademarks are property of their respective owners.
Typical breakdowns of the VAZ-1111
In general, the Oka car is a fairly reliable and unpretentious model: the car has low fuel consumption, a high-quality chassis that is perfectly adapted to our roads. However, during operation, certain technical problems appear with enviable regularity in various systems and mechanisms of the machine. We will tell you in more detail about the most common breakdowns and malfunctions.
Starter problems
Probably all VAZ-1111 owners are familiar with the situation when you turn the ignition key, but the car does not react at all - the starter does not even try to turn the crankshaft. How to find out what the problem is and what to do in such a situation? First, check the battery terminals: are they securely clamped, is there any oxide on them. Perhaps the “plus” or “minus” just disappeared. Secondly, it is necessary to prevent jamming of the crankshaft. To do this, rotate the coolant pump (pump) or the generator shaft. If they do not rotate, you should contact a service station; such a problem cannot be fixed on site. Third, inspect the ignition switch and starter - perhaps one of the contacts has become disconnected and therefore no electric current is supplied. Fourth, if you hear a crackling sound under the hood when you turn the ignition key, then most likely the starter traction relay has burned out. It needs to be replaced. Fifth, it is not uncommon for the starter to make a lot of noise when operating. A possible cause is incorrect installation of the starter or a loose fastening. Tighten loose bolts or align the entire mechanism. Sixth, strong noise is also possible due to wear of the bearing bushings. In this case, they should be replaced.
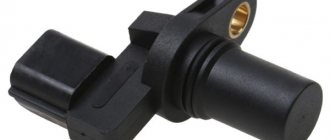
If the starter turns the crankshaft freely, but the engine still does not start, then do the following: • check the battery capacity, there may not be enough voltage. Most often in this case, a crash is heard. If so, recharge the battery or replace it; • check the Hall sensor using a voltmeter; if the required device is not at hand, then install a known-good sensor (experienced motorists recommend always carrying a spare Hall sensor with you); • the engine may not start due to a faulty switch. It cannot be repaired - it should be replaced immediately; • check that the ignition timing is set correctly; • make sure that the marks on the crankshaft and camshaft match.
If after this the car still does not start, then we proceed to checking the spark plugs: • unscrew the spark plugs and measure the gap (standard – 0.7-0.8 mm); • if there are spare working spark plugs, screw them in; it may be that the old ones have simply become unusable. Carburetor malfunctions
The second mechanism that may be causing the car to not start is the carburetor: • the needle valve may be stuck in the closed position - lightly tap the carburetor cover. Replace the faulty valve as soon as possible; • if there is no gasoline in the carburetor float chamber, then check the filters and pipes of the fuel system. They may be clogged or pinched; • in hot weather, especially after standing for a long time, gasoline may evaporate from the carburetor. Try manually pumping fuel; • the pump may be faulty - unscrew the fuel hose from the carburetor, clamp it with your finger and pump gasoline manually - a working pump will create noticeable pressure; • check the jets (main fuel and idle), maybe dirt has gotten into them; • tighten all carburetor bolts and fastenings.
Idle problems
There are situations when the VAZ-1111 engine does not run smoothly or often stalls. There are several reasons for such malfunctions: • the filter, fuel lines are clogged, or water has entered the gasoline - replace the filter or use a special fuel additive that dissolves water; • the idle speed may not be adjusted; • dirt has got into the jets (main and idle) - wash them with gasoline; if there is a thin needle, clean the channels; • if the engine does not start well or there are popping noises, then most likely there is insufficient fuel level in the float chamber. The float should be adjusted; • too high a fuel level in the carburetor can also cause the engine to run rough; • check the idle speed solenoid valve - often the terminal simply falls off due to vibration; • insufficient or excessive spark plug gap (recommended values – 0.7-0.8 mm). Low idle speed can be the result of the following malfunctions: low or excessively high fuel level in the float chamber; • insufficient engine warm-up; • loose jets; • clogged air and fuel filters. High speeds are most often due to incorrect idle speed adjustment, incorrectly set ignition angle, or a faulty throttle valve.
What carburetors are installed on Oka cars?
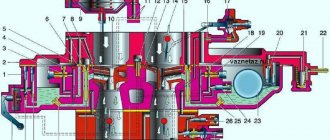
To equip the power units of Oka cars, carburetors produced by the Dimitrovgrad Automotive Unit are used; DAAZ carburetors of a special series are produced.
The DAAZ-1111 carburetor has some specific differences from similar devices . Thus, the float chamber of the mechanism is placed not along the carburetor, but across it. Thanks to this device, the carburetor mechanism can receive additional enrichment of the mixture immediately at the moment of sudden acceleration or braking.
Carburetor mechanism used to equip Oka cars
The DAAZ-1111 itself has a simplified design, as it contains a minimum number of electronic components. The main parts of the unit are:
engine starting device;
two internal combustion chambers;
float chamber and float.
All elements of the device are combined in a common housing cup. Protection from dirt, dust adhesion and unfavorable climatic conditions is provided by the housing cover.
For ease of operation and maintenance, the carburetor is divided into three parts:
The upper one, which consists of a cover with a flange, studs for fastening the air filter element and a fuel fitting.
The middle one is the carburetor body itself, which contains diffusers and a float chamber.
The lower one consists of throttle valves and drive rods.
The carburetor on the Oka performs its functions in exactly the same way as similar mechanisms installed on other vehicles. The fuel is supplied to the cavity of the float chamber, from where it is sent to the first or second chamber for air enrichment. Special sprayers crush gasoline droplets, so they easily mix with air and turn into an air-fuel mixture. This mixture enters the carburetor through diffusers and then into the engine.
Engine modifications
A few words about the engines of this car. Initially, the Oka was equipped with a unit with a working volume of only 650 cubic meters. cm. The basis for its creation was the installation from the VAZ-2108 with a 1.3-liter unit, but the number of cylinders was reduced to two (people often said that the Oka uses half of the G8 engine). The model with this engine received the factory index VAZ-1111.
A little later, another modification began to be produced - the VAZ-1113, whose volume was increased to 750 cubic meters. see, but in fact, they “halved” the 1.5-liter unit of the same “Eight”. Naturally, the engine power indicators also changed. For the 650 cc engine this figure was 29.3 liters. s., and for 0.75 liters - 33 liters. With.
Related link:
Installation and repair of Oka car starter
The VAZ-1113 modification was the most widespread, so we will consider it in the future. We also note that in the last years of production, the Oka was equipped with a 1.0-liter Chinese engine with 3 cylinders, but there were few of them.
Device repair
Self-repair of a carburetor device requires a clear identification of the malfunction, the ability to properly dismantle the mechanism and wash it. In addition, in case of severe wear, it may be necessary to replace one or another structural element.
If the car owner does not have practical experience in servicing cars, it is not recommended to take any actions independently.
Video: performing repair work on the DAAZ-1111 with your own hands
Malfunctions and their diagnosis
The specificity of the structure of the cavities of the DAAZ-1111 carburetor is that exhaust gases are not removed immediately, but gradually. That is, the engine unit is forced to experience some difficulties when operating at high speeds. In addition, the entire design of the DAAZ-1111 does not prevent lubricating fluids from entering the carburetor, which can quickly lead to its contamination.
If the ignition system operates without interruption, the following malfunctions may occur on the Oka carburetor:
instability of the engine unit (this may be due to carbon deposits on the fuel nozzles or malfunctions of the economizer);
incorrect operation of the gas pedal while driving (the nozzle holes are clogged);
deterioration in the dynamic qualities of the car occurs due to a critical decrease in the fuel level in the float chamber - the engine simply does not have enough fuel to fully operate at high speeds;
jerks during movement indicate that carbon deposits have formed in the float chamber, therefore the normal movement of fuel in the system is disrupted;
instability of revolutions indicates that the carburetor trigger needs to be adjusted.
However, the main sign that indicates a malfunction of the carburetor can be considered a sharp increase in fuel consumption.
Idle adjustment
Loss of idle speed, instability at low speeds, and frequent engine stops cause a lot of trouble for car owners; to eliminate such malfunctions, the carburetor has to be removed. But in some cases, you can do without disassembling/assembling the HRSG, limiting yourself to only purging.
Cleaning the XX channel can be done as follows:
- Having turned off the engine, removed the KVF and disconnected the supply wire, unscrew the XX solenoid valve;
- plugging the channel with your finger in the place where the electromagnetic valve (EMV) was turned out, start the internal combustion engine, apply gas, let the engine run for a while;
- we blow through the jet and the EMG itself, put the parts in place, connect the wiring;
- use the quantity screw to add a little speed and start the engine;
- if the cleaning was successful, the engine will already operate at idle, but at increased speed;
- Now, turning the quality screw, we adjust the fuel mixture, turn it until the engine begins to slow down somewhat and “fail”;
- slightly unscrewing the quality screw, having achieved stable functioning of the engine, use the quantity screw to set XX within the prescribed norm (850-900 rpm).
If purging does not help, then you need to remove the carburetor, disassemble it and thoroughly clean it. When fuel consumption is too high, you can experiment with XX, for example, buy an EMG jet of a smaller cross-section at a car store and install it instead of a standard part.
How to remove
The removal procedure is quite simple, but it is recommended to follow a clear action plan so as not to damage the internal components of the carburetor during the dismantling process. To successfully carry out the work, you will need only three tools:
open-end wrench 8;
open-end wrench 13;
Before starting work, you must disconnect the wire from the negative terminal of the battery. This action will protect you from possible electric shock.
The procedure for dismantling the DAAZ-1111 carburetor is as follows:
It will be necessary to remove the air filter box. It is located in such a way that it prevents free access to the carburetor.
After this, you will need to loosen the bolted connection securing the damper drive rod to the lever. You will also have to slightly unscrew the bolt that secures the damper drive to the bracket.
After loosening, the bolts can be easily unscrewed - you need to disconnect the drive rod from all connections.
Using a screwdriver, disconnect the intermediate rod end from the lever.
Next, you need to disconnect the crankcase ventilation hose, which is connected to the fitting.
Afterwards, you can safely remove the wiring from the economizer valve.
The next step is to disconnect the vacuum regulator hose.
Next, you will need to loosen the clamp on the fuel supply pipe and remove the hose. Some fuel may spill out.
After which you can begin the procedure of removing the carburetor body. To do this, you will need to unscrew the forced idle economizer valve; behind them there are two nuts that need to be unscrewed.
After removing the filter element bracket, you can unscrew the two nuts that are located on the front side of the carburetor.
The device is carefully removed from the studs.
The main thing is to follow the exact procedure
Immediately after dismantling the carburetor, it is recommended to block the resulting hole in the intake manifold with a lint-free cloth. This measure is necessary to ensure that dust and dirt do not get inside.
Cleaning carburetor elements from carbon deposits and dirt
It is advisable to have the carburetor cleaned both outside and inside at a service station. However, if the car owner has experience in independently servicing his car, then it is allowed to clean the carburetor from carbon deposits with his own hands. However, you should be as careful as possible, since some parts of the mechanism require special care.
Installing a carburetor on the Oka
Reinstalling the carburetor mechanism on a vehicle after cleaning and repair can be a labor-intensive procedure. In order for the power unit to operate in normal mode, it is necessary to correctly connect all the components of the carburetor and securely fix them.
Getting started with installing the DAAZ-1111 is based on installing the gasket. The element is put on the studs and pressed tightly against the surface of the intake manifold. After which the carburetor itself is installed in its place:
First, screw in the two fastening nuts on the front side.
The other two nuts are tightened on the back side, after which the economizer valve can be returned to its previous position.
The first step is to connect the pipe that supplies fuel to the mechanism. It is recommended to use a new clamp to secure it.
Next, connect the vacuum regulator hose.
The connector that comes from the engine is connected to the forced idle economizer valve. Before connecting, it is advisable to make sure that the connector is clean and free of deformations.
The crankcase ventilation hose is connected to the fitting.
The tip of the intermediate rod of the lever is screwed to the corresponding place on the carburetor.
The drive rod is returned to its place and connected to the lines.
Next, it is recommended to install the air filter in place and check the operation of the system. If gasoline leaks out at the joints, you need to carefully tighten them again.
It is recommended to carry out all work in natural light or good artificial light
What can be repaired with the engine removed?
The described method is one of the easiest to perform, since it does not require any special equipment.
Now let’s go over why you should remove the internal combustion engine from a car at all, and what kind of repairs can be done. As already noted, dismantling is carried out in the event of a replacement of the power plant, as well as problems with the crankshaft and CPG.
Related link:
Electrical equipment Oka
One of the frequently performed works is replacing the rings on the Oka. This operation is difficult because it requires almost complete disassembly of the engine to remove the pistons. And it is naturally easier to disassemble it if it is installed on a table or floor, and you can easily turn it as convenient.
Also, all work with the crankshaft is carried out on the removed engine, because removing and installing the crankshaft without dismantling the gearbox is impossible, and while the installation is on the car, the gearbox is practically impossible to remove.
But we note that removing the engine to carry out work on the cylinder-piston group and the crankshaft is a recommendation from the manufacturer. If the matter concerns only the cylinder-piston group (for example, replacement of piston rings or pistons is required) and grooving of the cylinders is not expected, then all work can be performed without removing the engine.
Let's look at how to replace the same rings on an Oka engine without removing it from the car. The tools you will need are the same as those listed above, but it is best to perform the work in the inspection hole.