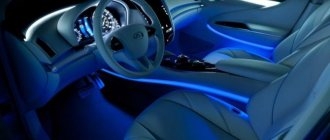
Interior lighting plays an important role in the dark: it creates comfortable conditions for the driver, makes it possible to better see the instruments, gear shift knob, etc. The interior lighting of the Priora does not always satisfy car enthusiasts. The article discusses types of lighting and provides instructions on how to install lampshades.
Features of interior lighting on VAZ cars
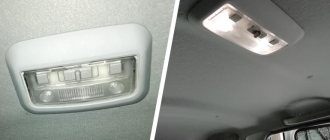
In the simplest configuration of the Lada Priora, there is only one interior lighting fixture. It is located on the ceiling at the front. They are equipped with C10W bulbs, which emit a soft but faint yellow light. Priora owners are not satisfied with such light, so they install an improved unit from the “Lux” version model.
Two lighting fixtures are fully equipped in Priora and Kalina. One is located near the driver. The second is located in the ceiling above the rear seats. Although an LED lamp is used, it shines no worse than light sources installed near the driver.
Additional cabin lighting
Responsibility for faulty lighting devices
Traffic rules prohibit operating a vehicle with faulty lighting devices. This is due to safety considerations for all road users. It is also prohibited to use vehicles that use lamps that do not meet the design requirements for the operation of the vehicle.
It is important to remember that you are not the only participant driving on the highway, and it is highly not recommended to install more powerful and brighter lamps in the headlights of your car. By this action you endanger traffic participants moving in the opposite direction.
All changes in the design of the vehicle or non-working lighting devices entail administrative penalties.
Instructions for installing new lampshades
To replace lighting fixtures in both the Priora and Kalina interiors, no special knowledge is required, since the procedure is simple.
Photo gallery “Step-by-step installation of lighting shades”
To replace the light bulb, follow these steps:
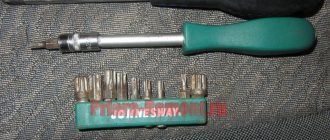
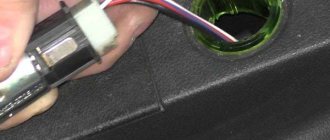
- First you need to remove the protective cover. This can be done by prying it with a screwdriver from the mounting side and lightly pressing the clip. Now the cover can be easily removed from the ceiling.
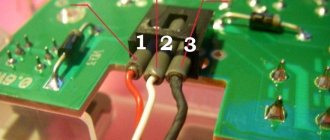
- Next you need to disconnect the power wires.
- Having disconnected the old lamp, a new element is installed in its place.
- Assembly is carried out in reverse order.
Installing an additional “Lux” lighting fixture will require care and time. First of all, you need to purchase a new block, which will be placed above the rear sofa.
Lighting connection diagram
The installation procedure consists of the following steps:
- First, you need to apply markings to the ceiling, deciding on the place where the rear lamp will be located.
- Then, according to the markings, a hole is cut in the ceiling covering.
- Next, you need to stretch the power wire from the front light between the roof and the ceiling covering.
- At the next stage, the unit to be installed is connected.
- To ensure that the lid fits tightly to the ceiling, you can cut a frame from some kind of rubber seal.
In the Priora “Norma” configuration, it is recommended to change the front unit installed from the factory. Replacing it is easy, since the characteristics of the devices are the same.
The replacement scheme is similar to replacing a light bulb: a new element will be installed instead of the old light source. When installing LEDs, keep in mind that they differ in brightness color. For the rear light, it is better to make the LED backlight brighter, and put medium-brightness LEDs in front (the author of the video is Repair and Tuning).
After replacing the lighting unit of the Priora Norma configuration with a higher-quality luxury one, the driver becomes more comfortable in the cabin.
Simplicity of installation and low time costs make it possible to replace the standard lighting unit with a more powerful one, or equip the cabin with an additional light source. At the same time, you do not need to have in-depth knowledge of electrical engineering; even a novice driver can perform the replacement.
Price issue
The block (diode) costs 460 rubles. The front Lux package costs 535 rubles.
There are two options to improve lighting by replacing it with LED:
- Replacing a conventional lamp with an LED one. Price 50 rub.
- Replacing a lighting lamp with an LED module - 350 rubles.
To replace the unit you do not need to remove it, just remove the glass.
Turn signal repeaters
Repeaters are installed in the front fender, with the exception of luxury trim levels, where the repeater is installed in the side rear view mirror.
| Installation location | Lamp type | Power, W) | Number in photo |
| Turn signal | W5W | 5 | 8 |
To remove the lamp in the turn signal, you need to pull it towards you and remove it from the wing. Then turn the socket counterclockwise and remove the lamp.
Video “Installing the tail light”
This video demonstrates how to install a rear light in the interior of a Lada Kalina with your own hands (the author of the video is NBI12345).
The popular Russian car Lada Priora is available in 4 body types: sedan (VAZ-2170), station wagon (VAZ-2171), hatchback (VAZ-2172), coupe (VAZ-2173) and in several trim levels, which undoubtedly makes this car convenient for different people. Lada Priora replaced the popular and beloved Lada of the 10th family and was created for our Russian roads and our harsh climate. Safety, efficiency, ease of maintenance, suitability for our fuel - the designers took care of all this.
Lada Priora is equipped with 8-valve (81 hp) and 16-valve (98 hp) engines, with a declared service life of 200,000 km. The new engines have a lightweight connecting rod and piston group, which increases engine power by 10%. A number of trim levels are equipped with tuning options as standard: air conditioning with climate control, light and rain sensor, parking sensors, heated front seats, electric windows on all doors, electric and heated mirrors.
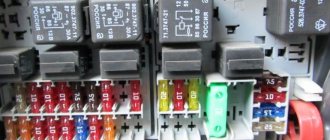
Priora fuse box diagram
| Fuse no. | Current strength, A | "Standard" and "Norm" | “Norma” with air conditioning and “luxury” |
| F1 | 25 | Engine cooling radiator fan | Reserve |
| F2 | 25 | Heated rear window | Mounting block, rear window heating relay (contacts). Electrical package controller, contact “10” of XP2 block. Rear window heating element. |
| F3 | 10 | Right headlight, high beam | Right headlight, high beam lamp. Instrument cluster, headlight high beam indicator. |
| F4 | 10 | Left headlight, high beam | |
| F5 | 10 | Sound signal | Mounting block, horn relay. Sound signal. |
| F6 | 7.5 | Left headlight, low beam | |
| F7 | 7.5 | Right headlight, low beam | |
| F8 | 10 | Alarm signal | Mounting block, alarm relay. Alarm sound. |
| F9 | 25 | Priora heater fuse | Reserve |
| F10 | 7.5/10* | Interior lighting, instrument panels, brake light | Instrument cluster, pin “20”. Brake light switch. Brake light bulbs. Interior lighting unit. Interior lighting. The door sill light on the right front door. Additional brake signal. |
| F11 | 10/20* | Wiper | Mounting block, high speed windshield wiper relay. Switch for cleaners and washers, contact “53a”. Wiper and washer switch, contact “53ah”. Heated rear window switch. Mounting block, rear window heating relay (winding). Windshield wiper motor. Rear window wiper motor (2171,2172). Windshield washer motor. Rear window washer motor (2171,2172). Airbag control unit, pin “25”. |
| F12 | 20/10* | Terminal 15 devices | Instrument cluster, pin “21”. Electrical package controller, contact “9” of block X2. Electromechanical power steering control unit, contact “1” of block X2. Reversing light switch. Reversing lamps. Parking system control unit, contacts “11” and “14”. |
| F13 | 15 | Cigarette lighter fuse Priora | |
| F14 | 5 | Left headlight, parking light, license plate light, trunk light | Side light lamps (left side) Instrument cluster, main light indicator License plate lights Trunk light Electrical package controller, pin “12” of block X2 |
| F15 | 5 | Right headlight, parking light | Side light lamps (right side) Glove compartment lamp |
| F16 | 10 | Terminal 15 ABS | Hydraulic unit, contact "18" |
| F17 | 10 | Left fog lamp | |
| F18 | 10 | Right fog lamp | |
| F19 | 15 | Seat heating | Seat heating switch, contact "1" Front seat heaters |
| F20 | 5/10* | Immobilizer control unit | Recirculation switch (switch on) Mounting block, relay for low beam headlights and parking lights (automatic lighting control system) Heater electric fan relay Automatic lighting control switch Windshield wiper and external lighting control unit, contacts “3”, “11” Automatic climate control system controller installation, pin “1” Automatic window cleaning system sensor (rain sensor), pin “1” |
| F21 | 7.5/5* | Rear fog lights | Light switch, contact "30" Diagnostic block, contact "16" Clock Automatic climate control system controller, contact "14" |
| F22 | -/20* | Reserve | Windshield wiper motor (automatic) Mounting block, windshield wiper relay and windshield wiper high speed relay, (contacts) |
| F23 | -/7.5* | Reserve | Windshield wipers and external lighting control unit, pin “20” |
| F24-F30 | Reserve | ||
| F31 | 30 | Electrical package control unit | Electrical package controller, terminal “2” of block X1 Electrical package controller, terminal “3” of block X1 Driver’s door module, pin “6” Threshold light of the left front door |
| F32 | Reserve | ||
Additional interior lighting for Priora
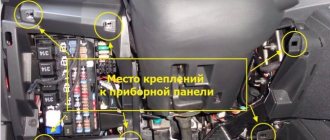
| The lighting of the VAZ 2170 differs from its predecessor the VAZ 2110; for example, in the Priora’s interior there is no central lamp. As a result, rear passengers often lack light. There are at least two ways to correct a design error. |
Installation of the central lamp in Lada Priora
When the frame and lampshade are found, we proceed to install it. To do this, feel for the edge behind the ceiling upholstery and make a small hole. We stretch the wiring and then fix the lamp frame to the ceiling. If you cannot find holes for installing the lampshade, then it is better to remove the ceiling upholstery.
Another example is when a lampshade from Chevrolet Lanos was chosen as a light source. It is attached to the ceiling upholstery itself (screwed). For this, a couple of metal plates with holes drilled in them were useful.
Additional interior lighting of the Priora in the rear pillar trims
Then unclip the clips and remove the plastic covers on the back of the struts. Cut holes in them for the lampshades, and install them.
Connecting additional interior lighting of the VAZ 2170
It is important that when you lay wires under the headliner, be sure to wrap it in modelin (anti-creaking) to prevent the appearance of new crickets in the cabin.
By the way, upgrading the interior lighting is not limited to the above methods; try installing the lighting in the ceiling handles, as in Grant. And yet, installing a standard Priora lamp in the center of the ceiling will eliminate the problem of sagging upholstery.
Similar materials
Location of Priora fuses under the hood
- F1 (30 A) – power supply fuse for the electronic engine control system (ECM);
- F2 (60 A) – fuse for the power supply circuit of the engine cooling system fan (power circuit), additional relay (ignition relay), rear window heating, electrical package controller;
- F3 (60 A) – fuse for the power supply circuit of the electric fan of the engine cooling system (relay control circuit), sound signal, alarm signal, ignition switch, instrument cluster, interior lighting, brake light, cigarette lighter;
- F4, F6 (60 A) – generator power circuit fuses;
- F5 (50 A) – fuse for the power supply circuit of the electromechanical power steering
Relay and fuse box for Halla air conditioner
- right electric fan power supply fuse (30 A);
- fuse for the power supply circuit of the left electric fan (30 A).
- right electric fan relay;
- additional relay (sequential activation of left and right electric fans);
- left electric fan relay;
- heater fan power supply fuse (40 A);
- compressor power supply fuse (15 A);
- heater fan relay;
- compressor relay.
Panasonic air conditioner relay and fuse box
- Heater fan maximum speed
- Right fan
- Fan sequential relay (low speed)
- Left fan
- Left fan fuse (low speed)
- Right fan
- Heater fan
- Compressor
- Heater fan
- Compressor
Installing floor (leg) lighting in Priora
Installing footlights in Lada Priora
Floor lighting for the driver and front passenger: the LED strip can be secured using either double-sided tape or plastic ties directly above the pedals. We place the second tape under the glove compartment:
Lighting for rear passengers: We will place the LED strip under the front seats. The most convenient way to secure the backlight is to use a corner from the cable channel, to which we glue the prepared tape. We attach the corner itself to the air ducts with self-tapping screws. It is not at all necessary to remove the seats for this; it is enough to move them as far forward as possible.
Connecting the interior lighting of the VAZ 2170
By the way, do you want to make the Priora’s interior more diverse? Use an RGB controller for the LED strip; it will allow you to change the color of the interior lighting:
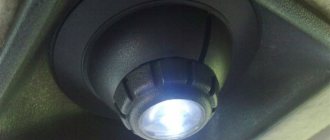
To illuminate not only the passengers' feet, it is recommended to install an additional lighting lamp on the ceiling.
Similar materials
Bright corner - LEDs • Interior lamps in Lada Priora
Let's shine a light on our favorite pepelats
Interior lamps in Lada Priora
RZ296 » Aug 28, 2011, 00:02
The car is a Lada Priora in the Lux configuration - two LED lamps, in the front there are two spot lights with 12 mm LEDs and one common with 3 piranhas, in the back there are only 2 spot lights. The spectrum, it should be noted, was neutral, without noticeable blue. The diodes worked in, presumably, prohibitive modes - 30 mA for the point ones and it’s unclear how much for the piranhas (two 33 Ohm resistors, it’s unclear what the drop on the diodes is, I didn’t measure it. First one of the piranhas died - the lamp blinked. Temporarily installed 4 segments LED strip on warm white diodes. Then, with a difference of 2 weeks, both rear diodes blinked. I ordered 3HP2C, removed the shades and began to remodel. From the dealextrimov ceiling lamp with 7 one-watts, embedded in a table lamp with the dismantling of the optics, 7 collimators with a diameter of 20 mm remained. I really didn’t want to glue the collimators with the front plane, but there was no other option, so I did the following: I ground off the tubes of the lamp housing protruding inward at an angle (the original diodes stood at an angle on plastic stands on the boards). In the photo, the left one has already been sawed off. I mounted 3 on the boards radiator made of AMCP sheet 2 mm thick: On the boards, the lead-out elements in the radiator area were raised above the boards so that the leads did not reach the back surface of the board. I glued the diodes onto the radiators with hot glue - one for the spot ones and 2 for the central ones (I also decided to add a central light at the back): I replaced the quenching resistors - with 2 point resistors connected in series with 47 Ohms each, and with central ones - two in parallel with 100 Ohms. The current through the diodes is about 100 mA, you don’t need much more, and there won’t be any problems due to the small area of the radiators. I did not install stabilizers due to the fact that smooth attenuation of light is implemented as standard, and with such a current reserve they are not needed. Installation using conventional MGTF. On the boards near the elements there is not flux, but remnants of the urethane varnish that was used to coat the board at the factory. A disgusting substance in terms of repair. I connected the rear light to the battery from a screwdriver and locked myself in the bathroom with it: I was happy to note that gluing the collimators to the body had virtually no effect on focusing. Now how it shines in the car: The result is excellent, nothing could be asked for better. The last photo shows an example of how the front passenger's spotlight shines. The footwells of the driver and front passenger are illuminated using strips of warm white diodes, switched on in parallel with the corresponding spotlights. RZ296 Flashlight Messages: 26 Registered: Aug 14, 2011, 07:32 pm From: Moscow region, Klimovsk Thanked: 0 times. Thanked: 3 times.