In order to better understand the operation of car systems, as well as promptly eliminate any problems that may arise during the operation of the Lada Priora, this information may be useful to you. After all, by understanding the basic car error codes, you can make your car life much easier.
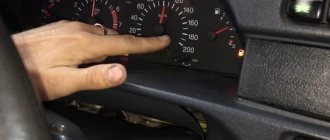
To test panel error codes on a car, you need to press the “reset daily mileage” button, without releasing it, you need to turn on the ignition. After which, all familiar positions will be displayed on the indicator, and the speedometer, tachometer, fuel level indicator and other instruments will show values on their scale from minimum to maximum and back. This is an independent test, as well as a visual check of the instruments and indicator.
What does error 4 mean on Lada Priora and how to fix it
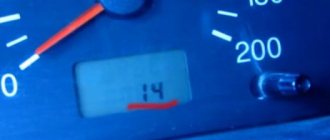
So, when self-diagnosis is carried out and error 4 lights up on the panel, then most likely the car has a problem with the coolant temperature sensor.
Many people immediately ask the question “Which sensor should I change?”, but first you need to find out what exactly the problem is. Note that in order to start self-diagnosis, you need to press and hold the daily mileage reset button + turn on the ignition. After a few seconds, the on-board computer displays an error code. It is noteworthy that codes in different firmware versions may indicate different problems. Therefore, we recommend that you stock up on an up-to-date reference book. In our case, the software version is 1.0. How other error codes are deciphered:
- code 2 indicates that there is high voltage in the on-board network;
- code 3 indicates a fuel level sensor error;
- error number 5 indicates incorrect operation of the outside temperature sensor;
- code 6 is engine overheating;
- code 8 – problems with the brake system;
- error number 9 indicates that the battery is discharged;
- P0441 – high or low air flow through the valve;
- P0443 – faulty canister purge valve control circuit;
- P0480 – failure of the cooling fan relay No. 1;
- P0481 – failure of the cooling fan relay No. 2;
- P0500 – incorrect signal from the vehicle speed sensor;
- P0503 – intermittent car speed sensor signal;
- P0506 – low idle speed if the idle speed control is blocked;
- P0507 – high idle speed when the idle speed control is blocked.
You can get acquainted with all error codes in more detail if you purchase a special book or on the official website of the manufacturer.
Deciphering faults in the fuel and air systems
- P0030 - the oxygen sensor heater wire to the exhaust gas converter has broken;
- P0031 - the same electrical wire has shorted to ground;
- P0032 - the same wire has shorted to the on-board network (BS);
- P0036 - the wiring of the oxygen sensor heater is broken, after the converter;
- P0037 - the same wiring has shorted to ground;
- P0038 - it has shorted to BS;
- P0102 - weak signal in the mass air flow sensor network;
- P0103 - very strong signal in the network of this device;
- P0112 - weak signal in the air temperature sensor network;
- P0113 - very strong signal in the network of the same device;
- P0116 - antifreeze temperature sensor signal is out of operating range;
- P0117 - poor signal from the antifreeze temperature sensor network;
- P0118 - very strong signal from the antifreeze temperature sensor;
P0122 - poor signal in the throttle position sensor circuit;
- P0123 - very strong signal in the same circuit;
- P0130 - the oxygen sensor before the converter does not work;
- P0131 - weak outgoing signal on the network of this device;
- P0132 - signal too strong on the same network;
- P0133 - slow response to changes in mixture quality in the network of the same device;
- P0134 - oxygen sensor circuit inactive;
- P0136 - the oxygen sensor after the converter is broken;
- P0137 - poor signal in the circuit of this device;
- P0138 - signal too strong in the same circuit;
- P0140 - the same sensor circuit is inactive;
- P0141 - the oxygen sensor heater after the converter is broken;
- P0171 - there is a lot of air in the fuel mixture;
- P0172 - there is a lot of gasoline in the fuel mixture;
- P0201 - injector wire No. 1 is broken;
- P0202 - injector wire No. 2 is broken;
- P0203 - injector wire No. 3 is broken;
- P0204 - injector wire No. 4 is broken;
- P0217 - engine overheated;
- P0230 - failure in the electric fuel pump relay network;
How to fix the problem
To resolve the error, do the following:
- Check the sensor for functionality. If it breaks, you simply need to replace it.
- Make sure there is no plaque on the contact. If it is there, you need to clean it.
- Check the operation of the on-board circuit and make sure that it has contact.
- A random error can only be corrected by flashing the on-board computer, but to do this you need to go to the nearest service station.
So, you can solve this problem yourself, however, as practice shows, this does not always work out. It is worth noting that this code often appears in winter, if the car has been standing outside for a long time and not in the garage. It is noteworthy that it does not matter which engine is installed - 16 valves or 8 valves.
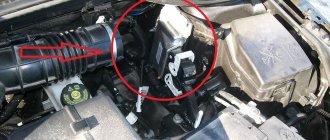
What to do if the radiator fan does not work?
My car's engine does not turn on from the radiator. Help me to understand! (Kairat)
As we understand, your problem is an inoperative radiator fan. If this is the case, then you first need to diagnose the expansion tank cap - make sure that its valve is working; if not, then the cap must be replaced. If this does not help, then check the functionality of the thermostat (if the lower radiator line is cold, then the thermostat must be replaced).
If these steps do not help, check the condition of the fuse. Find the mounting block in your car and open its cover - on its back there should be an image diagram with the purpose of all safety elements. If all the parts are intact, then you need to check the fan itself - it is connected directly to the battery, if it turns on when connected, this means that it is operational.
If your car has a controller for turning on the ventilation device, then it is diagnosed as follows:
- On carburetor engines, you need to close the contacts of the regulator located in the radiator itself. If the fan is activated when closed, this indicates that the regulator is working.
- On injection engines, the connector from the controller located near the thermostat is disconnected. Since the device is controlled by the control unit, it should be automatically activated in emergency mode. If this is the case, then this means that the regulator is not working (the author of the video is the Dmitriy Sherstniev channel).
Another possible reason could be an open circuit. Conduct diagnostics of all contacts, and also try to find a break; for this you will need a diagram, which should be in the service book.
Error 4 on Priora
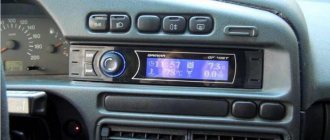
On the Priora, like on many other cars, there is a display on the panel behind the steering wheel that displays the status of internal systems. When an error occurs, its number immediately appears on the screen. And there are a lot of these numbers, to decipher them you will need to read the instructions or article.
You often see error 4 there, which means problems with the coolant temperature sensor. What exactly is faulty there is up to the owner to figure out. For this purpose, additional testing and visual diagnostics are carried out.
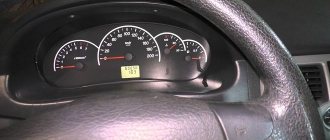
Main indicators
The Priora dashboard contains twenty-four visual elements. When the ignition is turned on, all warning lights on the dashboard turn on briefly. Thus, the on-board computer (in the future, possibly BC) checks their serviceability. This is not a mistake, as some novice car enthusiasts think.
On the Priora shield, from left to right, there are four largest elements in the form of graduated semicircles.
- The first scale is the tachometer scale, the purpose of which is to measure the engine speed. The values are shown in two colors: white (normal) and red (dangerous). If the instrument needle falls into the last gap, then the Priora’s engine is in danger.
- The second scale is a visualization of the car's speed - the speedometer.
- The third graduated semicircle indicates the current antifreeze temperature. If the indicator needle hits the area with red numbers, the Priora should be stopped in order to avoid boiling in the cooling system.
- The fourth semicircular scale of the Priora dashboard reflects the fuel level in the tank. When the arrow hits the area with red scale divisions, the yellow indicator lights up. It is located slightly lower and is depicted in the form of a gas station. This means that Priora has been transferred to the reserve level of gasoline consumption.
There are two green arrows to the left and right of the speed indicator. They light up when the corresponding turn is engaged or during an emergency stop.
The following indicators are located at the bottom of the panel from left to right.
- Check signal, or Check Engine. This indicator lights up when a breakdown occurs in the engine and displays Priora errors on the instrument panel.
- Lights up when there is a problem with the clutch system.
- Signals that a certain airbag is disabled.
- Indicates that an accident has occurred with the brake system.
- If the passenger's seat belts are not worn, this indicator will illuminate.
- BC screen.
- It beeps and lights up if there is a malfunction in the immobilizer system.
- Airbag failure indicator.
- Indicator of the operation of external lighting devices: low beam or dimensions.
- Lights up when the high beams are turned on.
- Failure indicator in the electric amplifier.
- Alarm when the emergency lights are on.
- Reset button.
Why does it occur: reasons
The reason for the appearance of the number on the display is rarely clear without a detailed analysis of the issue; there is only general information. But, according to the experts, the options are as follows:
- The greatest probability is due to a malfunction of the coolant temperature sensor.
- Further in descending order - the circuit with this sensor could break.
- Due to external influences (accident, shock, etc.), the control unit system sometimes malfunctions and generates an error.
- Plaque on the device may contribute to loss of contact.
Such reasons will not be a serious stumbling block to free travel, and will not make your wallet noticeably empty. Each of the points is completely solvable, both independently and at a service station, you just need to allocate time and a little effort for this.
p1558
This error usually occurs on cars with a 127 engine. It is associated with the throttle valve, the quality of which in this power plant leaves much to be desired. P1558 does not interfere with normal engine operation, but you can still try to fix it. Some people solve the problem by flashing it, but we offer a simpler method.
Remove the throttle valve, and then remove the cover - this can be done using a hexagon. We find a plastic gear inside - this is the working part. Lubricate the gear thoroughly and reassemble in reverse order. Most likely, error p1558 will disappear after these manipulations.
How to check on the on-board computer
To carry out a check on the on-board computer, you need to insert the ignition key and simultaneously hold down the button that resets the daily mileage. When the correct actions are performed, all elements on the LCD will light up. And the arrows (speedometer, tachometer, etc.) will begin to quickly and continuously move from zero to the maximum indicator and back. Already here you can see how good the LCD indicator and sensors are.
Next, you can use one of the buttons that switches the functions of the bookmaker. As a result, a set of numbers will appear on the display indicating the version of the program currently installed. Now you need to apply pressure on the key again, then the error codes that are available in this car will appear there.
If you need to reset information from the LCD, it is best to press the button for three seconds, which resets information about mileage during the day. Now it's time to return the light to the sensors and use one of the BC keys. Due to the lack of impact on the system, after about half a minute the instrument panel will return to working condition.
The process of diagnosing a car using a tester or a connected computer
Much more accurate and reliable data when checking a car for malfunctions can be obtained if you use separately connected equipment. But the introduction of such tools and devices gives encrypted readings, therefore, in order to correctly understand and find all the faults in the car, you need to decrypt the data received from diagnostic devices.
Of course, manufacturers could have done things easier for Russian-speaking car enthusiasts. It would be possible to write “replace the canister valve” on the device screen after diagnostics, but instead, only a code in the form of p0441 can be found on the display, and code p0130 will appear only due to problems with the oxygen sensor.
Troubleshooting
There are several methods for troubleshooting the problem, but together they constitute a complete diagnosis of the car for faults in the coolant temperature sensor. After all, error number 4 gives a signal about exactly this. You can fix it like this:
- First we check the sensor to see how well it functions. It copes with the assigned tasks, there are no complaints about the speed and clarity of data transmission - let's move on to the next point. Does not respond to signals - most likely, it is completely broken and requires replacement.
- This is followed by checking for contact and absence of plaque. If a problematic connection is identified, the sensor will have to be replaced with a new one. And if the surface is covered with plaque, it is necessary to thoroughly clean the seat.
- Now you can move on to the on-board circuit, make sure that there is contact there.
- The remaining dilemmas usually lie in electronics, for this reason the car is taken to a specialist who can adjust the device. Usually in such a situation the ECU is re-flashed, which means that errors are prudently reset.
The issue of eliminating error 4 can be solved on your own, but not in one hundred percent of cases. Sometimes you have to turn to specialists to perform work that requires specific knowledge and skills. But it would be right to try to prevent a breakdown, since most often it occurs after a long period of parking in the cold in an open area (that is, not in a garage or covered parking).
p0504
Also, many owners of a Lada Priora with 16 valves have questions about the appearance of error p0504. She tells the owner that there is a malfunction in the brake pedal sensor. To find out the exact reason for the appearance of p0504, you need to remove the sensor and disassemble it. Pay attention to its springs, one of them could burst - replace the damaged part.
see also
Another reason is copper contacts, which can burn. Inspect them and clean them if necessary. Sometimes error p0504 pops up due to the incorrect position of the brake pedal sensor on Priora 16. Twist it and check whether codes p0504 remain on the screen or not.
conclusions
Finding and eliminating the cause of error 4 on the Lada Kalina turned out to be quite easy. Although deciphering error codes requires special knowledge, the necessary information can be found in this article.
Quite often, especially in the cold season, owners of a Lada Kalina car are faced with the fact that the car signals that error 4 has occurred. There is no need to immediately take it for a diagnostic examination at a car dealership, since it is quite possible to fix it yourself. The Lada Kalina car has an on-board computer, which is equipped with it during assembly. This is a necessary element with a variety of functionality, which is not only convenient to use, but also allows you to self-diagnose all errors that may occur in the car. In today's article we will talk in detail about error 4: why does it occur, what does it lead to, and how to eliminate it? We will also tell you how to check for other possible faults using the car’s on-board computer.
Comments
Guests cannot leave comments on the site, please log in.
Products for LADA at the best price
A selection of accessories for LADA from AliExpress
The coolant temperature sensor (CTS) is not as simple as it might seem at first glance. Many people think that it is only responsible for turning the cooling fan on/off and displaying the coolant temperature on the dashboard. Therefore, if the engine malfunctions, they do not pay special attention to it. That is why I decided to write this article and talk about all the signs of a faulty DTOZH.
And so, the first sign is poor engine starting when cold . How this happens is that the engine starts and immediately stalls. More or less works only with gas. After warming up this problem goes away. Why might this happen? The coolant temperature sensor may provide incorrect readings to the controller. For example, that the engine is already warmed up (temperature 90+ degrees). As you know, starting a cold engine requires more fuel than starting a hot one. And since the ECU “thinks” that the engine is hot, it gives it little fuel. This is what causes poor cold starting.
The second sign is poor engine starting when hot . Here everything is exactly the opposite. DTOZH may always submit underestimated readings, i.e. “tell” the controller that the engine is cold. This is normal for a cold start, but bad for a hot start. A hot engine will simply fill with gasoline. Here, by the way, error P0172 may appear - rich mixture. Check the spark plugs - they should be blackened.
The third sign is increased fuel consumption . This is a consequence that follows from the 2nd sign. If the engine is filled with gasoline, then consumption will naturally increase.
Fourth - random activation of the cooling fan . Those. The engine seems to be working normally, only sometimes the fan will turn on for no reason. This is already a direct sign of a malfunction of the coolant temperature sensor. The sensor may give erratic readings. Those. if the actual coolant temperature has increased by 1 degree, the sensor may “say” that it has increased by 4 degrees or may not react at all. So, if the temperature at which the fan turns on is 101 degrees, and the actual coolant temperature is 97 degrees (working), then, having jumped by 4 degrees, the sensor will “tell” the ECU that the temperature is already 101 degrees and it’s time to turn on the fan.
It’s worse if the opposite happens - the sensor can sometimes underestimate readings. The coolant temperature may already reach boiling point, and the sensor will “say” that the temperature is normal (for example, 95 degrees) and therefore the ECU will not turn on the fan. Thus, the fan may turn on when the engine is already boiling or may not turn on at all.
Diagnostic methods
There are two proven methods for finding problems on this modification of the car. Each has its own advantages and disadvantages.
Self-diagnosis using on-board computer
This method does not require the user to have additional equipment. All the necessary systems are already installed inside the machine. The processing sequence looks like this:
- Find the odometer reset key on the daily mileage;
- While holding the button, turn the ignition key.
If everything is done correctly, all the lamps on the dashboard will light up, the arrow indicators will make a full revolution and drop to the “0” position. In this way, the functionality of all vehicle systems is checked. If there is no response from any indicator, you need to check the circuit following the indicator. To more accurately determine the source of the problem, you can, in the same mode, press the mode scroll key to the “error codes” position, which in 90% of cases provokes the appearance of one of these indicators:
- 2 – short circuit or high voltage flow on the BS;
- 3 – the fuel level sensor in the gas tank is covered;
- 4 – antifreeze temperature sensor has burned out;
- 5 – error of the sea thermometer;
- 6 – severe overheating of the internal combustion engine;
- 7 – you need to check the oil level – the pressure has dropped;
- 8 – failure or jamming of the calipers, the pressure inside the line has dropped;
- 9 – battery “died”;
- E – failure or violation of the integrity of the EEPROM data packet.
To exit the menu, you must leave the on-board computer alone for 30 seconds. The main disadvantage of the method is its mediocre accuracy. The light only shows a broad problem in the design of the entrusted part of the machine. Thus, to more specifically identify the problem, you will need to resort to the following technology.
Checking via connected unit
Modern computers connect to the car's network via a diagnostic connector. The block is located inside the cabin, under the dashboard on the front passenger side. To work you will need a laptop or PC with the necessary software. After establishing a stable connection, an error code will appear on the unit’s display, explaining why the machine is acting up.
Standard codings were developed due to the sale of cars for export. It is inconvenient for the manufacturer to program each ECU for a different language. The standard cipher consists of 5 characters, each of which is responsible for a narrow range of information. One of these elements always comes first:
- P – malfunction of the power plant electronics;
- C – chassis electronics failure;
- B – problem inside the cabin;
- U – synchronization of two or more circuits is disrupted.
Next comes the first digit:
- 0 – OBD 2;
- 1/2 – enterprise code;
- 3- reserve
The data indicates a malfunction. The following indicates the serial number of the circuit containing the breakdown:
- 0 – exhaust gas system;
- 1/2 – fuel/air supply;
- 3 – ignition distribution system;
- 4 – additional control;
- 5 – violation of idle speed;
- 7/8 – gearboxes, differentials and drive axles.
The last two indices indicate the serial number of the breakdown.