Motorists are interested in how DVRs are repaired. As you know, DVRs, like any electrical devices, can fail or simply break down. What is the cause of the device malfunction and how to fix it yourself? Below we will discuss how to repair a DVR.
DVR button assignments
Depending on the brand and model, the DVR may have a different number of buttons (on average there are 5-7).
Let's consider the purpose of all possible control elements of a modern recorder:
1. POWER button (ON/OFF) - turns the device on/off. A long press on this key allows you to turn the DVR on and off.
On many models, this button has another function: a short press during operation turns on/off the LED backlight on the front panel.
The DVR power button is usually located on the top of the case;
2. REC/OK - button to enable video recording. It is also used to confirm the selection of a particular function/task in various operating modes of the device.
So, in the main menu mode, pressing this button confirms the selected action; in photo or video recording mode, pressing the Rec button on the DVR performs the shutter function;
3. MENU/MODE - button for selecting video and photo shooting modes. Pressing this button launches the main menu of the recorder and settings in various operating modes of the device.
The MODE button on the DVR is used to switch between different shooting modes and viewing photos and videos. In shooting mode, pressing the MENU button will bring up the context menu toolbar;
4. The Up/Zoom plus button performs different functions in different operating modes of the recorder. Used as a key to move the cursor up in the operating mode in the main menu.
In video recording, photo shooting or standby mode, pressing/holding this button allows you to zoom closer to the subject (zoom+).
In the mode of viewing captured and saved files, this button switches to the previous recording.
5. The Down/Zoom minus button also performs different functions in different operating modes of the device. Used as a downward cursor key in operating mode in the main menu.
- In video recording, photo shooting or standby mode, pressing/holding this button allows you to reduce the zoom ratio, i.e. move the subject away (zoom -).
- In the mode of viewing captured and saved files, this button moves to the next recording.
6. The HOLD button in video recording mode allows you to protect the current file from deletion, even if recording is carried out cyclically;
7. Photo button - quickly switch to camera mode. In video viewing mode, this key is often used to delete files.
8. Reset - a button that, when pressed, will cause a hardware reboot of the device. Pressing the Reset button allows you to reset all user settings of the DVR to factory settings.
Attention! If the DVR freezes and stops responding to commands and performing requested operations, you should first completely turn off the device by pressing the POWER (ON/OFF) button, and then turn on the device again. If this manipulation does not help fix the problem, you can completely reboot the system
To do this, press and hold the RESET button for 5 seconds.
If this manipulation does not help resolve the problem, you can completely reboot the system. To do this, press and hold the RESET button for 5 seconds.
To do this, use a paper clip, pen, or any other thin, hard object.
Answers to frequently asked questions
It should be understood that any DVR is a miniature computer, with all the “sores” inherent in a computer.
Most likely, there was a failure in the system and the DVR froze. To fix the problem, try turning off and turning on the device again. If this does not help, perform a hardware reset using the RESET button. How to do this is described in the paragraph above.
What is the Sos button for in the DVR?
Intuitively, it may seem that this button is intended to transmit an emergency signal to the rescue service. In fact, everything is much simpler: on some models of recorders, the emergency mode button is called SOS. A file recorded in this mode is protected from automatic erasure during cyclic rewriting.
Why is the blue button flashing on the DVR?
A flashing blue indicator on some recorder models indicates that video is currently being recorded.
Why won't the DVR turn on?
There may be several reasons: the battery is low, the battery is installed incorrectly, condensation has formed inside the device. Make sure the battery is installed correctly and charge it. Leave the device in a warm, dry room for about an hour to allow the moisture to evaporate.
Advantages of attaching objects with suction cups
The main area of application for objects that have a suction cup for attaching them to a smooth tile or glass surface is the bathroom or kitchen. If previously, almost the only accessory that could be stuck to the wall using a suction cup was a hook, today the list of such items is quite extensive and is constantly growing. On sale you can find the following products with suction cups:
- hooks;
- soap dishes;
- glasses for toothbrushes;
- shower head holders;
- toilet paper holders;
- towel holders;
- decorative items;
- shelves for bathroom accessories and cosmetics.
Most often, suction cups are used in the bathroom.
The growing popularity of products with this type of fastening is due to a number of advantages that the suction cup provides:
- a soap dish, hook or any other object can be quickly, within a few seconds, attached to the desired location on the ceramic lining;
- In order for the device to be securely held on the tiles, the use of mechanical and electrical tools and drilling of walls for installation of various brackets and clamps is not required;
- if necessary, the product can be easily dismantled without leaving traces and transferred to another location;
- small price.
The DVR does not turn on, what to do AutoHack
Causes of automatic transmission malfunctions and possible breakdowns
It is difficult to imagine modern traffic safety monitoring without the use of a video recorder, which has become indispensable in most cases. Without recording events in the constant driving mode of the car using video recording devices, it is impossible to create an objective picture of what is happening and what happened on the road.
The device's recordings provide invaluable information that helps to reconstruct events down to the smallest detail, and in cases of unpleasant situations on the road, this is perhaps the main tool for proving either rightness or guilt.
But any technical tool or electronic device can fail, and the DVR is not immune from this.
Typical DVR malfunctions
Electronic equipment fails like any other, and this is its disadvantage. The positive point is that, unlike mechanical devices, electronic failures can be classified, and on this basis repairs can be carried out, even without deeply analyzing the fault, but only knowing its external manifestations.
For example, a typical breakdown of a DVR is a malfunction of the connectors, of which there are several in the DVR: a connector for an external memory card, a USB connector, and others. Also, DVR problems often arise due to mechanical damage, which gives rise to a lot of negative consequences. For example, the DVR does not turn on and it is not immediately clear what to do about it. The most common malfunctions of DVRs include the following problems:
- When you try to turn on the device, a squeak is heard and after trying to turn on, a reset occurs. This condition is typical for some recorder models: DVR-227, DVR-F500;
- if the device is connected through the cigarette lighter, the standby mode is automatically switched on and recording is not carried out;
- DVRs that record in Full HD freeze after several hours of operation;
- after complete discharge, in some models of recorders the control buttons do not work, in particular Reset, which is typical for many models. If the carcam DVR does not turn on and you don’t know what to do, maybe this is the reason;
- a separate category is Chinese-made recorders that can turn off spontaneously, without instructions to change the route. Rebooting the system does not solve the problem.
The most common DVR malfunctions
- Squeaking and excessive noise. An unstable recording that alternates between a sharp reset and an attempt to start a new recording may indicate that negative processes are occurring with the memory card adapter. The way to improve the situation is to replace the adapter, and if the result is not obtained, you will have to change the memory card itself. To protect yourself as reliably as possible from this problem in the future, the memory card must be set to at least Class 10.
- Connection via cigarette lighter. Often, when connecting the recorder through the cigarette lighter, the device freezes, recording is not carried out, or the DVR turns on and turns off immediately - what to do in these cases? Most likely, the problems lie in a malfunction of the adapter or memory card, which, depending on the severity of the failure, can either be repaired or completely replaced.
- Charging problems. In models that are equipped with micro USB connectors, the same problem occurs, which occurs when the DVR is connected through the cigarette lighter. In such cases, the screen may not turn on, the menu may not be fully displayed, or the device may not respond to commands at all. The reason is the connector, which should either be soldered or simply replaced.
- No sound or picture. If your device is dropped, it may not play sound or video. This usually happens due to damage to the cable.
The battery "died"
Most recorders, in order to compensate for battery wear, receive power from the cigarette lighter (or USB) in parallel. If you constantly use only one battery, its service life, alas, will quickly expire.
As a rule, the problem manifests itself as follows: the DVR battery does not hold a charge and discharges many times faster than it charges.
In this case, all that remains is to buy a new one, since the gadget will not work properly on a “dead” battery (for example, it will not be able to record the situation when the engine is turned off). It’s easy to check the functionality of the power supply: remove it and connect the device to the cigarette lighter. If the shooting continues uninterruptedly, unfortunately, it is the DVR battery that is not charging.
A new power supply is not cheap, often almost half the cost of the device. Some craftsmen manage to connect a removable battery from a mobile phone, but, in our opinion, this is a dubious option. It’s not a fact that it will work and the device will charge as it should.
Karkam Q2 DVR does not turn on
How to replace the battery in a Hyundai DVR
During the last New Year's road trip around Latvia, a very unpleasant loss occurred. The Karkam Q2 DVR broke down and simply stopped turning on. I usually take the recorder out of the car, but here I decided to leave it in the glove compartment, because... The car was in a guarded hotel parking lot in Riga. Mashana stood for several days, on January 2nd we got ready to go to Jurmala, took out the recorder, turned on the power, the recorder seemed to turn on and froze. I turned it off and tried to turn it on again, but all subsequent attempts were in vain, Karkam Q2 would no longer turn on. I tried to turn it on in different ways, with and without power, took out the battery, reinserted it, installed a known working battery from another Karkam, but nothing helped.
What upset me most was that I still had about 1000 km to go home, and my impartial witness would not be with me. The Karkam Q2 worked for almost 2 years and during this time I got so used to it that without it I feel less confident behind the wheel. And because everyone knows about the law of meanness, so something could have happened just at the moment when the recording was not going on. Therefore, I had to be doubly vigilant while driving in the second half of the trip. Upon returning home, I began to google the Internet for similar cases with Karkam Q2. As it turns out, this is a very common problem with these DVRs. In most cases, Karkam Q2 stops turning on after a year of operation, and for some, immediately after the warranty expires. And the warranty for Karkam Q2 is only 6 months. So I was lucky, because... My copy worked for almost 2 years.
Based on the reviews, it became clear that the problem was most likely with the soldering on the main board. This is the weak point of all Q2 Karkam. What surprises me most is that such Chinese quality costs quite a lot of money. I bought this Karkam Q2 for 8,000 rubles two years ago. Now they, of course, have fallen in price, but only slightly. The red price for him is 3-4 tr. and not a penny more.
There are quite a lot of service centers in St. Petersburg that repair Karkam DVRs. I called one of these companies, described the symptoms of Karkam, the master confirmed my fears, most likely the main board will need to be replaced, and this costs 3,400 rubles. and wait about a week. Of course, this option did not suit me. After weighing all the pros and cons, what for 3400 rubles. I can get my old device and a 1 month warranty on the work, or I can go buy a new DVR. Unfortunately, over these two years there has been no big leap in the development of technology in this area. Stores offer the same thing, Chinese DVRs for obscene money. As a result, I didn’t think twice about it, I went and bought a new Karkam Q2 for 5,000 rubles and a 6-month warranty.
Another compelling argument for buying a new Karkam Q2 rather than repairing the old one is that the old one had a very big drawback
There was a pause between the recorded files - 2-3 seconds, and during this time something important could happen. The new Karkam Q2 revision 6.2 IR has no such drawback
I checked this right in the store, taking off the stopwatch.
I decided to disassemble the broken Karkam Q2 and see what was inside. I took a few photos if anyone is interested.
Build quality is excellent
The camera is easily detached from the board
The screen is also removable, but not as easily as the camera
It was not possible to visually determine the cause of the breakdown; I tried to press the microcircuits and turn them on to determine the problem soldering.
What should you consider when choosing a device for its effective operation?
In order for the DVR to work smoothly and efficiently, when choosing a device, you should pay attention to its technical parameters and the classification of possible breakdowns of each model. So, DVRs can be built-in or stationary.
To repair the built-in mechanism, it is better to seek help from professionals. Also, recording devices differ in the type of mounting.
It is recommended to purchase a device whose fastening mechanism is made of durable material.
The reliability of the DVR operation and its quality depend on the manufacturer's brand. It is known that the most common types of breakdowns of devices from Chinese manufacturers are rapid consumption of battery power and rattling of the lid. You should buy equipment from official dealers who provide a warranty on the device and repair DVRs if the cause of its breakdown is not the result of external physical influence.
The video shows a minor repair of the DVR:
What types of DVR breakdowns are there?
Repair of vehicle DVRs mainly includes the following areas:
- Inspect the system connector (charging socket). If it is impossible to charge the device or if charging is interrupted while the car is moving, the reason is a loose connector;
- Troubleshoot audio problems. If the video recording device does not record or play back sound, then it is necessary to diagnose the device. Typically, the problem is a broken speaker, which should be checked first;
- Troubleshooting cable problems. If the device falls or makes sudden movements, the cables that connect the screen to the main board break, causing the image to disappear.
Malfunctions of the recording device included in the video surveillance system can be caused by the following reasons:
- Broken cable lines;
- Mechanical damage to surveillance cameras;
- Power supply failure;
- Lack of video signal;
- The operating system of the recording device has failed.
Also, if the DVR breaks down, then perhaps errors were made during installation and connection of the device or the device was not operated correctly. It is recommended that equipment installation be trusted only to specialized companies.
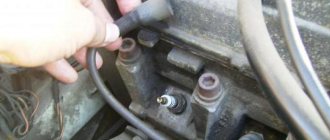
How to fix the DVR connector yourself?
The most common recorder breakdowns that you can fix yourself are mechanical damage to connectors and connectors. In most cases, the mini USB connector simply becomes disconnected due to cold soldering or even falls apart. When fixing this problem yourself, first of all, you should find out how many pins the connector has. As a rule, a standard USB connector has four pins, two of which supply 5V power (+ and -), and the rest transmit information. The mini USB 5 pin connector has an additional contact that connects to the common cable.
If the device is equipped with a mini USB 10 pin connector, then repairing the DVRs yourself will be more difficult, since the distance between the contacts is quite small. Therefore, if such a connector breaks, it is recommended to replace it with a five-pin one; moreover, it is much easier to find such an element. However, please remember that if you replace the USB connector in this way, some functions of the recorder may be blocked.
Repair of DVRs, including replacing the connector with your own hands, is carried out according to the following algorithm:
- The device is being disassembled. To do this, you can use a Phillips screwdriver or a universal master key for mobile phones;
- Next, you need to ground the soldering iron: one wire (minus) is soldered to the common body, the second (plus) to the body of the soldering iron;
- If you replace the connector, you need to heat the fastening petals of the mechanism to unsolder its leads, and then solder the new element;
- If the mechanism is intact, but disconnected from the board, then you should find out which wires are broken and solder them.
When repairing DVRs yourself causes difficulties, it is better to turn to professionals. If you have a warranty card, you do not need to look for where to repair the device, since all work will be performed by service employees.
Problems with internal cameras
The windshield wiper does not work: possible causes and solutions to the problem
Doesn't provide an image, not even a background one, doesn't respond to requests. The cause may be burnt-out control boards, a physical break, or damaged power cables. The problem is solved by replacing damaged parts.
The camera boots with the internal menu displayed on the monitor, but there is no image. CCD matrix burnout. If this part forms a monoblock with a sensor board, then replacement is not difficult.
It loads, listens to controls, but there is no image, and the menu does not appear. In most cases, this is a breakdown along the video output transmission circuits. The reason could be interference and large voltage surges from the operation of powerful equipment (electric welding, etc.). The board needs to be replaced.
The image arrives, the menu loads and passes the test, the PTZ device is not controlled. Burnout of the control board on port 485, usually due to interference in an ungrounded twisted pair. The control board needs to be replaced.
Unstable operation, expressed in periodic shutdowns and reboots, in the presence of a PTZ drive, does not obey the control. There may be a hardware malfunction - overheating of the microcircuits. Software malfunction - a failure in the firmware or a mismatch of versions with the control program.
It is recommended to reinstall the camera to another location (perhaps it is mounted above a heating device or air conditioner), flashing the firmware and switching to the current version
ATTENTION: take firmware only from the manufacturer’s website
After running the test it freezes and then gives an error. When starting the camera, many models perform an autotest of the device; the composition of the testing program depends on the specific model and manufacturer. As a rule, the device passport contains a plate of error codes and suggested actions to eliminate them. But errors can also be caused by external reasons.
In PTZ cameras this can be:
- wear of the rotating device gear;
- contamination of the rotation control sensor;
- failure in the logical block program.
Mechanical parts should be replaced and camera firmware updated.
Problems with the operating system using the example of Viaccess 605: consumer reviews
If consumer reviews are to be believed, they often encounter problems due to the operating system. As a rule, this happens when the modulator fails. In this case, you can do the repairs yourself. The Viaccess 605 DVR needs to be inspected for this. For this purpose, the cover is disconnected and the external contacts of the printed circuit board are checked.
Next, you should inspect the modulator itself. To do this, you need to carefully disconnect the camera and cable. The next step is to remove the modulator using a screwdriver. As a rule, the problem lies in burnt out contacts. In this situation, the part will have to be completely changed. This model has a wired modulator installed.
Problems with cable networks
Cable networks are the main cause of malfunctions in video surveillance.
Effect of radio interference
From across the entire radio spectrum, high-frequency waves can have the greatest impact. Electromagnetic disturbances in signal transmission lines can be caused by nearby powerful radio and television transmitters, radars, microwave emitting equipment and other emitting equipment.
Such interference appears in the form of image distortion, stripes and lines on the screen.
Effect of lightning
Lead to massive burnout of ungrounded equipment. Standard systems for protecting buildings and structures - lightning rods - are not designed to protect data lines and electronic devices.
Often, when installing an outdoor video camera, the tallest structure that is exposed to the greatest risk of lightning is used as a support.
Shielded cables and devices must be grounded. In accordance with technical requirements, the grounding of all network elements must take place at one point.
Stray currents in grounding
During installation work, especially in multi-channel systems, grounding rules are often ignored. Sometimes this is technically impossible to do, especially when using cheap cameras where the BNC connector is not isolated from the body.
The body of such a device itself is grounded by the corresponding contact of the flying plug, which has a grounding terminal. In fact, instead of a grounding bus, a power supply zero is used. Accordingly, several such points are formed in the video surveillance system.
For long-distance communication lines, stray ground currents lead to a potential difference of several hundred volts between transmitting and receiving equipment.
Dips and overvoltages in power networks
They are caused not only by the low quality of electrical networks, but also by periodic daily fluctuations. The peaks of fluctuations occur in the morning and evening, the highest level of overvoltage occurs at night.
Phase imbalance and neutral overload are a less common cause of overvoltage in networks associated with errors in electrical wiring installation.
Periodic and single impulse noise:
- turning on and off lighting and climate control equipment that consumes a large amount of electricity;
- turning on and off devices and devices with a high level of inductance: starters, transformers, operation of electric welding equipment, etc. etc.
- accidents and short circuits in low-voltage circuits with subsequent tripping of an RCD;
- influence of inductive interference from the operation of urban electric transport.
The device gets very hot
There is essentially one reason why the DVR gets hot - a malfunction of one of its parts or a factory defect. It can get warm:
- swollen battery;
- CPU;
- the building itself is in the sun.
If the reason is the battery, then it needs to be replaced urgently, otherwise it will not only stop working soon, but also damage other components.
If it’s a case, it’s not scary, but it’s better to somehow protect it from the sun or next time buy a recorder with a white, although more noticeable, but not so hot, case.
And if the problem is with the processor, then you can try replacing the thermal paste that connects it to the cooler, or replacing the cooler itself with a more powerful one. You can also try changing the video resolution to a lower one, if this is acceptable. If this does not help, then most likely the processor or other part simply has a manufacturing defect, and the device must be replaced if the warranty period has not expired.
Frequent malfunctions
The reliability of recorders depends on the brand and manufacturer. Chinese video surveillance devices are cheaper, but break down more often
Therefore, when purchasing equipment, special attention is paid to the possibility of warranty service from the official dealer of the manufacturer, provided that the cause of the breakdown is not external mechanical influence
The following typical faults occur:
- The DVR constantly beeps, starts recording, as indicated by a special icon on the screen, resets the recording, then the process repeats, the device is reactivated. The reason why this happens may be due to the microSD card adapter. Reformatting the flash drive often does not help, so the drive is replaced.
- When connected to the cigarette lighter, the device turns on, but cyclic recording does not work. The product is constantly in standby mode. This type of breakdown is rare. The problem is solved by replacing the adapter.
- If the DVR is connected to the on-board power supply or cigarette lighter, the monitor may turn on, but then turns off spontaneously. Sometimes a menu consisting of 2-3 lines appears, the control buttons do not respond, and going through the settings items does not produce results. The reason is the micro USB connector on the power cable. To connect, you must use only the original cable included with the video surveillance system. Otherwise, when purchasing a cable with a charger in cellular stores or shops, the wiring in the plug will not work.
- The gadget does not turn on and the red light is on. Sometimes the device activates and works for a long time, but then freezes. This is typical for devices with a Full HD resolution of 1920x1080 px. After formatting the flash card, the situation repeats. This can be corrected by removing the battery or pressing the RESET button. For continuous operation, the device is combined with the required class of memory card. This parameter can be found in the technical specifications described in the instructions for using the device. For high resolution Full HD, grade 10 is recommended.
- The device turns on and off spontaneously, automatically stopping recording without a user command. At the same time, car GPS navigators can change the route and stick to it. Such malfunctions are often found in inexpensive Chinese models. The reason lies in the use of a charger with a low-quality micro-USB plug. Solved by replacing the charger.
- After the equipment is completely discharged, a working charging system fails, the gadget does not turn on, does not charge and does not respond to control buttons, including the RESET button. The problem applies to any model, regardless of price and popularity of the brand. To eliminate the cause, check the connector wiring, remove the battery and connect it directly to the electrical network so that voltage is supplied to the battery contacts.
- Slow startup of the device, accompanied by flashing display. In low temperature conditions, the battery loses capacity, the voltage drops below the threshold value, and the charging controller blocks the charging process. When overheated in the sun, the battery swells, covers, protective films and fastening elements warp. If it becomes swollen, it is replaced; warping is prevented by covering the gadget with a white cloth or foil. If there are no signs of damage to the integrity of the battery, apply a voltage of 3.7-4.2 V to the “+” and “-” terminals for 1-2 minutes.
Methods to help securely attach the bracket
There are methods that help to secure the suction cup more securely, here are some of them (as car enthusiasts advise):
- warm up the fastening element by bringing it close to the heater fan, while the car interior must be warmed up;
- use double-sided tape;
- coat the contact surface of the bracket with silicone;
- cut a rubber gasket along the diameter of the circle and place it between the glass and the holder;
- To seal, add a little glycerin to the contact surface; you can also use laundry soap and garlic juice.
Not all of the listed methods work 100%, and there are side effects. The adhesive tape holds up well, but in the sun it heats up and loses its properties. An additional rubber gasket helps in many cases, but you just need to take into account that the DVR becomes a little heavier, the load on the bracket increases (it can break), and adding rubber is pointless on suction cups without a lever. Garlic juice always helps, but not everyone likes the smell it gives off. A solution of laundry soap gives a good effect, you just need to take one thing into account - until the soap has dried, you can move the suction cup on the glass, then everything will set tightly. Silicone should be spread in a not too thin layer, evenly, its disadvantage is that it sets well only after a day; if you drive the car right away, the fasteners may fall off. Another drawback is that the silicone-lubricated holder moves across the surface.
Reasons for the lack of a stable supply of electricity
Many types of DVRs are designed in such a way that the moment they start recording, they stop consuming full charge. This is caused by the need to constantly power the device from the cigarette lighter, and thus compensates for battery wear. Car owners see more disadvantages than advantages in this, since if the device is removed from the charging socket, the camera may turn off, which leads to interruption of shooting. The manufacturer, when creating this method of functioning of the recording mechanism, counted on the longevity of the battery, since constant power supply from it with maximum charging leads to a reduction in the life of the device.
To charge as quickly as possible, the DVR must be disconnected from the shooting mode and allowed to accumulate full energy from the cigarette lighter. In some cases, the device does not charge due to a faulty battery, and to check this version, you need to remove the power supply and take pictures directly from the cigarette lighter. If the equipment operates stably and without failures, the product should be returned under warranty to the electrical department.
When purchasing a product, you need to fully charge the battery and further discharge it to the maximum until the equipment itself turns off. Then you should plug it in for another 6 hours so that the battery reaches the required density. After this, the device can be fully operated and recharged at any convenient time.
Charging methods
The video recording device also does not charge if the external power supply mechanism fails, which must be purchased, taking into account the amount of energy consumed by the recorder. Most video recorders consume a current of 1A, and if you try to buy a charging product with higher parameters, you can burn not only the battery, but also the recording device itself.
In the video - how to find out the reasons why the DVR is not charging:
https://youtube.com/watch?v=VqBq_B62Mi0
How to charge the recorder can also be found in the instructions for your phone, since the principle of battery saving is also described for mobile mechanisms. The recorder is most often charged using the following devices:
- Car cigarette lighter;
- USB input in laptop;
- Battery using a rectifier.
If charging through the cigarette lighter, if the current is not constant, the fuse or the flash drive controller, which is responsible for recharging the product, may burn out.
What reasons can lead to the device turning off?
The most common causes of device failure are usually associated with the following components of the recorder:
- Battery;
- Charging cord;
- Car charging socket;
- Removable media.
Based on the presented elements of the component equipment, problems appear that lead to the fact that the device stops turning on. Of all the reasons leading to the device turning off, the following can be distinguished:
- The battery is low;
- The battery has failed;
- The charging cord is broken;
- The cable is not recognized by the equipment;
- The car's cigarette lighter is loose and does not hold the charge tightly;
- The memory card is formatted with incorrect parameters and affects the performance of the product;
- The firmware has not been removed from the flash drive, which leads to constant updating of the existing version of the program.
The main problems that most often occur are problems with the battery, which are expressed in the fact that even when the charger is turned on, the device does not work and does not accumulate energy to the battery. The reason for this phenomenon is a 100% discharge of the battery, which cannot be corrected by regular charging.
In order to create a so-called boost for the battery, universal charging is used, producing an initial degree of accumulation of the required amount of energy for the further recharging process through the DVR.
If the recorder does not turn on after a long period of charging, then the reason lies in a faulty power supply, which has simply failed and does not accumulate sufficient charge. In this case, you need to buy a new power supply in a specialized store, taking into account all the rules for the initial operation of the battery, which will extend the life of the product.
The video explains the reasons why the DVR does not turn on:
Defective cord and charging socket
The reason that the product does not function even if the USB cord to the cigarette lighter is replaced may be a poor-quality cable. Chinese USB cords often only have contacts for charging, and the terminals for transmitting information are simply soldered together and do not function.
Most DVRs operate on original cables that have terminals for parallel and signal transmission, so you need to buy a cable designed for a specific model. Due to frequent use, the charging device cord can break near the plug, and in this case it is better to replace the cable with a new one.
Sometimes the registrar begins to perform the work independently without instructions from the owner. This happens when the charging socket becomes loose and the contact does not reach the device well, which causes the unexpected delivery of incorrect signals. To figure out how to turn on the DVR with such problems, you need to replace the charger. No other solution options simply exist in this case.
The CCTV camera is not working.
There may be several visible reasons why the CCTV camera does not show:
- There is no power to the camera. Cover the light sensor with your hand, if the infrared illumination lights up, then everything is fine, but if the backlight does not light up, check whether the power source is working. It is also worth looking at the connections of the power connectors on the outdoor camera; over time they could have oxidized, resulting in loss of contact.
- The BNC connector has oxidized. Like the bnc power plug, the connector is susceptible to oxidation in a humid outdoor environment, and it makes no sense where it is located in a junction box or in another secluded place. If the picture on the camera periodically disappears, then first of all you need to check the contact.
- Poorly crimped RJ45 connector. Incorrect crimping of the connector, for example, when the twisted pair wires did not reach the end, can subsequently lead to random loss and appearance of the signal on the IP camera.
Hardware problems include the following:
1)The analog camera has left compatibility mode. Analog cameras today can work in hybrid mode with various analog formats (CVBS, AHD, HD-TVI, HD-CVI). For example, we have an AHD recorder that works only with AHD cameras; we connected a multi-format camera to it and switched it to AHD mode using a switch. One fine day we discover that the camera does not show, and in the DVR window, for example, an “N” icon appears, which means that the camera is currently operating in CVBS mode, which the recorder does not support. (Not all devices show what format the connected camera is working in, so you may not immediately see the error.)
As a rule, the camera switches to a different format when the voltage surges or drops. To return the camera to the desired mode, you need to disconnect the power from it for a short time, reapply the power and select the desired mode on the joystick with a long press. Format switches may vary in appearance and design.
2) IP camera freezes or signal loss.
Budget IP cameras can freeze from time to time, this can be treated by disconnecting from the power source and then turning it on, in other words, you need to restart the device.
Loss of image on an IP camera can occur due to a violation of the IP signal transmission technology; as is known, under ideal conditions, a good twisted pair cable can be used to transmit a camera at a distance of up to 100 meters without auxiliary devices. In fact, normal operation of the device is guaranteed at a distance of no more than 90 meters, and in the case of a bad cable, 60 - 70 meters.
Correct wiring of the power cable plug with a micro-USB connector made in China
As already mentioned, non-standard wiring of the plug leads to malfunction of the device. If it is not possible to get the original wire, simply change the wiring on a new detachable plug with your own hands. The standard diagram looks like this:
The wiring diagram shows which contacts are connected to each other and where the voltage is supplied
- VBUS – plus;
- GND – minus;
- ID or NC – total weight;
- D+ and D – contacts for signal transmission.
On most Chinese cables, some pins are not used at all, GND is a minus, and NC (or ID) is a plus. Those connectors that are sold in cellular communication stores do not charge Chinese DVRs, since the NC contact is closed with VBUS. Therefore, you need to purchase a detachable miniUSB plug; it must have a fourth contact (NC or ID). We change the circuit using a soldering iron, and the DVR will work without failures.
To improve the operation of the DVR, change the pinout on the power cable plug
How to fix a DVR yourself
Of course, a DVR is an indispensable device for all car enthusiasts. It often happens that after a traffic accident, drivers and representatives of the road patrol service have various disagreements or certain inconsistencies arise in the testimony. In such cases, drivers are helped by a video recorder, which records in detail the moment of the incident and provides them with indisputable evidence.
What to do when the DVR does not turn on
Often when you turn on this device and start recording, a reset occurs. And then everything repeats: recording starts and reset again. At the same time, a continuous squeak is heard. Unfortunately, formatting the flash drive will not help in this case. The memory card adapter needs to be replaced.
Often, after connecting the DVR using the cigarette lighter, the device turns on, and the screen immediately turns off. Here the reason may be in the cable. It is quite possible that the cable with the USB connector was taken from the kit for a cell phone, and not for the DVR. And when replacing the cable with a “native” one, this problem usually disappears.
If the device operates in normal mode for some time, and soon freezes, then, most likely, the resolution of this device does not quite correspond to the speed mode of the memory card being used. It is worth clarifying what class of memory card should be used for this DVR. Usually such information is written in the instructions for the device.
When your car DVR does not turn on without any visible damage, check that all connections are tight and correct. The reason will probably be found here. The culprit for the DVR not working can also be a discharged battery. Replacing or recharging the battery should bring the device back to life. You can perform these manipulations yourself.
If the recorder still doesn't work, the problem could be much more serious. In this case, it is useless to try to solve it yourself - this may lead to an even greater complication of the situation. Only accurate professional diagnostics will help you find the true reason for the non-working state of your device. This diagnosis can be performed at any specialized service center.
So, the main types of DVR breakdowns and methods for eliminating them.
In this article we will not be able to list all possible breakdowns and, especially, all the ways to repair them that are available to the average user, but nevertheless.
The DVR stopped turning on.
Well, that is, it doesn’t turn on at all. Not a single light comes on, and the hard drive does not make noise. In general, silence and despair.
First of all, we check the power supply of your recorder; it may be the culprit that the CCTV recorder does not start. In this case, it is easier to replace the power supply than to repair it.
Although if the filter capacitors are “covered,” it’s not difficult to fix, and the power supply will start producing 12 volts again.
The culprits can be easily identified by the swollen tops. A soldering iron, flux and solder with a handful of working capacitors will solve this issue. On such repairs you can save from 600 to 900 rubles.
Also, the culprit for not turning on the DVR (from the English digital video recorder) may be faulty elements on the main board. For example, a fuse or a PWM voltage controller may blow out, or God knows what else. In this case, you cannot do without knowledge of circuitry and the security recorder will have to be sent to our service center.
The DVR does not see the hard drive.
Every owner of a video surveillance system will sooner or later discover the alarm message “No Hdd”. To make sure that this is not a software failure of the DVR, place your palm on its cover. A working hard drive emits vibrations that are easily detected on the cover of the DVR; if you do not feel the vibration, the HDD is dead with a 99% probability.
Sometimes it happens that rebooting the DVR temporarily brings the disk back to life, but believe me, this is not for long. By the way, hard drives can't be repaired; if anyone says otherwise, they're a liar.
It happens that the DVR does not find the disk due to a poor-quality 12 volt power supply. A power supply that has worked for many years may sag and not produce the necessary power to start the hard drive, while the recorder itself may work completely normally. Replace the power supply to be sure.
Pictured: WD Purple is an excellent hard drive for video surveillance systems.
Why does the hard drive in the DVR break down?
A hard drive located in a DVR or a computer are absolutely identical devices, but with tasks of different intensity. The former experience a colossal load due to constant cyclic rewrites, as a result of which bad (damaged) sectors appear, the disk literally wears out at a breakneck speed. The latter, which are located in the computer, work mainly as a data storage; information is occasionally deleted or added to them, and if this happens, it is in completely different volumes, so the hdd in the computer can last from 4 to 10 years.
To reduce the wear rate of the disk in the DVR, it is necessary to purchase specialized disks for the video surveillance system; such a disk is designed to work with large streams of video data 24/7 with frequent rewriting.
Recommendations
Finally, here are some tips to follow when repairing your DVR:
- Do not use a very cheap and feature-rich DVR. They usually break down quickly.
- Try to prevent the recorder from being damaged or dropped.
- From time to time, clean your gadget from dust and dirt, paying special attention to the charging connectors.
- During the cold season, do not leave your gadget in the car; it is better to take it home with you. Due to temperature changes, condensation forms in the recorder, affecting the functionality of the device.
- When replacing the power supply, pay attention to the voltage; usually the recorders operate on 12 Volts. Repair of the rear view mirror recorder is best done in special service centers.
By following these tips, you can avoid serious damage to your gadget.