The VAZ 2110 fuel level sensor is a measuring device that is very necessary when operating a car. After all, if you don’t know how much fuel is in the gas tank, it’s impossible to calculate the distance the car will travel before it stops, and it’s not always clear whether you need to refuel or can still drive. And if you decide to stop for refueling, then how much to fill? Therefore, when it is discovered that the fuel level sensor on a VAZ 2110 does not work, or it is simply “lying,” any car owner tries to fix this malfunction as quickly as possible.
What is a fuel level sensor
The FLS is a special device that determines the level of the fuel column in the tank. With its help, you can find out the exact volume of available gasoline or diesel, their consumption for a specific period and the time of refueling or draining. Such a sensor is installed not only on cars, but also on stationary objects.
The FLS operates in conjunction with the fuel level indicator located on the dashboard, where it transmits the received parameters. A GPS tracking platform will be required to display detailed information.
How does the device work?
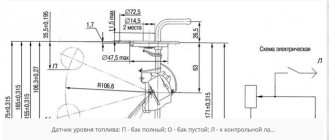
To understand the problem yourself, you need to understand how the fuel level is measured and information is transmitted to the device indicator. The circuit implemented in most vehicles includes the following main elements:
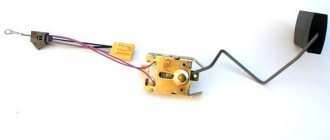
- a float made of lightweight polymer is immersed in the gas tank and is often combined with the pump block;
- gasoline sensor – lever-type potentiometer (otherwise known as rheostat);
- pointer arrow with scale;
- connecting wires.
In many modern cars, an electronic control unit is connected to the system.
The classic rheostat is an open coil of high resistance wire. A lever equipped with a contact and attached to the float rises or falls with the level of fuel in the tank, and the contact moves along the turns of the winding. The classic scheme works simply:
- The rheostat and the pointer device are connected in series in the circuit, both are powered from the vehicle's on-board network.
- When moving the float with the lever, the resistance of the potentiometer changes.
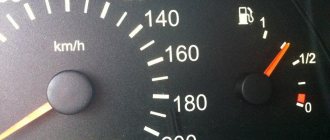
- A change in resistance causes an increase or decrease in the current in the circuit, to which the indicator arrow reacts. The scale is graduated according to the resistance values corresponding to the filling of the gas tank.
The updated version of the system works with the participation of a controller. The fuel level arrow receives a processed digital signal from the electronic unit that supplies power to the potentiometer. The principle of operation does not change, but the circuit allows you to obtain more accurate readings.
Operating principle of the fuel level sensor
How exactly the fuel level sensor works depends on its type. However, the basic principle of their operation is always identical. It is based on the constant determination of fuel residues using a special float, tubes or ultrasound. Each measuring element evaluates the level of gasoline or diesel in a special way and transmits the resulting parameters to the dashboard and monitoring system.
The output signal can be analog, frequency or digital. Each has its own characteristics and advantages. Analogue type FLS remain the most affordable, but they have poor protection against interference, which is why information is transmitted with a large error. Frequency signals conduct signals in encoded form, which somewhat improves the situation. Digital fuel level sensors have microprocessors and are better protected from interference, which allows them to demonstrate maximum accuracy.
Common problems
FLS failures are recorded based on noticeably erroneous readings or their complete absence. In the most common case of a mechanical connection with a float and an analog potentiometer, the indicator needle begins to twitch, increasing or decreasing the readings. This is almost always associated with mechanical wear of the contact group of the variable resistor.
The second common case is a change in the density of the float due to degradation of the material or filling it with fuel. Up to complete drowning and constant zero readings.
If electronic sensors malfunction, they simply stop giving readings. Sometimes this is due to wiring, which is less protected from external influences. Indicators fail much less often.
Malfunctions and repairs
If the FLS is faulty, this affects the quality of measurements and the operation of the fuel level indicator. The arrow may “freeze” at zero, stop in place, or simply show incorrect parameters. To carry out independent repairs, you will need to study the circuit diagram of the fuel level sensor and dismantle it.
Main malfunctions and their elimination:
- wear of resistive elements - the problem can be solved by bending the “tongue”;
- movement of the board with resistive elements - you will need to solder the component in its place;
- disturbances in the electrical circuit - lubrication of components, as well as cleaning and tightening of contacts can help; an electrical diagram may be required;
- damage to wires - minor damage can be repaired using electrical tape;
- If the tube is dirty, just clean it and wash off the deposits with a special cleaning agent.
Any serious damage to the fuel control sensor requires replacement of the damaged elements. In most cases, it would be better to contact the service for full testing and repair. Capacitive fuel level meters are generally not subject to home inspection and require the attention of a specialist.
When is it necessary to change the sensor?
The fuel sensor must be replaced if at least one of the following reasons occurs:
- contacts are so destroyed that there is nothing left to protect;
- resistive tracks are worn to the limit;
- there is damage to the float. This is rare, but it happens. Ruptures lead to the fact that the latter fills with gasoline and sinks, showing an empty or half-empty tank,
- even when it is full;
- The slider itself is damaged.
In case of the above-mentioned defects, the FLS must be replaced.
Types of fuel level sensors
There are 3 types of fuel level sensors in the tank: float, capacitive and ultrasonic. Each of them has its own measurement characteristics and is distinguished by accuracy. As a rule, a float-based FLS is installed on cars from the factory, while capacitive and ultrasonic ones can be installed by GPS monitoring integrators.
Float FLS
The float fuel level sensor is located inside the tank and only shows the approximate volume of fuel. The error in measurements can sometimes reach even 30%, which is why it cannot be called accurate. If the fuel level sensor is digital, then deviations from real indicators can be noticeably reduced. Most often they are installed on new car models.
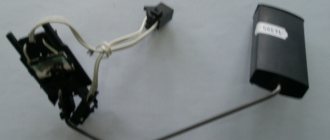
Such a sensor determines the fuel level using a special float. An important component in the device is the potentiometer. When the amount of fuel in the tank changes, the float moves in the appropriate direction and affects the resistance of the resistor with voltage. New parameters are transmitted to the dashboard and contribute to the movement of the arrow in a certain direction.
Capacitive FLS
Capacitive type fuel level sensors are installed inside the tank. They are distinguished by high-precision measurements, the error of which does not exceed 2%. Such a FLS can be installed at GPS monitoring integrators.
According to the principle of operation, the capacitive type fuel level sensor is somewhat different from the float version. It contains two tubes, external and internal, which are attached to the device board and act as capacitor plates. They fall inside the tank and pass current. When the fuel level increases or decreases, the electrical capacitance of the sensor changes. These parameters allow you to determine how full the tank is.
Ultrasonic FLS
The ultrasonic fuel level sensor is installed from the outside of the tank and is only possible at the integrator’s service. It allows you to measure fuel volumes with high accuracy, without deviating from real indicators beyond 2%. However, the measurement results can be negatively affected by foreign elements or partitions inside the tank, unevenness of its walls and loose installation of the fuel level meter itself.
The device is a special emitter, which is placed on the central part of the bottom of the tank. During use, it creates ultrasonic pulses that travel throughout the container and return. The time spent on one travel cycle becomes the basis for automatically calculating the actual level of remaining fuel.
Causes
Now you need to find out why this sensor on your car does not display the current fuel level correctly and what is causing this.
There are several potential reasons. Therefore, each of them needs to be considered in detail.
- Violation of the tightness of the installed float. It is found on sensors where the float is made in the form of a ball made of fragile plastic. With mechanical shocks, as well as under the influence of extreme cold, the material is destroyed. If the seal is broken, the float simply remains on the surface of the liquid or sinks. As a result, the controller shows that there is no fuel. For repairs, it is necessary to replace the float separately, or the entire sensor. Much less often, the float part is disconnected from the lever and begins to move independently inside the container.
- Lever damage. Due to its deformation, the float loses mobility or transmits information incorrectly. The cause of the problem is long driving. Moreover, on uneven and bad roads. Or in violation of the rules for dismantling the fuel unit from the tank. You can try to restore the lever. But more often repairs are carried out by replacing it.
- Deformation of the controller body. Because of this, the installed resistive elements give incorrect readings, or the lever is damaged and does not record data correctly. The reason is the filling of low-quality flammable liquid, or mechanical stress.
- Breakage of resistive elements. A common reason why the FLS stops working correctly. It occurs due to natural causes. That is, resistors wear out from a long service life. The contact between the elements disappears, and the arrow ends up at zero, or simply twitches.
- There is no contact on the electrical circuit section. This happens on those contacts that can simply oxidize over time due to exposure to moisture or the fuel itself. Wires are damaged, the integrity of the insulation is compromised, breaks occur, etc. Sometimes the reason lies in the electrical connectors.
- FLS wire shorted to ground. This occurs precisely with the signal wire, which begins to short to ground. As a result, the FLS indicators become incorrect, and the resistance tends to zero. No matter how much fuel is filled, the sensor will show a fictitious full tank.
- Burnt fuse. The car has a sensor that is responsible for the FLS. The specific fuse number should be found in the owner's manual for your specific vehicle.
- Failure of the fastening on the housing inside the fuel tank itself. As a result, the sensor fell into the tank or was distorted. Usually accompanied by the spread of fuel odors into the cabin.
- Break on the signal wire side. Found on tubular sensors. Then the arrow constantly indicates that the fluid tank for operating the internal combustion engine is empty.
- Plaque formation. Another characteristic feature of tubular type controllers. Plaque accumulates on the guide post. This interferes with the normal and free movement of the installed float. The deposit appears due to the filling of low quality fuel. The arrow stops in one static position.
- Damage to the magnetic sensor, wires. Relevant for contactless fuel level monitoring devices. Some FLS models of this type have control and control boards. Problems happen to them too. Then the sensor completely fails, and the correct fuel level is not displayed.
Practice shows that most often problems are observed from the resistive elements, as well as the float. They wear out over time and can no longer display and transmit data correctly.
Don't immediately blame the sensor. There is a possibility that the arrow of the device is broken, or there are faults on the side of the wires connecting the elements.
Design features of FLS
Manufacturers sometimes change the design of fuel level sensors in some models, adding new elements to them. They are usually equipped with special components that add new functions or improve existing ones. The main meter circuit remains unchanged.
Remote control of FLS power supply
Sometimes the signal transmission from the fuel level meter stops. This happens for two reasons: a dead battery or a power outage. In some cases, unscrupulous drivers do this intentionally to drain fuel. The remote control function eliminates this situation and sends information to the fleet if the fuel sensors have been disabled.
Fuel temperature control
The temperature control function can even be present on ultrasonic fuel level sensors. It allows you to identify deviations in fuel heating and maintain the engine in good working order, but there is no practical use in it, since temperature indicators do not affect the service life of the machine.
Universal connection interface
The fuel level sensor with a universal connection interface allows you to choose between analogue and digital signals at any time. This feature is useful in cases where the device needs to be connected to an existing tracker or a whole batch of meters is purchased for a large fleet.
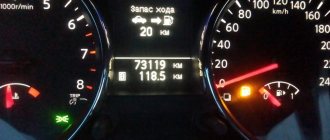
Fuel level indicator
The fuel indicator is located in the cockpit. It shows the exact amount of fuel remaining to control consumption. In some cases, the device has a disciplinary function. Using indicators in the cockpit, you can hint to an unscrupulous driver that the drain will be detected by the fuel level indicator and will lead to punishment.
FLS bend
If the gas tank has a complex shape, then a special FLS with the possibility of bending the measuring part may be required. Such models allow single bending at an angle of up to 70° without reducing the service life of the device.
CAN-like bus S6
The use of a CAN-like bus is being promoted in the FLS market as a means of creating a universal interface for connecting various devices in cars. Such devices with a fuel level meter transmit information via a CAN bus and provide a great advantage in the form of the ability to combine several sensors.
Explosion-proof version
FLS in explosion-proof design have a special design that provides increased safety. They are used on fuel tankers and other equipment transporting dangerous goods, where only such a fuel sensor can be installed by law.
Built-in GPS tracker in FLS
If your car does not require a full-fledged GPS monitoring system, but you need to track its location, then a FLS with a GPS tracker will be the best option. It helps to control fuel consumption and see the location of the car without purchasing additional expensive devices and saving space.
Calibration
When installing and cutting a capacitive fuel level meter, it will need to be calibrated. To do this, you need to set new parameters indicating the minimum and maximum volume of fuel. This can be done by simply measuring the fuel level in an empty and full tank.
Calibration process:
- Connect the FLS to the computer, first turning it over with the meter facing up.
- Fill the space between the tubes with the used fuel.
- When the indicators are recorded in the software on the computer, mark them with a full tank.
- Drain the fuel from the sensor, wait for stabilization in the software and mark the empty tank.
You can also perform the procedure using a reservoir, but this method will be much more complicated and require more time. Therefore, it is easier to use the available tools from the instructions above.
How to choose a sensor
When choosing a FLS, you should immediately decide what type it will be. Situations when it makes sense to install a float model are rare. As a rule, the choice is between an ultrasonic fuel level sensor and a capacitive one. There is no big difference between them, so the question is rather individual.
What to consider when choosing a FLS:
- Output signal type. It is recommended to give preference to digital devices operating using the RS-485 standard.
- Length of the meter in a capacitive FLS. If the device has too short tubes, the minimum fuel level will be displayed incorrectly.
- Additional functions. The need for functions that expand the capabilities of the device is determined individually.
- Enhanced power protection and galvanic isolation. Such parameters help maintain the functionality of the device after a power surge.
- Case material. Metal devices are more resistant to shock and provide protection from external electromagnetic influence.
It is also important to pay attention to the equipment and manufacturer of the device. The box must contain fasteners, gaskets and a seal. It is preferable to choose models from Bosch, Omnicomm, VDO or Italon. Especially in cases where an electronic FLS with additional functions is purchased. If you need to save money, you can consider options from AEB, Febi and JP Group.
Replacing the device
If you need to install a new fuel sensor by replacing the old one, then there is no need to go to a service center - you can perform the procedure yourself. You just need to have all the tools at hand.
How to replace the FLS:
- If the car is gasoline, you need to disconnect the negative terminal of the battery at the very beginning.
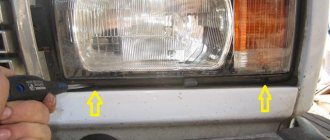
- Remove the luggage compartment trim and rear seats to gain access to the sensor.
- Remove the protective plate by twisting the screws and thoroughly wipe the surface, removing dirt around the sensor.
- Disconnect all connected electrical circuits, first leaving markings on each to prevent future errors.
- Tighten the screws securing the FLS and carefully disconnect the device. If the meter is installed in the fuel pump, it may need to be disassembled.
- Thoroughly clean the area where the new device will be installed from dirt and glue, ensuring a good seal.
- When installing the sensor, it is important to accurately align it with the gasket and, if necessary, carefully treat the gasket with glue.
- Perform all steps in reverse order, except for installing the trim and rear seats.
Once the connection is complete, diagnostics should be performed. First you need to fill the tank full and make sure that the arrow shows an increase in fuel volume. Then you need to drive at least 30 kilometers and check for leaks and smell of fuel. If everything is in order, then all that remains is to put the seats and trim back in place.
Most actions with the sensor can be done independently. However, you should not disassemble the device and repair it if you do not have experience working with similar devices. It is better to contact the service and get qualified help.
DIY repair
If the sensor is equipped with a porous component, there are several options for changing it:
- You can remove it from the retainer socket and install a new one, securing it.
- Or replace the float itself along with the rod.
The second option is more preferable because it is easy to implement. If the surface of the strip on the rheostat scale is dirty, the element is cleaned.
The cleaning procedure is performed exclusively with cotton wool or a soft cloth pre-treated with alcohol. The use of harsh materials or other products is not permitted. This will damage the working layer of the scale; it is quite thin, so it can cause the rheostat to break. The element cannot be repaired; it will have to be replaced.
If the contacts of the electrical circuit come off the controller, they must be carefully soldered back or connected at the point of damage. Plates with mechanical damage (cracks, fractures) cannot be repaired, only replaced. If the sensor gives incorrect readings, the problem can be corrected by adjusting the angle on the so-called rod. This element is designed to fix the float. To get accurate readings, the angle is bent in different directions.